首先安裝python環境,安裝好python環境后。使用以下命令進行frida的安裝:
**`pip install frida`**
**`pip install frida-tools`**
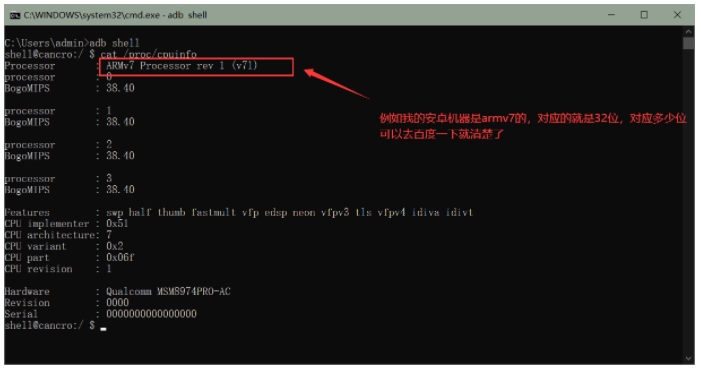
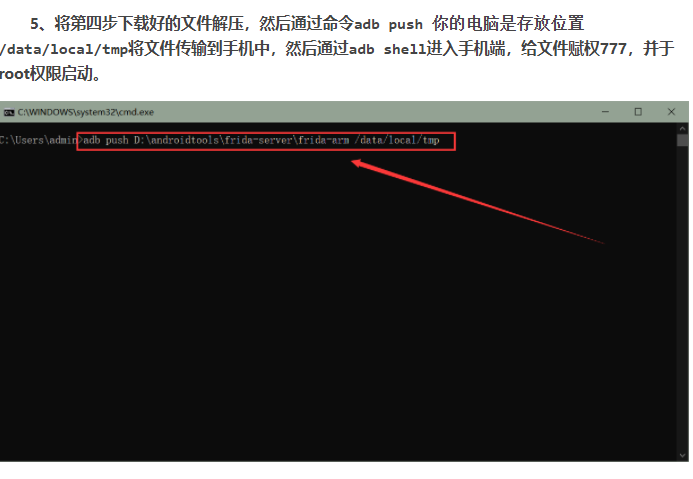
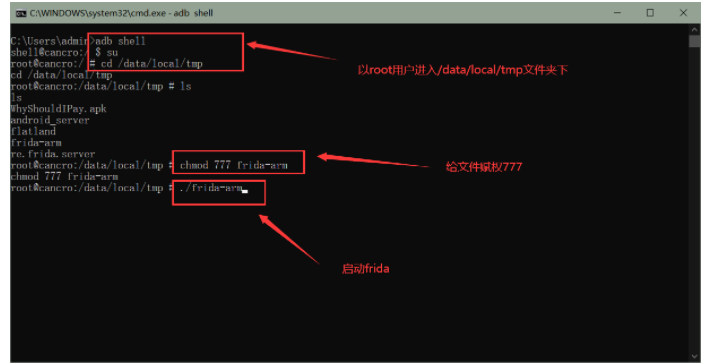
**下載運行在目標機上的frida-sever端,官方下載地址:[https://github.com/frida/frida/releases](https://github.com/frida/frida/releases),下載時要選擇對應的版本下載,例如我的機器為arm32為架構,就選擇`frida-server-12.8.14-android-arm.xz`下載。(可以在adb使用命令`cat /proc/cpuinfo`查詢)**
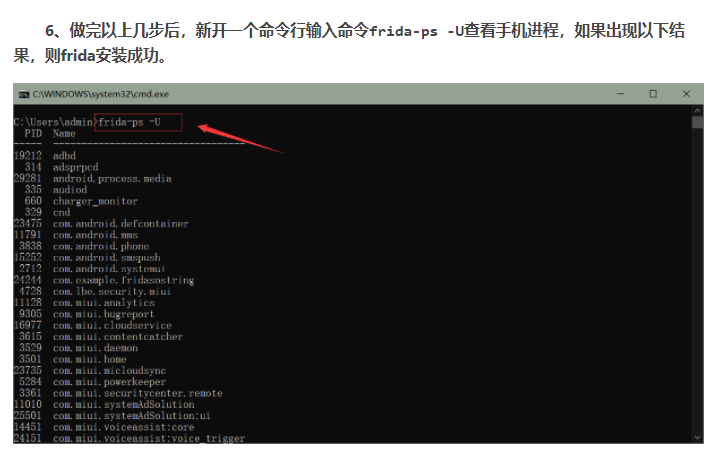
前提說明:app名稱“fridafirst”,包名“com.feng.frida”。結論:attach后名稱以frida-ps -U命令中顯示為準,不一定是包名,可能是應用名稱。過程:網上看了很多frida教程,process = frida.get_usb_device().attach('com.feng.frida') ,attach()后面大都寫的進程的包名,自己進行嘗試,一直提示找不的對應進程,換為應用名稱后,attach成功。
python腳本:
```
import frida#導入frida模塊 import sys #導入sys模塊 jscode = """??#從此處開始定義用來Hook的javascript代碼 ? ? Java.perform(function(){?? ? ?? ???var MainActivity = Java.use('com.example.testfrida.MainActivity'); //獲得MainActivity類 ? ?? ???MainActivity.testFrida.implementation = function(){ //Hook testFrida函數,用js自己實現 ? ?? ?? ?? ?send('Statr! Hook!'); //發送信息,用于回調python中的函數 ? ?? ?? ?? ?return 'Change String!' //劫持返回值,修改為我們想要返回的字符串 ? ?? ???} ? ? }); """ def on\_message(message,data): #js中執行send函數后要回調的函數 print(message) process = frida.get\_remote\_device().attach('com.example.testfrida') #得到設備并劫持進程com.example.testfrida(該開始用get\_usb\_device函數用來獲取設備,但是一直報錯找不到設備,改用get\_remote\_device函數即可解決這個問題) script = process.create\_script(jscode) #創建js腳本 script.on('message',on\_message) #加載回調函數,也就是js中執行send函數規定要執行的python函數 script.load() #加載腳本 sys.stdin.read()
```
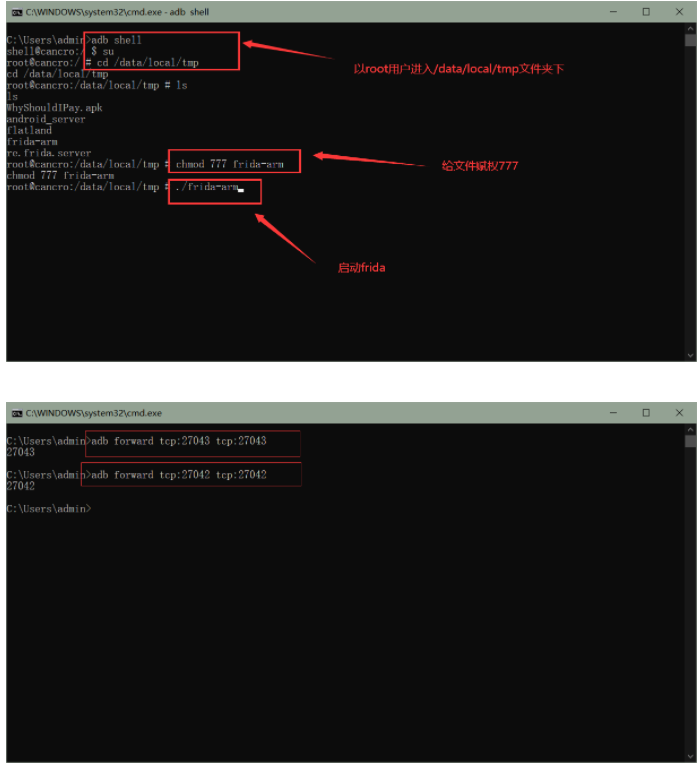
**??4、現在python腳本編寫完畢,我們來執行該腳本,首先手機端執行frida,然后通過命令`adb forward tcp:27043 tcp:27043`和`adb forward tcp:27042 tcp:27042`來轉發這兩個端口,接著在手機上運行該應用程序,在命令行中執行腳本,最后點擊應用的按鈕,即可看到字符串已經被替換成我們要替換的了!!!**
```
import frida import sys jscode = """ Java.perform(function(){ ? ? //下面這一句代碼是指定要Hook的so文件名和要Hook的函數名,函數名就是上面IDA導出表中顯示的那個函數名 ? ? Interceptor.attach(Module.findExportByName("libfridaso.so","Java\_com\_example\_fridaso\_FridaSoDefine\_FridaSo"),{ ? ?? ???//onEnter: function(args)顧名思義就是進入該函數前要執行的代碼,其中args是傳入的參數,一般so層函數第一個參數都是JniEnv,第二個參數是jclass,從第三個參數開始才是我們java層傳入的參數 ? ?? ???onEnter: function(args) { ? ?? ?? ?? ?send("Hook start"); ? ?? ?? ?? ?send("args\[2\]=" + args\[2\]); //打印我們java層第一個傳入的參數 ? ?? ?? ?? ?send("args\[3\]=" + args\[3\]); //打印我們java層傳入的第二個參數 ? ?? ???}, ? ?? ???onLeave: function(retval){ //onLeave: function(retval)是該函數執行結束要執行的代碼,其中retval參數即是返回值 ? ?? ?? ?? ?send("return:"+retval); //打印返回值 ? ?? ?? ?? ?retval.replace(0); //替換返回值為0 ? ?? ???} ? ? }); }); """ def printMessage(message,data): if message\['type'\] == 'send': ? ?? ???print(' {0}'.format(message\['payload'\])) else: ? ?? ???print(message) process = frida.get\_remote\_device().attach('com.example.fridaso') script = process.create\_script(jscode) script.on('message',printMessage) script.load() sys.stdin.read()
```
```
* import frida import sys jscode = """ Java.perform(function(){ ? ? Interceptor.attach(Module.findExportByName("libfridaso.so","Java\_com\_example\_fridasostring\_fridaSoString\_FridaSo"),{ ? ?? ???onEnter: function(args) { ? ?? ?? ?? ?send("Hook start"); ? ?? ?? ?? ?send("args\[2\]=" + args\[2\]); ? ?? ???}, ? ?? ???onLeave: function(retval){ ? ?? ?? ?? ?send("return:"+retval); ? ?? ?? ?? ?var env = Java.vm.getEnv(); //獲取env對象,也就是native函數的第一個參數 ? ?? ?? ?? ?var jstrings = env.newStringUtf("tamper"); //因為返回的是字符串指針,使用我們需要構造一個newStringUtf對象,用來代替這個指針 ? ?? ?? ?? ?retval.replace(jstrings); //替換返回值 ? ?? ???} ? ? }); }); """ def printMessage(message,data): if message\['type'\] == 'send': ? ?? ???print(' {0}'.format(message\['payload'\])) else: ? ?? ???print(message) process = frida.get\_remote\_device().attach('com.example.fridasostring') script = process.create\_script(jscode) script.on('message',printMessage) script.load() sys.stdin.read()
```
調用參數打印輸出:
```
import frida #導入frida模塊
import sys #導入sys模塊
jscode = """
rpc.exports = {
getsig:function(){
var ciphertext = "";
Java.perform(function(){
var MainActivity = Java.use('com.maihan.tredian.util.TreUtil');
ciphertext = MainActivity.sign('123456')
})
return ciphertext
}
}
"""
def printMessage(message,data):
if message['type'] == 'send':
print('[*] {0}'.format(message['payload']))
else:
print(message)
process = frida.get_remote_device().attach('com.maihan.tredian:pushservice') #得到設備并劫持進程com.example.testfrida(該開始用get_usb_device函數用來獲取設備,但是一直報錯找不到設備,改用get_remote_device函數即可解決這個問題)
script = process.create_script(jscode) #創建js腳本
script.on('message',printMessage) #加載回調函數,也就是js中執行send函數規定要執行的python函數
script.load() #加載腳本
# sys.stdin.read()
ll = script.exports.getsig()
print(ll)
```
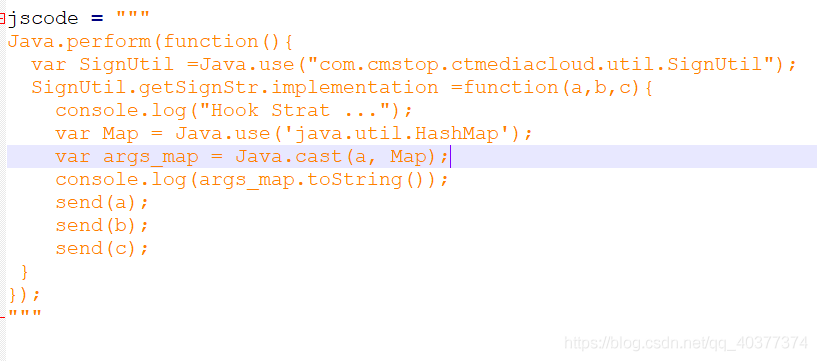
調用map:
```
// Call Sign 函數
function callsign() {
Java.perform(function () {
var ClassName = "com.bilibili.nativelibrary.LibBili";
var Bilibili = Java.use(ClassName);
var targetMethod = "s";
var TreeMap = Java.use("java.util.TreeMap");
var map = TreeMap.$new();
map.put("ad_extra", "E1133C23F36571A3F1FDE6B325B17419AAD45287455E5292A19CF51300EAF0F2664C808E2C407FBD9E50BD48F8ED17334F4E2D3A07153630BF62F10DC5E53C42E32274C6076A5593C23EE6587F453F57B8457654CB3DCE90FAE943E2AF5FFAE78E574D02B8BBDFE640AE98B8F0247EC0970D2FD46D84B958E877628A8E90F7181CC16DD22A41AE9E1C2B9CB993F33B65E0B287312E8351ADC4A9515123966ACF8031FF4440EC4C472C78C8B0C6C8D5EA9AB9E579966AD4B9D23F65C40661A73958130E4D71F564B27C4533C14335EA64DD6E28C29CD92D5A8037DCD04C8CCEAEBECCE10EAAE0FAC91C788ECD424D8473CAA67D424450431467491B34A1450A781F341ABB8073C68DBCCC9863F829457C74DBD89C7A867C8B619EBB21F313D3021007D23D3776DA083A7E09CBA5A9875944C745BB691971BFE943BD468138BD727BF861869A68EA274719D66276BD2C3BB57867F45B11D6B1A778E7051B317967F8A5EAF132607242B12C9020328C80A1BBBF28E2E228C8C7CDACD1F6CC7500A08BA24C4B9E4BC9B69E039216AA8B0566B0C50A07F65255CE38F92124CB91D1C1C39A3C5F7D50E57DCD25C6684A57E1F56489AE39BDBC5CFE13C540CA025C42A3F0F3DA9882F2A1D0B5B1B36F020935FD64D58A47EF83213949130B956F12DB92B0546DADC1B605D9A3ED242C8D7EF02433A6C8E3C402C669447A7F151866E66383172A8A846CE49ACE61AD00C1E42223");
map.put("appkey", "1d8b6e7d45233436");
map.put("autoplay_card","11");
map.put("banner_hash","10687342131252771522");
map.put("build","6180500");
map.put("c_locale","zh_CN");
map.put("channel","shenma117");
map.put("column","2");
map.put("device_name","MIX2S");
map.put("device_type","0");
map.put("flush","6");
map.put("ts","1612693177");
var result = Bilibili.s(map);
// 打印結果,不需要做什么額外處理,這兒會隱式調用toString。
console.log("\n返回結果:",result);
return result;
});
}
```
調用so:
```
import frida
import sys
jscode = """
Java.perform(function(){
var str_name_so = "libjnitest.so"; //需要hook的so名
var n_addr_func_offset = 0x00000680; //需要hook的函數的偏移
var n_addr_so = Module.findBaseAddress(str_name_so); //加載到內存后 函數地址 = so地址 + 函數偏移
var n_addr_func = parseInt(n_addr_so, 16) + n_addr_func_offset;
var ptr_func = new NativePointer(n_addr_func);
//var ptr_func = Module.findExportByName("libjnitest.so","test_add") //對函數名hook
Interceptor.attach(ptr_func,{
//onEnter: 進入該函數前要執行的代碼,其中args是傳入的參數,一般so層函數第一個參數都是JniEnv,第二個參數是jclass,從第三個參數開始是我們java層傳入的參數
onEnter: function(args) {
send("Hook start");
send("args[2]=" + args[2]); //第一個傳入的參數
send("args[3]=" + args[3]); //第二個參數
},
onLeave: function(retval){ //onLeave: 該函數執行結束要執行的代碼,其中retval參數即是返回值
send("return:"+retval); //返回值
retval.replace(100); //替換返回值為100
}
});
});
"""
def printMessage(message,data):
if message['type'] == 'send':
print('[*] {0}'.format(message['payload']))
else:
print(message)
process = frida.get_remote_device().attach('com.example.testso') #進程名
script = process.create_script(jscode)
script.on('message',printMessage)
script.load()
sys.stdin.read()
```