## 19 自己動手豐衣足食—簡單線程池實現
> 學習要注意到細處,不是粗枝大葉的,這樣可以逐步學習、摸索,找到客觀規律。
> —— 徐特立
專欄寫到這里,已經完成了前四章的內容。前四章主要圍繞線程基礎概念在做講解。比如如何創建線程,多線程并發的問題等等。從本章開始我們會開始講解 JDK 提供給我們的并發工具類,我們在做多線程開發時經常會借助這些工具類,不但節省了工作量,而且程序也更為健壯。
## 1、創建線程的問題
并發的本質其實就是任務的并行處理。絕大多數的并發程序都是圍繞離散的任務執行來進行構建。我們在設計此類多線程程序時,首要任務就是對任務進行劃分,使得各個不同類型的任務之間相互獨立,沒有依賴。這樣我們就可以并行處理任意的任務。基于我們之前所學習的知識,我們可以為每一個任務建立一個線程來執行。不過我們知道電腦的資源是有限的,無止境的創建線程,性能并不會一直提升,反而會達到峰值后開始衰減。為每個任務都去創建線程存在如下的問題:
1. 線程創建需要消耗資源。通過前面的學習,我們知道線程的創建和啟動都需要消耗資源,需要 JVM 和操作系統提供支持。如果線程運行的任務十分輕量級,那么會造成創建線程的時間開銷比任務邏輯運行時間還要長;
2. CPU 性能有限。當活躍的線程超過了 CPU 的承載限度,那么會有大量線程參與競爭 CPU,造成系統額外的開銷,但是永遠都會有很多線程無法競爭到 CPU,造成了資源的浪費;
3. 系統能夠支持的線程存在上限。如果超出上限,整個應用就會崩潰。
那么有沒有一種方法,既能得到多線程的好處,又能避免以上的問題呢?
## 2、線程池簡介
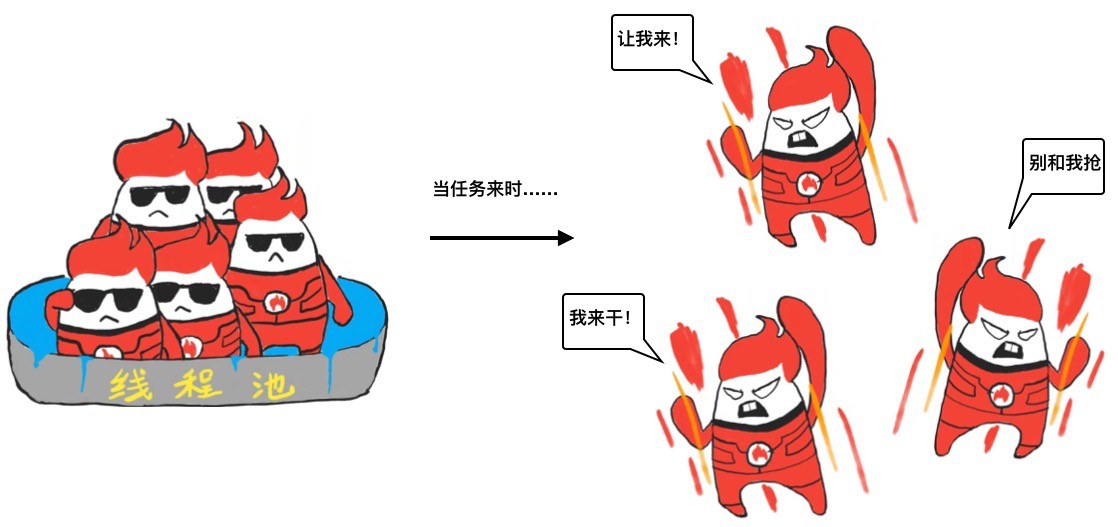
說了那么多,其實答案你肯定已經知道,那就是線程池。線程池的作用是維護一定數量的線程,接收任意數量的任務,這些任務被線程池中的線程并發執行。看到這是不是很像前面講道德生產者 / 消費者模式?沒錯,線程池就是基于生產者 / 消費者模式來實現的。客戶端調用線程池暴露的方法,向任務列表中生產任務,而線程池中的線程并發消費任務,執行任務的邏輯。

Java 提供了 Excutor 來實現線程池。不過為了加深對線程池的理解,本節我們先不介紹 Excutor,而是自己動手來實現一個線程池。
## 3、自開發線程池設計
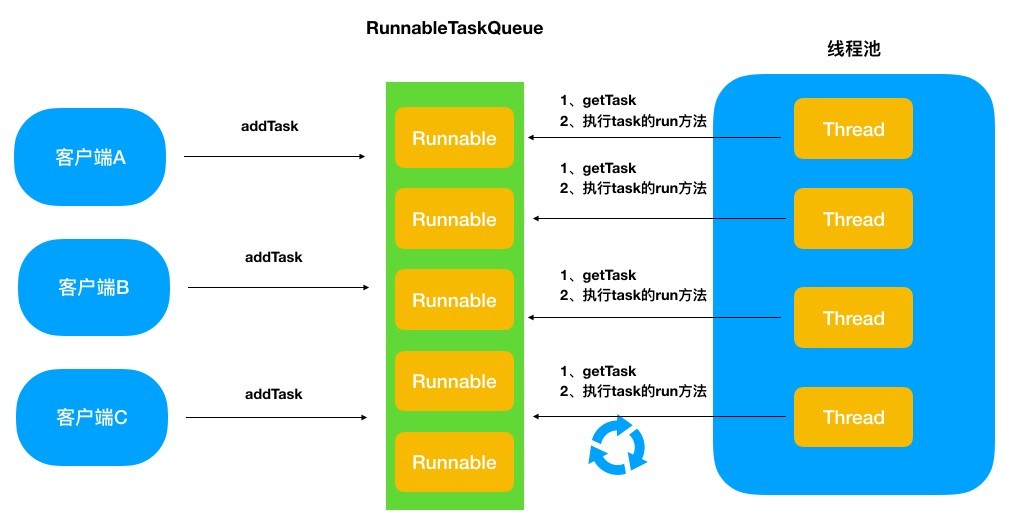
接下來我們將開發一個簡單的線程池程序 MyExecutor。正如前文所述,我們的線程池基于生產者 / 消費者模式設計。線程池中維護一個任務對列,線程池接收到的任務放入此隊列中。另外還有一個線程隊列,其實就是消費者隊列,會輪詢取得任務隊列中的任務,進行執行。如下圖所示。

MyExecutor 持有任務隊列 RunnableTaskQueue 及固定數量的線程。客戶端調用 MyExecutor 對外暴露的 execute 方法,像 RunnableTaskQueue 中添加任務。而 MyExecutor 維護的每個 Thread,其實只做一件事情 —— 不斷從 RunnableTaskQueue 中取得 Runable 的實現,調用其 run 方法。run 方法的邏輯就是要執行的任務。而 RunnableTaskQueue 一旦任務被取完,就會開始 wait,線程阻塞。而一旦有新的任務被客戶端添加進來,線程池中線程則被喚醒繼續拉取任務并執行。如下圖所示:

我們實現的這個簡單的線程池主要有兩個類
1. MyExecutor;
2. RunnableTaskQueue 。
另外還有個測試用的 Client 類。我們逐一講解。
### 3.1 RunnableTaskQueue
先看 RunnableTaskQueue 類。這個類中維護了一個 Runnable 實現對象的 LinkedList。并且提供線程安全的 add 和 get 方法,用來添加任務和獲取任務。利用 LinkedList 的特性,在獲取任務的同時會從隊列中移除。代碼如下:
~~~java
public class RunnableTaskQueue {
private final LinkedList<Runnable> tasks = new LinkedList<>();
public Runnable getTask() throws InterruptedException {
synchronized (tasks) {
while (tasks.isEmpty()) {
System.out.println(Thread.currentThread().getName() + " says task queue is empty. i will wait");
tasks.wait();
}
return tasks.removeFirst();
}
}
public void addTask(Runnable runnable) {
synchronized (tasks) {
tasks.add(runnable);
tasks.notifyAll();
}
}
}
~~~
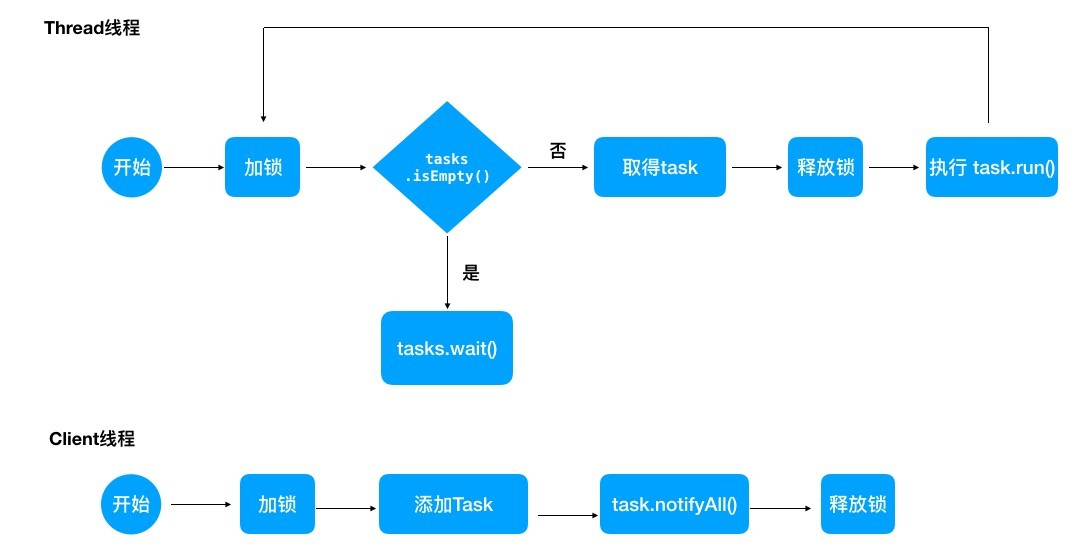
RunnableTaskQueue 是一個阻塞隊列,這保證了線程池中的線程能夠不斷從中取得任務執行,沒有任務時線程也能停下來等待。getTask 和 setTask 都會以同步的方式執行,確保線程安全,并且采用 wait 和 nofityAll 的方式讓線程在一定條件下等待和繼續運行。
### 3.2 MyExecutor
接下來我們看 MyExecutor 代碼:
~~~java
public class MyExecutor {
private final int poolSize;
private final RunnableTaskQueue runnableTaskQueue;
private final List<Thread> threads = new ArrayList<>();
public MyExecutor(int poolSize) {
this.poolSize = poolSize;
this.runnableTaskQueue = new RunnableTaskQueue();
Stream.iterate(1, item -> item + 1).limit(poolSize).forEach(item -> {
initThread();
});
}
private void initThread() {
if (threads.size() <= poolSize) {
Thread thread = new Thread(() -> {
while (true) {
try {
Runnable task = runnableTaskQueue.getTask();
task.run();
} catch (InterruptedException e) {
e.printStackTrace();
}
}
});
threads.add(thread);
thread.start();
}
}
public void execute(Runnable runnable) {
runnableTaskQueue.addTask(runnable);
}
}
~~~
poolSize 是線程池的容量,在 MyExecutor 的構造函數中,我們會創建 poolSize 個 Thread。創建 Thread 的方法為 initThread。此方法中先比較已有線程數量是否達到 poolSize。未達到的話,則創建 thread,并且提供 run 的邏輯。這里采用 lambda 表達式的方式,傳入 runnable。可以看到線程的 run 方法很簡單,就是不斷從 runnableTaskQueue 中取得 task,然后運行 task 的 run 方法。回憶下剛剛講過的 runnableTaskQueue 的 getTask 方法,在沒有 task 的時候,會讓此線程陷入等待中。
execute 方法是對外暴露的執行任務的方法,方法中向 runnableTaskQueue 添加 task。addTask 方法中,在添加完 task 后,會 nofity 所有等待 task 的線程。
是不是很絲滑,getTask 時可能觸發 wait,而一旦 addTask 則會 notifyAll。這一來一往,線程池就能順暢地工作起來。
### 3.3 運行你的線程池
* [ ] **方式一**:
接下來我們看看客戶端代碼,對我們剛剛編寫線程池做一下測試。我們看下面客戶端的代碼:
~~~java
public class Client {
public static void main(String[] args) {
MyExecutor executor = new MyExecutor(5);
Stream.iterate(1, item -> item + 1).limit(10).forEach(
item -> {
executor.execute(() -> {
try {
System.out.println(Thread.currentThread().getName() + " execute this task");
TimeUnit.SECONDS.sleep(2);
} catch (InterruptedException e) {
e.printStackTrace();
}
});
}
);
}
}
~~~
首先我們聲明了一個 5 個線程的線程池。然后以 lambda 形式向線程池添加了 10 個任務。任務的內容很簡單,只是打印執行任務線程的名稱,然后 sleep 2 毫秒就結束了。這里大家可以先自己思考下程序運行的結果,再看下面的程序輸出:
~~~java
Thread-0 says task queue is empty. i will wait
Thread-2 says task queue is empty. i will wait
Thread-1 says task queue is empty. i will wait
Thread-3 says task queue is empty. i will wait
Thread-4 says task queue is empty. i will wait
Thread-4 execute this task
Thread-3 execute this task
Thread-0 execute this task
Thread-2 execute this task
Thread-1 execute this task
Thread-4 execute this task
Thread-0 execute this task
Thread-3 execute this task
Thread-2 execute this task
Thread-1 execute this task
Thread-2 says task queue is empty. i will wait
Thread-3 says task queue is empty. i will wait
Thread-0 says task queue is empty. i will wait
Thread-1 says task queue is empty. i will wait
Thread-4 says task queue is empty. i will wait
~~~
以上輸出是和程序執行過程保持一致的。下面我們分析下程序執行過程。
* 1、首先聲明 5 個線程的線程池后,這 5 個線程會立即啟動,然后從 RunnableTaskQueue 中 getTask;
* 2、由于還沒有添加任務,所以 5 個線程全部開始 wait;
* 3、然后 10 個任務幾乎同時被添加進線程池;
* 4、每添加一個 task,就會觸發 task.notifyAll ()。使得所有線程從從 task 的 waitSet 中被彈出;
* 5、其中一個線程會取得鎖,進入同步的 getTask 方法中獲取一個 task;
* 6、獲取 task 后釋放鎖;
* 7、執行這個 task 的 run 方法;
* 8、與此同時其他某個線程會獲得鎖,然后從 RunnableTaskQueue 獲取任務。由于 10 個任務幾乎同時被添加進來,所以 RunnableTaskQueue 中此時還有 9 個 task,第二個線程也可以順利拿到 task。以此類推 5 個線程都能順利取得 task 執行;
* 9、第一輪執行完畢后,RunnableTaskQueue 中還剩 5 個 task。于是 5 個線程在第二輪中又各自成功取得一個 task 執行;
* 10、當 5 個線程第三輪再去 getTask 時,發現 RunnableTaskQueue 已經沒有任務了,所以 5 個線程全部開始 wait。
以上分析的執行過程和我們的輸出完全吻合。
下面我們換一種執行方式。
* [ ] **方式二:**
~~~java
public class Client {
public static void main(String[] args) {
MyExecutor executor = new MyExecutor(5);
Stream.iterate(1, item -> item + 1).limit(10).forEach(
item -> {
try {
if(item%2==0){
TimeUnit.SECONDS.sleep(2);
}
} catch (InterruptedException e) {
e.printStackTrace();
}
executor.execute(() -> {
System.out.println(Thread.currentThread().getName() + " execute this task");
});
}
);
}
}
~~~
和方式一的區別是,客戶端在 2 的整數倍時,sleep2 毫秒再創建。另外任務中不再 sleep。這樣會造成生產得慢,消費得快,我們看下程序輸出:
~~~java
Thread-0 says task queue is empty. i will wait
Thread-2 says task queue is empty. i will wait
Thread-1 says task queue is empty. i will wait
Thread-4 says task queue is empty. i will wait
Thread-3 says task queue is empty. i will wait
Thread-3 execute this task
Thread-4 says task queue is empty. i will wait
Thread-1 says task queue is empty. i will wait
Thread-2 says task queue is empty. i will wait
Thread-0 says task queue is empty. i will wait
Thread-3 says task queue is empty. i will wait
Thread-3 execute this task
Thread-2 says task queue is empty. i will wait
Thread-0 execute this task
Thread-1 says task queue is empty. i will wait
Thread-4 says task queue is empty. i will wait
Thread-0 says task queue is empty. i will wait
Thread-3 says task queue is empty. i will wait
Thread-3 execute this task
Thread-0 execute this task
Thread-4 says task queue is empty. i will wait
Thread-1 says task queue is empty. i will wait
Thread-2 says task queue is empty. i will wait
Thread-0 says task queue is empty. i will wait
Thread-3 says task queue is empty. i will wait
Thread-3 execute this task
Thread-2 says task queue is empty. i will wait
Thread-0 execute this task
Thread-1 says task queue is empty. i will wait
Thread-4 says task queue is empty. i will wait
Thread-0 says task queue is empty. i will wait
Thread-3 says task queue is empty. i will wait
Thread-3 execute this task
Thread-4 says task queue is empty. i will wait
Thread-0 execute this task
Thread-1 says task queue is empty. i will wait
Thread-2 says task queue is empty. i will wait
Thread-0 says task queue is empty. i will wait
Thread-3 says task queue is empty. i will wait
Thread-3 execute this task
Thread-0 says task queue is empty. i will wait
Thread-2 says task queue is empty. i will wait
Thread-1 says task queue is empty. i will wait
Thread-4 says task queue is empty. i will wait
Thread-3 says task queue is empty. i will wait
~~~
可以看到由于消費得快,每產生一個 task 會被迅速消費掉,所以絕大多是時間,大多睡線程都在 wait。另外我們注意看除了第一個 task 和最后一個 task,中間的 task 基本上都是成對被執行的,這是因為雙數的任務被添加前要 sleep 2 毫秒,而單數 task 會被立即創建,這就造成雙數的 task 產生和上一個 task 有時間間隔。10 個 task 就像被分成了 5 組,分別是 1、2 和 3、4 和 5、6 和 7、8 和 9、10。所以會呈現以上日志中的情況。
## 4、總結
本節我們自己實現了一個很簡單的線程池,提供了非常有限的功能,并且線程池是固定大小。不過這已經足以體會線程池設計的核心思想。就是以固定數量的線程來輪詢執行任務隊列中的任務。有了這一節的學習,我相信下一節學習 JDK 提供的 Excutor 不會有任何障礙。
- 前言
- 第1章 Java并發簡介
- 01 開篇詞:多線程為什么是你必需要掌握的知識
- 02 絕對不僅僅是為了面試—我們為什么需要學習多線程
- 03 多線程開發如此簡單—Java中如何編寫多線程程序
- 04 人多力量未必大—并發可能會遇到的問題
- 第2章 Java中如何編寫多線程
- 05 看若兄弟,實如父子—Thread和Runnable詳解
- 06 線程什么時候開始真正執行?—線程的狀態詳解
- 07 深入Thread類—線程API精講
- 08 集體協作,什么最重要?溝通!—線程的等待和通知
- 09 使用多線程實現分工、解耦、緩沖—生產者、消費者實戰
- 第3章 并發的問題和原因詳解
- 10 有福同享,有難同當—原子性
- 11 眼見不實—可見性
- 12 什么?還有這種操作!—有序性
- 13 問題的根源—Java內存模型簡介
- 14 僵持不下—死鎖詳解
- 第4章 如何解決并發問題
- 15 原子性輕量級實現—深入理解Atomic與CAS
- 16 讓你眼見為實—volatile詳解
- 17 資源有限,請排隊等候—Synchronized使用、原理及缺陷
- 18 線程作用域內共享變量—深入解析ThreadLocal
- 第5章 線程池
- 19 自己動手豐衣足食—簡單線程池實現
- 20 其實不用造輪子—Executor框架詳解
- 第6章 主要并發工具類
- 21 更高級的鎖—深入解析Lock
- 22 到底哪把鎖更適合你?—synchronized與ReentrantLock對比
- 23 按需上鎖—ReadWriteLock詳解
- 24 經典并發容器,多線程面試必備—深入解析ConcurrentHashMap上
- 25 經典并發容器,多線程面試必備—深入解析ConcurrentHashMap下
- 26不讓我進門,我就在門口一直等!—BlockingQueue和ArrayBlockingQueue
- 27 倒數計時開始,三、二、一—CountDownLatch詳解
- 28 人齊了,一起行動—CyclicBarrier詳解
- 29 一手交錢,一手交貨—Exchanger詳解
- 30 限量供應,不好意思您來晚了—Semaphore詳解
- 第7章 高級并發工具類及并發設計模式
- 31 憑票取餐—Future模式詳解
- 32 請按到場順序發言—Completion Service詳解
- 33 分階段執行你的任務-學習使用Phaser運行多階段任務
- 34 誰都不能偷懶-通過 CompletableFuture 組裝你的異步計算單元
- 35拆分你的任務—學習使用Fork/Join框架
- 36 為多線程們安排一位經理—Master/Slave模式詳解
- 第8章 總結
- 37 結束語
