假如有一行文本是:
```shell
choose sections from each line of files
```
如果你想從這一行文本中選取一部分,比如選取第 2 和第 3 個字段,你會怎么做?用 `awk` 還是 `cut`?
用 `awk` 實現:
```shell
$ echo "choose sections from each line of files"|awk '{print $1 $2}'
choosesections
```
用 `cut` 實現:
```shell
$ echo "choose sections from each line of files"|cut -d " " -f 1 -f 2
choose sections
```
其實,你看,不管是用 `awk` 還是 `cut`,似乎都不夠簡單。`awk` 是一門文本處理語言,功能當然是非常強大,但用起來卻沒那么簡單,光是括號引號就讓你眼花繚亂,而用 `cut` 命令也是一樣不簡單。
但用`choose`,選取字符就會變得輕而易舉。
比如,用 `choose` 實現上述需求:
```shell
$ echo "choose sections from each line of files"|choose 0 1
choose sections
```
簡單吧! 那 choose 是什么?
<a name="5wIpA"></a>
# 簡介
**choose** 是一款用于選取字段或字符的命令行工具,它以一種對人類友好且快速的方式選取文件每一行的字段或字符。
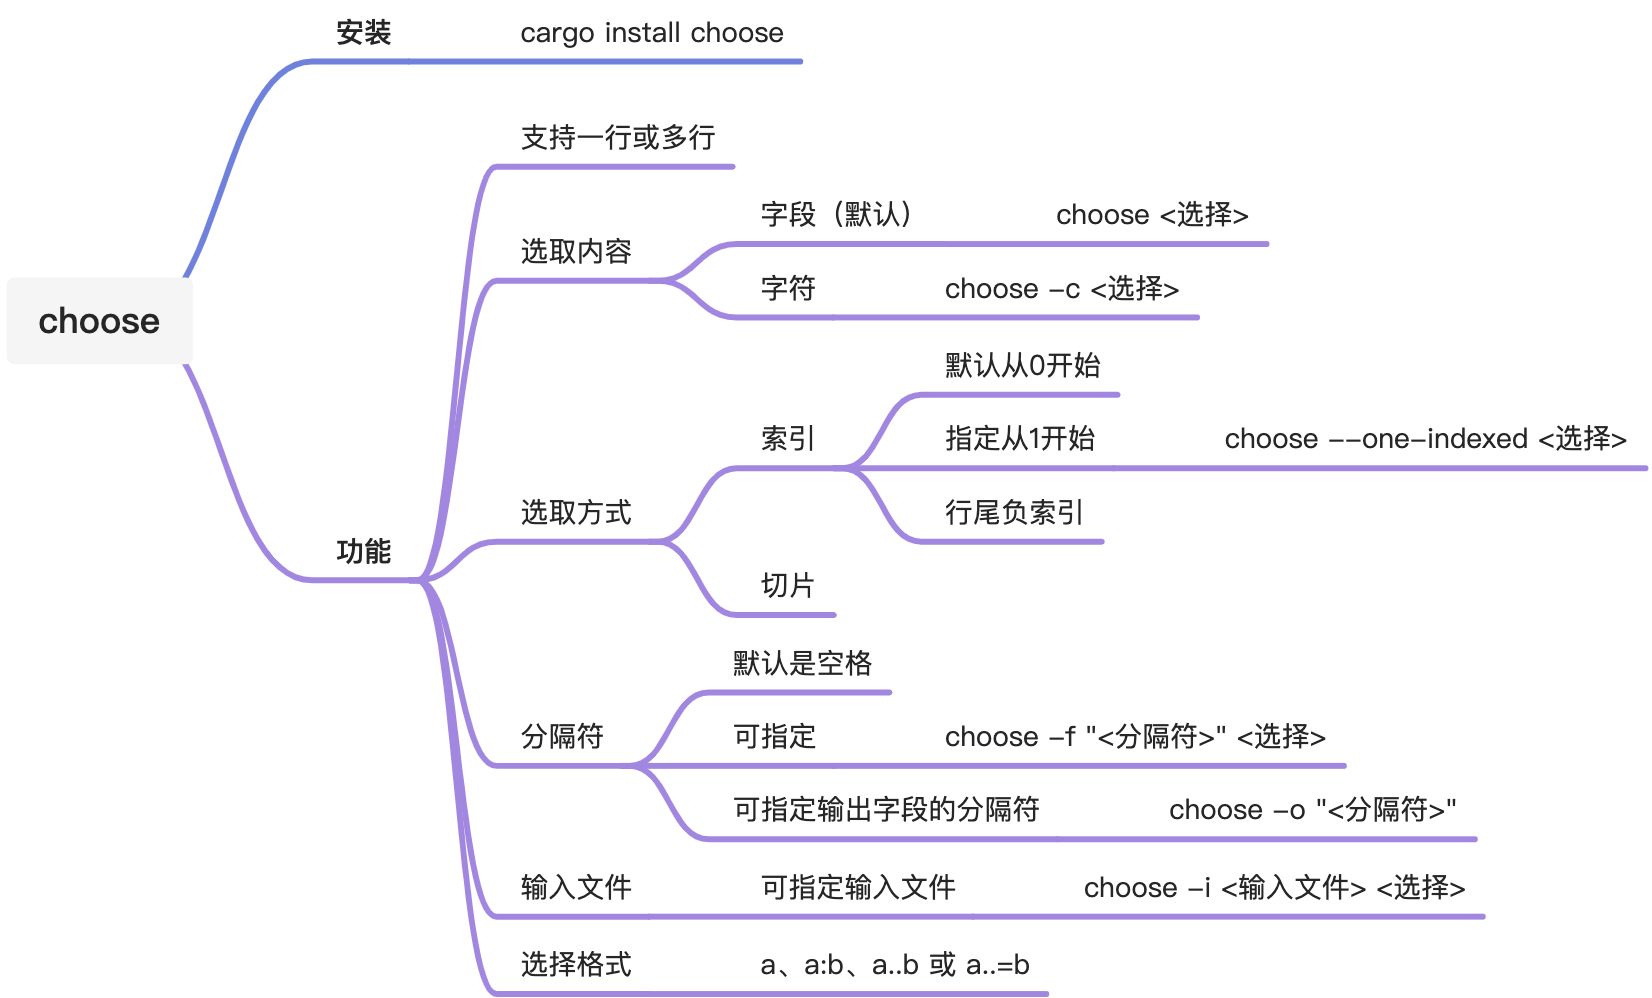
默認情況下,`choose` 認為字段之間以空格作為分隔符,從 0 開始索引,通過索引選擇內容。可同時選取多個索引的內容,支持類似 Python 列表的切片選擇語法,以及行尾的負索引等功能。
當然,如果不想用默認的空格作為分隔符,也可以自行指定,不想以 0 開始索引,也可以從 1 開始。
總之,在選取字符和字段方面,完全可以使用 `choose` 來替代 `cut` 和 `awk` 的這部分功能。
一句話總結:因為專注,所以簡單。其他命令要么太「重」,要么太「繁」,要么太「慢」, `choose` 實現了截取每行字符這一單一場景的最優解決方案。
**基本信息**
| **工具名稱** | **choose** |
| --- | --- |
| **當前版本** | 1.3.4 |
| **開發語言** | Rust(93.5%) |
| **適用平臺** | macOS、Linux、Windows |
| **開源地址** | [https://github.com/theryangeary/choose](https://github.com/theryangeary/choose) |
| **當前星標** | 1.3k |
**功能特性**
- 支持選取文件中每一行的字段或字符;
- 支持類似 Python 列表的切片選擇語法;
- 支持行尾的負索引;
- 分隔符默認是空格,可指定;
- 默認索引從 0 開始,可指定從1開始。
<a name="xCZtp"></a>
# 準備環境
各平臺(macOS/Linux/Windows)通用的安裝方法是使用 Cargo 安裝。
**安裝命令:**
```shell
cargo install choose
```
如果安裝了 Homebrew/Linuxbrew,也可以使用 brew 安裝:
```shell
brew install choose-rust
```
安裝成功之后,查看幫助信息。
**幫助信息:**
```shell
$ choose -h
choose 1.3.4
`choose` sections from each line of files
用法:
choose [標記] [選項] <選擇>...
標記:
-c, --character-wise 按字符編號選擇字段
-d, --debug 激活調試模式
-x, --exclusive 使用獨占范圍,比如:choose -x :5(選取0到5但不包括第5個字段)
-h, --help 打印幫助信息
-n, --non-greedy 使用非貪婪字段分隔符
--one-indexed 索引從 1 開始而非 0
-V, --version 打印版本信息
選項:
-f, --field-separator <字段分隔符> 指定分隔符(如果不想用空格)
-i, --input <輸入> 輸入文件
-o, --output-field-separator <輸出字段分隔符> 指定輸出字段分隔符
參數:
<選擇>... 選擇要打印的字段。
格式:a、a:b、a..b 或 a..=b,其中 a 和 b 是整數。 a:b 包含 b(除非被 -x 覆蓋),a..b 不包括 b,a..=b 包括 b。
```
<a name="hZDpi"></a>
# 快速開始
```shell
# 選取第 1 個字段
$ echo "choose sections from each line of files" | choose 0
choose
# 選取第 2 個字段
$ echo "choose sections from each line of files" | choose 1
sections
# 選取第 3 個字段
$ echo "choose sections from each line of files" | choose 2
from
# 將索引改為從 1 開始,而不是默認的 0。
$ echo "choose sections from each line of files" | choose --one-indexed 1
choose
# 選取第 0、2、5 個字段
$ echo "choose sections from each line of files" | choose 0 2 5
choose from of
# 選取第 2 到 5 個字段
$ echo "choose sections from each line of files" | choose 2:5
from each line of
# 選取第 0 到 5 個字段,但不包括第 5 個。
$ echo "choose sections from each line of files" | choose -x 2:5
from each line
# 選取第 0 到第 5 個字段
$ echo "choose sections from each line of files" | choose :5
choose sections from each line of
# 選取第 0 到第 5 個字段,但不包括第 5 個。
$ echo "choose sections from each line of files" | choose -x :5
choose sections from each line
# 選取第 0 到第 5 個字段,但不包括第 5 個。
$ echo "choose sections from each line of files" | choose 0..5
choose sections from each line
# 選取第 0 到第 5 個字段,包括第 5 個。
$ echo "choose sections from each line of files" | choose 0..=5
choose sections from each line of
# 選取第 5 個開始到行尾的所有字段
$ echo "choose sections from each line of files" | choose 5:
of files
# 選取最后一個字段
$ echo "choose sections from each line of files" | choose -1
files
# 選取最后 5 個字段
$ echo "choose sections from each line of files" | choose -5:-1
from each line of files
# 效果同上
$ echo "choose sections from each line of files" | choose -5:
from each line of files
```
至此,你基本上已經學會了`choose` 。
<a name="7F6vJ"></a>
# 使用指南
下面對 `choose` 的其它用法進行介紹。
<a name="W4QuP"></a>
## 1. 選取多行字段
前面都只介紹了選取一行的字段,這里再演示一下選取多行字段的效果。
例如:
```shell
$ ps | choose 0
PID
33914
25327
25342
37052
37063
90599
12021
90610
....
$ ps | choose 0 3
PID CMD
33914 /bin/zsh
25327 /bin/zsh
25342 /bin/zsh
37052 /bin/zsh
37063 /bin/zsh
90599 /bin/zsh
12021 /bin/zsh
90610 /bin/zsh
....
```
<a name="HkNph"></a>
## 2. 指定字段分隔符
默認的分隔符是空格,如果想指定別的分隔符,可以使用 `-f `來指定。
命令格式:
```shell
choose -f "<分隔符>" <選擇>
```
例如:
```shell
# ps 的輸出信息
$ ps
PID TTY TIME CMD
33914 ttys000 9:19.22 /bin/zsh (figterm)
25327 ttys001 92:44.44 /bin/zsh (figterm)
25342 ttys002 0:00.48 /bin/zsh --login
37052 ttys005 92:25.94 /bin/zsh (figterm)
37063 ttys006 0:00.44 /bin/zsh --login
...
# 我們想要獲取 TIME 這一列:后面的內容
$ ps | choose 2 | choose -f ":" 1
19.22
44.44
00.48
25.94
00.44
...
```
<a name="kr8TV"></a>
## 3. 指定輸入文件
`choose` 可以通過 `-i` 選項指定輸入文件。
命令格式:
```shell
choose -i <輸入文件> <選擇>
```
例如:
```shell
# 將字符串寫入文件
$ echo "choose sections from each line of files" >> test.log
# 指定輸入文件,選取第1到4個字段
$ choose -i test.log 0:3
choose sections from each
```
<a name="SCWLq"></a>
## 4. 指定輸出分隔符
`choose` 可以通過 `-o` 選項指定輸出的分隔符。
命令格式:
```shell
choose -o <分隔符> <選擇>
```
例如:
```shell
# 將字符串寫入文件
$ echo "choose sections from each line of files" >> test.log
# 指定輸入文件,選取第1到4個字段,并以 - 為分隔符
$ choose -i test.log 0:3 -o "-"
choose-sections-from-each
```
<a name="cXPn5"></a>
## 5. 選取字符
前面都是介紹選取字符串的內容,其實 choose 也支持選取字符,按編號選取就行了。
例如:
```shell
# 選取第 1 個字符
$ echo "choose sections from each line of files" | choose -c 0
c
# 選取第 2 個字符
$ echo "choose sections from each line of files" | choose -c 1
h
# 選取第 3 個字符
$ echo "choose sections from each line of files" | choose -c 2
o
# 選取第 1 到 6 個字符
$ echo "choose sections from each line of files" | choose -c 0:6
choose
# 同時選取多行的字符
$ ps | choose -c 0
3
2
2
3
....
```
<a name="cfGzh"></a>
# 總結
