## volume

## docker持久化方案
> 我們研究第一種
## Data Volume 持久化方式1
* 使用mysql鏡像啟動一個容器。
```
docker run -d -v mysql:/var/lib/mysql --name mysql1 -e MYSQL_ALLOW_EMPTY_PASSWORD=true mysql
```
> -v 是設置volume ,名字是mysql,存儲位置是/var/lib/mysql ,這個存儲位置是mysql
鏡像里面dockerfile規定的,不可以修改。
> -e 是什么一個環境變量,讓mysql能無密碼啟動。
* 可以查看本機的volume
```
[root@VM_0_11_centos ~]# sudo docker volume ls
DRIVER VOLUME NAME
local cbb4a46f4530dd9cf05975bc5b8535459168758215ae9a5e909846f2137de2ec
local d3ce5752140025e47778de31ec32c9bec2c5438a83cd26c5d8eb9b607d0cdd5c
local mysql
```
* 進入容器,再進入mysql命令行,新建一個數據庫。
```
[root@VM_0_11_centos ~]# docker exec -it mysql1 /bin/bash
root@0a3e0fcc2b8a:/# mysql -uroot -p
Enter password:
Welcome to the MySQL monitor. Commands end with ; or \g.
Your MySQL connection id is 8
Server version: 8.0.17 MySQL Community Server - GPL
Copyright (c) 2000, 2019, Oracle and/or its affiliates. All rights reserved.
Oracle is a registered trademark of Oracle Corporation and/or its
affiliates. Other names may be trademarks of their respective
owners.
Type 'help;' or '\h' for help. Type '\c' to clear the current input statement.
mysql>
mysql> show databases;
+--------------------+
| Database |
+--------------------+
| docker |
| information_schema |
| mysql |
| performance_schema |
| sys |
+--------------------+
```
* 退出后強制刪除正在運行的容器。
```
[root@VM_0_11_centos ~]# docker rm -f mysql1
mysql1
```
* 重新建一個mysql2容器,volume還使用之前的。
```
docker run -d -v mysql:/var/lib/mysql --name mysql2 -e MYSQL_ALLOW_EMPTY_PASSWORD=true mysql
```
* 然后進入容器,進入mysql,會發現新建的名為docker的數據庫依舊存在。
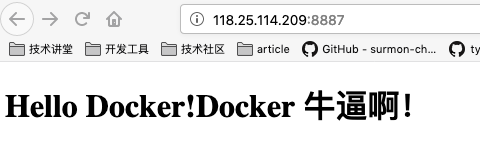
## Binding Mounting 持久化方式2 (這個牛逼啊!!)
> 其實就是宿主機的文件夾和容器內文件夾做的映射。
* 用dockerfile創建一個有nginx 的image
```
FROM nginx:latest
WORKDIR /usr/share/nginx/html
COPY index.html index.html
```
```
docker build -t bizzbee/nginx-bizzbee .
```
* 啟動容器 映射端口
```
docker run -d -v $(pwd):/usr/share/nginx/html -p 8887:80 --name web bizzbee/nginx-bizzbee
```
> -v 是把當前目錄映射到容器中nginx根目錄。
* 這樣這兩個目錄就完全同步了。我們可以在當前目錄修改,容器里也會修改。