[TOC]
# 安裝
```
ELECTRON_MIRROR="https://cdn.npm.taobao.org/dist/electron/" npm install // mac 命令行下
```
> [tutorial/installation](https://www.electronjs.org/docs/tutorial/installation)
# Electron 架構
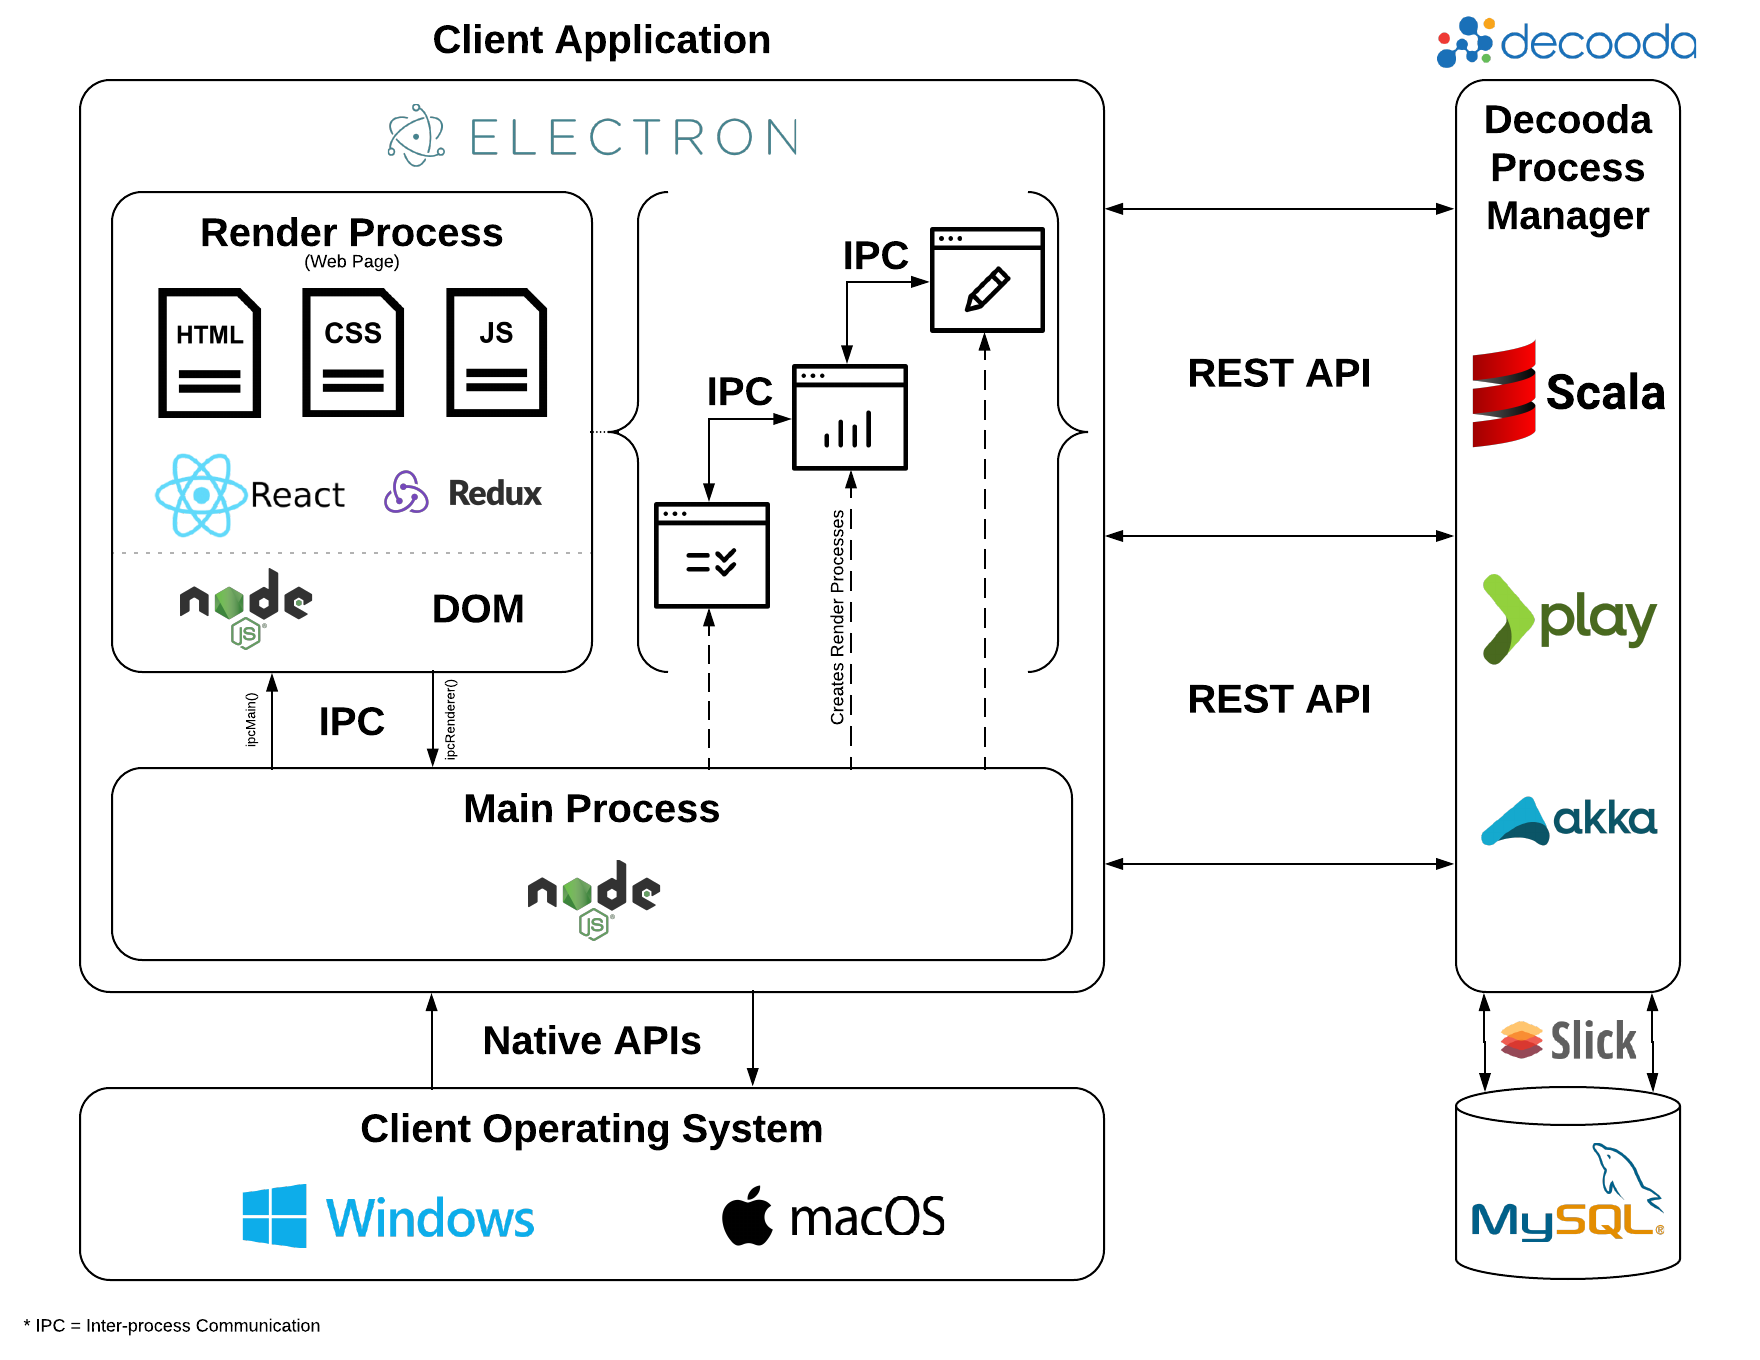
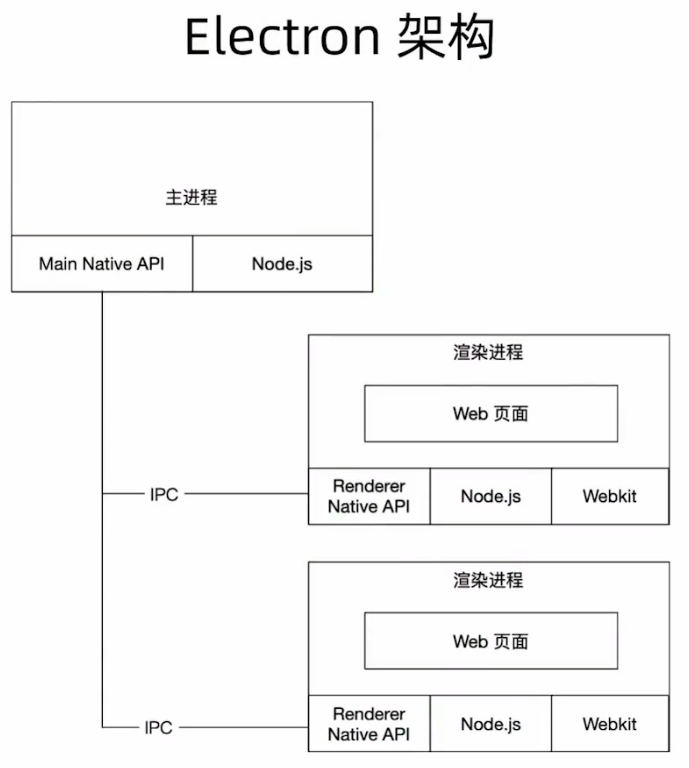
> [Electron:PC 端多端融合方案](https://segmentfault.com/a/1190000022543101)
# 基礎
一個 Electron 應用總是有且只有一個主進程。
每個`electron`中的 web 頁面 運行在它自己的渲染進程中
每個`BrowserWindow`實例都在自己的渲染進程里運行頁面
nodejs 在主進程和渲染進程中都可以使用。渲染進程因為安全限制,不能直接操作原生 GUI。
# 右鍵菜單
~~~
/*
*給窗口加事件
*/
window.addEventListener('contextmenu', (e) => {
e.preventDefault(); //阻止默認事件
var rightM = Menu.buildFromTemplate([
{label:'返回'},
{label:'前進'},
{label:'重新加載'},
{type:'separator'},
{label:'存儲為...'},
{label:'打印...'},
{label:'投射...'},
{label:'翻譯成中文(簡體)'},
{type:'separator'},
{label:'查看網頁源代碼'},
{label:'檢查'},
]);
rightM.popup({window: remote.getCurrentWindow()});
}, false);
~~~
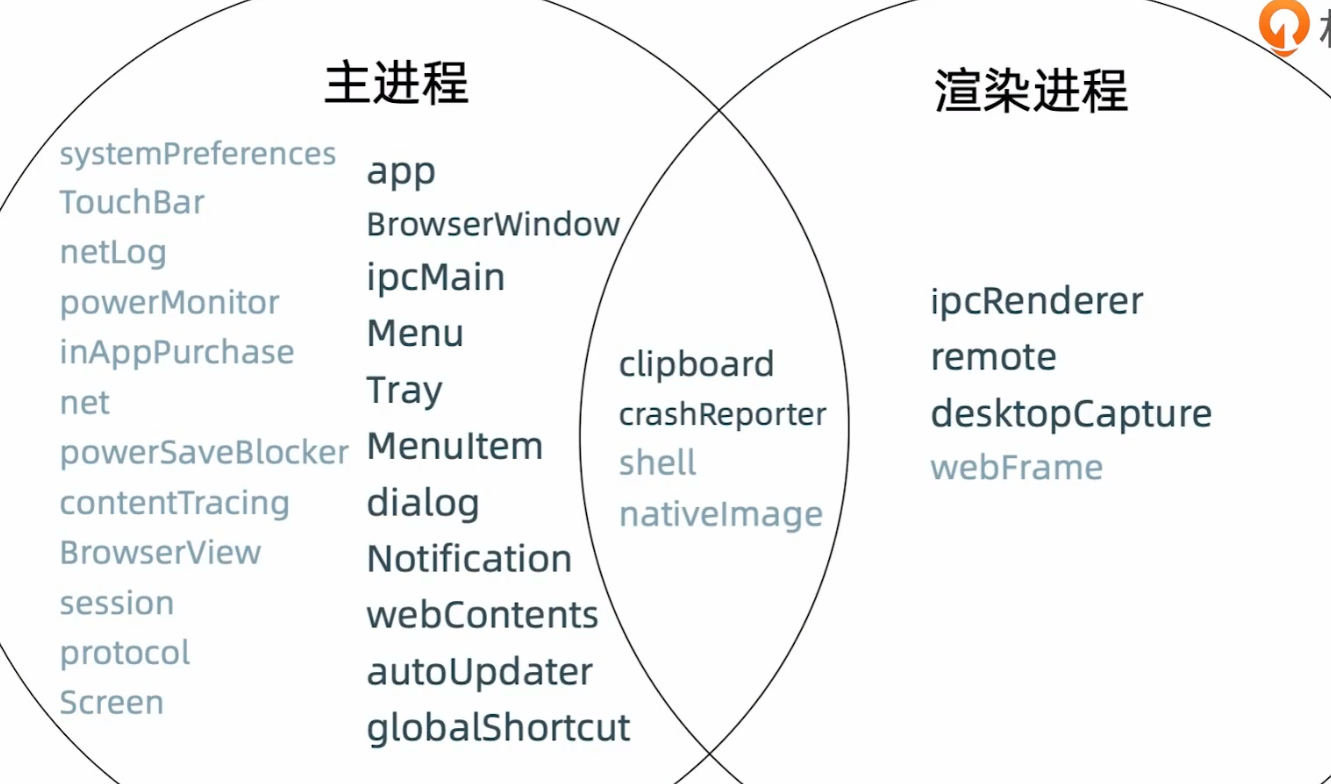
# 主進程
## session
管理瀏覽器會話,Cookie,緩存,代理設置等。
## webContents
`webContents`是一個[EventEmitter](https://nodejs.org/api/events.html#events_class_eventemitter)。
它負責渲染并控制BrowserWindow實例的內容,并且是該`BrowserWindow`對象的屬性。
## contentTracing
從Chromium的內容模塊收集跟蹤數據,以查找性能瓶頸和緩慢的操作。
# 渲染進程模塊
主進程模塊就不介紹了,渲染模塊之外或者部分都在主進程模塊可用~
## shell
用來操作本地文件
## clipboard
## crashReporter
將崩潰報告提交給遠程服務器,要搭建專用的服務器
~~~javascript
const {crashReporter} = require('electron')
crashReporter.start({
productName: 'YourName',
companyName: 'YourCompany',
submitURL: 'https://your-domain.com/url-to-submit',
uploadToServer: true
})
~~~
> [tencent-Electron 教程](https://cloud.tencent.com/developer/section/1116147)
## nativeImage
使用 PNG 或 JPG 文件創建托盤,底座和應用程序圖標。
## ipcRenderer
渲染進程 ipc 通信的模塊
## remote
可以調用 main 進程對象的方法, 而不必顯式發送進程間消息。
1. 給主進程傳遞回調函數
2. 訪問主進程中的內置模塊
3. `remote.require(module)`
4. `remote.getCurrentWindow()` -獲取主進程的窗體
5. `remote.getCurrentWebContents()` - 獲取主進程的 webContent 屬性
6. `remote.getGlobal(name)` -用于數據共享。
~~~
const { dialog } = require('electron').remote
dialog.showMessageBox({type: 'info', message: '在渲染進程中直接使用主進程的模塊'})
~~~
## desktopCapturer
從桌面捕獲音頻和視頻的媒體源的信息
## webFrame
自定義當前網頁的呈現。
## contextBridge
# 進程間通信

* 自主到從:從 Main 到 Renderer 的消息傳遞,借助`BrowerWindow.webContents.send()` 向所有渲染進程發送消息。
* 自從到主:從 Renderer 到 Main 的消息傳遞,借助`ipcRender`和`ipcMain`發送/接收消息。
* 事件機制:無論是`BrowerWindow.webContents.send()`,還是`ipc`,其實都是`node`的事件機制,都是`EventEmitter`的實例。
****
:-: 從渲染進程到主進程
* Callback 寫法:
* ipcRenderer.send(channel, ...args)
* ipcMain.on(channel, handler)
* Promise 寫法(Electron 7.0 之后,處理請求 + 響應模式):
* ipcRenderer.invoke(channel, ...args)
* ipcMain.handle(channel, handler)
> [主進程與渲染進程/主進程與webview通信](https://dushusir.com/electron-ipcmain-ipcrenderer/)
# 通知渲染進程
~~~
//主進程
const {ipcMain} = require('electron');
/**
* 接受渲染進程發送過來的數據
* 使用 event.sender.send() 于渲染進程通信
*/
ipcMain.on('msg', (event, data) => {
event.sender.send('reply','hi lee my name is yuan, age is 17'); // # 主進程接收到異步消息以后通知渲染進程
console.log(data);
})
~~~
## 主進程與渲染進程共享數據
[https://www.yuque.com/xiaoershangjiu-mattw/bhgamp/eyzdrz#hw8Jk](https://www.yuque.com/xiaoershangjiu-mattw/bhgamp/eyzdrz#hw8Jk)
## 渲染進程于渲染進程通信
1. 獲取當前窗口的 id:
~~~
const winId = BrowserWindow.getFocusedWindow().id;
~~~
2. 通過 id 查找窗口:
~~~
let win = BrowserWindow.fromId(winId);
~~~
> [渲染進程于渲染進程通信](http://www.hmoore.net/lihaotian001/electron-01/731073)
# preload
`electron`渲染進程默認為`nodejs`環境,在里面你可以調用`require`引入第三方模塊,但有時候我們想要的是一個真實的瀏覽器環境。`electron`需要做的配置如下:
```
const mainWindow = new BrowserWindow({
resizable: true,
width: size.width,
height: size.height,
title: 'HolaStudio',
webPreferences:
{
nodeIntegration: false,
preload: path.join(__dirname, 'tangide', 'expose-window-apis.js')
}
});
```
創建`BrowserWindow`的時候指定`nodeIntegration`為`false`。 這樣在`electron`內置瀏覽器里面不會有`module`和`require`全局變量。但 preload 文件 `expose-window-apis.js`仍可以訪問;
preload 腳本文件,會在頁面加載資源前就加載執行,保證了頁面無論是在什么地方、什么時候調用注入接口都能調用到。
## 示例 preload 文件
`expose-window-apis.js` 文件的內容:
```
const { BrowserWindow } = require('electron')
const path = require('path')
const renderProcessApi = path.join(__dirname, './inject.js')
let win = new BrowserWindow({
webPreferences: {
preload: renderProcessApi
}
})
```
`preload.js`是一個特殊且單獨的文件,在此文件中可以訪問`node模塊`、`electron`、`其他node 模塊`提供的api,并掛載到`window`對象中,你其他的普通j avascript 代碼就可以訪問這些 api。
> [在Electron中最快速預加載腳本](https://www.cnblogs.com/lovesong/p/11161293.html)
> [Uncaught ReferenceError: require is not defined](https://github.com/electron/electron/issues/9920)
# asar
[asar 加密打包](https://electronjs.org/docs/tutorial/application-packaging),僅僅是對`resource/app`目錄的封裝,讓人們不是那么容易看到你寫的代碼結果而已。
安裝asar
```
npm install -g asar
asar p/pack your-app app.asar // 用 asar pack 打包
asar list xxxxxx.asar // 讀取 asar 里面的文件
```
從 asar 包讀取一個文件:
```
const fs = require('fs');
fs.readFileSync('/path/to/example.asar/file.txt');
```
列出 asar 包中根目錄下的所有文件:
```
const fs = require('fs');
fs.readdirSync('/path/to/example.asar');
```
使用 asar 包中的一個模塊:
```
require('/path/to/example.asar/dir/module.js');
```
使用 BrowserWindow 來顯示一個 asar 包里的 web 頁面:
```
const BrowserWindow = require('electron').BrowserWindow;
var win = new BrowserWindow({width: 800, height: 600});
win.loadURL('file:///path/to/example.asar/static/index.html');
```
# 參考
[Electron webview完全指南](http://www.ayqy.net/blog/electron-webview%E5%AE%8C%E5%85%A8%E6%8C%87%E5%8D%97/)
