
# workerman
## 端口
20005 socket端口
20014 外部通訊端口
20015 內部通訊端口
此workerman啟動和CRMEB商城項目端口不會發生沖突
## 解禁函數
~~~
`pcntl_signal` `pcntl_signal_dispatch` pcntl_fork` `pcntl_wait` `pcntl_alarm`
~~~
## Linux 下命令詳解
~~~
#長連接服務
php think workerman [ status ] [ server ] [ --d ]
#Linux 觀察者模式啟動
php think workerman start
或
sudo -u www php think workerman start
#Linux 進程守護模式啟動
php think workerman start --d
或
sudo -u www php think workerman start --d
#Linux 停止
php think workerman stop
#Linux 查看運行狀態
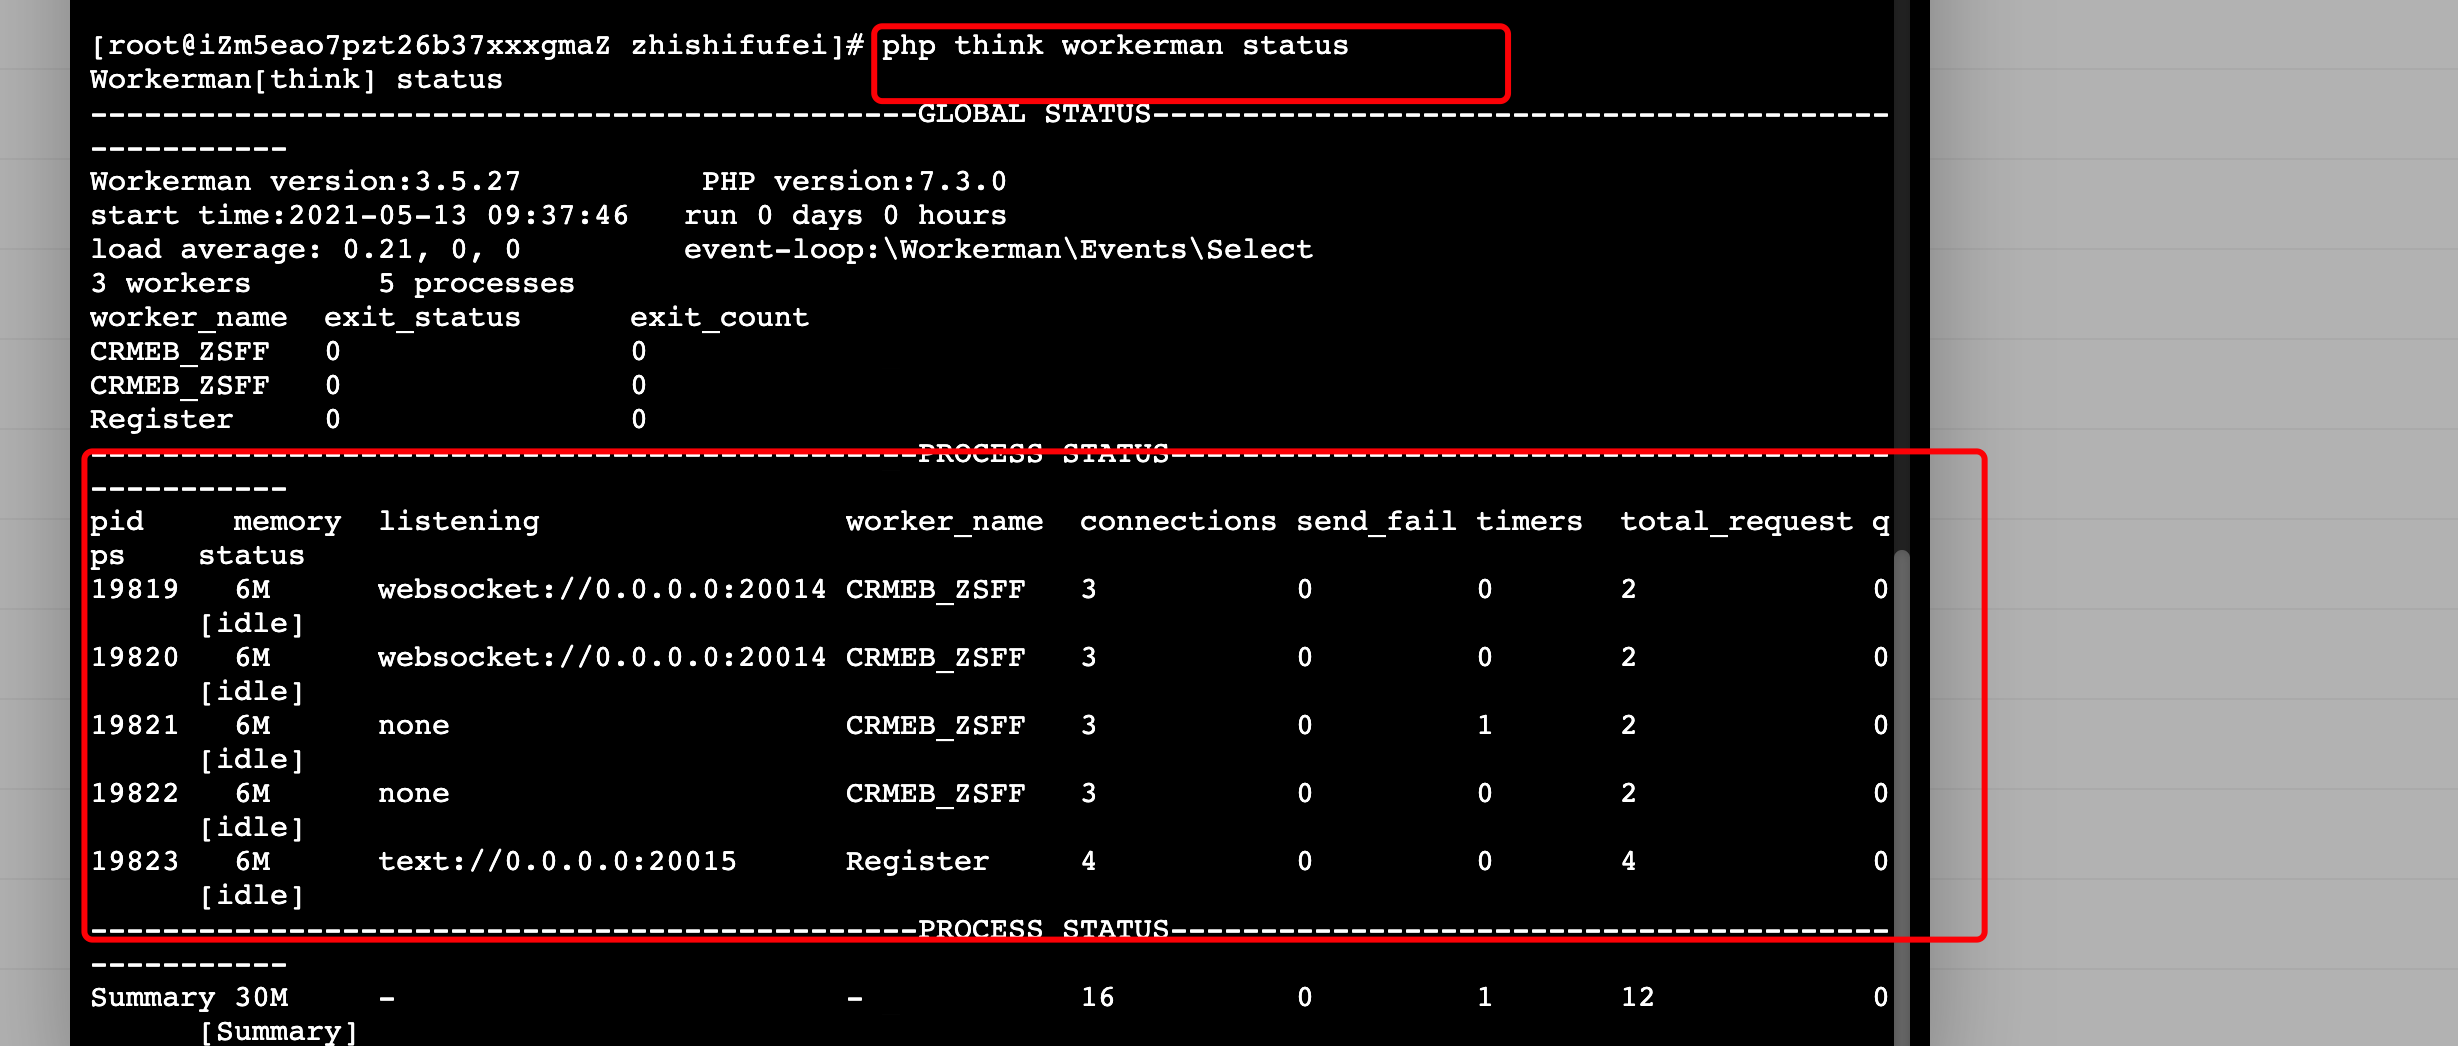
php think workerman status
~~~
### Linux 下啟動workerman步驟
1.目錄切換到知識付費項目根目錄,點擊終端
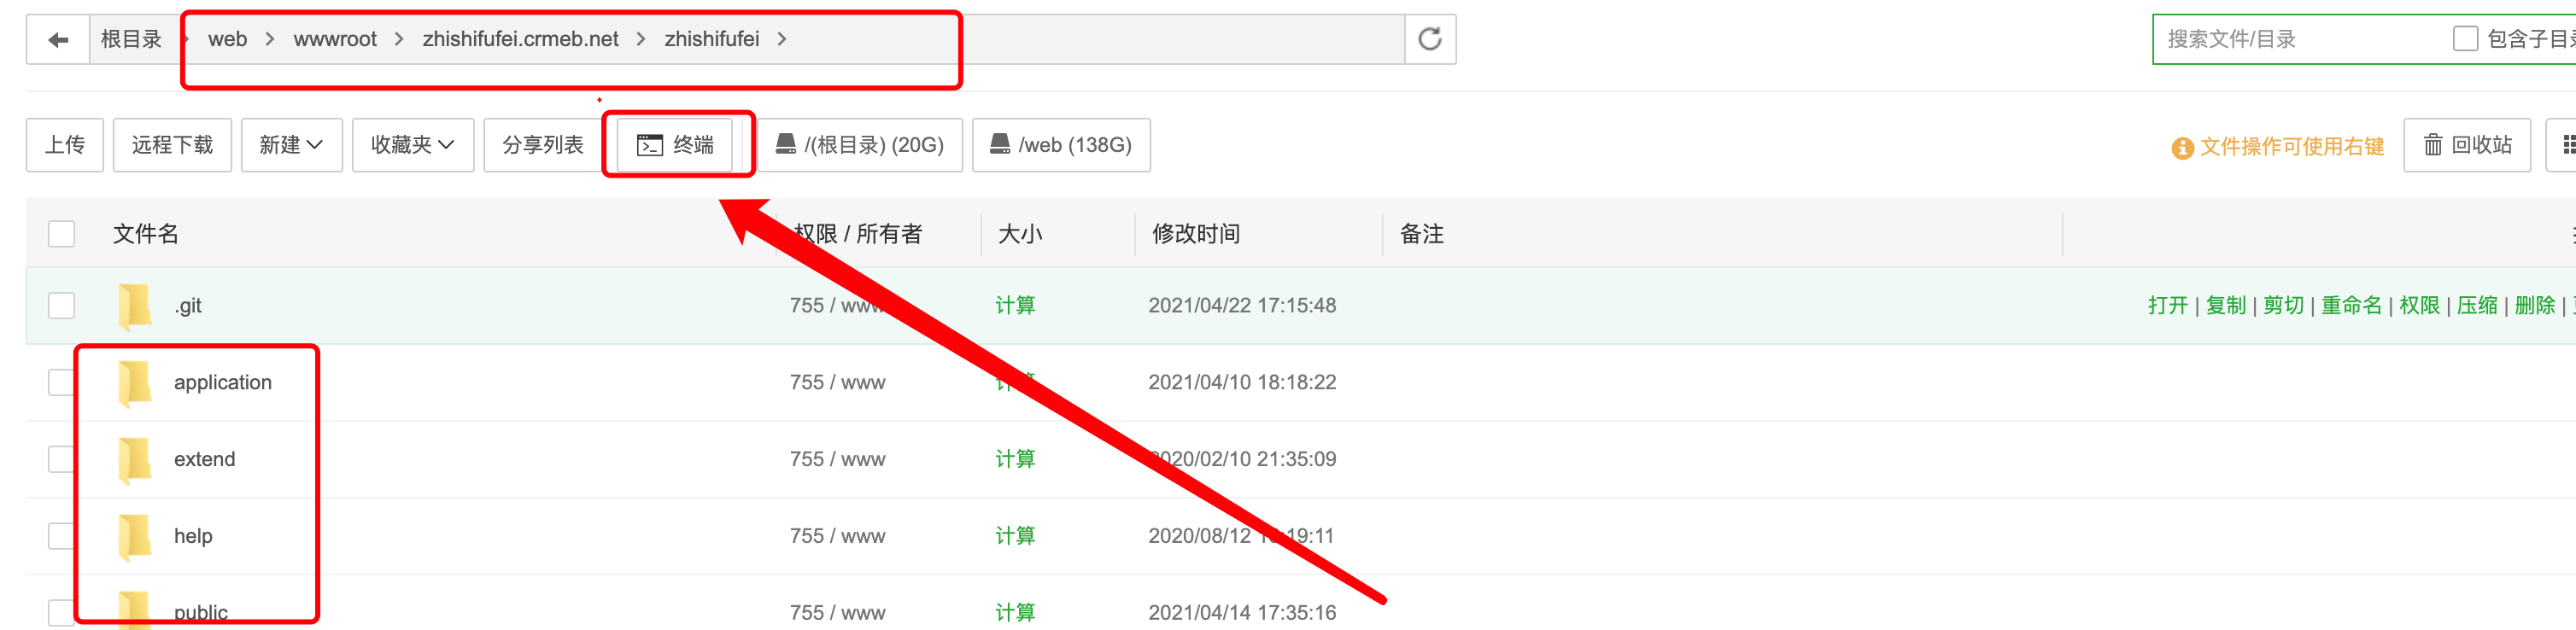
2.打開終端后切到知識付費根目錄
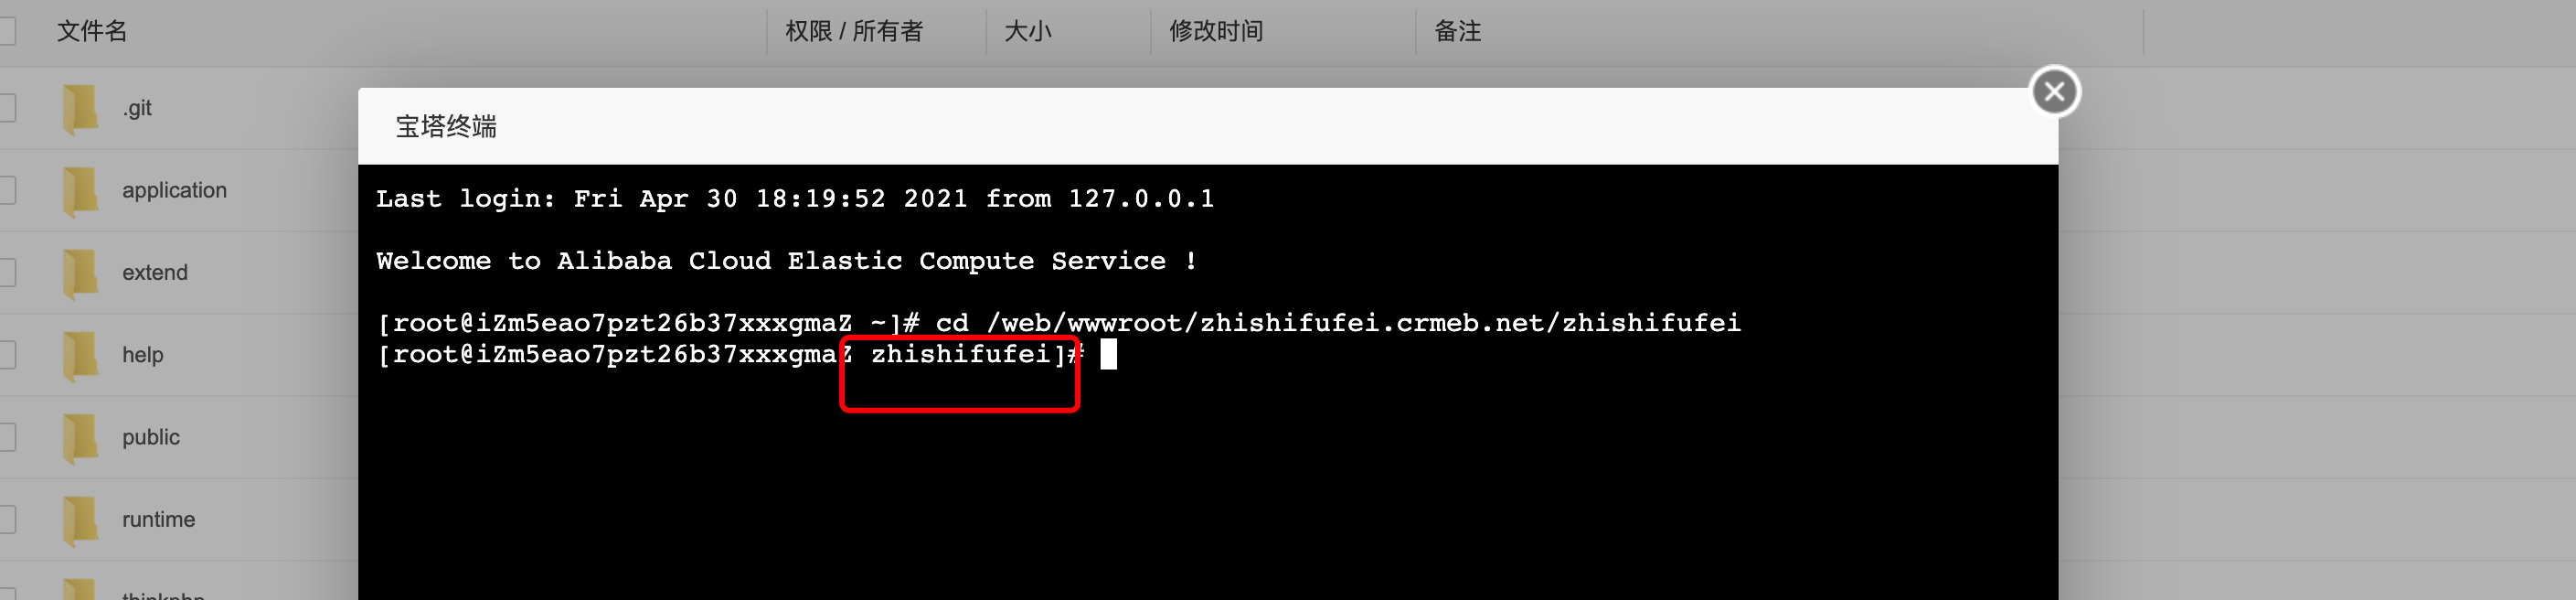
3.執行命令檢測命令查看workerman是否啟動
未啟動樣子

啟動了的樣子【**已啟動workerman就不需要再次啟動,若想重啟請先執行關閉**】
4.未啟動執行啟動命令
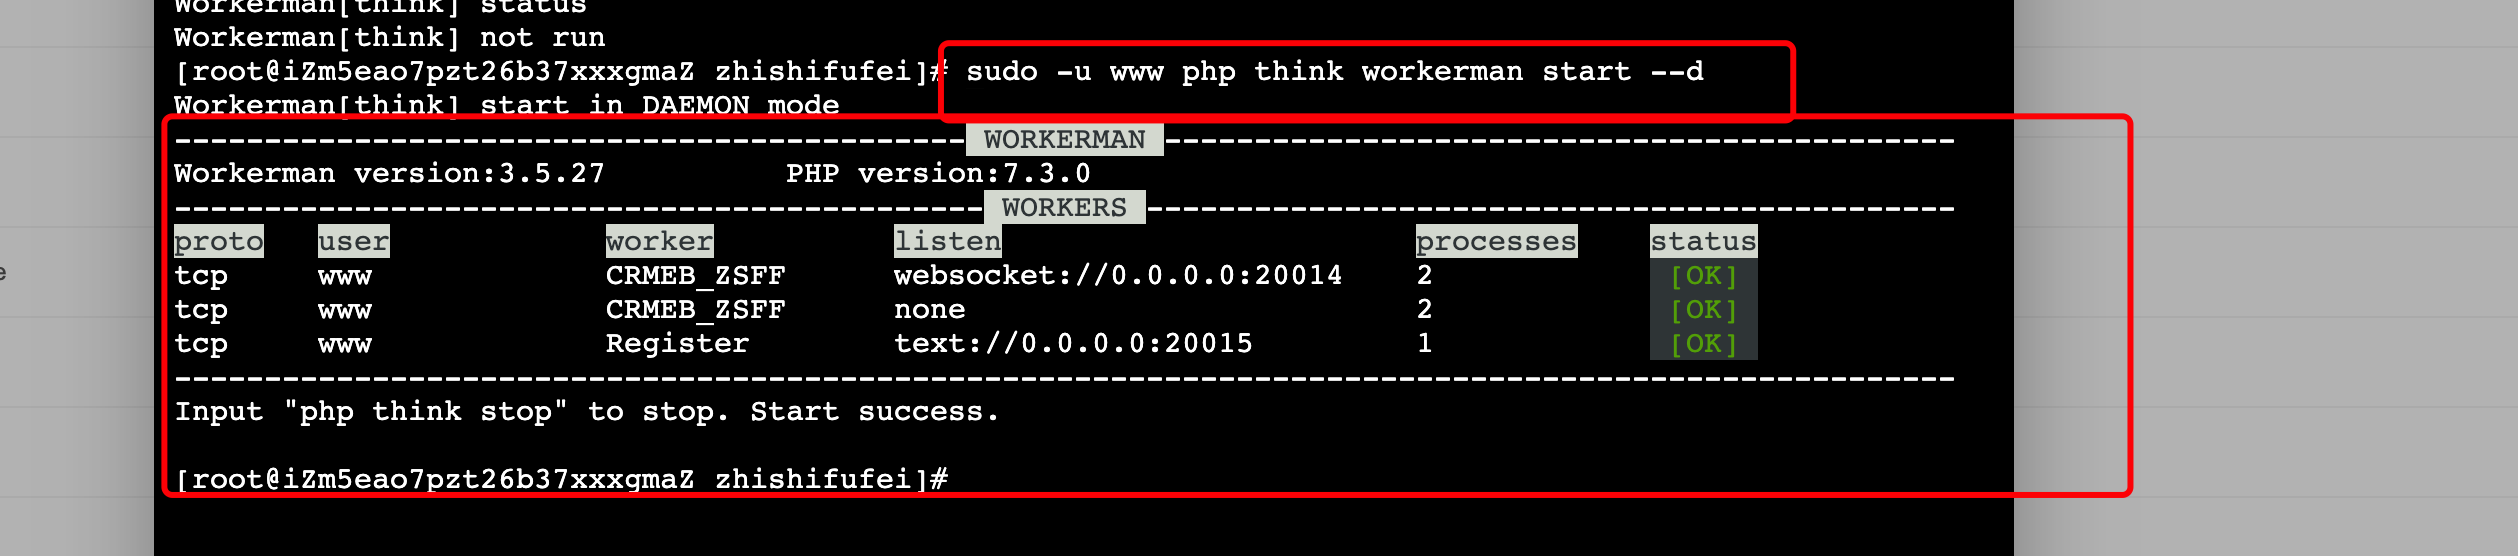
關閉workerman方法【***想要重啟workerman,必須先關閉***】

## Windows 下命令詳解
~~~
# 第一步 啟動內部通訊
php think workerman start channel
# 第二步 啟動聊天服務
php think workerman start chat
# 第三步 啟動bussinessWorker 進程
php think workerman start business
~~~
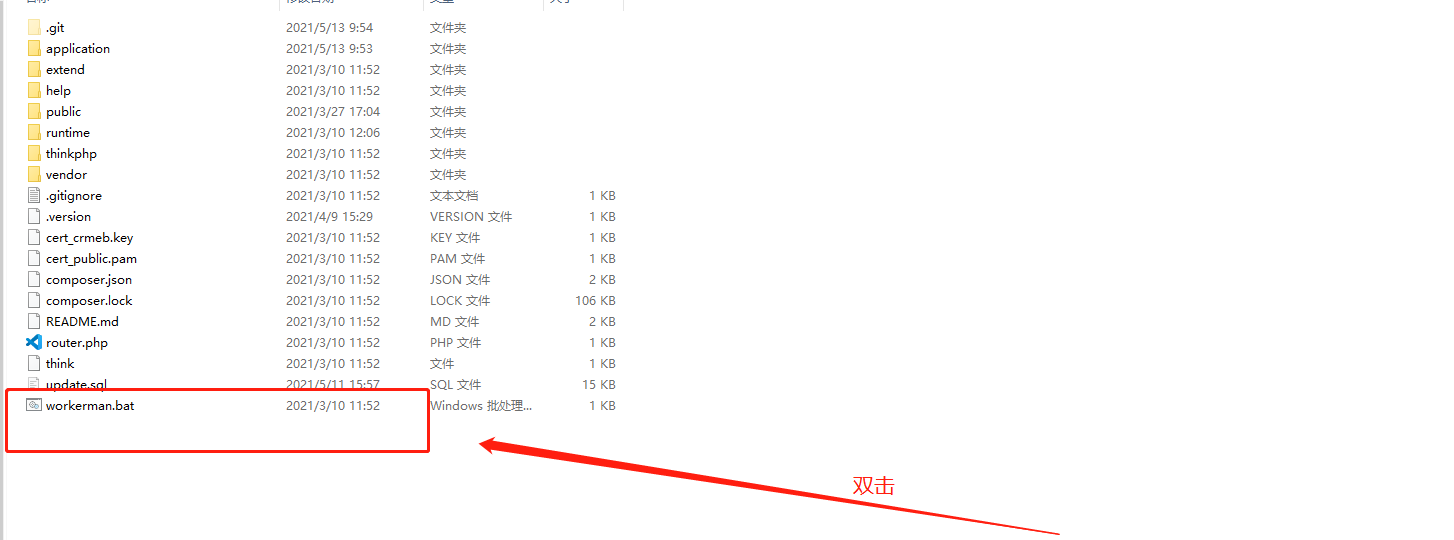
**windows下雙擊 workerman.bat文件**
#### 注意事項
1. windows 下啟動workerman必須得同時啟動以上三條命令. 關閉服務只需要關閉命令行就可以;
2. windows下方便用戶操作可直接運行 根目錄下得 woekman.bat 文件;就可以啟動workerman服務;
3. windows下雙擊 workerman.bat文件閃退,基本上是由于PHP環境變量沒有配置導致得,可以查看[配置]->[PHP環境變量配置]文章進行配置;
4. 此workerman服務,已經包含**定時任務**;
5. liunx服務器上需要切換到當前項目得根目錄執行啟動命令,啟動命令: `php think workerman start --d`
6. 需要開啟 **20005,20014, 20015** 端口,寶塔設置放行端口,服務器還需放行端口規則
#### 修改端口
**注:若服務器中端口沖突可以修改端口,一個服務器中安裝多套知識付費系統則必須要修改端口**
首先在**application/config.php**文件中修改對應的端口,**端口可以自行設置**
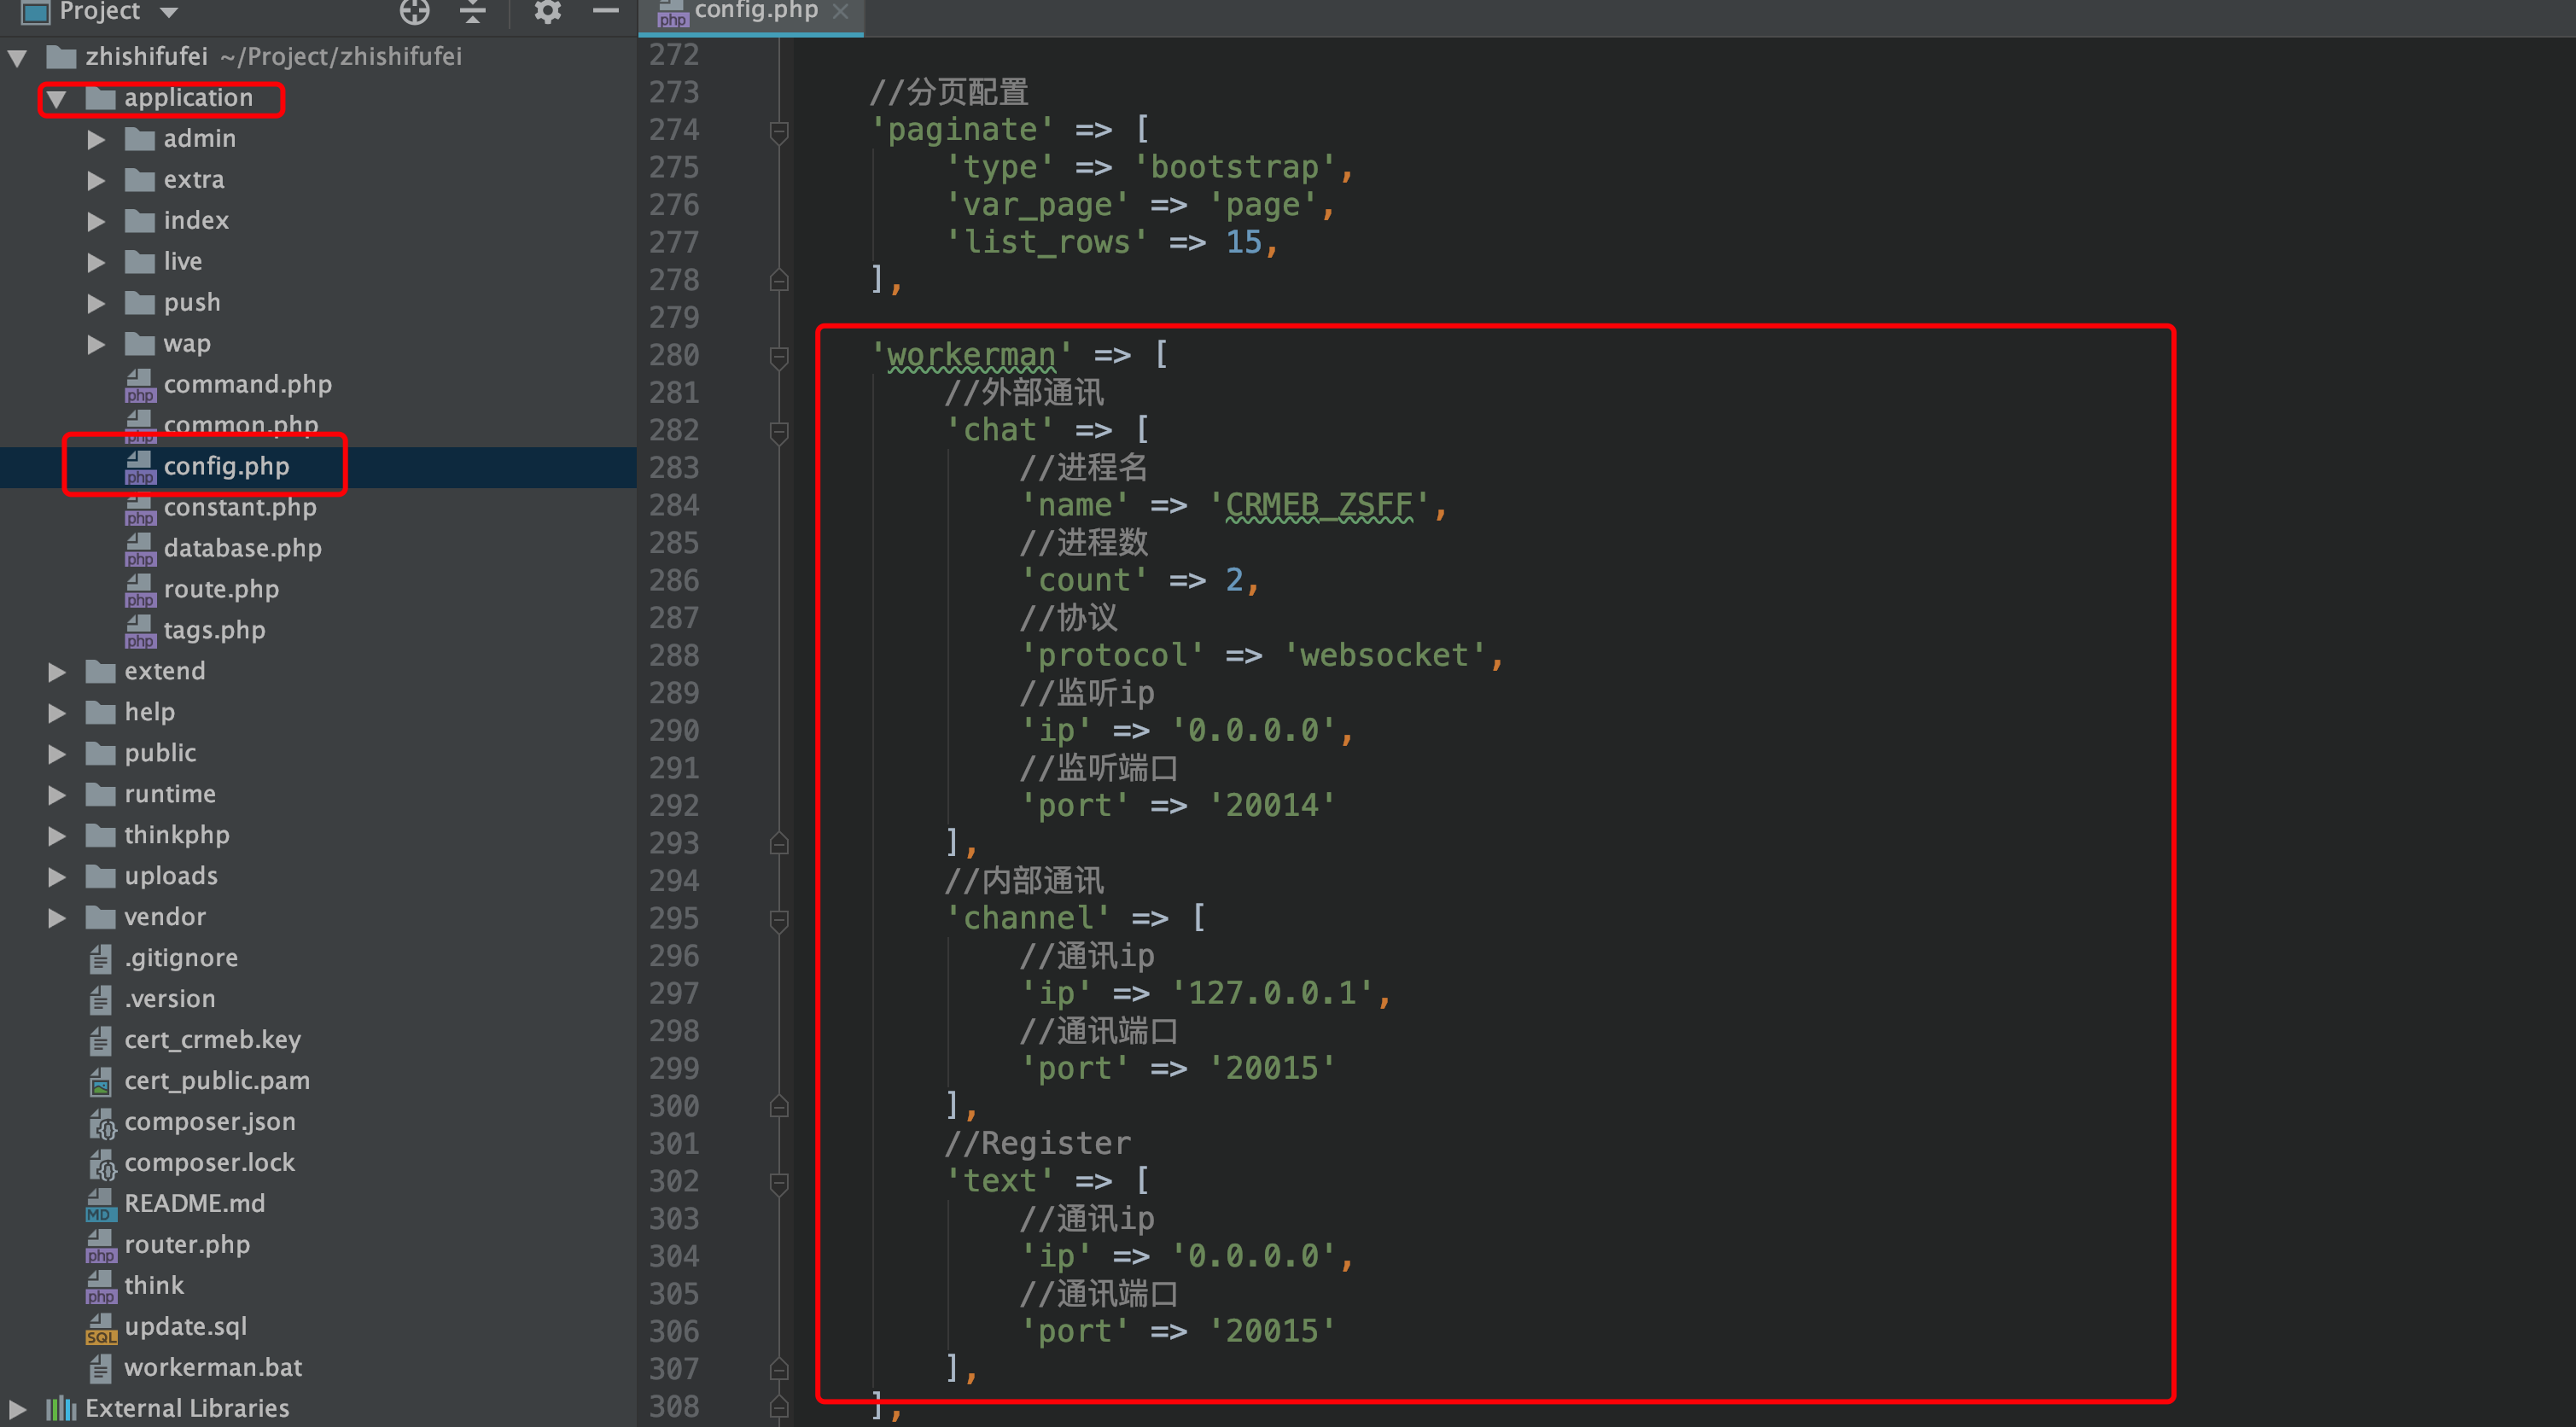
* **workerman.chat**為外部通信服務端口,默認為20014
* **workerman.channel**為內部通信服務端口,默認為20015
* **workerman.text**為Register服務端口,默認為20015
* 修改后需要重啟workerman才能生效
- 序言
- 系統簡介
- 系統介紹
- 前端功能腦圖
- 后端功能列表
- 項目介紹
- 免費版與商業版功能對比
- 源碼安裝(必看)
- 安裝前必讀
- 服務器及域名配置
- 服務器購買
- 服務器端口
- 域名購買
- 域名配置
- https域名
- ssl證書申請
- https域名配置
- 新手推薦-寶塔安裝
- 【安裝視頻教程】
- 1.寶塔配置
- 1.服務器配置
- 2.登錄寶塔
- 2.環境配置
- 3.安裝 swoole-loader
- 4.源碼安裝
- 5.程序一鍵安裝
- 6.啟動命令
- 啟動消息隊列
- 啟動workerman
- Windows環境安裝
- windows+寶塔安裝教程
- windows+phpstudy8 安裝教程
- 偽靜態配置
- 安裝 swoole-loader
- workerman啟動
- 手動安裝教程
- 安裝完檢測
- 切換PHP版本
- 多項目部署
- 程序配置(必讀)
- 公眾號
- 公眾號-域名配置
- 公眾號-開發配置
- 公眾號-模版消息
- 公眾號-訂閱消息
- 公眾號-微信菜單
- 阿里云產品配置
- 阿里云購買產品
- key-阿里云key配置
- 視頻加密-阿里云視頻點播
- 阿里云資源包購買
- 上傳圖片視頻配置(方法二選一 只需安裝一個即可)
- 上傳圖片視頻-系統后臺配置
- 上傳圖片視頻-阿里云平臺配置
- 直播配置(方法二選一 只需安裝一個即可)
- 直播-系統后臺配置
- 直播-阿里云控制臺配置
- 短信
- 短信-CRMEB短信平臺
- 短信-阿里云短信
- 支付
- 公眾號-微信端支付
- 公眾號-h5端微信支付
- 公眾號-微信掃碼支付
- 支付寶-支付寶支付配置
- 支付寶-支付寶掃碼支付
- workerman 啟動
- 配置常見問題
- 項目更新及pc安裝操作
- 項目更新說明
- pc端安裝說明
- pc端更新說明
- 功能說明
- 前端界面說明
- 移動首頁
- 分類
- 商品
- 個人中心
- 在線直播
- 添加直播
- 直播列表管理
- 禮物管理
- 直播帶貨
- 直播后臺功能
- 直播間說明
- 商品管理
- 商品分類
- 商品列表
- 商品評論
- 專題課程
- 界面展示
- 添加專題
- 添加視頻
- 素材管理
- 專題評論
- 輕專題
- 課程有效期
- 贈送好友
- 訂單管理
- 新聞管理
- 拼團
- 添加拼團
- 添加拼團彈幕
- 拼團推薦到首頁
- 分銷規則
- 規則說明
- 分銷配置
- 提現銀行配置
- 會員功能
- 會員配置
- 會員使用
- 成為會員
- 活動管理
- 簽到
- 余額支付
- 地址管理
- 設置子賬號
- 講師功能
- 推流軟件使用
- 教務管理
- 老師管理
- 班級管理
- 助學工具
- 題庫管理
- 試卷管理
- 證書管理
- 兌換碼
- 資料下載
- pc端展示
- pc端開啟
- PC端平臺頁面配置
- 網站統計
- 客服功能
- 微信客服
- CRMchat客服
- 短信通知
- 常見問題
- 數據庫修改配置
- 后臺接口訪問異常
- workerman常見問題
- 直播常見問題
- 每月一號前端報500錯
- redis密碼
- 設置redis密碼
- reids認證報錯
- 密碼有誤
- 切換php版本
- 音視頻上傳有誤
- 安裝完成后臺報語法錯誤
- 刷新緩存報錯
- 安裝完成報內存超出
- 直播彈幕或禮物有時候無法發出
- 安裝無法修改寫入權限
- windows下首頁空白或提示控制器不存在
- 直播延遲問題
- OBS降低延遲
- 支付寶支付錯誤
- 支付寶支付報錯invalid [default store dir]: /tmp/
- 阿里云oss設置防盜鏈
- 直播拉取回放
- 首頁提示Undefined index: host
- 首頁空白檢查提示系統錯誤
- 客服功能報錯
- 數據庫主鍵沖突
- 微信菜單添加報錯
- 微信提示用戶信息獲取失敗
- 支付寶回調有問題
- 守護進程不顯示
- 后臺直播域名無法設置錄制
- 后臺題庫批量導入報錯
- pc配置不顯示
- 商業授權
- 授權說明
- 申請授權
- 技術文檔
- 頁面鏈接
- 開發規范
- 數據字典