React 是通過管理狀態來實現對組件的管理,即使用 this.state 獲取 state,通過 this.setState() 來更新 state,當使用 this.setState() 時,React 會調用 render 方法來重新渲染 UI。
首先看一個例子:
~~~js
class Example extends React.Component {
constructor() {
super();
this.state = {
val: 0
};
}
componentDidMount() {
this.setState({val: this.state.val + 1});
console.log(this.state.val); // 第 1 次 log
this.setState({val: this.state.val + 1});
console.log(this.state.val); // 第 2 次 log
setTimeout(() => {
this.setState({val: this.state.val + 1});
console.log(this.state.val); // 第 3 次 log
this.setState({val: this.state.val + 1});
console.log(this.state.val); // 第 4 次 log
}, 0);
}
render() {
return null;
}
};
~~~
**答案是: 0 0 2 3,你做對了嗎?**

### 一、setState 異步更新
setState 通過一個**隊列機制**來實現 state 更新,當執行 setState() 時,會將需要更新的 state**淺合并**后放入 狀態隊列,而不會立即更新 state,隊列機制可以高效的**批量更新**state。而如果不通過setState,直接修改this.state 的值,則不會放入狀態隊列,當下一次調用 setState 對狀態隊列進行合并時,之前對 this.state 的修改將會被忽略,造成無法預知的錯誤。
React通過狀態隊列機制實現了 setState 的異步更新,避免重復的更新 state。
~~~js
setState(nextState, callback)
~~~
在 setState 官方文檔中介紹:**將 nextState 淺合并到當前 state。這是在事件處理函數和服務器請求回調函數中觸發 UI 更新的主要方法。不保證`setState`調用會同步執行,考慮到性能問題,可能會對多次調用作批處理。**
舉個例子:
~~~js
// 假設 state.count === 0
this.setState({count: state.count + 1});
this.setState({count: state.count + 1});
this.setState({count: state.count + 1});
// state.count === 1, 而不是 3
~~~
本質上等同于:
~~~js
// 假設 state.count === 0
Object.assign(state,
{count: state.count + 1},
{count: state.count + 1},
{count: state.count + 1}
)
// {count: 1}
~~~
但是如何解決這個問題喃,在文檔中有提到:
**也可以傳遞一個簽名為`function(state, props) => newState`的函數作為參數。這會將一個原子性的更新操作加入更新隊列,在設置任何值之前,此操作會查詢前一刻的 state 和 props。`...setState()`并不會立即改變`this.state`,而是會創建一個待執行的變動。調用此方法后訪問`this.state`有可能會得到當前已存在的 state(譯注:指 state 尚未來得及改變)。**
即使用 setState() 的第二種形式:以一個函數而不是對象作為參數,此函數的第一個參數是前一刻的state,第二個參數是 state 更新執行瞬間的 props。
~~~js
// 正確用法
this.setState((prevState, props) => ({
count: prevState.count + props.increment
}))
~~~
這種函數式 setState() 工作機制類似:
~~~js
[
{increment: 1},
{increment: 1},
{increment: 1}
].reduce((prevState, props) => ({
count: prevState.count + props.increment
}), {count: 0})
// {count: 3}
~~~
關鍵點在于**更新函數(updater function)**:
~~~
(prevState, props) => ({
count: prevState.count + props.increment
})
~~~
這基本上就是個 reducer,其中`prevState`類似于一個累加器(accumulator),而`props`則像是新的數據源。類似于 Redux 中的 reducers,你可以使用任何標準的 reduce 工具庫對該函數進行 reduce(包括`Array.prototype.reduce()`)。同樣類似于 Redux,reducer 應該是[純函數](https://medium.com/javascript-scene/master-the-javascript-interview-what-is-a-pure-function-d1c076bec976)。
> 注意:企圖直接修改`prevState`通常都是初學者困惑的根源。
相關源碼:
~~~js
// 將新的 state 合并到狀態隊列
var nextState = this._processPendingState(nextProps, nextContext)
// 根據更新隊列和 shouldComponentUpdate 的狀態來判斷是否需要更新組件
var shouldUpdate = this._pendingForceUpdate ||
!inst.shouldComponentUpdate ||
inst.shouldComponentUpdate(nextProps, nextState, nextContext)
~~~
### 二、setState 循環調用風險
當調用 setState 時,實際上是會執行`enqueueSetState`方法,并會對`partialState`及`_pendingStateQueue`隊列進行合并操作,最終通過`enqueueUpdate`執行 state 更新。
而`performUpdateIfNecessary`獲取`_pendingElement`、`_pendingStateQueue`、`_pendingForceUpdate`,并調用`reaciveComponent`和`updateComponent`來進行組件更新。
** 但,如果在`shouldComponentUpdate`或`componentWillUpdate`方法里調用 this.setState 方法,就會造成崩潰。 **這是因為在`shouldComponentUpdate`或`componentWillUpdate`方法里調用`this.setState`時,`this._pendingStateQueue!=null`,則`performUpdateIfNecessary`方法就會調用`updateComponent`方法進行組件更新,而`updateComponent`方法又會調用`shouldComponentUpdate`和`componentWillUpdate`方法,因此造成循環調用,使得瀏覽器內存占滿后崩潰。
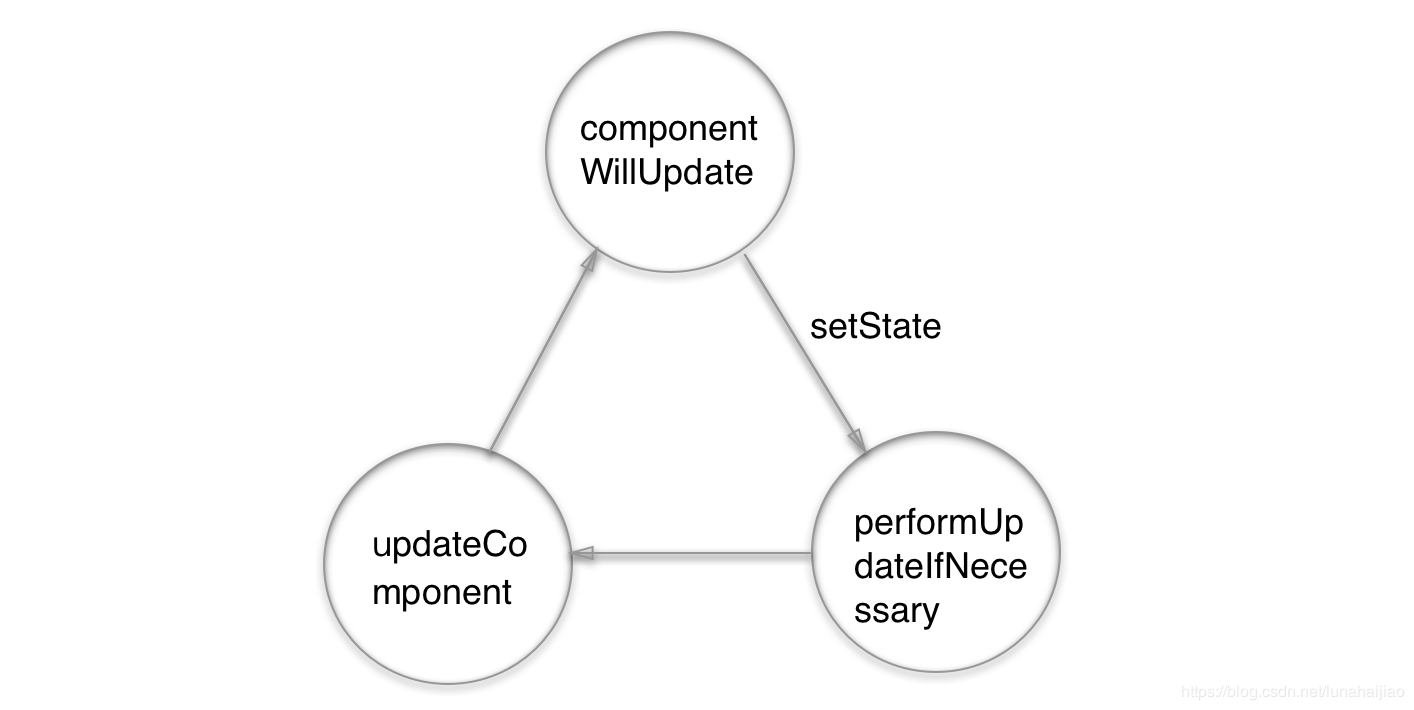
**圖 2-1 循環調用**
setState 源碼:
~~~js
// 更新 state
ReactComponent.prototype.setState = function(partialState, callback) {
this.updater.enqueueSetState(this, partialState)
if (callback) {
this.updater.enqueueCallback(this, callback, 'setState')
}
}
enqueueSetState: function(publicInstance, partialState) {
var internalInstance = getInternalInstanceReadyForUpdate(
publicInstance,
'setState'
)
if (!internalInstance) {
return
}
// 更新隊列合并操作
var queue = internalInstance._pendingStateQueue || (internalInstance._pendingStateQueue=[])
queue.push(partialState)
enqueueUpdate(internalInstance)
}
// 如果存在 _pendingElement、_pendingStateQueue、_pendingForceUpdate,則更新組件
performUpdateIfNecessary: function(transaction) {
if (this._pendingElement != null) {
ReactReconciler.receiveComponent(this, this._pendingElement, transaction, this._context)
}
if (this._pendingStateQueue != null || this._pendingForceUpdate) {
this.updateComponent(transaction, this._currentElement, this._currentElement, this._context, this._context)
}
}
~~~
### 三、setState 調用棧
既然 setState 是通過 enqueueUpdate 來執行 state 更新的,那 enqueueUpdate 是如何實現更新 state 的喃?
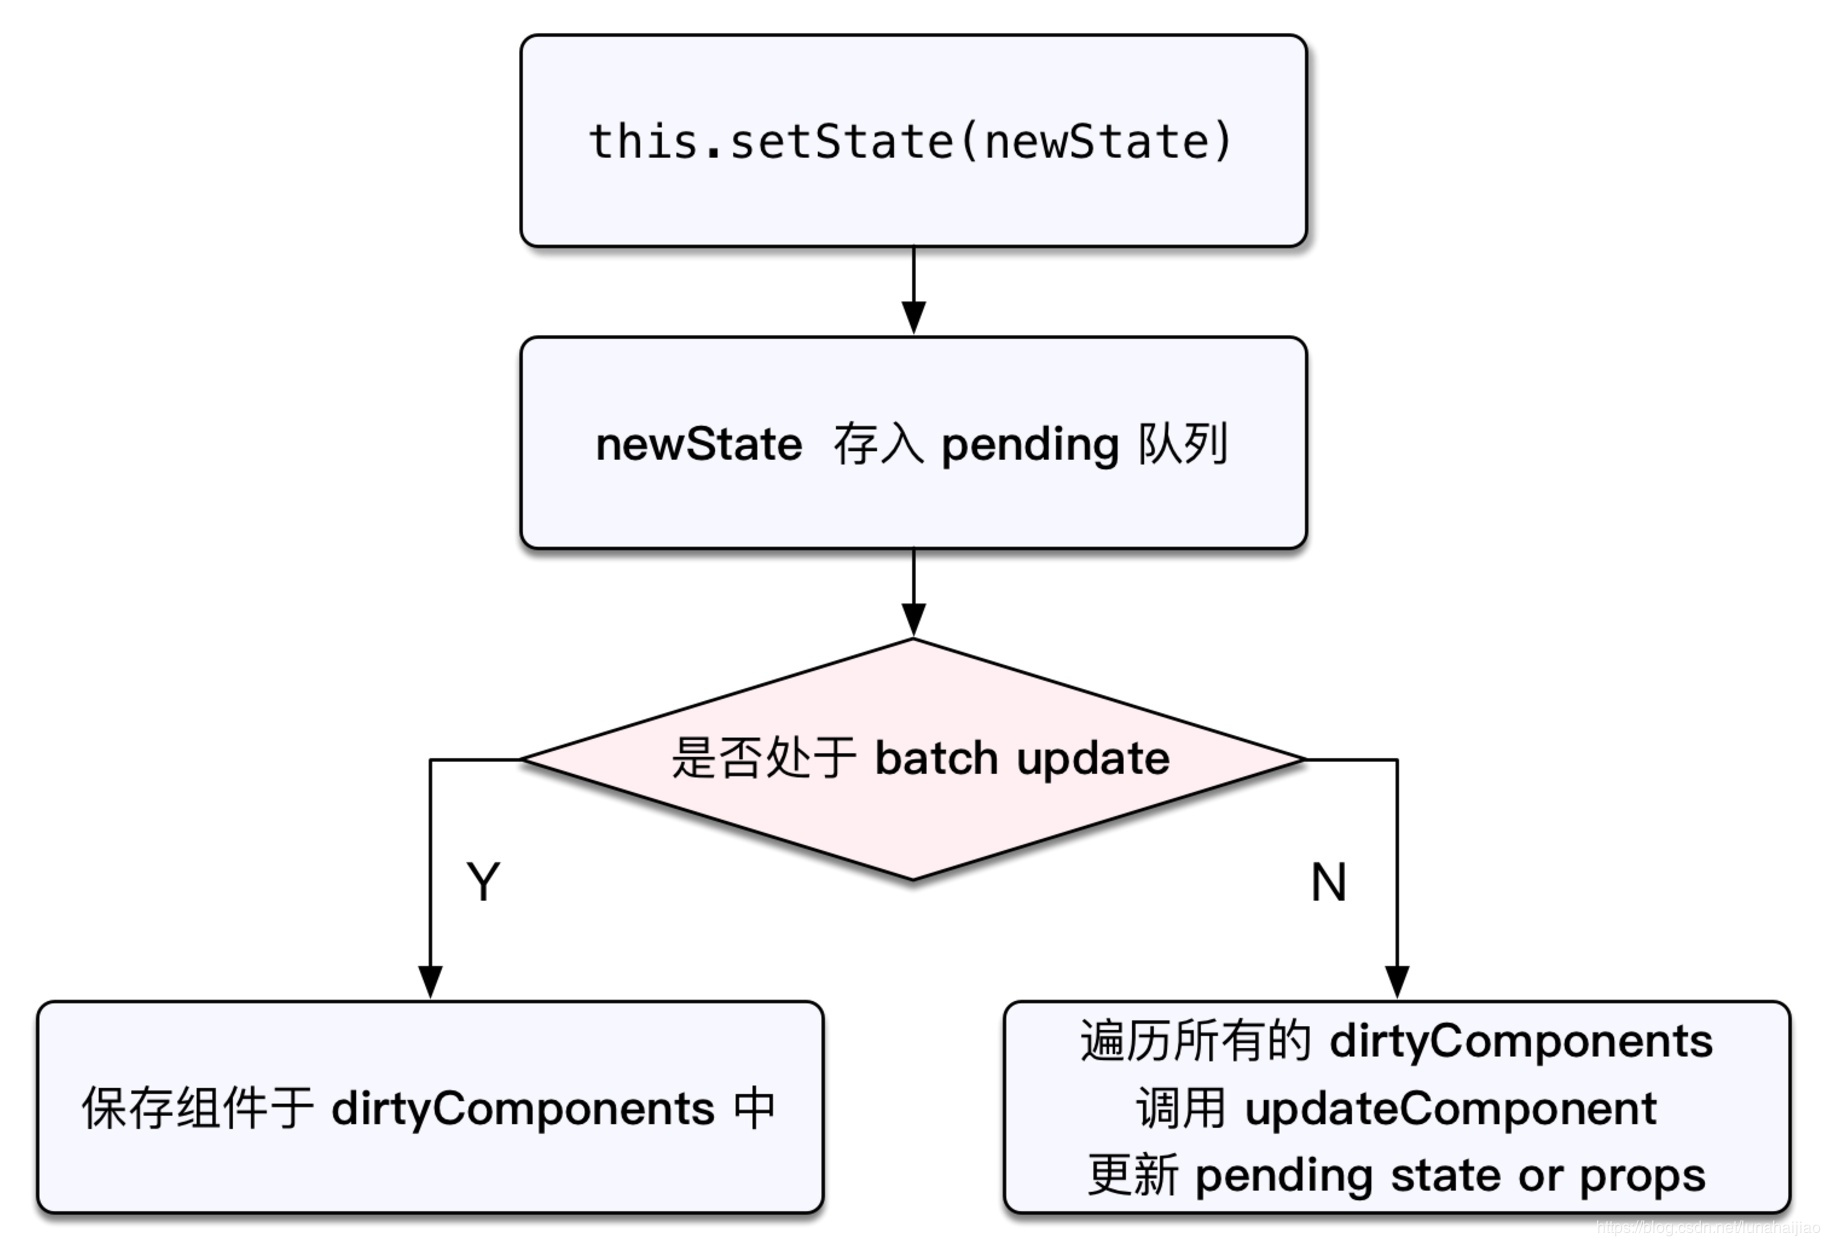
**圖3-1 setState 簡化調用棧**
上面這個流程圖是一個簡化的 setState 調用棧,注意其中核心的狀態判斷,在[源碼(ReactUpdates.js)](http://link.zhihu.com/?target=https%3A//github.com/facebook/react/blob/35962a00084382b49d1f9e3bd36612925f360e5b/src/renderers/shared/reconciler/ReactUpdates.js%23L199)中
~~~
function enqueueUpdate(component) {
// ...
if (!batchingStrategy.isBatchingUpdates) {
batchingStrategy.batchedUpdates(enqueueUpdate, component);
return;
}
dirtyComponents.push(component);
}
~~~
若 isBatchingUpdates 為 false 時,所有隊列中更新執行 batchUpdate,否則,把當前組件(即調用了 setState 的組件)放入 dirtyComponents 數組中。先不管這個 batchingStrategy,看到這里大家應該已經大概猜出來了,文章一開始的例子中 4 次 setState 調用表現之所以不同,這里邏輯判斷起了關鍵作用。
那么*batchingStrategy*究竟是何方神圣呢?其實它只是一個簡單的對象,定義了一個 isBatchingUpdates 的布爾值,和一個 batchedUpdates 方法。下面是一段簡化的定義代碼:
~~~
var batchingStrategy = {
isBatchingUpdates: false,
batchedUpdates: function(callback, a, b, c, d, e) {
// ...
batchingStrategy.isBatchingUpdates = true;
transaction.perform(callback, null, a, b, c, d, e);
}
};
~~~
注意 batchingStrategy 中的**batchedUpdates**方法中,有一個 transaction.perform 調用。這就引出了本文要介紹的核心概念 —— Transaction(事務)。
### 四、初識事務
在 Transaction 的[源碼](http://link.zhihu.com/?target=https%3A//github.com/facebook/react/blob/6d5fe44c8602f666a043a4117ccc3bdb29b86e78/src/shared/utils/Transaction.js)中有一幅特別的 ASCII 圖,形象的解釋了 Transaction 的作用。
~~~
/*
* <pre>
* wrappers (injected at creation time)
* + +
* | |
* +-----------------|--------|--------------+
* | v | |
* | +---------------+ | |
* | +--| wrapper1 |---|----+ |
* | | +---------------+ v | |
* | | +-------------+ | |
* | | +----| wrapper2 |--------+ |
* | | | +-------------+ | | |
* | | | | | |
* | v v v v | wrapper
* | +---+ +---+ +---------+ +---+ +---+ | invariants
* perform(anyMethod) | | | | | | | | | | | | maintained
* +----------------->|-|---|-|---|-->|anyMethod|---|---|-|---|-|-------->
* | | | | | | | | | | | |
* | | | | | | | | | | | |
* | | | | | | | | | | | |
* | +---+ +---+ +---------+ +---+ +---+ |
* | initialize close |
* +-----------------------------------------+
* </pre>
*/
~~~
簡單地說,一個所謂的 Transaction 就是將需要執行的 method 使用 wrapper 封裝起來,再通過 Transaction 提供的 perform 方法執行。而在 perform 之前,先執行所有 wrapper 中的 initialize 方法;perform 完成之后(即 method 執行后)再執行所有的 close 方法。一組 initialize 及 close 方法稱為一個 wrapper,從上面的示例圖中可以看出 Transaction 支持多個 wrapper 疊加。
具體到實現上,React 中的 Transaction 提供了一個 Mixin 方便其它模塊實現自己需要的事務。而要使用 Transaction 的模塊,除了需要把 Transaction 的 Mixin 混入自己的事務實現中外,還需要額外實現一個抽象的 getTransactionWrappers 接口。這個接口是 Transaction 用來獲取所有需要封裝的前置方法(initialize)和收尾方法(close)的,因此它需要返回一個數組的對象,每個對象分別有 key 為 initialize 和 close 的方法。
下面是一個簡單使用 Transaction 的例子
~~~
var Transaction = require('./Transaction');
// 我們自己定義的 Transaction
var MyTransaction = function() {
// do sth.
};
Object.assign(MyTransaction.prototype, Transaction.Mixin, {
getTransactionWrappers: function() {
return [{
initialize: function() {
console.log('before method perform');
},
close: function() {
console.log('after method perform');
}
}];
};
});
var transaction = new MyTransaction();
var testMethod = function() {
console.log('test');
}
transaction.perform(testMethod);
// before method perform
// test
// after method perform
~~~
當然在實際代碼中 React 還做了異常處理等工作,這里不詳細展開。有興趣的同學可以參考源碼中[Transaction](http://link.zhihu.com/?target=https%3A//github.com/facebook/react/blob/401e6f10587b09d4e725763984957cf309dfdc30/src/shared/utils/Transaction.js)實現。
說了這么多 Transaction,它到底是怎么導致上文所述 setState 的各種不同表現的呢?
### 五、解密 setState
那么 Transaction 跟 setState 的不同表現有什么關系呢?首先我們把 4 次 setState 簡單歸類,前兩次屬于一類,因為他們在同一次調用棧中執行;setTimeout 中的兩次 setState 屬于另一類,原因同上。讓我們分別看看這兩類 setState 的調用棧:
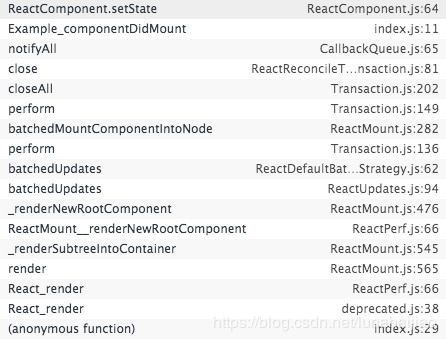
**圖 5-2 setTimeout 里的 setState 調用棧**
很明顯,在 componentDidMount 中直接調用的兩次 setState,其調用棧更加復雜;而 setTimeout 中調用的兩次 setState,調用棧則簡單很多。讓我們重點看看第一類 setState 的調用棧,有沒有發現什么熟悉的身影?沒錯,就是**batchedUpdates**方法,原來早在 setState 調用前,已經處于 batchedUpdates 執行的 transaction 中!
那這次 batchedUpdate 方法,又是誰調用的呢?讓我們往前再追溯一層,原來是 ReactMount.js 中的\*\*\_renderNewRootComponent\*\* 方法。也就是說,整個將 React 組件渲染到 DOM 中的過程就處于一個大的 Transaction 中。
### 六、回到題目
接下來的解釋就順理成章了,因為在 componentDidMount 中調用 setState 時,batchingStrategy 的 isBatchingUpdates 已經被設為 true,所以兩次 setState 的結果并沒有立即生效,而是被放進了 dirtyComponents 中。這也解釋了兩次打印this.state.val 都是 0 的原因,新的 state 還沒有被應用到組件中。
再反觀 setTimeout 中的兩次 setState,因為沒有前置的 batchedUpdate 調用,所以 batchingStrategy 的 isBatchingUpdates 標志位是 false,也就導致了新的 state 馬上生效,沒有走到 dirtyComponents 分支。也就是,**setTimeout 中第一次 setState 時,this.state.val 為 1,而 setState 完成后打印時 this.state.val 變成了 2。第二次 setState 同理**。
在上文介紹 Transaction 時也提到了其在 React 源碼中的多處應用,想必調試過 React 源碼的同學應該能經常見到它的身影,像 initialize、perform、close、closeAll、notifyAll 等方法出現在調用棧里時,都說明當前處于一個 Transaction 中。
**既然事務那么有用,那我們可以用它嗎?**
答案是**不能**,但在 React 15.0 之前的版本中還是為開發者提供了 batchedUpdates 方法,它可以解決針對一開始例子中 setTimeout 里的兩次 setState 導致 rendor 的情況:
~~~js
import ReactDom, { unstable_batchedUpdates } from 'react-dom';
unstable_batchedUpdates(() => {
this.setState(val: this.state.val + 1);
this.setState(val: this.state.val + 1);
});
~~~
在 React 15.0 之后的版本已經將 batchedUpdates 徹底移除了,所以,不再建議使用。
### 七、總結
在React中,**如果是由React引發的事件處理(比如通過onClick引發的事件處理),調用setState不會同步更新this.state,除此之外的setState調用會同步執行this.state**。所謂“除此之外”,指的是繞過React通過addEventListener直接添加的事件處理函數,還有通過setTimeout/setInterval產生的異步調用。
\*\*原因:\*\*在React的setState函數實現中,會根據一個變量isBatchingUpdates判斷是直接更新this.state還是放到隊列中回頭再說,而isBatchingUpdates默認是false,也就表示setState會同步更新this.state,但是,**有一個函數batchedUpdates,這個函數會把isBatchingUpdates修改為true,而當React在調用事件處理函數之前就會調用這個batchedUpdates,造成的后果,就是由React控制的事件處理過程setState不會同步更新this.state**。
對于異步渲染,我們應在`getSnapshotBeforeUpdate`中讀取`state`、`props`, 而不是`componentWillUpdate`。但調用`forceUpdate()`強制 render 時,會導致組件跳過`shouldComponentUpdate()`,直接調用`render()`。
## 摘自
[深入 setState 機制]([https://github.com/sisterAn/blog/issues/26](https://github.com/sisterAn/blog/issues/26))
