我們今天來配置下vscode+rust。
vscode開發rust很方便。但配置有點坑,我們都認為vscode很簡單,很完善。
但這里很多同學也出現不少問題。
我們在這里簡單記錄下win7下配置的過程,跟著我一步步來,應該就可打造你的屠龍寶刀。
首先,我們安裝插件:
Rust Extension Pack
Rust Test Explorer
然后打開上一篇文章的工程:`hello-rust`,見:# rustlang語言零基礎快速入門(1)
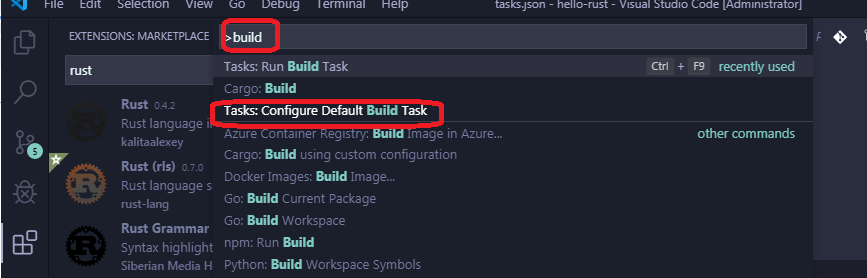
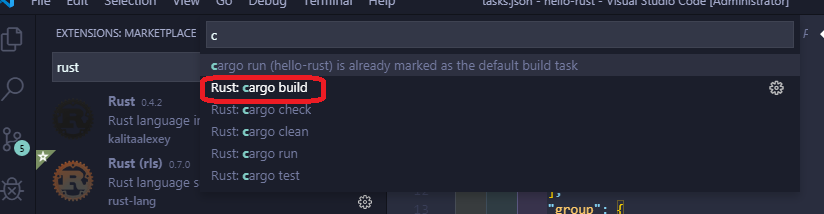
打開command palette (Ctrl-Shift-P):輸入:build,然后選擇:Tasks: Configure Default Build Task,再選擇:Rust: cargo build
?vscode會自動生成一個json文件:
?**//?See?https://go.microsoft.com/fwlink/?LinkId=733558?**
**????//?for?the?documentation?about?the?tasks.json?format**
**????"version":?"2.0.0",**
**????"tasks":?\[**
**????????{**
**????????????"label":?"cargo?run",**
**????????????"type":?"shell",**
**????????????"command":?"cargo",**
**????????????"args":?\[**
**????????????????"run"**
**????????????\],**
**????????????"group":?{**
**????????????????"kind":?"build",**
**????????????????"isDefault":?true**
**????????????}**
**????????}**
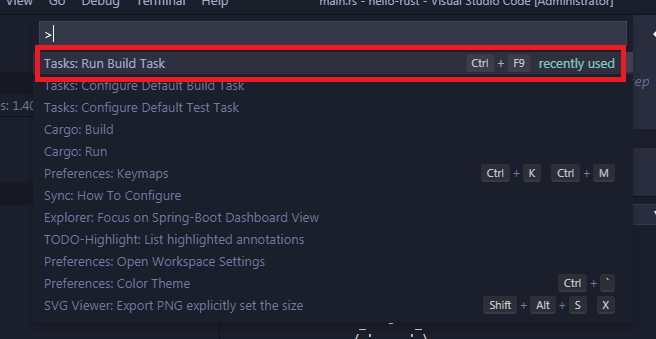
**?這里,我們直接按“CTRL+SHIFT+P”,選擇:“Task:Run Build Task”,或者直接按快捷鍵“CTRL+F9”**
VSCODE會自動BUILD,并在終端窗口顯示打印結果:
\-------------------------------------------------------
\> Executing task: cargo run <
?? Compiling hello-rust v0.1.0 (E:\\code\\rustProject\\hello-rust)
??? Finished dev \[unoptimized + debuginfo\] target(s) in 2.11s
???? Running `target\\debug\\hello-rust.exe`
\----------------------------
| Hello fellow Rustaceans! |
\----------------------------
????????????? \\
?????????????? \\
????????????????? \_~^~^~\_
????????????? \\) /? o o? \\ (/
??????????????? '\_?? -?? \_'
??????????????? / '-----' \\
Terminal will be reused by tasks, press any key to close it.
\--------------------------------------------------------------
?下面配置測試task:
先在main函數下面增加測試代碼:
~~~
#[test]
fn should_fail() {
unimplemented!();
}
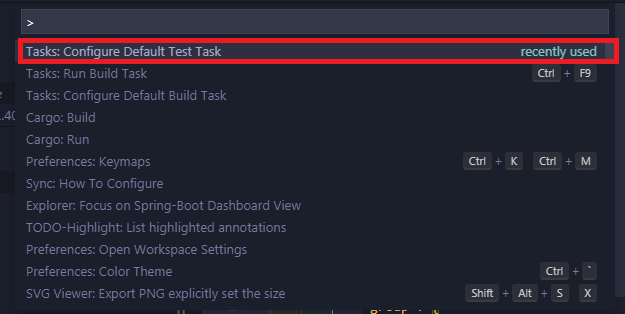
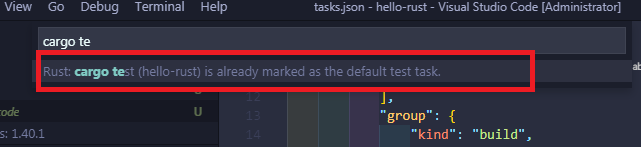
保存后,按快捷鍵:“CTRL+SHIFT+P”,輸入:Task,選擇“Tasks: Configure Default Test Task”,然后選擇:“Rust: cargo test”
~~~
?
~~~
vscode自動生成:
~~~
{
????????????"type":?"cargo",
????????????"subcommand":?"test",
????????????"problemMatcher":?\[
????????????????"$rustc"
????????????\],
????????????"group":?{
????????????????"kind":?"test",
????????????????"isDefault":?true
????????????}
????????}
~~~
保存后,按按快捷鍵:“CTRL+SHIFT+P”,輸入:Task:Run test Task,回車。
vscode自動運行測試用例,并打印結果:
---------------------------------------
> Executing task: cargo test <
?? Compiling hello-rust v0.1.0 (E:\code\rustProject\hello-rust)
??? Finished dev [unoptimized + debuginfo] target(s) in 1.77s
???? Running target\debug\deps\hello_rust-bfa762df5afd173e.exe
running 1 test
test should_fail ... FAILED
failures:
---- should_fail stdout ----
thread 'should_fail' panicked at 'not yet implemented', src\main.rs:14:5
note: run with `RUST_BACKTRACE=1` environment variable to display a backtrace.
failures:
??? should_fail
test result: FAILED. 0 passed; 1 failed; 0 ignored; 0 measured; 0 filtered out
error: test failed, to rerun pass '--bin hello-rust'
The terminal process terminated with exit code: 1
Terminal will be reused by tasks, press any key to close it.
-----------------------------------------------------------
下面繼續配置DEBUG環境。
這里參照這個文章:https://www.forrestthewoods.com/blog/how-to-debug-rust-with-visual-studio-code/
簡單來說,你按如下幾步來配置就可以:
1.安裝:
C/C++ extension.
Native Debug extension
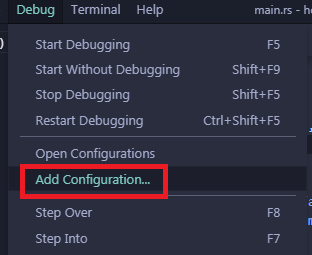
2.在debug面板,新建一個新的配置,如下:
~~~
然后選擇:“C++ (Windows)” environment
會自動生成launch.json代碼,如下 :
{
????//?Use?IntelliSense?to?learn?about?possible?attributes.
????//?Hover?to?view?descriptions?of?existing?attributes.
????//?For?more?information,?visit:?https://go.microsoft.com/fwlink/?linkid=830387
????"version":?"0.2.0",
????"configurations":?\[
????????{
????????????"name":?"(Windows)?Launch",
????????????"type":?"cppvsdbg",
????????????"request":?"launch",
????????????"program":?"${workspaceFolder}/target/debug/hello-rust.exe",
????????????"args":?\[\],
????????????"stopAtEntry":?false,
????????????"cwd":?"${workspaceFolder}",
????????????"environment":?\[\],
????????????"externalConsole":?false
????????}
????\]
}
~~~
其中program的值改為你自己的exe的路徑,比如我的就是:
${workspaceFolder}/target/debug/hello-rust.exe
~~~
~~~
這時,你直接按F5,你就進入debug狀態,你現在可以設置斷點了。
~~~
~~~
如果,你順利走到這一步,恭喜你,你已經基本配置好rust的開發環境。
~~~
- rustlang語言零基礎快速入門(1)開篇
- rustlang語言零基礎快速入門(2)VSCODE配置
- rustlang語言零基礎快速入門(3)所有權Ownership
- rustlang語言零基礎快速入門(4)
- rustlang語言零基礎快速入門(5)
- rustlang語言零基礎快速入門(6)變量綁定
- rustlang語言零基礎快速入門(7)函數Functions與閉包Closure
- rustlang語言零基礎快速入門(8)Operators操作符
- rustlang語言零基礎快速入門(9)Control Flows流程控制
- rustlang語言零基礎快速入門(10)Vectors容器
- rustlang語言零基礎快速入門(11)Structs結構體
- rustlang語言零基礎快速入門(12)Enums枚舉
- rustlang語言零基礎快速入門(13)Generics泛型
- rustlang語言零基礎快速入門(14)Impls & Traits實現與特征
- rustlang語言零基礎快速入門(15)Unit Testing單元測試
- rustlang語言零基礎快速入門(16)代碼組織與模塊化
- rustlang語言零基礎快速入門(17)裝箱crates
- rustlang語言零基礎快速入門(18)use關鍵詞
- rustlang語言零基礎快速入門(19)多線程
- rustlang語言零基礎快速入門(20)錯誤處理
- rustlang語言零基礎快速入門(21)智能指針
- rustlang語言零基礎快速入門(22)宏Macro
- rustlang語言零基礎快速入門(23)實戰1:猜數字游戲
- rustlang語言零基礎快速入門(24)實戰2:命令行工具minigrep(1)
- rustlang語言零基礎快速入門(25)實戰2:命令行工具minigrep(2)
- rustlang語言零基礎快速入門(26)實戰3:Http服務器
- rustlang語言零基礎快速入門(26)實戰3:Http服務器(多線程版本)
- rustlang語言零基礎快速入門(27)實戰4:從零實現BTC區塊鏈
- rustlang語言零基礎快速入門(28)實戰5:實現BTC價格轉換工具
- rustlang語言零基礎快速入門(29)實戰6:BDD工具cucumber_rust