
https://www.cnblogs.com/jpfss/p/9082542.html
文章來源:http://www.cnplugins.com/tool/specify-postman-methods.html
一 簡介 Postman 是一款功能超級強大的用于發送 HTTP 請求的 Chrome插件 。做web頁面開發和測試的人員應該是無人不曉無人不用!其主要特點 特點: 創建 + 測試:創建和發送任何的HTTP請求
# 一 簡介
[Postman](http://www.cnplugins.com/devtool/postman/)是一款功能超級強大的用于發送 HTTP 請求的?[Chrome插件](http://www.cnplugins.com/)?。做web頁面開發和測試的人員應該是無人不曉無人不用!其主要特點特點:
創建 + 測試:創建和發送任何的HTTP請求,請求可以保存到歷史中再次執行
Organize:使用Postman Collections為更有效的測試及集成工作流管理和組織APIs
document:依據你創建的Clollections自動生成API文檔,并將其發布成規范的格式
collarorate:通過同步連接你的team和你的api,以及權限控制,API庫
# 準備
### 1\. 下載安裝postman(具體安裝方法這里不贅述,見[http://www.cnplugins.com/devtool/postman/](http://www.cnplugins.com/devtool/postman/))
### 2\. 設置環境變量
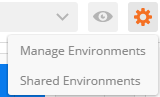
有時需要在不同的環境下跑相同的測試,此時可以通過設置環境變量來動態選擇。點擊右上角的設置按鈕:
[](http://www.cnplugins.com/cdn/allimg/170316/2231495O9-0.png)
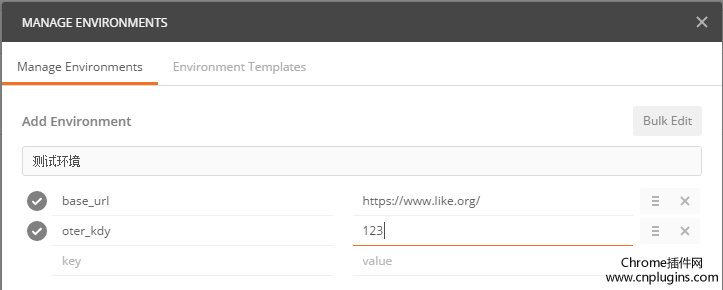
填寫該環境的名稱:如測試環境,并在key和value中填寫需要的鍵值
[](http://www.cnplugins.com/cdn/allimg/170316/2231493N1-1.png)
使用這些鍵值的時候只需要加上兩個花括號引用key
1 {{url\_base}}/username
解析完后
> 建立多個環境時,key通常都是相同的,只是value不同
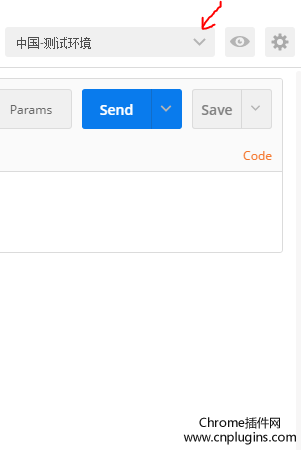
創建好所有環境后,在跑用例的時候在右上角下拉列表選擇需要的環境就好
?[](http://www.cnplugins.com/cdn/allimg/170316/2231496460-2.PNG)
# 二 請求
* [postman](http://www.cnplugins.com/devtool/postman/)界面分為兩部分:左邊的sidebar 右邊的request builder:快速創建幾乎所有的請求

001
* HTTP請求的4部分:URL,請求的method,headers,body。

* ### URL
首先需要設置的就是URL

注意:如果在輸入參數時,沒有自動decode到URL中,則可以選中參數右鍵后,選擇EncodeURIComponent(一般都會自動填充的):

同樣也可以decode,將參數生成dictionary的形式(一般都會自動填充的):

有的URL中有path變量,postman可以自動提取該path變量為一個key

點擊headers toggle:

輸入key-value時,會有自動提示的下拉面板:

有些headers和cookies是保密的,如:
~~~
1.Accept-Charset
2.Accept-Encoding
3.Access-Control-Request-Headers
4.Access-Control-Request-Method
5.Connection
6.Content-Length
7.Cookie
8.Cookie 2
9.Content-Transfer-Encoding
10.Date
11.Expect
12.Host
13.Keep-Alive
14.Origin
15.Referer
16.TE
17.Trailer
18.Transfer-Encoding
19.Upgrade
20.User-Agent
21.Via
~~~
postman 0.9.6版本后,這些限制可以解除:
點擊右上角的Interceptor 安裝這個:

* ### cookies
分開打包的應用程序運行在沙箱瀏覽器,它不能訪問cookie設置瀏覽器內。這種限制也可以使用攔截器擴展。
* ### Method

* ### Request body

* ##### 不同的body editor 分為4個區域,根據body類型有不同的控制。

* ##### mutipart/form-data是網頁表單用來傳輸數據的默認格式。可以模擬填寫表單,并且提交表單。
可以上傳一個文件作為key的value提交(如上傳文件)。但該文件不會作為歷史保存,只能在每次需要發送請求的時候,重新添加文件。

* ### 2 urlencoded
同前面一樣,注意,你不能上傳文件通過這個編碼模式。
該模式和表單模式會容易混淆。urlencoded中的key-value會寫入URL,form-data模式的key-value不明顯寫入URL,而是直接提交。
* ### 3 raw
raw request可以包含任何東西。所有填寫的text都會隨著請求發送。

* ### 4 binary
image, audio or video files.text files 。 也不能保存歷史,每次選擇文件,提交。
# 三 響應
保證API響應的正確性,就是你需要做的大部分工作。postman的response viewer部分會協助你完成該工作且使其變得簡單。
一個API的響應包含body,headers,響應狀態碼。postman將body和headers放在不同的tabs中。響應碼和響應時間顯示在tabs的旁邊。將鼠標懸停在響應碼上面可以查看更詳細的信息。
### 1 保存responses

### 2 查看responses
三種視圖查看body:

* #### Pretty
格式化了JSON和XML,方便查看。 點擊里面的URL,postman會創建一個request:

點擊左邊的三角可以折疊展開:

postman自動格式化body必須保證返回了正確的Content-Type.如果API沒有返回,則可以點擊”Force JSON“來設置。

* #### Raw
是text。
* #### preview
有的瀏覽器會返回HTML的錯誤,對于找問題比較方便。由于sandbox的限制,js和圖片不會顯示在這里的iframe中。你可以maximize該body窗口方便查看結果。
Headers key-value形式展示。鼠標懸停在headers標簽上,有詳細的HTTP說明。
* #### cookies
可以顯示browser cookies,需要開啟Interceptor。
* #### 身份驗證Authentication
postman有一個helpers可以幫助我們簡化一些重復和復雜的任務。當前的一套helpers可以幫助你解決一些authentication protocols的問題。

* #### Basic Auth
填寫用戶名和密碼,點擊Refresh headers
* #### Digest Auth
要比Basic Auth復雜的多。使用當前填寫的值生成authorization header。所以在生成header之前要確保設置的正確性。如果當前的header已經存在,postman會移除之前的header。
* #### OAuth 1.0a
postman的OAuth helper讓你簽署支持OAuth 1.0基于身份驗證的請求。OAuth不用獲取access token,你需要去API提供者獲取的。OAuth 1.0可以在header或者查詢參數中設置value。
* #### OAuth 2.0
postman支持獲得OAuth 2.0 token并添加到requests中。
# 四 Writting Test
Postman的Tests標簽可以用來寫測試:

本質上是javascript code,可以為tests object設置values。這里使用描述性文字作為key,檢驗body中的各種情況,當然你可以創建任意多的key,這取決于你需要測試多少點。 tests也會隨著request保存到collection中。api測試保證前端后臺都能正常的于api協作工作,而不用在出錯時猜測是哪里的問題。 需要在request的test中創建了test后,再進行request,test的結果在body的test中查看。 注意: 1.這里的key描述必須是唯一的,否則相同描述只會執行第一個。 2.這里的key可以使用中文。 例子: tests\[“Body contains user\_id”\] = responseBody.has(“user\_id”)
這里描述性的key為:Body contains user\_id。檢測點為:responseBody.has(“user\_id”),意思是檢測返回的body中是否包含”user\_id”這個字段。
查看responses中的Tests結果:記過顯示每個key,也就是我們測試點的具體結果,是否通過。

* #### Testing Sandbox
postman的測試是運行在沙箱環境,是與app獨立的。查看什么在沙箱中是可用的,參見Sandbox documentation.
* #### Snippets
用于快速添加常用的測試代碼。可以自定義snippets。

* #### Viewing results
postman每次執行request的時候,會執行tests。測試結果會在tests的tab上面顯示一個通過的數量。
* #### Testing Sandbox
* #### Testing examples
測試代碼會在發送request并且接收到responses后執行。
* 1.設置環境變量 postman.setEnvironmentVariable("key", "value");
* 2.設置全局變量 postman.setGlobalVariable("key", "value");
* 3.檢查response body中是否包含某個string tests\["Body matches string"\] =responseBody.has
("string\_you\_want\_to\_search");
* 4.檢測JSON中的某個值是否等于預期的值
var data = JSON.parse(responseBody);tests\["Your test name"\] = data.value === 100;
JSON.parse()方法,把json字符串轉化為對象。parse()會進行json格式的檢查是一個安全的函數。 如:檢查json中某個數組元素的個數(這里檢測programs的長度)
var data = JSON.parse(responseBody);tests\["program's lenght"\] = data.programs.length === 5;
* 5.轉換XML body為JSON對象 var jsonObject = xml2Json(responseBody);
* 6.檢查response body是否與某個string相等 tests\["Body is correct"\] = responseBody === "response\_body\_string";
* 7.測試response Headers中的某個元素是否存在(如:Content-Type)
tests\["Content-Type is present"\] = postman.getResponseHeader("Content-Type"); //getResponseHeader()方法會返回header的值,如果該值存在
或者:
tests\["Content-Type is present"\] = responseHeaders.hasOwnProperty("Content-Type");
上面的方法,不區分大小寫。下面的方法,要區分大小寫。

* 8.驗證Status code的值 tests\["Status code is 200"\] = responseCode.code === 200;
* 9.驗證Response time是否小于某個值 tests\["Response time is less than 200ms"\] = responseTime < 200;
* 10.name是否包含某個值 tests\["Status code name has string"\] = responseCode.name.has("Created");
* 11.POST 請求的狀態響應碼是否是某個值 tests\["Successful POST request"\] = responseCode.code === 201 || responseCode.code === 202;
* 12.很小的JSON數據驗證器
var schema = { "items": { "type": "boolean" }};var data1 = \[true, false\];var data2 = \[true, 123\];console.log(tv4.error);tests\["Valid Data1"\] = tv4.validate(data1, schema);tests\["Valid Data2"\] = tv4.validate(data2, schema);
結果:

# 五 運行Collections
postman允許你運行collection,你可以運行任意的次數。 最后會給出一個整體運行的結果。會保存每一次運行的結果,提供給你比較每一次運行解雇的不同。
選擇collection,選擇環境。點擊運行按鈕。

在需要csv和json文件的地方記得添加。
運行collection測試會在另一個窗口運行。如果需要在main窗口修改東西,在新窗口能正常讀取。
- 空白目錄1
- RBAC
- RBAC權限模型[完整]
- 你知道權限管理的RBAC模型嗎?
- rbac 一個用戶對應多個賬號_如何設計一個強大的權限系統
- Postman 快速使用(設置環境變量)
- postman的使用方法詳解!最全面的教程
- Postman常用的幾個功能
- ThinkPHP項目總結
- thinkphp5 遞歸查詢所有子代,查詢上級,并且獲取層級
- PHP原生項目之留言板
- 智慧校園
- PHP如何實現訂單的延時處理詳解
- VUE
- const {data:res} = await login(this.loginForm)
- Vue中的async和await的使用
- PHP實現消息推送(定時輪詢)
- tp5 計算兩個日期之間相差的天數
- 使用jquery的ajax方法獲取下拉列表值
- jQuery實現select下拉框選中數據觸發事件
- SetFocus 方法
- 快來了解下TP6中的超級函數app()!
- PHP socket 服務器框架 workerman
- 程序員如何才能成為獨立開發者?
- PHP 錯誤處理
- php面向對象類中的$this,static,final,const,self及雙冒號 :: 這幾個關鍵字使用方法。
- 小白教你玩轉php的閉包
- 關于TP6項目搭建的坑(多應用模式)
- ThinkPHP6.0 與5.0的差別及坑點
- axios在vue項目中的使用實例詳解
- php中的類、對象、方法是指什么
- 聊一聊PHP的依賴注入(DI) 和 控制反轉(IoC)
- 深入理解控制反轉(IoC)和依賴注入(DI)
- Private,Public,Protected
- ThinkPHP5(目錄,路徑,模式設置,命名空間)
- 在 ThinkPHP6 中使用 Workerman
- 介紹thinkphp lock鎖的使用和例子
- php中_initialize()函數與 __construct()函數的區別說明
- api接口數據-驗證-整理
- api接口數據-驗證-整理【續】
- TP6容易踩得坑【原創】
- TP6的日志怎么能記錄詳細的日志?
- 是否需要模型分層
- PHP面試題 全網最硬核面試題來了 2021年學習面試跳槽必備(一)
- MySQL單表數據量過千萬,采坑優化記錄,完美解決方案
- MySql表分區(根據時間timestamp)
- MySQL大表優化方案
- 閑言碎語
- 數據庫外鍵的使用
- 深入理解thinkphp、laravel等框架中容器概念
- vue做前端,thinkphp6做后臺,項目部署
- 簡單MVC架構的PHP留言本
- TP5里面extend和vendor的區別
- 在mysql數據庫中制作千萬級測試表
- MySQL千萬級的大表要怎么優化
- ThinkPHP關聯模型操作實例分析
- lcobucci/jwt —— 一個輕松生成jwt token的插件
- RESTful API 設計指南
- MySQL如何為表字段添加索引
- ThinkPHP6.0快速開發手冊(案例版)
- tp5 靜態方法和普通方法的區別
- 數據字典功能
- mysql中的數據庫ID主鍵的設置問題
- 基于角色的權限控制(django內置auth體系)
- RBAC系統經典五張表
- 什么是接口文檔,如何寫接口,有什么規范?
- thinkphp5.0自定義驗證器