### **1. 簡單版**
> 參數:expires
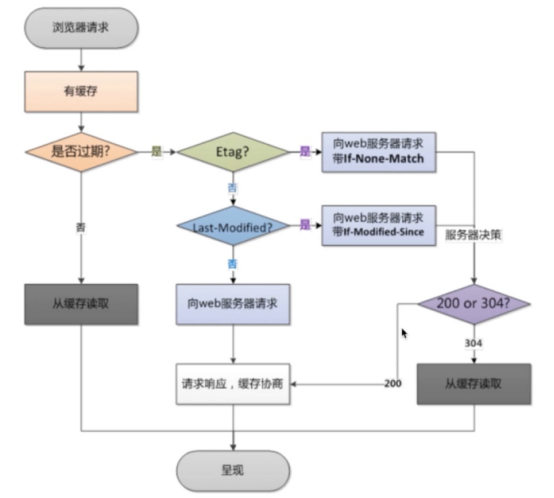
瀏覽器請求流程:
使用示例:
```
location ~ .*\.(htm|html)$ {
expires 1h; #緩存時間
root 路徑; #可無
}
```
### **2. 復雜版**
①基本配置
```
proxy_cache_path /data/nginx/cache_item levels=1:1:2 keys_zone=cache_item:10m max_size=10g inactive=60m;
server {
location ~ \.(gif|jpg|jpeg|png|bmp|ico)$ {
proxy_set_header Host $host;
proxy_set_header X-Forwarded-For $remote_addr;
proxy_pass http://127.0.0.1:8080;
proxy_cache cache_item;
???? ???proxy_cache_key $host$uri$is_args$args;#以全路徑md5值做做為Key
proxy_cache_valid 200 304 12h; #對不同的HTTP狀態碼設置不同的緩存時間
expires 7d; #總體緩存時間
}
}
```
參數說明:
| 父元素 | 名稱 | 描述 |
| --- | --- | --- |
| http | proxy_cache_path | 指定緩存區的根路徑 |
| | levels| 緩存目錄級最高三層,每層1-2個字符表示。如1:1:2三層。 |
| | keys_zone | 緩存塊名稱及內存塊大小。如cache_item:500m表示聲明一個名為cache_item大小為500m。超出大小 后最早的數據將被清除。 |
| | max_size| 緩存區硬盤的 最大值。超出閑置數據將被清除 |
| | inactive | 最長閑置時間 如10d 如果一個 數據被閑置10天則將被清除 |
| location | proxy_cache| 指定緩存區,對應keys_zone中設定的值 |
| | proxy_cache_key| 通過參數拼裝參數key如:`$host$uri$is_args$args`則會以全部領md5值做為key |
| | proxy_cache_valid | 對不同的狀態碼設置緩存有效期 |
②緩存的清除
該功能 可以采用第三方模塊ngx_cache_purge實現:
為nginx添加ngx_cache_purge模塊
```
#下載ngx_cache_purge 模塊包 ,nginx 版本為1.6.2 purge 對應2.0版
wget http://labs.frickle.com/files/ngx_cache_purge-2.0.tar.gz
#查看已安裝模塊
./sbin/nginx -V
#進入nginx安裝包目錄 重新安裝 --add-module為模塊解壓的全路徑
./configure --prefix=/root/svr/nginx --with-http_stub_status_module --with-http_ssl_module --
add-module=/root/svr/nginx/models/ngx_cache_purge-2.0
#重新編譯
make
#拷貝 安裝目錄/objs/nginx 文件用于替換原nginx 文件
#檢測查看安裝是否成功
nginx -t
```
清除配置
```
location ~ /purge(/.*) {
#允許訪問的IP
allow 127.0.0.1;
allow 192.168.0.193;
#禁?訪問的IP
deny all;
#配置清除指定緩存區和路徑(與proxy_cache_key??)
proxy_cache_purge cache_item $host$1$is_args$args;
}
```
測試:
1、首次訪問:
http://localhost8080/demo/images/logo.jpg
2、緩存清理
http://localhost8080/purge/demo/images/logo.jpg