
## Golang 支持在一個平臺下生成另一個平臺可執行程序的交叉編譯功能。
Mac下編譯Linux, Windows平臺的64位可執行程序:
```
CGO\_ENABLED=0 GOOS=linux GOARCH=amd64 go build test.go
CGO\_ENABLED=0 GOOS=windows GOARCH=amd64 go build test.go
```
Linux下編譯Mac, Windows平臺的64位可執行程序:
```
CGO\_ENABLED=0 GOOS=darwin GOARCH=amd64 go build test.go
CGO\_ENABLED=0 GOOS=windows GOARCH=amd64 go build test.go
```
Windows下編譯Mac, Linux平臺的64位可執行程序:
```
SET CGO\_ENABLED=0
SET GOOS=darwin3
SET GOARCH=amd64
```
go build test.go
SET CGO\_ENABLED=0
SET GOOS=linux
SET GOARCH=amd64
go build test.go
GOOS:目標可執行程序運行操作系統,支持 darwin,freebsd,linux,windows
GOARCH:目標可執行程序操作系統構架,包括 386,amd64,arm
## 使用bee工具打包
`bee pack`
會順便把靜態文件也打包起來,生成一個***.tar.gz文件,將這個文件復制到你的服務器上,再解壓到wwwroot/go/blog/目錄下,再啟動
```
nohup ./blog &
```
看一下啟動的服務內容
`tail nohup.out`
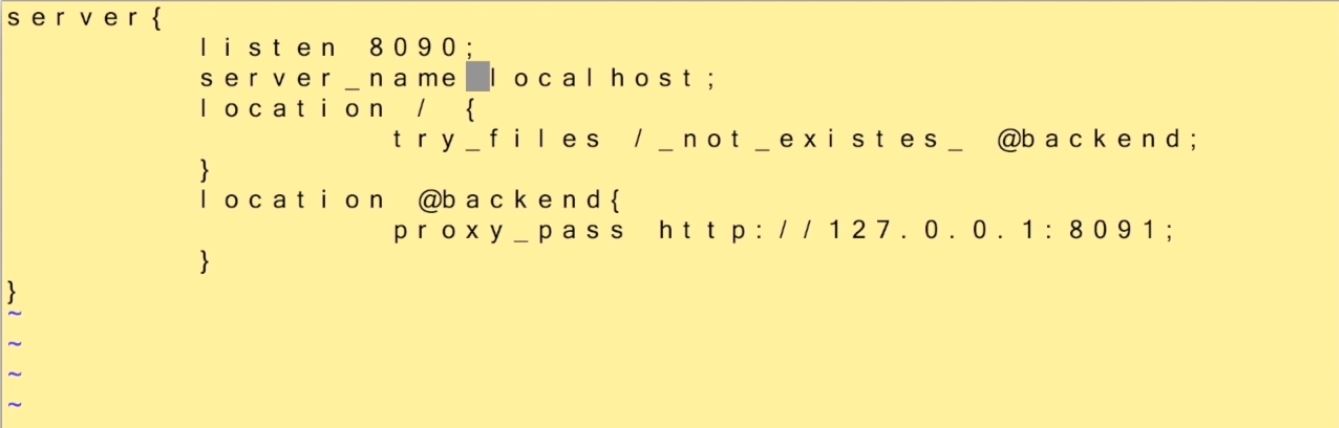
## nginx反向代理
監聽8090端口,你可以部署為監聽80端口
服務器名為localhost,你可以部署為你的域名
然后將你的127.0.0.1:8091反向代理到你的網站上。
將以下test.conf放入nginx/server/下,重啟nginx就可以了
```
server{
listen 80;
server_name test.com;
location /{
try _files / _not_existes_ @backend;
}
location @backend{
proxy_pass http://127.0.0.1:8080;
}
}
```
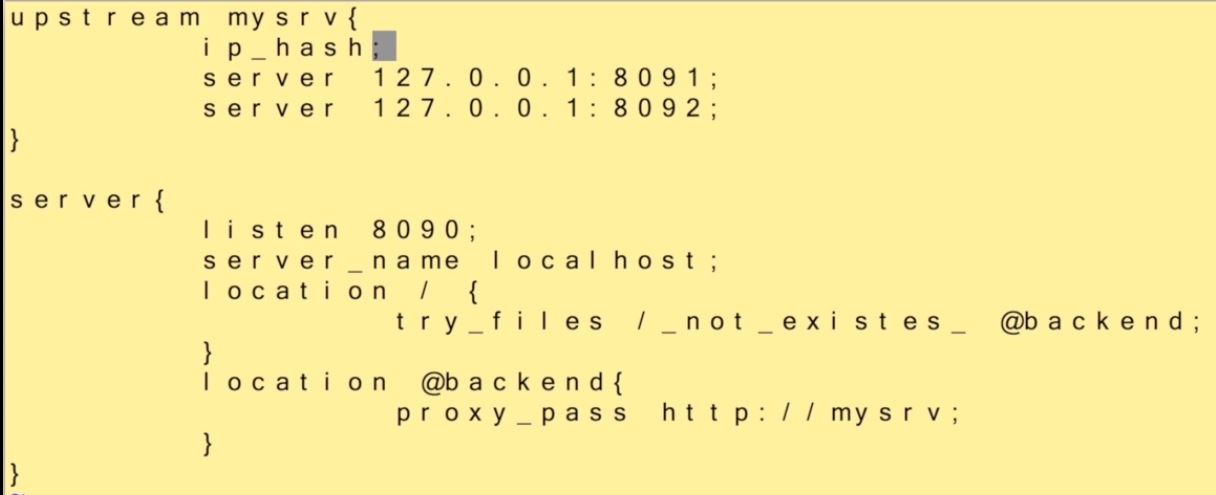
### ngin雙機部署

問題來了,雙機部署后,session永遠沒法存在一個機器上,所以要在upstream中加入ip_hash, 如圖:
- go環境搭建
- 解決go get網絡慢的問題
- beego的安裝
- bee的安裝
- 編輯器
- go module
- 配置文件詳解
- 配置文件其他說明
- 路由方法
- 路由
- 數據校驗
- 校驗函數
- 頁面跳轉
- 獲取前端數據
- json文件的獲取
- xsrf的用法
- xsrf的防護
- srfs和json的搭配
- flash的用法
- 過濾器
- url反轉
- 各類數據的處理
- 模板函數
- 內置模板函數
- 自定義模板函數
- 模板
- 模板處理
- 模板渲染
- 視圖文件的處理
- 靜態文件
- 請求方式判斷
- 驗證碼
- 另一種方法
- 分頁類
- session
- 登錄判斷
- orm模塊
- 使用方法
- mysql的安裝
- 安裝orm及驅動
- 建立模型
- 自定義模型
- 增刪改查
- 高級查詢
- 常見問題匯總
- 代碼收藏
- 打包部署
- go build打包
- utils收藏
- 新goer容易犯的錯
- 字符串操作