[TOC]
*****
# 1. ngnix安裝
## 1.1 centos 一鍵安裝nginx環境
```shell
$ yum install nginx
根據提示 進行確認 下一步 即可安裝完畢;
服務器默認根目錄為: /usr/share/nginx/html.
nginx 配置目錄為:/etc/nginx/nginx.conf.
nginx操作命令:
啟動 service nginx start
停止 service nginx stop
重啟 service nginx restart
```
## 1.2 Linux手動安裝ngnix
```
1. 安裝ngnix的編譯環境. 參考ngnix安裝手冊.doc
2. 把ngnix的代碼上傳到linux.
3. 解壓代碼 tar -zxvf ngnix-1.8.0.tar.gz
4. 注意:上邊將臨時文件目錄指定為/var/temp/nginx,需要在/var下創建temp及nginx目錄
5. 配置makefile
參考安裝手冊 configure 參數設置, 復制執行一遍就會出現makefile
6. 編譯 執行 make 命令
7. 安裝 執行 make install ,成功后安裝的目錄為configure參數設置的--prefix=/usr/local/nginx 下面.
8. 查看 cd /usr/local/nginx/sbin 下 是否有可執行文件 ngnix
或者
安裝nginx
[root@localhost]tar zxvf nginx-1.8.0.tar.gz
[root@localhost] cd nginx-1.8.0
[root@localhost] ./configure && make && make install
```
## 1.3 docker 安裝 ngnix
```
Dockerfile 文件:
FROM nginx:1.15-alpine
COPY cms-page.conf /etc/nginx/conf.d/default.conf
WORKDIR /app
COPY ./dist /app
```
```
cms-page.conf 文件:
server {
listen 8080;
location ^~/apis {
rewrite ^~/apis/(.*)$ /$1 break;
proxy_pass https://www.xiangchuxing.cn:8089;
}
location / {
root /app;
try_files $uri $uri/ /index.html;
index index.html;
}
location ~ (.*\.json) {
root /app;
error_page 405 =200 $1;
}
error_page 500 502 503 504 /50x.html;
location = /50x.html {
root html;
}
}
```
```
docker-compose.yml 文件:
version: '3'
services:
cms-nginx:
image: "nginx:1.15-alpine"
container_name: cms-nginx
networks:
- nginx_nw
ports:
- "8080:8080"
cms-page:
build: registry.git.brightcns.cn/official-website/cms-page:master-5720
container_name: cms-page
depends_on:
- cms-nginx
networks:
nginx_nw:
driver: bridge
```
# 2. ngnix應用場景
```
1. http服務器.Nginx是一個http服務可以獨立提供http服務.可以做網頁靜態服務器
2. 虛擬主機。可以實現在一臺服務器虛擬出多個網站.例如個人網站使用的虛擬主機.
3. 反向代理,負載均衡
```
## 2.1 nginx代理瀏覽
## 2.2 ngnix實現虛擬主機配置
```
可以實現在同一臺服務器上實現多個網站,而且網站間互相不干擾.
同一個服務器可能有一個ip,網站需要80端口.網站的域名不同.
區分不同網站有3種方式:
1). ip區分
2). 端口區分
3). 域名區分
```
### 2.2.1 基于ip的虛擬主機配置
```
1. nginx的配置文件
#user nobody;
worker_processes 1;
#error_log logs/error.log;
#error_log logs/error.log notice;
#error_log logs/error.log info;
#pid logs/nginx.pid;
events {
worker_connections 1024;
}
http {
include mime.types;
default_type application/octet-stream;
#log_format main '$remote_addr - $remote_user [$time_local] "$request" '
# '$status $body_bytes_sent "$http_referer" '
# '"$http_user_agent" "$http_x_forwarded_for"';
#access_log logs/access.log main;
sendfile on;
#tcp_nopush on;
#keepalive_timeout 0;
keepalive_timeout 65;
#gzip on;
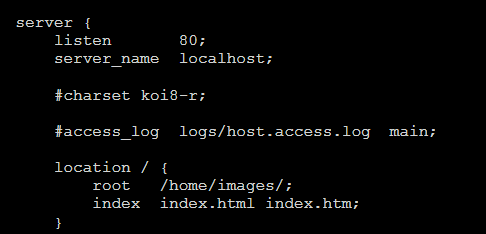
server { #一個Server就是一個虛擬主機
listen 80;
server_name localhost;
#charset koi8-r;
#access_log logs/host.access.log main;
location / {
root html;
index index.html index.htm;
}
}
}
```
```
2. 基于ip的虛擬主機配置 , 一個server就是一個虛擬主機,在配置文件添加server
server {
listen 80;
server_name 192.168.25.141;
#charset koi8-r;
#access_log logs/host.access.log main;
location / {
root html-141;
index index.html index.htm;
}
}
server {
listen 80;
server_name 192.168.25.100;
#charset koi8-r;
#access_log logs/host.access.log main;
location / {
root html-100;
index index.html index.htm;
}
}
```
```
3. nginx重新加載配置文件 ./ngnix -s reload
```
### 2.2.2 基于端口的虛擬主機配置
```
注: 首先關閉防火墻,原因若81,82 端口不開放會訪問不到.
server {
listen 81;
server_name 192.168.25.141;
#charset koi8-r;
#access_log logs/host.access.log main;
location / {
root html-81;
index index.html index.htm;
}
}
server {
listen 82;
server_name 192.168.25.141;
#charset koi8-r;
#access_log logs/host.access.log main;
location / {
root html-82;
index index.html index.htm;
}
}
```
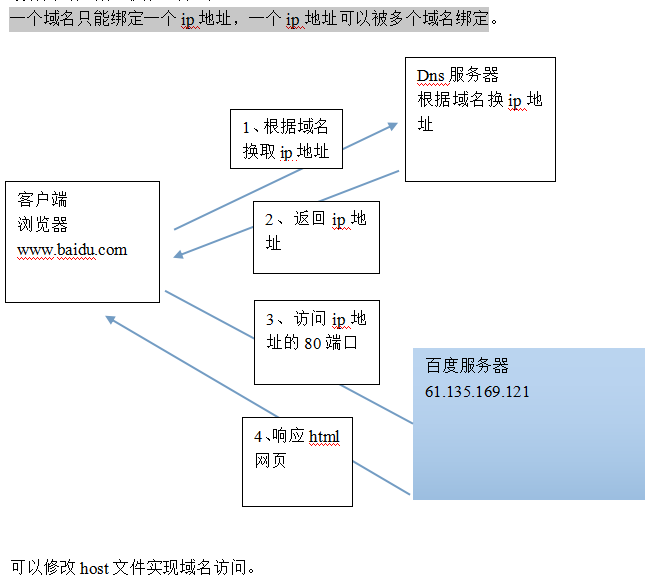
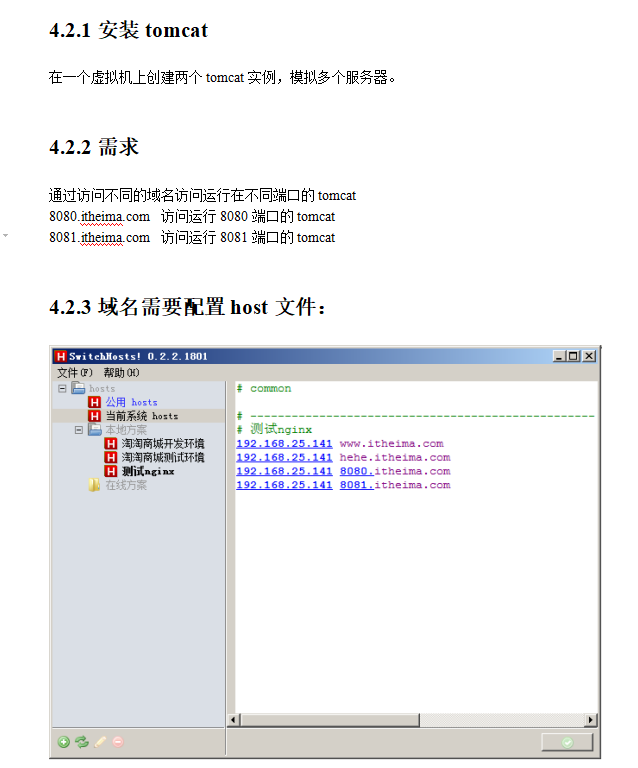
### 2.2.3 基于域名的虛擬主機
```
注: 都用80端口,即ip相同,端口相同,區分域名(最常用).
一個域名只能綁定一個ip地址,一個ip地址可以被多個域名綁定.
```
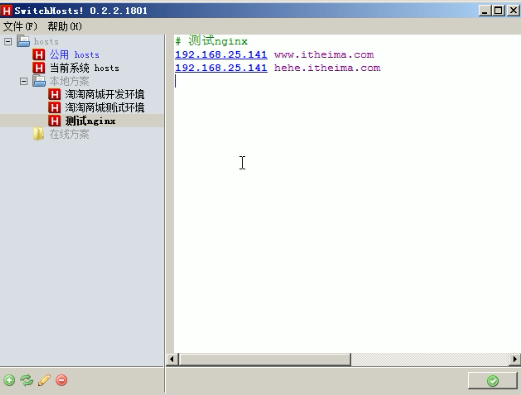
```
修改window的hosts文件:(C:\\Windows\\System32\\drivers\\etc)
```
```
添加基于域名虛擬主機的配置:
server {
listen 80;
server_name www.itheima.com;
#charset koi8-r;
#access_log logs/host.access.log main;
location / {
root html-www;
index index.html index.htm;
}
}
server {
listen 80;
server_name hehe.itheima.com;
#charset koi8-r;
#access_log logs/host.access.log main;
location / {
root html-hehe;
index index.html index.htm;
}
}
```
## 2.3 ngnix反向代理
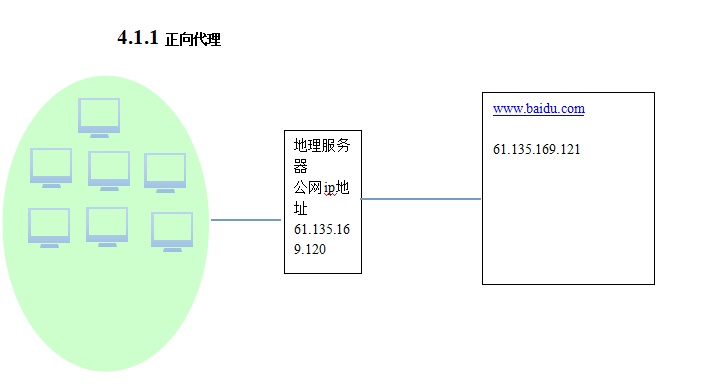
### 2.3.1 正向代理與反向代理對比
### 2.3.2 nginx實現反向代理
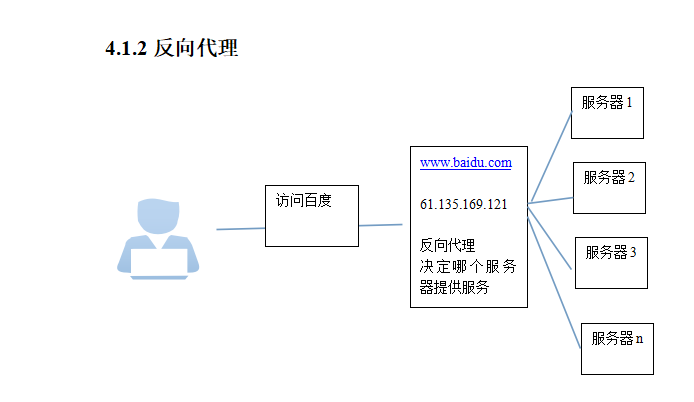
```
nginx只做請求的轉發,后臺有多個http服務器提供服務,
nginx的功能就是把請求轉發給后面的服務器,決定把請求轉發給誰.
```
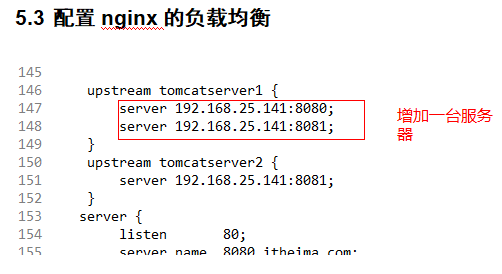
```
nginx的反向代理配置:
upstream tomcatserver1 {
server 192.168.25.141:8080;
}
upstream tomcatserver2 {
server 192.168.25.141:8081;
}
server {
listen 80;
server_name 8080.itheima.com;
#charset koi8-r;
#access_log logs/host.access.log main;
location / {
proxy_pass http://tomcatserver1;
index index.html index.htm;
}
}
server {
listen 80;
server_name 8081.itheima.com;
#charset koi8-r;
#access_log logs/host.access.log main;
location / {
proxy_pass http://tomcatserver2;
index index.html index.htm;
}
}
如果在同一個域名下有多臺服務器提供服務,此時需要nginx負載均衡.
```
# 3. nginx負載均衡
## 3.1 負載均衡原理
```
1. 負載均衡 建立在現有網絡結構之上,它提供了一種廉價有效透明的方法擴展網絡設備
和服務器的帶寬、增加吞吐量、加強網絡數據處理能力、提高網絡的靈活性和可用性.
2. 負載均衡,英文名稱為Load Balance,其意思就是分攤到多個操作單元上進行執行,
例如Web服務器、FTP服務器、企業關鍵應用服務器和其它關鍵任務服務器等,從而共同完成工作任務.
```
## 3.2 負載均衡需求
```
nginx作為負載均衡服務器,用戶請求先到達nginx,再由nginx根據負載配置將請求轉發至 tomcat服務器。
nginx負載均衡服務器:192.168.25.141
tomcat1服務器:192.168.25.141:8080
tomcat2服務器:192.168.25.141:8081
```
## 3.3 負載均衡配置
```
官網文檔: http://nginx.org/en/docs/beginners\_guide.html
```
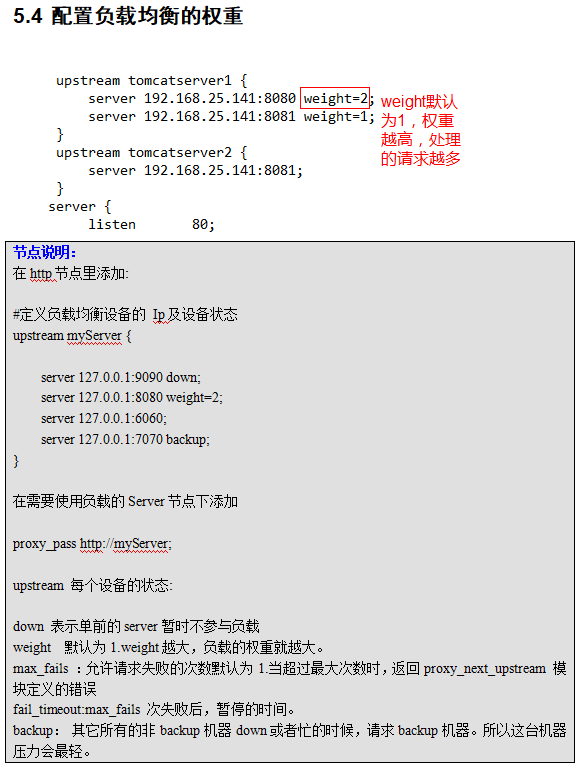
```
upstream a.com {
server 192.168.5.126:80 weight=1; #權重為1
server 192.168.5.27:80 weight=2; #權重為2
}
server{
listen 80;
server_name a.com;
location / {
proxy_pass http://a.com;
proxy_set_header Host $host;
proxy_set_header X-Real-IP $remote_addr;
proxy_set_header X-Forwarded-For $proxy_add_x_forwarded_for;
}
}
```
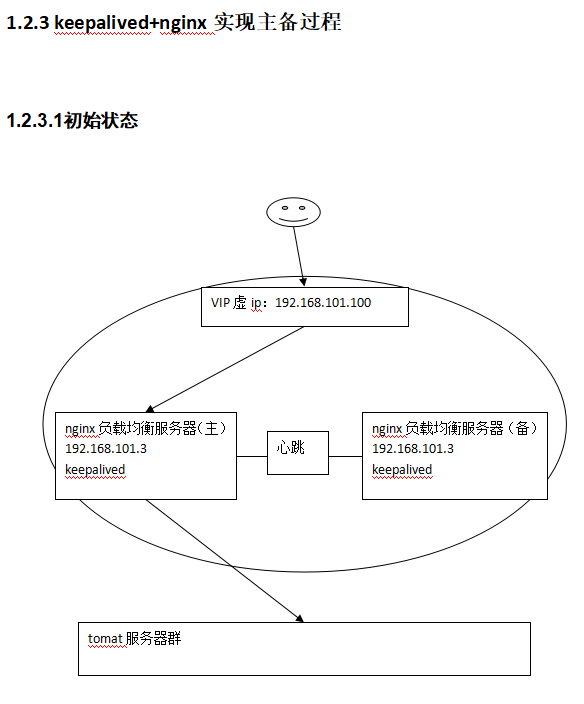
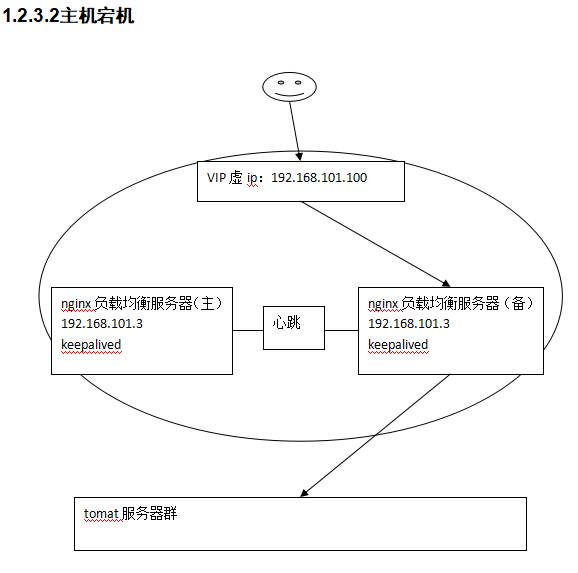
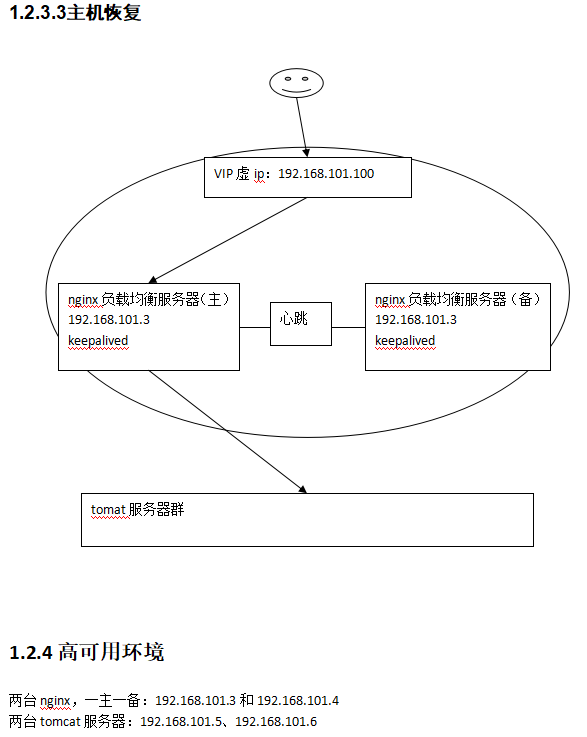
# 4. ngnix高可用
```
解決高可用的方案就是添加冗余。(添加備份機)
通過 keepalived 對主備nginx實時心跳檢測 (keepalived+nginx)
```
## 4.1 keepalived安裝
```
1. 安裝環境
*****
su - root
yum -y install kernel-devel*
yum -y install openssl-*
yum -y install popt-devel
yum -y install lrzsz
yum -y install openssh-clients
yum -y install libnl libnl-devel popt
```
```
2. 安裝keepalived
*****
將keepalived-1.2.15.tar.gz上傳到服務器/usr/local/下。
cd /usr/local
tar -zxvf keepalived-1.2.15.tar.gz
cd keepalived-1.2.15
執行配置命令
./configure --prefix=/usr/local/keepalived
3、編譯
make
4、安裝
make install
至此安裝成功
5、拷貝執行文件
cp /usr/local/keepalived/sbin/keepalived /usr/sbin/
6、將init.d文件拷貝到etc下,加入開機啟動項
cp /usr/local/keepalived/etc/rc.d/init.d/keepalived /etc/init.d/keepalived
7、將keepalived文件拷貝到etc下,加入網卡配置
cp /usr/local/keepalived/etc/sysconfig/keepalived /etc/sysconfig/
8、創建keepalived文件夾
mkdir -p /etc/keepalived
9、將keepalived配置文件拷貝到etc下
cp /usr/local/keepalived/etc/keepalived/keepalived.conf /etc/keepalived/keepalived.conf
10、添加可執行權限
chmod +x /etc/init.d/keepalived
```
```
3. 加入開機啟動
*****
chkconfig --add keepalived #添加時必須保證/etc/init.d/keepalived存在
chkconfig keepalived on
添加完可查詢系統服務是否存在:chkconfig --list
```
```
4. 啟動keepalived
*****
啟動:service keepalived start
停止:service keepalived stop
重啟:service keepalived restart
```
```
5. 配置日志文件
*****
1.將keepalived日志輸出到local0:
vi /etc/sysconfig/keepalived
KEEPALIVED_OPTIONS="-D -d -S 0"
2.在/etc/rsyslog.conf里添加:
local0.* /var/log/keepalived.log
3.重新啟動keepalived和rsyslog服務:
service rsyslog restart
service keepalived restart
```
```
6. 打開防火墻的通訊地址
*****
iptables -A INPUT -d 224.0.0.18 -j ACCEPT
/etc/rc.d/init.d/iptables save
```
## 4.2 ngnix負載均衡高可用
[參考文檔](http://note.youdao.com/noteshare?id=c12e0e5c1bbd102317dc2370ef3f90b0)
