[TOC]
## **Selenium是一款基于Web頁面的UI自動化測試框架**
1、支持多瀏覽器操作:Chrome、IE、Firefox、Safaria等
2、支持夸平臺,Windows、Linux、Mac等
3、支持多語言,Python、Java、Ruby、C#等
## **1、Selenium webdriver 原理:**
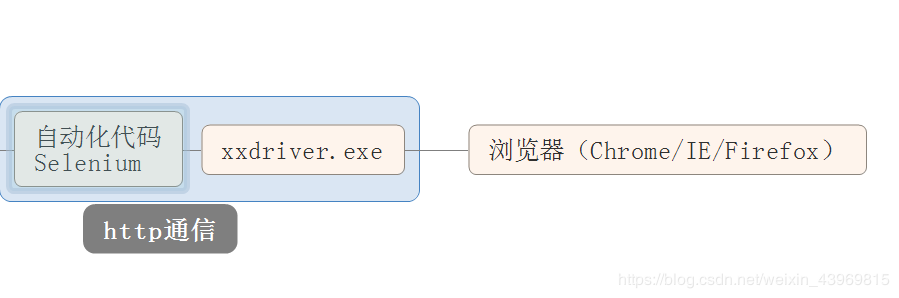
Webdriver是按照Client/Server模式設計的
Client:編程語言客戶端
Server:瀏覽器驅動程序。用來接收客戶端的請求并驅動瀏覽器執行操作然后返回結果
Selenium代碼與瀏覽器驅動程序之間是通過http協議進行數據交互的。這種方式,不在乎客戶端是什么樣的形式,只要數據的格式和協議是服務端能夠解析的就可以了。
通信步驟為:
1、webdriver啟動瀏覽器驅動程序,并設置偵聽端口號
2、webdriver客戶端與瀏覽器服務端建立連接
3、連接成功后,所有的操作(比如:查找元素、點擊等)都是客戶端通過
commandExecuter發送http請求到服務端;服務端根據收到的請求做相應的操作并返回
<br>
<br>
以上簡單的介紹,那么下面我們一起來搭建環境,記得當初我自己自學selenium的時候,說來也是奇葩烏龍事件很多
一個selenium環境搭建了3天,還吧電腦搞得系統重裝,哈哈哈哈哈,正題進入
:-: 1:python3的環境要下載好,python3大家去自行下載(版本:3.6-3.8即可)
:-: 2:chrome瀏覽器
:-: 3:selenium
:-: 4: ChromeDriver版本
**注意: ChromeDriver的版本和chrome的版本要對應,如下是對應表,必須對應,以免后期出現環境問題(本人已mac為準)**
**[第一步]():**
chrome老版本下載地址:https://www.slimjet.com/chrome/google-chrome-old-version.php
<br>
**[第二步:]()**
chromedriver:地址如下
鏡像1:[http://npm.taobao.org/mirrors/chromedriver/](http://npm.taobao.org/mirrors/chromedriver/)
鏡像2:[http://chromedriver.storage.googleapis.com/index.html](http://chromedriver.storage.googleapis.com/index.html)

chrome和chromedriver的版本按照搭建所用的系統以及系統(64位)(32位)下載即可
<br>
**[第三步:]()**
下載------>:selenium
使用windows的伙伴如果python3的環境已經下載好了,那么可以使用pip來下載
```
pip install selenium # 默認下載最高版本
pip install selenium==2.4.1 # 指定版本
```
下載后驗證是否下載成功打開cmd,輸入python回車
~~~bash
from selenium import webdriver
~~~
沒有報錯就成功了
**有的時候pip下載selenium特別慢怎么辦或者安裝總是提示連接超時失敗。可以通過國內源進行安裝,別急讓子彈飛一會兒,解決方法:給它加加速**
阿里云?[https://mirrors.aliyun.com/pypi/simple/](http://mirrors.aliyun.com/pypi/simple/)
中國科技大學?[https://pypi.mirrors.ustc.edu.cn/simple/](https://pypi.mirrors.ustc.edu.cn/simple/%20)
豆瓣(douban)?[http://pypi.douban.com/simple/](http://pypi.douban.com/simple/)
清華大學?[https://pypi.tuna.tsinghua.edu.cn/simple/](https://pypi.tuna.tsinghua.edu.cn/simple/)
中國科學技術大學?[http://pypi.mirrors.ustc.edu.cn/simple/](http://pypi.mirrors.ustc.edu.cn/simple/)
```
pip install -i https://mirrors.aliyun.com/pypi/simple/ selenium
```
<br>
<br>
現在我們selenium已經下載好了,導入也成功說明沒問題,那么我們將chrome瀏覽器下載好后安裝,然后在吧ChromeDriver解壓:放入**python的bin目錄即可**
現在在進入cmd,輸入如下,如果沒有問題瀏覽器被正常打開說明我們環境以及成功了,就剩下寫代碼
~~~bash
Python 3.7.0 (default, Aug 22 2018, 15:22:33)
Type 'copyright', 'credits' or 'license' for more information
IPython 6.5.0 -- An enhanced Interactive Python. Type '?' for help.
from selenium import webdriver
browser = webdriver.Chrome()
~~~
- 自動化測試之程
- 第一章:adb——小識
- 一:adb介紹
- 二:adb安裝與卸載
- 三:adb獲取包名
- 四:adb獲取日志
- 五:其他常用命令
- 第二章:LIunx
- 一:Liunx:簡介
- 二:Liunx:常用命令
- 第三章:測試常見面試題
- 一:HTTP與HTTPS
- 二:token-cookie-session
- 三:定位以及數據分離
- 四:接口測試面試題
- 五:Python面試題
- 數據類型
- 1:python面試題
- 六:selenium面試題
- 七:liunx面試題
- 1:liunx查看日志
- 二:文件操作
- 八:WebSocket
- 九:騰訊面試題
- 十:關于adb的面試題
- 小結:不常見的面試題
- 模擬面試
- 第四章:selenium自動化
- 一:selenium介紹以及環境搭建
- 二:selenium項目目錄解析
- 三:selenium項目方法實現
- 四:八大定位方法
- 五:selenium基本操作
- 六:selenium顯示等待和隱式等待
- 七:selenium鍵盤操作
- 八:獲取斷言信息
- 九:selenium窗口操作
- 十:selenium-cookie操作
- 十二:selenium截圖操作
- 第五章:Appium-Python篇
- 一:Appium介紹
- 二:windows搭建Appium
- 三:Mac版Appium搭建IOS
- 四:Appium初次啟動
- 五:Capsbility詳解
- 六:定位元素以及工具介紹
- 七:Appium代碼實現
- 八:Capability配置數據與定位參數分離
- 九:定位方法以及元素等待
- 十:頁面滑動
- 十一:appium截圖
- 十二:Automator簡介
- 十三:uiautomator定位方式
- 十四:Monkey介紹
- 十五:Monkey命令解析
- 十六:Monkey查看日志
- 第六章:接口自動化測試
- 一:什么是接口自動化
- 二:HTTP協議
- 三:Request接口訪問
- 四:unittest使用
- 五:獲取cookie以及請求處理
- 六:接口異常處理
- 七:接口測試框架設計到開發
- 八:接口測試之數據庫操作
- 九:定時任務
- 第七章:Python負載工具Locust
- 一:Locust介紹
- 第八章:搭建測試環境
- 一:安裝java的jdk
- 二:安裝tomcat
- 三:Mysql安裝
- 第九章:ios自動化系列
- 一:ios自動化介紹
- 二:ios自動化環境搭建
- 三:ios常用命令
- 第十章:測試工具系列
- 一:postman系列
- 1:postman介紹
- 2:postman界面介紹
- 3:postman請求實例
- 4:postman高階應用
- 5:collection用例集
- 6:postman上傳圖片
- 7:postman上傳文件
- 8:postman使用Headers
- 二:jmeter
- 三:charles