基于寶塔環境安裝magento2系統:
數據庫只能大于等于Mysql5.7+服務選擇:Nginx1.18 或者 apache2.4
先設置php的內存大小:盡量調整的大一點如圖所示

然后執行下一步,安裝JDK環境,步驟如下:
下載jdk:(直接復制我的路徑黏貼與ssh中執行即可)
wget --no-cookies --no-check-certificate --header "Cookie: gpw\_e24=http:%2F%[2Fwww.oracle.com%2F;](http://2fwww.oracle.com%2f%3b/) oraclelicense=accept-securebackup-cookie" "[https://download.oracle.com/otn-pub/java/jdk/16+36/7863447f0ab643c585b9bdebf67c69db/jdk-16\_linux-x64\_bin.rpm](https://download.oracle.com/otn-pub/java/jdk/16+36/7863447f0ab643c585b9bdebf67c69db/jdk-16_linux-x64_bin.rpm)"
安裝JDK:
sudo rpm -ivh jdk-16\_linux-x64\_bin.rpm
待安裝完JDK環境后,執行安裝[elasticsearch](https://artifacts.elastic.co/downloads/elasticsearch/e)?服務,簡稱ES:
wget https://artifacts.elastic.co/downloads/elasticsearch/elasticsearch\-7.12.0\-x86\_64.rpm
此過程根據服務器的帶寬以及所處地域決定快慢,如果是國內服務器需要等待較長時間
待下載完成后執行安裝ES操作:
sudo rpm \--install elasticsearch\-7.12.0\-x86\_64.rpm
待安裝完畢后執行啟動ES服務命令:
systemctl start elasticsearch.service
執行此步驟如果不出現結果就是正常情況,
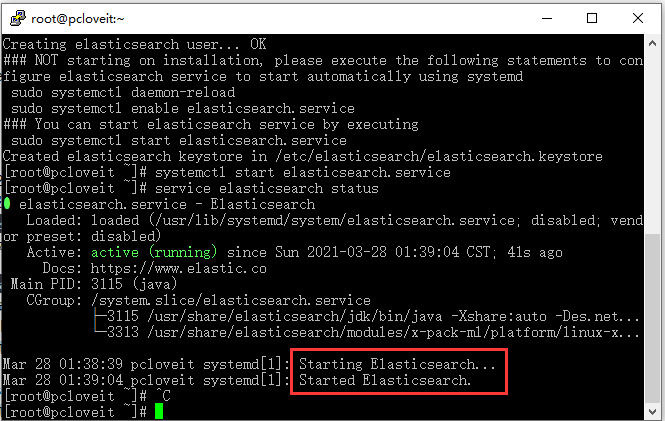
然后查看ES運行狀態:
service elasticsearch status
執行以上命令出現下列情況就是正常:
然后切換到站點根目錄:
cd /www/wwwroot/域名
然后執行創建數據庫語句:
bin/magento setup:install \\
\--base-url=[http:](http://yz.woeru.com/)//[niubeing.com](http://niubeing.com/)/ \\
\--db-host=localhost \\
\--db-name=niubeing\_com?\\
\--db-user=niubeing\_com\\
\--db-password=AGw6HGMkSNiZ3HJwA1S2D3G5H6J7\\
\--admin-firstname=admin \\
\--admin-lastname=admin \\
\--admin-email=[admin@admin.com](mailto:admin@admin.com) \\
\--admin-user=admin \\
\--admin-password=admin888 \\
\--language=en\_US \\
\--currency=USD \\
\--timezone=America/Chicago \\
\--use-rewrites=1 \\
\--search-engine="elasticsearch7" \\
\--elasticsearch-host="127.0.0.1" \\
\--elasticsearch-port="9200"
安裝完上述操作之后記得去站點的文件里面添加如下代碼:
upstream fastcgi\_backend {
??server???unix:/tmp/php-cgi-73.sock;
}
set $MAGE\_ROOT??/www/wwwroot/shop.uniapp.vip;
include /www/wwwroot/shop.uniapp.vip/nginx.conf.sample;
# root /www/wwwroot/shop.uniapp.vip;
常見問題:
如果安裝之后首頁空白,則需要執行:
cd? 站點的路徑
find var generated vendor pub/static pub/media app/etc -type f -exec chmod g+w {} +
find var generated vendor pub/static pub/media app/etc -type d -exec chmod g+ws {} +
chown -R[www.www](http://www.www/)
chmod u+x bin/magento
sudo chmod 777 -R var
# magento2.4遇到的錯誤記錄:
錯誤:You need to configure Two-Factor Authorization in order to proceed to your store’s admin area
bin/magento module:disable Magento\_TwoFactorAuth
bin/magento cache:flush

如果忘了magento2的后臺登錄地址,則查看:/www/wwwroot/shop.uniapp.vip/app/etc/env.php 文件里面的?frontName 的值,這個后臺的地址可以自己隨意修改

復位magento基本配置,開啟前后臺https
php bin/magento config:set web/cookie/cookie\_domain NULL
php bin/magento config:set web/unsecure/base\_url [http://www.yoursite.com/](http://www.yoursite.com/)
php bin/magento config:set web/secure/base\_url [https://www.yoursite.com/](https://www.yoursite.com/)
php bin/magento config:set web/secure/use\_in\_frontend 1
php bin/magento config:set web/secure/use\_in\_adminhtml 1
php bin/magento setup:upgrade
php bin/magento setup:di:compile
php bin/magento setup:static-content:deploy -f
php bin/magento indexer:reindex
php bin/magento cache:clean
