[toc]
## 一、簡介
### 1.1 什么是Runtime
>Runtime是一套底層純`C語言API`,我們編寫的OC代碼最終都會被編譯器轉化為`運行時代碼`,通過`消息機制`決定函數調用方式,這也是OC作為`動態語言`使用的基礎。
### 1.2 消息機制的基本原理
在Object-C的語言中,對象方法調用都是類似`[receiver selector]` 的形式,其本質:`就是讓對象在運行時發送消息的過程。`
而方法調用`[receiver selector] `分為兩個過程:
- `編譯階段`
[receiver selector] 方法被編譯器轉化,分為兩種情況:
>1.不帶參數的方法被編譯為:objc_msgSend(receiver,selector)
2.帶參數的方法被編譯為:objc_msgSend(recevier,selector,org1,org2,…)
- `運行時階段`
消息接收者`recever`尋找對應的`selector`,也分為兩種情況:
>1.接收者能找到對應的selector,直接執行接收receiver對象的selector方法。
2.接收者找不到對應的selector,`消息被轉發`或者臨時向接收者添加這個selector對應的實現內容,否則崩潰
**總而言之:**
>OC調用方法`[receiver selector]`,`編譯階段`確定了要`向哪個接收者`發送message消息,但是`接收者`如何響應決定于`運行時的判斷`
### 1.3 Runtime中的概念解析
#### 1.3.1 objc_msgSend
>`所有` Objective-C 方法調用在`編譯時`都會轉化為對 `C` 函數 `objc_msgSend `的調用。`objc_msgSend(receiver,selector); 是 `[receiver selector]; `對應的 C 函數
#### 1.3.2 Object(對象)
在 `objc/runtime.h` 中,`Object(對象)` 被定義為指向 `objc_object` **結構體的指針**,`objc_object`結構體 的數據結構如下:
```
//runtime對objc_object結構體的定義
struct objc_object {
Class _Nonnull isa OBJC_ISA_AVAILABILITY;
};
//id是一個指向objc_object結構體的指針,即在Runtime中:
typedef struct objc_object *id;
//OC中的對象雖然沒有明顯的使用指針,但是在OC代碼被編譯轉化為C之后,每個OC對象其實都是擁有一個isa的指針的
```
#### 1.3.3 Class(類)
在 `objc/runtime.h` 中,`Class(類)` 被定義為指向 `objc_class` **結構體 的指針**,`objc_class`結構體 的數據結構如下:
```
//runtime對objc_class結構體的定義
struct objc_class {
Class _Nonnull isa; // objc_class 結構體的實例指針
#if !__OBJC2__
Class _Nullable super_class; // 指向父類的指針
const char * _Nonnull name; // 類的名字
long version; // 類的版本信息,默認為 0
long info; // 類的信息,供運行期使用的一些位標識
long instance_size; // 該類的實例變量大小;
struct objc_ivar_list * _Nullable ivars; // 該類的實例變量列表
struct objc_method_list * _Nullable * _Nullable methodLists; // 方法定義的列表
struct objc_cache * _Nonnull cache; // 方法緩存
struct objc_protocol_list * _Nullable protocols; // 遵守的協議列表
#endif
};
//class是一個指向objc_class結構體的指針,即在Runtime中:
typedef struct objc_class *Class;
```
#### 1.3.4 SEL (方法選擇器)
在 `objc/runtime.h `中,`SEL (方法選擇器)` 被定義為指向 `objc_selector` **結構體 的指針**:
```
typedef struct objc_selector *SEL;
//Objective-C在編譯時,會依據每一個方法的名字、參數序列,生成一個唯一的整型標識(Int類型的地址),這個標識就是SEL
```
**注意:**
>1.不同類中相同名字的方法對應的方法選擇器是相同的。
2.即使是同一個類中,方法名相同而變量類型不同也會導致它們具有相同的方法選擇器。
**通常獲取SEL有三種方法:**
>1.OC中,使用`@selector("方法名字符串")`
2.OC中,使用`NSSelectorFromString("方法名字符串")`
3.`Runtime`方法,使用`sel_registerName("方法名字符串")`
#### 1.3.5 Ivar
在 `objc/runtime.h` 中,`Ivar` 被定義為指向 `objc_ivar` 結構體 的指針,`objc_ivar`結構體 的數據結構如下:
```
struct objc_ivar {
char * Nullable ivar_name OBJC2UNAVAILABLE;
char * Nullable ivar_type OBJC2UNAVAILABLE;
int ivar_offset OBJC2_UNAVAILABLE;
#ifdef LP64
int space OBJC2_UNAVAILABLE;
#endif
}
//Ivar代表類中實例變量的類型,是一個指向ojbcet_ivar的結構體的指針
typedef struct objc_ivar *Ivar;
```
在`objc_class`中看到的`ivars`成員列表,其中的元素就是`Ivar`,可以通過實例查找其在類中的名字,這個過程被稱為反射,下面的`class_copyIvarList`獲取的不僅有實例變量還有屬性:
```
Ivar *ivarList = class_copyIvarList([self class], &count);
for (int i= 0; i<count; i++) {
Ivar ivar = ivarList[i];
const char *ivarName = ivar_getName(ivar);
NSLog(@"Ivar(%d): %@", i, [NSString stringWithUTF8String:ivarName]);
}
free(ivarList);
```
#### 1.3.5 Method(方法)
在 `objc/runtime.h` 中,`Method(方法)` 被定義為指向 `objc_method` 結構體 的指針,在`objct_class`定義中看到`methodLists`,其中的元素就是`Method,objc_method`結構體 的數據結構如下:
```
struct objc_method {
SEL _Nonnull method_name; // 方法名
char * _Nullable method_types; // 方法類型
IMP _Nonnull method_imp; // 方法實現
};
//Method表示某個方法的類型
typedef struct objc_method *Method;
```
## 二、和Runtime交互的三種方式
### 2.1 OC源代碼
>OC代碼會在`編譯階段`被編譯器轉化。OC中的類、方法和協議等在`Runtime`中都由一些`數據結構`來定義。
所以在日常的項目開發過程中,使用OC語言進行編碼時,這已經是在和Runtime進行交互了,只是這個過程對于開發者而言是無感的
### 2.2 NSObject方法
>Runtime的最大特征就是實現了OC語言的`動態特性`。
作為大部分`Objective-C`類繼承體系的根類的`NSObject`,其本身就具有了一些非常具有運行時動態特性的方法, 比如:
>1. `-respondsToSelector:`方法可以檢查在代碼運行階段當前對象是否能響應指定的消息
>2. `-description:`返回當前類的描述信息
>3. `-isKindOfClass: `和 `-isMemberOfClass:` 檢查對象是否存在于指定的類的繼承體系中
>4. `-conformsToProtocol:` 檢查對象是否實現了指定協議類的方法;
>5. `-methodForSelector:` 返回指定方法實現的地址。
### 2.3 使用Runtime函數
>`Runtime`系統是一個由`一系列函數`和`數據結構`組成,具有`公共接口`的`動態共享庫`。頭文件存放于`/usr/include/objc`目錄下。
在項目工程代碼里引用Runtime的頭文件,同樣能夠實現類似OC代碼的效果:
```
//相當于:Class class = [UIView class];
Class viewClass = objc_getClass("UIView");
//相當于:UIView *view = [UIView alloc];
UIView *view = ((id (*)(id, SEL))(void *)objc_msgSend)((id)viewClass, sel_registerName("alloc"));
//相當于:UIView *view = [view init];
((id (*)(id, SEL))(void *)objc_msgSend)((id)view, sel_registerName("init"));
```
## 三、Runtime消息轉發
### 3.1 動態方法解析與消息轉發
#### 3.1.1 動態方法解析:動態添加方法
Runtime足夠強大,能夠在`運行時`動態添加一個`未實現的方法`,這個功能主要有兩個應用場景:
>1.動態添加未實現方法,解決代碼中因為方法未找到而報錯的問題;
>2.利用懶加載思路,若一個類有很多個方法,同時加載到內存中會耗費資源,可以使用動態解析添加方法
方法動態解析主要用到的方法如下:
```
//OC方法:
//類方法未找到時調起,可于此添加類方法實現
+ (BOOL)resolveClassMethod:(SEL)sel
//實例方法未找到時調起,可于此添加實例方法實現
+ (BOOL)resolveInstanceMethod:(SEL)sel
//Runtime方法:
/**
運行時方法:向指定類中添加特定方法實現的操作
@param cls 被添加方法的類
@param name selector方法名
@param imp 指向實現方法的函數指針
@param types imp函數實現的返回值與參數類型
@return 添加方法是否成功
*/
BOOL class_addMethod(Class _Nullable cls,
SEL _Nonnull name,
IMP _Nonnull imp,
const char * _Nullable types)
```
#### 3.1.2 解決方法無響應崩潰問題
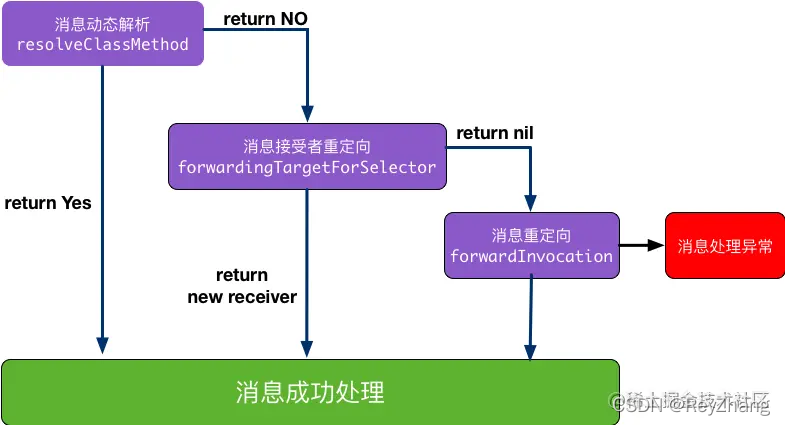
執行OC方法其實就是一個發送消息的過程,若方法未實現,可以利用`方法動態解析`與`消息轉發`來避免程序崩潰,這主要涉及下面一個處理未實現消息的過程:
在這個過程中,可能還會使用到的方法有:
**例子:**
```
#import "ViewController.h"
#import <objc/runtime.h>
@interface ViewController ()
@end
@implementation ViewController
- (void)viewDidLoad {
[super viewDidLoad];
// 執行 fun 函數
[self performSelector:@selector(fun)];
}
// 重寫 resolveInstanceMethod: 添加對象方法實現
+ (BOOL)resolveInstanceMethod:(SEL)sel {
if (sel == @selector(fun)) { // 如果是執行 fun 函數,就動態解析,指定新的 IMP
class_addMethod([self class], sel, (IMP)funMethod, "v@:");
return YES;
}
return [super resolveInstanceMethod:sel];
}
void funMethod(id obj, SEL _cmd) {
NSLog(@"funMethod"); //新的 fun 函數
}
@end
//日志輸出:
2019-09-01 23:24:34.911774+0800 XKRuntimeKit[3064:521123] funMethod
```
從執行任務的輸出日志中,可以看到:
>雖然沒有實現 `fun `方法,但是通過重寫 `resolveInstanceMethod:` ,利用 `class_addMethod `方法添加對象方法實現 `funMethod` 方法,并執行。從打印結果來看,成功調起了`funMethod` 方法。
### 3.2 消息`接收者`重定向:
如果上一步中 `+resolveInstanceMethod:`或者 `+resolveClassMethod: `沒有添加其他函數實現,運行時就會進行下一步:消息接受者重定向。
如果當前對象實現了` -forwardingTargetForSelector:`,Runtime 就會調用這個方法,允許將消息的接受者轉發給其他對象,其主要方法如下:
```
//重定向類方法的消息接收者,返回一個類
- (id)forwardingTargetForSelector:(SEL)aSelector
//重定向實例方法的消息接受者,返回一個實例對象
- (id)forwardingTargetForSelector:(SEL)aSelector
```
**例子:**
```
#import "ViewController.h"
#import <objc/runtime.h>
@interface Person : NSObject
- (void)fun;
@end
@implementation Person
- (void)fun {
NSLog(@"fun");
}
@end
@implementation ViewController
- (void)viewDidLoad {
[super viewDidLoad];
// 執行 fun 方法
[self performSelector:@selector(fun)];
}
+ (BOOL)resolveInstanceMethod:(SEL)sel {
return YES; // 為了進行下一步 消息接受者重定向
}
// 消息接受者重定向
- (id)forwardingTargetForSelector:(SEL)aSelector {
if (aSelector == @selector(fun)) {
return [[Person alloc] init];
// 返回 Person 對象,讓 Person 對象接收這個消息
}
return [super forwardingTargetForSelector:aSelector];
}
//日志輸出:
2019-09-01 23:24:34.911774+0800 XKRuntimeKit[3064:521123] fun
```
從執行任務的輸出日志中,可以看到:
>雖然當前 ViewController 沒有實現 `fun` 方法,`+resolveInstanceMethod: `也沒有添加其他函數實現。
但是我們通過 `forwardingTargetForSelector `把當前 ViewController 的方法轉發給了 `Person 對象`去執行了
通過`forwardingTargetForSelector` 可以`修改消息的接收者`,該方法返回參數是一個對象,如果這個對象是不是 `nil`,也不是 `self`,系統會將運行的消息轉發給這個對象執行。否則,繼續進行下一步:消息重定向流程
### 3.3 `消息`重定向:
如果經過消息`動態解析`、`消息接受者重定向`,Runtime 系統還是找不到相應的方法實現而無法響應消息,Runtime 系統會利用 `-methodSignatureForSelector:` 方法獲取函數的參數和返回值類型。
**其過程:**
>1.如果 `-methodSignatureForSelector:` 返回了一個 `NSMethodSignature` 對象(函數簽名),Runtime 系統就會創建一個 `NSInvocation `對象,
并通過 -forwardInvocation: 消息通知當前對象,給予此次消息發送最后一次尋找 IMP 的機會。
2.如果 `-methodSignatureForSelector:` 返回 nil。則 Runtime 系統會發出 `-doesNotRecognizeSelector: `消息,程序也就崩潰了
所以可以在`-forwardInvocation:`方法中對`消息進行轉發`。
其主要方法:
```
// 消息重定向
- (void)forwardInvocation:(NSInvocation *)anInvocation;
// 獲取函數的參數和返回值類型,返回簽名
- (NSMethodSignature*)methodSignatureForSelector:(SEL)aSelector;
```
**例子:**
```
#import "ViewController.h"
#import <objc/runtime.h>
@interface Person : NSObject
- (void)fun;
@end
@implementation Person
- (void)fun {
NSLog(@"fun");
}
@end
@implementation ViewController
- (void)viewDidLoad {
[super viewDidLoad];
// 執行 fun 函數
[self performSelector:@selector(fun)];
}
+ (BOOL)resolveInstanceMethod:(SEL)sel {
return YES; // 為了進行下一步 消息接受者重定向
}
- (id)forwardingTargetForSelector:(SEL)aSelector {
return nil; // 為了進行下一步 消息重定向
}
// 獲取函數的參數和返回值類型,返回簽名
- (NSMethodSignature *)methodSignatureForSelector:(SEL)aSelector {
if ([NSStringFromSelector(aSelector) isEqualToString:@"fun"]) {
return [NSMethodSignature signatureWithObjCTypes:"v@:"];
}
return [super methodSignatureForSelector:aSelector];
}
// 消息重定向
- (void)forwardInvocation:(NSInvocation *)anInvocation {
SEL sel = anInvocation.selector; // 從 anInvocation 中獲取消息
Person *p = [[Person alloc] init];
if([p respondsToSelector:sel]) { // 判斷 Person 對象方法是否可以響應 sel
[anInvocation invokeWithTarget:p]; // 若可以響應,則將消息轉發給其他對象處理
} else {
[self doesNotRecognizeSelector:sel]; // 若仍然無法響應,則報錯:找不到響應方法
}
}
@end
//日志輸出:
2019-09-01 23:24:34.911774+0800 XKRuntimeKit[30032:8724248] fun
```
從執行任務的輸出日志中,可以看到:
>在` -forwardInvocation: `方法里面讓 Person 對象去執行了 fun 函數
既然 `-forwardingTargetForSelector:` 和 `-forwardInvocation: `都可以將消息轉發給其他對象處理,那么兩者的**區別在哪?**
>區別就在于` -forwardingTargetForSelector: `只能將消息轉發給`一個對象`。而 `-forwardInvocation: `可以將消息轉發給`多個對象`。
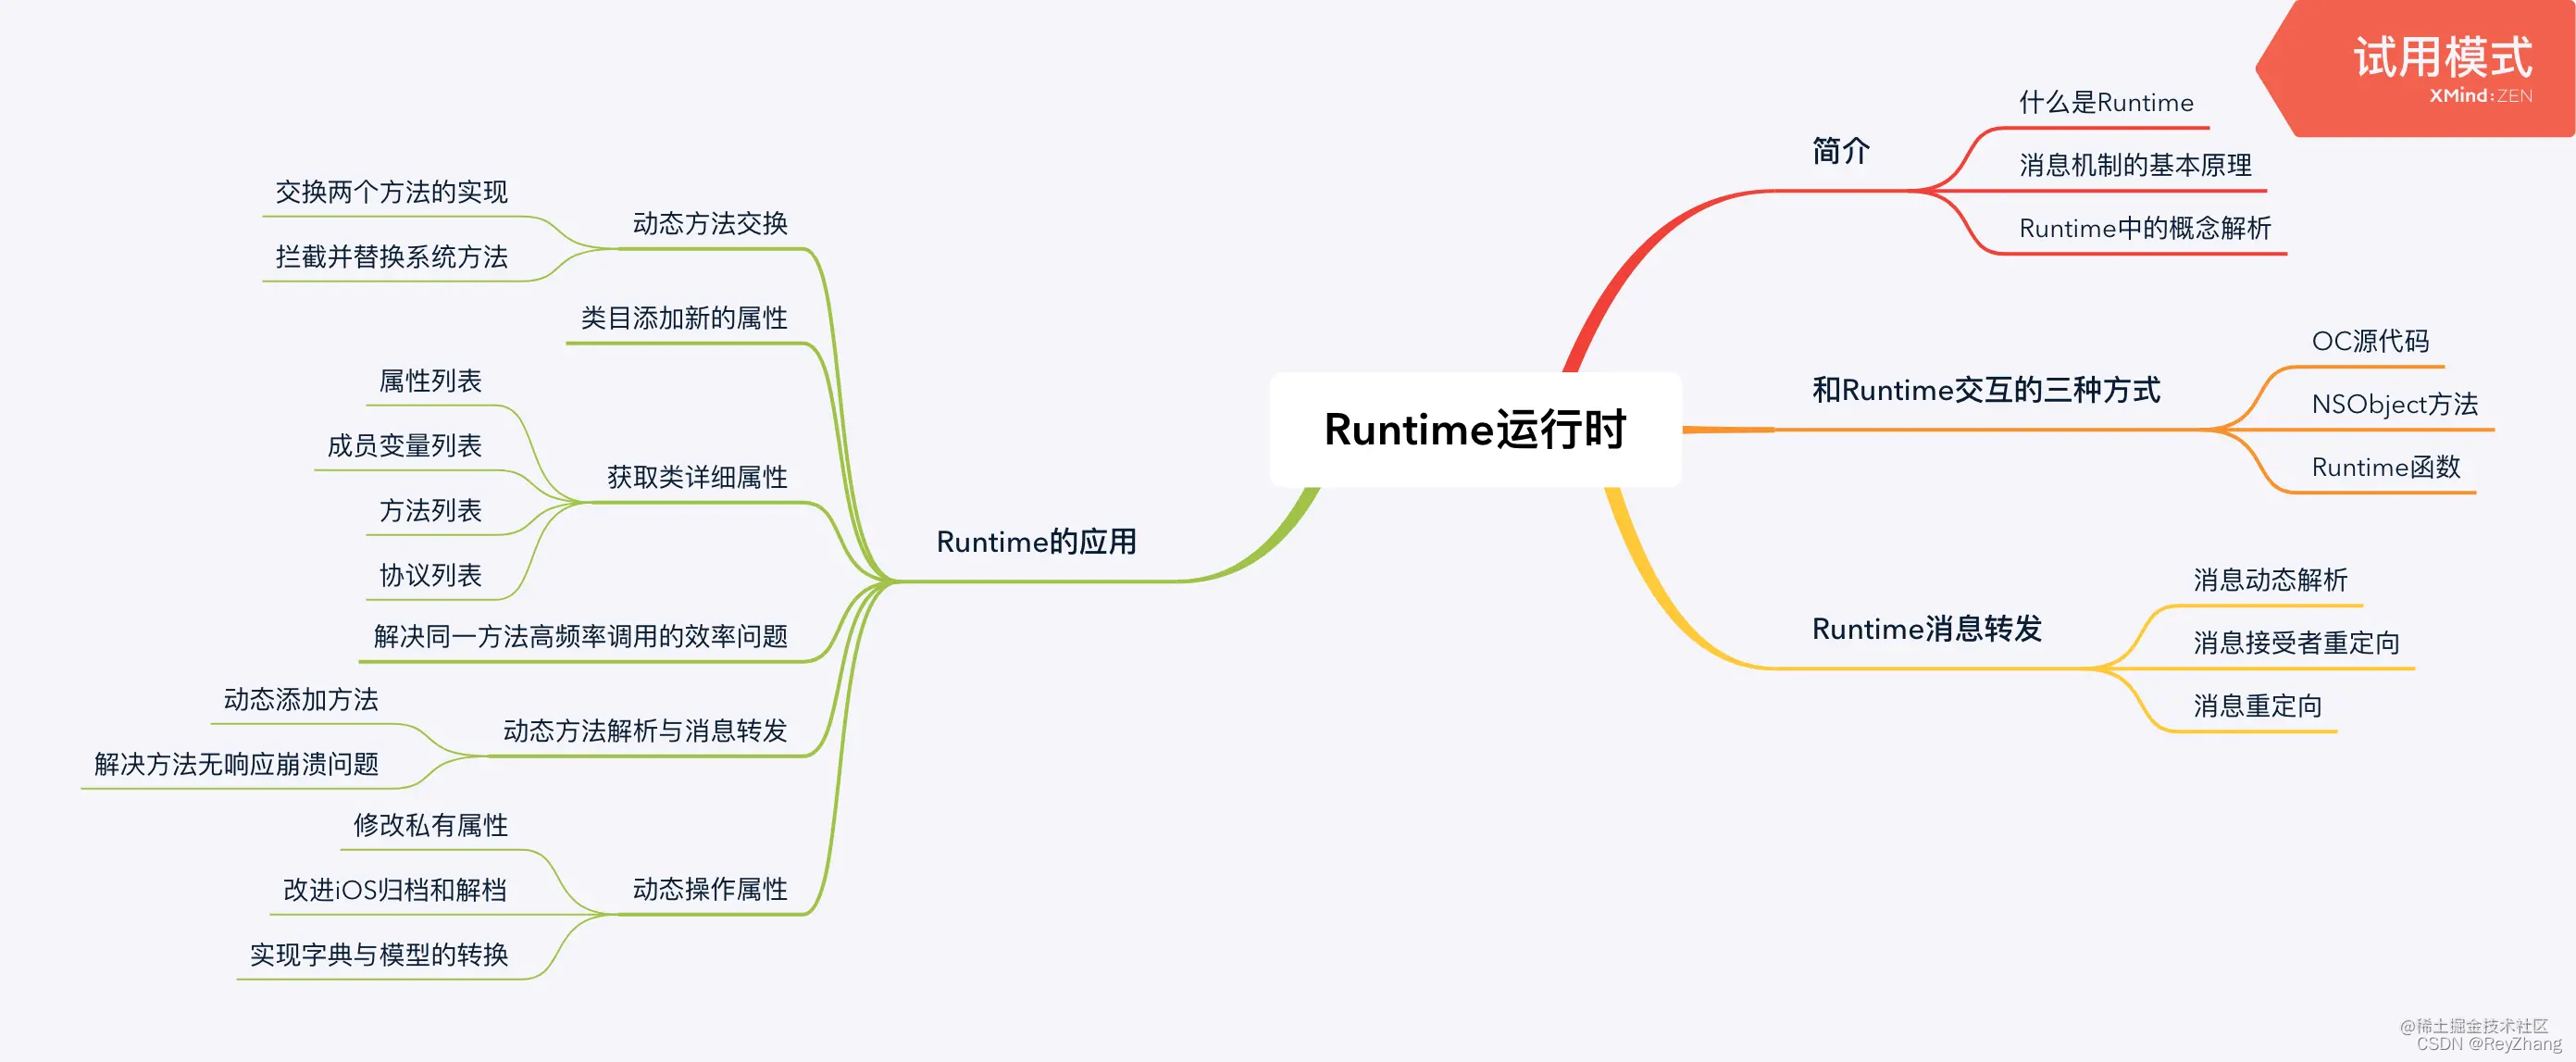
## 四、Runtime的應用
### 4.1 動態方法交換
實現動態方法交換(Method Swizzling )是Runtime中最具盛名的應用場景,其原理是:
>通過`Runtime`獲取到方法實現的地址,進而動態交換兩個方法的功能
關鍵方法:
```
//獲取類方法的Mthod
Method _Nullable class_getClassMethod(Class _Nullable cls, SEL _Nonnull name)
//獲取實例對象方法的Mthod
Method _Nullable class_getInstanceMethod(Class _Nullable cls, SEL _Nonnull name)
//交換兩個方法的實現
void method_exchangeImplementations(Method _Nonnull m1, Method _Nonnull m2)
```
#### 4.1.1 動態方法交換
```
#import "RuntimeKit.h"
#import <objc/runtime.h>
@implementation RuntimeKit
- (instancetype)init
{
self = [super init];
if (self) {
//交換方法的實現,并測試打印
Method methodA = class_getInstanceMethod([self class], @selector(testA));
Method methodB = class_getInstanceMethod([self class], @selector(testB));
method_exchangeImplementations(methodA, methodB);
[self testA];
[self testB];
}
return self;
}
- (void)testA{
NSLog(@"我是A方法");
}
- (void)testB{
NSLog(@"我是B方法");
}
@end
日志輸出:
2019-09-01 21:25:32.858860+0800 XKRuntimeKit[1662:280727] 我是B方法
2019-09-01 21:25:32.859059+0800 XKRuntimeKit[1662:280727] 我是A方法
```
#### 4.1.2攔截并替換系統方法
```
#import "UIViewController+xk.h"
#import <objc/runtime.h>
@implementation UIViewController (xk)
+ (void)load{
//獲取系統方法地址
Method sytemMethod = class_getInstanceMethod([self class], @selector(viewWillAppear:));
//獲取自定義方法地址
Method customMethod = class_getInstanceMethod([self class], @selector(run_viewWillAppear:));
//判斷存在與否
if (!class_addMethod([self class], @selector(viewWillAppear:), method_getImplementation(customMethod), method_getTypeEncoding(customMethod))) {
method_exchangeImplementations(sytemMethod, customMethod);
}
else{
class_replaceMethod([self class], @selector(run_viewWillAppear:), method_getImplementation(sytemMethod), method_getTypeEncoding(sytemMethod));
}
}
- (void)run_viewWillAppear:(BOOL)animated{
[self run_viewWillAppear:animated];
NSLog(@"我是運行時替換的方法-viewWillAppear");
}
- (void)run_viewWillDisappear:(BOOL)animated{
[self run_viewWillDisappear:animated];
NSLog(@"我是運行時替換的方法-viewWillDisappear");
}
@end
日志輸出:
2019-09-01 21:36:55.610385+0800 XKRuntimeKit[1921:310118] 我是運行時替換的方法-viewWillAppear
```
將該分類引入,從執行結果可以看到,但系統的控制器執行`viewWillAppear`時,則會進入已經替換的方法`run_viewWillAppear`之中。
### 4.2 類目添加新的屬性
在日常開發過程中,常常會使用類目`Category`為一些已有的類擴展功能。雖然繼承也能夠為已有類增加新的方法,而且相比類目更是具有增加屬性的優勢,但是繼承畢竟是一個重量級的操作,添加不必要的繼承關系無疑增加了代碼的復雜度。
>遺憾的是,OC的類目并不支持直接添加屬性
為了實現給分類添加屬性,還需借助 `Runtime`的`關聯對象(Associated Objects)`特性,它能夠幫助我們在運行階段將任意的屬性關聯到一個對象上:
```
/**
1.給對象設置關聯屬性
@param object 需要設置關聯屬性的對象,即給哪個對象關聯屬性
@param key 關聯屬性對應的key,可通過key獲取這個屬性,
@param value 給關聯屬性設置的值
@param policy 關聯屬性的存儲策略(對應Property屬性中的assign,copy,retain等)
OBJC_ASSOCIATION_ASSIGN @property(assign)。
OBJC_ASSOCIATION_RETAIN_NONATOMIC @property(strong, nonatomic)。
OBJC_ASSOCIATION_COPY_NONATOMIC @property(copy, nonatomic)。
OBJC_ASSOCIATION_RETAIN @property(strong,atomic)。
OBJC_ASSOCIATION_COPY @property(copy, atomic)。
*/
void objc_setAssociatedObject(id _Nonnull object,
const void * _Nonnull key,
id _Nullable value,
objc_AssociationPolicy policy)
/**
2.通過key獲取關聯的屬性
@param object 從哪個對象中獲取關聯屬性
@param key 關聯屬性對應的key
@return 返回關聯屬性的值
*/
id _Nullable objc_getAssociatedObject(id _Nonnull object,
const void * _Nonnull key)
/**
3.移除對象所關聯的屬性
@param object 移除某個對象的所有關聯屬性
*/
void objc_removeAssociatedObjects(id _Nonnull object)
```
**注意:**
>key與關聯屬性一一對應,我們必須確保其全局唯一性,常用我們使用@selector(methodName)作為key
**例子:**
在`UIViewController+xk.h`中新增一個`name`屬性:
```
@interface UIViewController (xk)
//新增屬性:名稱
@property(nonatomic,copy)NSString * name;
- (void)clearAssociatedObjcet;
@end
```
在`UIViewController+xk.m`中補充對應的實現:
```
#import "UIViewController+xk.h"
#import <objc/runtime.h>
@implementation UIViewController (xk)
//set方法
- (void)setName:(NSString *)name{
objc_setAssociatedObject(self,
@selector(name),
name,
OBJC_ASSOCIATION_RETAIN_NONATOMIC);
}
//get方法
- (NSString *)name{
return objc_getAssociatedObject(self,
@selector(name));
}
//添加一個自定義方法,用于清除所有關聯屬性
- (void)clearAssociatedObjcet{
objc_removeAssociatedObjects(self);
}
@end
```
**執行任務:**
```
ViewController * vc = [ViewController new];
vc.name = @"我是根控制器";
NSLog(@"獲取關聯屬性name:%@",vc.name);
[vc clearAssociatedObjcet];
NSLog(@"獲取關聯屬性name:%@",vc.name);
日志輸出:
2019-09-01 21:50:05.162915+0800 XKRuntimeKit[2066:335327] 獲取關聯屬性name:我是根控制器
2019-09-01 21:50:05.163080+0800 XKRuntimeKit[2066:335327] 獲取關聯屬性name:(null)
```
同樣的,使用運行時還可以為類目新增一些自身沒有的方法,比如給`UIView`新增點擊事件:
```
#import <objc/runtime.h>
static char onTapGestureKey;
static char onTapGestureBlockKey;
@implementation UIView (Gesture)
//添加輕拍手勢
- (void)addTapGestureActionWithBlock:(onGestureActionBlock)block{
UITapGestureRecognizer *gesture = objc_getAssociatedObject(self, &onTapGestureKey);
self.userInteractionEnabled = YES;
if (!gesture){
gesture = [[UITapGestureRecognizer alloc] initWithTarget:self action:@selector(xk_handleActionForTapGesture:)];
[self addGestureRecognizer:gesture];
objc_setAssociatedObject(self, &onTapGestureKey, gesture, OBJC_ASSOCIATION_RETAIN);
}
//添加點擊手勢響應代碼塊屬性
objc_setAssociatedObject(self, &onTapGestureBlockKey, block, OBJC_ASSOCIATION_COPY);
}
//點擊回調
- (void)xk_handleActionForTapGesture:(UITapGestureRecognizer*)sender{
onGestureActionBlock block = objc_getAssociatedObject(self, &onTapGestureBlockKey);
if (block) block(sender);
}
@end
```
但是使用運行時給類目新增代理屬性時,需要注意`循環引用`問題,由于運行時執行添加的屬性都是`retain`操作,所以往往在執行過程會導致對應的 `delegate` 得不到釋放,因而會導致崩潰,對此,可以進行以下修改操作:
**場景: 給`UIView`新增`emptyDataDelegate`空頁面代理,以處理一些異常情況的顯示**
在`UIView+EmptyDataSet.h`中新增一個`emptyDataDelegate`屬性:
```
//頁面無數據代理
@protocol XKEmptyDataSetDelegate <NSObject>
@optional
//占位文字
- (NSString*)placeholderForEmptyDataSet:(UIScrollView*)scrollView;
@end
//空頁面設置
@interface UIView (EmptyDataSet)
@property (nonatomic,weak) id<XKEmptyDataSetDelegate>emptyDataDelegate;
@end
```
在`UIView+EmptyDataSet.m`中借助`XKEmptyDataWeakObjectContainer`實現其方法:
```
//弱引用代理
@interface XKEmptyDataWeakObjectContainer : NSObject
@property (nonatomic,weak,readonly)id weakObject;
- (instancetype)initWithWeakObject:(id)object;
@end
@implementation XKEmptyDataWeakObjectContainer
- (instancetype)initWithWeakObject:(id)object{
self = [super init];
if (self) {
_weakObject = object;
}
return self;
}
@end
static char xk_EmptyDataSetDelegateKey;
//空視圖設置
@implementation UIView (EmptyDataSet)
- (void)setEmptyDataDelegate:(id<XKEmptyDataSetDelegate>)emptyDataDelegate{
objc_setAssociatedObject(self, &xk_EmptyDataSetDelegateKey, [[XKEmptyDataWeakObjectContainer alloc] initWithWeakObject:emptyDataDelegate], OBJC_ASSOCIATION_RETAIN_NONATOMIC);
}
- (id<XKEmptyDataSetDelegate>)emptyDataDelegate{
XKEmptyDataWeakObjectContainer * container = objc_getAssociatedObject(self, &xk_EmptyDataSetDelegateKey);
return container.weakObject;
}
@end
```
### 4.3 獲取類詳細屬性
#### 4.3.1獲取屬性列表
獲取類屬性列表用到runtime的 `class_copyPropertyList`方法,該方法接收一個類對象及返回屬性數量的地址引用
```
unsigned int count;
objc_property_t *propertyList = class_copyPropertyList([self class], &count);
for (unsigned int i = 0; i<count; i++) {
const char *propertyName = property_getName(propertyList[i]);
NSLog(@"PropertyName(%d): %@",i,[NSString stringWithUTF8String:propertyName]);
}
free(propertyList);
```
#### 4.3.2獲取所有成員變量
獲取類中所有的成員變量,使用的是runtime的`class_copyIvarList`方法。
```
Ivar *ivarList = class_copyIvarList([self class], &count);
for (int i= 0; i<count; i++) {
Ivar ivar = ivarList[i];
const char *ivarName = ivar_getName(ivar);
NSLog(@"Ivar(%d): %@", i, [NSString stringWithUTF8String:ivarName]);
}
free(ivarList);
```
#### 4.3.3.獲取所有方法
獲取類中所有的方法列表,使用runtime的`class_copyMethodList`方法。
```
Method *methodList = class_copyMethodList([self class], &count);
for (unsigned int i = 0; i<count; i++) {
Method method = methodList[i];
SEL mthodName = method_getName(method);
NSLog(@"MethodName(%d): %@",i,NSStringFromSelector(mthodName));
}
free(methodList);
```
#### 4.3.4獲取當前遵循的所有協議
獲取當前遵循的所有協議,使用`class_copyProtocolList`方法。
```
__unsafe_unretained Protocol **protocolList = class_copyProtocolList([self class], &count);
for (int i=0; i<count; i++) {
Protocol *protocal = protocolList[i];
const char *protocolName = protocol_getName(protocal);
NSLog(@"protocol(%d): %@",i, [NSString stringWithUTF8String:protocolName]);
}
free(propertyList); //C語言中使用Copy操作的方法,要注意釋放指針,防止內存泄漏
```
上面幾組獲取類的屬性列表,成員列表,方法列表及遵循的協議列表的方法最后都調用了`free`函數。 這是因為`C語言`中使用`Copy`操作的方法,要注意`釋放指針`,`防止內存泄漏`
### 4.4 解決同一方法高頻率調用的效率問題
Runtime源碼中的`IMP`作為`函數指針`,`指向方法的實現`。通過它,可以`繞開發送消息的過程`來提高函數調用的效率。當需要持續大量重復調用某個方法的時候,會十分有用,如下:
```
void (*setter)(id, SEL, BOOL);
int i;
setter = (void (*)(id, SEL, BOOL))[target methodForSelector:@selector(setFilled:)];
for ( i = 0 ; i < 1000 ; i++ )
setter(targetList[i], @selector(setFilled:), YES);
```
### 4.5 動態操作屬性
#### 4.5.1修改私有屬性
**場景:**
我們使用第三方框架里的Person類,在特殊需求下想要更改其私有屬性nickName,這樣的操作我們就可以使用Runtime可以動態修改對象屬性。
```
Person *ps = [[Person alloc] init];
NSLog(@"nickName: %@",[ps valueForKey:@"nickName"]); //null
//第一步:遍歷對象的所有屬性
unsigned int count;
Ivar *ivarList = class_copyIvarList([ps class], &count);
for (int i= 0; i<count; i++) {
//第二步:獲取每個屬性名
Ivar ivar = ivarList[i];
const char *ivarName = ivar_getName(ivar);
NSString *propertyName = [NSString stringWithUTF8String:ivarName];
if ([propertyName isEqualToString:@"_nickName"]) {
//第三步:匹配到對應的屬性,然后修改;注意屬性帶有下劃線
object_setIvar(ps, ivar, @"allenlas");
}
}
NSLog(@"nickName: %@",[ps valueForKey:@"nickName"]); //allenlas
```
#### 4.5.2改進iOS歸檔和解檔
`歸檔`是一種常用的`輕量型`文件存儲方式,但是它有個弊端:
>在歸檔過程中,若一個`Model`有多個屬性,我們不得不對每個屬性進行處理,非常繁瑣
歸檔操作主要涉及兩個方法: `encodeObject` 和 `decodeObjectForKey` ,對于這兩個方法,可以利用Runtime 來進行改進:
```
//原理:使用Runtime動態獲取所有屬性
//解檔操作
- (instancetype)initWithCoder:(NSCoder *)aDecoder{
self = [super init];
if (self) {
unsigned int count = 0;
Ivar *ivarList = class_copyIvarList([self class], &count);
for (int i = 0; i < count; i++) {
Ivar ivar = ivarList[i];
const char *ivarName = ivar_getName(ivar);
NSString *key = [NSString stringWithUTF8String:ivarName];
id value = [aDecoder decodeObjectForKey:key];
[self setValue:value forKey:key];
}
free(ivarList); //釋放指針
}
return self;
}
//歸檔操作
- (void)encodeWithCoder:(NSCoder *)aCoder{
unsigned int count = 0;
Ivar *ivarList = class_copyIvarList([self class], &count);
for (NSInteger i = 0; i < count; i++) {
Ivar ivar = ivarList[i];
NSString *key = [NSString stringWithUTF8String:ivar_getName(ivar)];
id value = [self valueForKey:key];
[aCoder encodeObject:value forKey:key];
}
free(ivarList); //釋放指針
}
```
**測試:**
```
//--測試歸檔
Person *ps = [[Person alloc] init];
ps.name = @"allenlas";
ps.age = 20;
NSString *temp = NSTemporaryDirectory();
NSString *fileTemp = [temp stringByAppendingString:@"person.archive"];
[NSKeyedArchiver archiveRootObject:ps toFile:fileTemp];
//--測試解檔
NSString *temp = NSTemporaryDirectory();
NSString *fileTemp = [temp stringByAppendingString:@"person.henry"];
Person *person = [NSKeyedUnarchiver unarchiveObjectWithFile:fileTemp];
NSLog(@"person-name:%@,person-age:%ld",person.name,person.age);
//person-name:allenlas,person-age:20
```
#### 4.5.3實現字典與模型的轉換
在日常項目開發中,經常會使用`YYModel `或 `MJExtension`等對接口返回的數據對象實現轉模型操作。對于此,可以利用`KVC`和`Runtime `來進行類似的功能實現,在這個過程中需要解決的問題有:
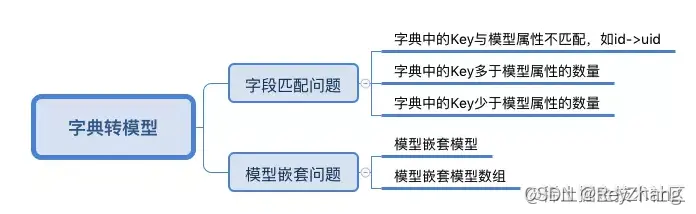
利用Runtime實現的思路大體如下:
>借助Runtime可以`動態獲取`成員列表的特性,遍歷模型中所有屬性,然后以獲取到的屬性名為key,在JSON字典中尋找對應的值value;再將每一個對應Value賦值給模型,就完成了字典轉模型的目的。
**json數據:**
```
{
"id":"10089",
"name": "Allen",
"age":"20",
"position":"iOS開發工程師",
"address":{
"country":"中國",
"province": "廣州"
},
"tasks":[{
"name":"Home",
"desc":"app首頁開發"
},{
"name":"Train",
"desc":"app培訓模塊開發"
},{
"name":"Me",
"desc":"完成個人頁面"
}
]
}
```
**1.創建NSObject的類目 NSObject+model,用于實現字典轉模型**
```
//在NSObject+model.h中
NS_ASSUME_NONNULL_BEGIN
//AAModel協議,協議方法可以返回一個字典,表明特殊字段的處理規則
@protocol AAModel<NSObject>
@optional
+ (nullable NSDictionary<NSString *, id> *)modelContainerPropertyGenericClass;
@end;
@interface NSObject (model)
+ (instancetype)xk_modelWithDictionary:(NSDictionary *)dictionary;
@end
NS_ASSUME_NONNULL_END
```
```
#import "NSObject+model.h"
#import <objc/runtime.h>
@implementation NSObject (model)
+ (instancetype)xk_modelWithDictionary:(NSDictionary *)dictionary{
//創建當前模型對象
id object = [[self alloc] init];
//1.獲取當前對象的成員變量列表
unsigned int count = 0;
Ivar *ivarList = class_copyIvarList([self class], &count);
//2.遍歷ivarList中所有成員變量,以其屬性名為key,在字典中查找Value
for (int i= 0; i<count; i++) {
//2.1獲取成員屬性
Ivar ivar = ivarList[i];
NSString *ivarName = [NSString stringWithUTF8String:ivar_getName(ivar)] ;
//2.2截取成員變量名:去掉成員變量前面的"_"號
NSString *propertyName = [ivarName substringFromIndex:1];
//2.3以屬性名為key,在字典中查找value
id value = dictionary[propertyName];
//3.獲取成員變量類型, 因為ivar_getTypeEncoding獲取的類型是"@\"NSString\""的形式
//所以我們要做以下的替換
NSString *ivarType = [NSString stringWithUTF8String:ivar_getTypeEncoding(ivar)];// 替換:
//3.1去除轉義字符:@\"name\" -> @"name"
ivarType = [ivarType stringByReplacingOccurrencesOfString:@"\"" withString:@""];
//3.2去除@符號
ivarType = [ivarType stringByReplacingOccurrencesOfString:@"@" withString:@""];
//4.對特殊成員變量進行處理:
//判斷當前類是否實現了協議方法,獲取協議方法中規定的特殊變量的處理方式
NSDictionary *perpertyTypeDic;
if([self respondsToSelector:@selector(modelContainerPropertyGenericClass)]){
perpertyTypeDic = [self performSelector:@selector(modelContainerPropertyGenericClass) withObject:nil];
}
//4.1處理:字典的key與模型屬性不匹配的問題,如id->uid
id anotherName = perpertyTypeDic[propertyName];
if(anotherName && [anotherName isKindOfClass:[NSString class]]){
value = dictionary[anotherName];
}
//4.2.處理:模型嵌套模型
if ([value isKindOfClass:[NSDictionary class]] && ![ivarType hasPrefix:@"NS"]) {
Class modelClass = NSClassFromString(ivarType);
if (modelClass != nil) {
//將被嵌套字典數據也轉化成Model
value = [modelClass xk_modelWithDictionary:value];
}
}
//4.3處理:模型嵌套模型數組
//判斷當前Vaue是一個數組,而且存在協議方法返回了perpertyTypeDic
if ([value isKindOfClass:[NSArray class]] && perpertyTypeDic) {
Class itemModelClass = perpertyTypeDic[propertyName];
//封裝數組:將每一個子數據轉化為Model
NSMutableArray *itemArray = @[].mutableCopy;
for (NSDictionary *itemDic in value) {
id model = [itemModelClass xk_modelWithDictionary:itemDic];
[itemArray addObject:model];
}
value = itemArray;
}
//5.使用KVC方法將Vlue更新到object中
if (value != nil) {
[object setValue:value forKey:propertyName];
}
}
free(ivarList); //釋放C指針
return object;
}
@end
```
**2.分別新建`UserModel、AddressModel、TasksModel`對json處理進行處理:**
UserModel類
```
#import "NSObject+model.h"
#import "AddressModel.h"
#import "TasksModel.h"
NS_ASSUME_NONNULL_BEGIN
@interface UserModel : NSObject<AAModel>
//普通屬性
@property (nonatomic, copy) NSString * uid;
@property (nonatomic, copy) NSString * name;
@property (nonatomic, copy) NSString * position;
@property (nonatomic, assign) NSInteger age;
//嵌套模型
@property (nonatomic, strong) AddressModel *address;
//嵌套模型數組
@property (nonatomic, strong) NSArray *tasks;
@end
NS_ASSUME_NONNULL_END
@implementation UserModel
+ (NSDictionary<NSString *,id> *)modelContainerPropertyGenericClass{
//需要特別處理的屬性
return @{@"tasks" : [TasksModel class],@"uid":@"id"};
}
@end
```
AddressModel類
```
#import "NSObject+model.h"
NS_ASSUME_NONNULL_BEGIN
@interface AddressModel : NSObject
@property (nonatomic, copy) NSString * country;
@property (nonatomic, copy) NSString * province;
@end
NS_ASSUME_NONNULL_END
@implementation AddressModel
@end
```
TasksModel類
```
#import "NSObject+model.h"
NS_ASSUME_NONNULL_BEGIN
@interface TasksModel : NSObject
@property (nonatomic, copy) NSString * name;
@property (nonatomic, copy) NSString * desc;
@end
NS_ASSUME_NONNULL_END
@implementation TasksModel
@end
```
**3.代碼測試**
```
- (void)viewDidLoad {
[super viewDidLoad];
//讀取JSON數據
NSDictionary * jsonData = @{
@"id":@"10089",
@"name": @"Allen",
@"age":@"20",
@"position":@"iOS開發工程師",
@"address":@{
@"country":@"中國",
@"province":@"廣州"
},
@"tasks":@[@{
@"name":@"Home",
@"desc":@"app首頁開發"
},@{
@"name":@"Train",
@"desc":@"app培訓模塊開發"
},@{
@"name":@"Me",
@"desc":@"完成個人頁面"
}
]
};
//字典轉模型
UserModel * user = [UserModel xk_modelWithDictionary:jsonData];
TasksModel * task = user.tasks[0];
NSLog(@"%@",task.name);
}
```
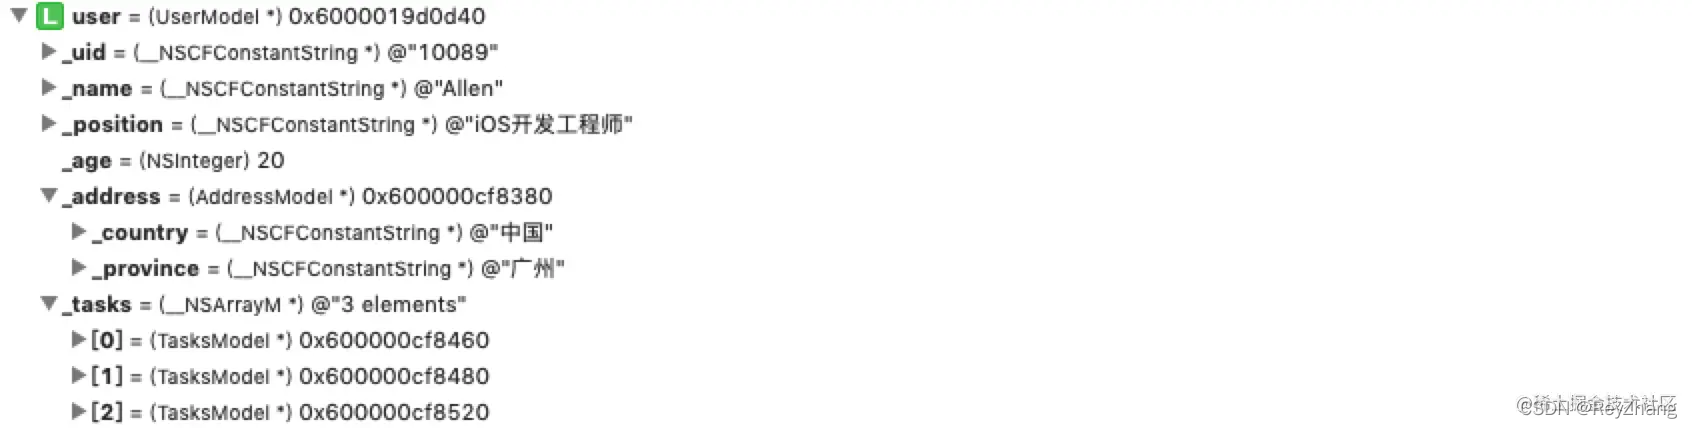
其執行結果,數據結構如下:
- 前言
- WebRTC知識集
- iOS 集成WebRTC各知識點小集
- iOS WebRTC集成時遇到的問題總結
- WebRTC多人音視頻聊天架構及實戰
- iOS端 使用WebRTC實現1對1音視頻實時通話
- iOS 基于WebRTC的點對點音視頻通信 總結篇
- WebRTC Native 源碼導讀 - iOS 相機采集實現分析
- OC 底層原理
- OC runtime 運行時詳解
- GCD dispatch_queue_create 創建隊列
- iOS底層 Runtime深入理解
- iOS底層 RunLoop深入理解
- iOS底層 Block的本質與使用
- iOS內存泄漏
- iOS中isKindOfClass和isMemberOfClass
- 從預編譯的角度理解Swift與Objective-C及混編機制
- 移動支付集成
- iOS 微信支付集成及二次封裝
- iOS 支付寶支付 Alipay集成及二次封裝
- iOS Paypal 貝寶支付集成及二次封裝
- iOS 微信、支付寶、銀聯、Paypal 支付組件封裝
- iOS 微信、支付寶、銀聯支付組件的進一步設計
- iOS 組件化
- iOS 組件化實施過程
- iOS 組件化的二進制化
- 使用pod package打包framework 實現組件的二進制化
- iOS 自制Framework 獲取指定bundle并讀取里面的資源
- .podSpec文件相關知識整理
- 開發并上傳靜態庫到CocoaPods
- pod引用第三方庫的幾種方式
- 如何在.podspec 文件中添加對本地庫的依賴
- lipo 命令合并真機與模擬器生成的framework
- iOS多線程
- NSOperation相關知識點
- 自定義NSOperation
- ios多個網絡請求之間的并行與串行場景的處理
- iOS動畫
- ios animation 動畫學習總結
- CABasicAnimation使用總結
- UITableView cell呈現的動效整理
- CoreAnimation動畫使用詳解
- iOS音視頻開發
- iOS 音視頻開發之AVCaptureMetadataOutput
- iOS操作本地視頻 - 獲取,壓縮,取第一幀
- 使用 GPUImage 實現一個簡單相機
- 直播App架構及思維導圖
- 如何快速的開發一個完整的iOS直播app
- iOS視頻拖動預覽及裁剪
- iOS 直播流程概述
- iOS直播:評論框與粒子系統點贊動畫
- iOS音視頻開發 - 采集
- 基于AVFoundation實現視頻錄制的兩種方式
- Swift知識集
- Swift 的枚舉、結構體和類詳解
- Swift 泛型詳解
- Swift屬性的包裝器@PropertyWrapper
- SwiftHub項目 之網絡層封裝的一點見解
- Moya+RxSwift+HandyJson 實現網絡請求及模型轉換
- Swift開發小記(含面試題)
- RxSwift 入坑手冊 - 基礎概念
- 理解 Swift 中的元類型:.Type 與 .self
- Swift HandyJSON庫中的類型相互轉換的實現
- Swift 中使用嵌套結構體定義一組相關的常量
- Swift Type-Erased(類型擦除)
- Swift中的weak和unowned關鍵字
- Swift 中的錯誤處理
- Swift中的Result 類型的簡單介紹
- Swift Combine 入門導讀
- Swift CustomStringConvertible 協議的使用
- 跨平臺
- Cordova跨平臺方案 iOS工程創建的步驟
- 使用Cordova 打包WebApp為原生應用詳解 (加殼封裝)
- RAC響應式編程
- 快速上手ReactiveCocoa之基礎篇
- RAC ReactiveCocoa 使用小集
- 優雅的 RACCommand
- 三方庫集成及使用
- 融云IM iOS sdk 集成 一篇就夠了
- iOS YYTextView使用筆記
- iOS YYLabel使用筆記
- iOS 蘋果集成登錄及蘋果圖標的制作要求
- iOS 面向切面編程 Aspects 庫的使用
- VKMsgSend庫對oc runtime的封裝
- OC Protocol協議分發器
- iOS 高德地圖實現大頭針展示,分級大頭針,自定制大頭針,在地圖上畫線,線和點共存,路線規劃(駕車路線規劃),路線導航,等一些常見的使用場景
- 工作總結
- 自定義UINavigationBar 適配iOS11, iOS15的問題
- SFSafariViewController 加載的網頁與原生oc之間的交互
- UICollectionView 設置header的二種方法
- UIPanGestureRecognizer進行視圖滑動并處理手勢沖突
- OC與Swift混編 注意事項
- UICollectionView 設置水平滑動后,調整每個Item項的排列方式
- oc 下定義字符串枚舉
- 高性能iOS應用開發中文版讀書筆記
- iOS 圖集滑動到最后時添加“顯示更多”效果的view組件 實現
- CocoaPods 重裝
- WKWebview使用二三事
- IOS電商首頁如何布局
- iOS中的投屏方案
- CGAffineTransform 介紹
- 用Block實現鏈式編程
- iOS 本地化簡明指南
- iOS 檢查及獲取相機、麥克風、相冊、位置等權限
- iOS 手勢UIGestureRecognizer詳解
- ios 編譯時報 Could not build module xxx 的解決方法嘗試
- iOS 常見編譯報錯及解決方案匯總(持續更新)
- AVMakeRectWithAspectRatioInsideRect 的使用
- graphhopper-ios 編譯過程詳解
- 算法
- iOS實現LRU緩存
- 架構
- IOS項目架構
- 其他雜項
- 推薦一個好用的Mac精品軟件下載站
- 如何能成為一位合格的職業經理人
- 零基礎怎么學習視頻剪輯?這篇初剪輯學者指南你一定不要錯過
- 免費SSL證書的制作
- 《一部手機拍全景》匯總課
- Linux下JAVA常用命令大全
- 即時通訊
- 通訊協議與即時通訊雜談
- 簡述移動端IM開發的那些坑:架構設計、通信協議和客戶端
- 基于實踐:一套百萬消息量小規模IM系統技術要點總結
- PaddleOCR 文字識別深度學習
- PaddleOCR mac 安裝指南
- PaddleOCR 標注工具PPOCRLabel的使用
- PaddleOCR 更換模型
- PaddleOCR 自制模型訓練