## **WebSocket概述**
WebSocket是HTML5規范提出的一種應用層協議(建立在TCP協議之上,目前除了完犢子的IE瀏覽器,其他瀏覽器都基本支持),它是Web 客戶端與服務器之間實現全雙工通信的標準。既然是全雙工,就意味著不是HTTP協議那種只能從客戶端向服務器發起請求的單向通信,服務端在必要的時候也可以推送信息到客戶端,而不是被動接收客戶端請求再返回響應。
### **WebSocket的運行機制**
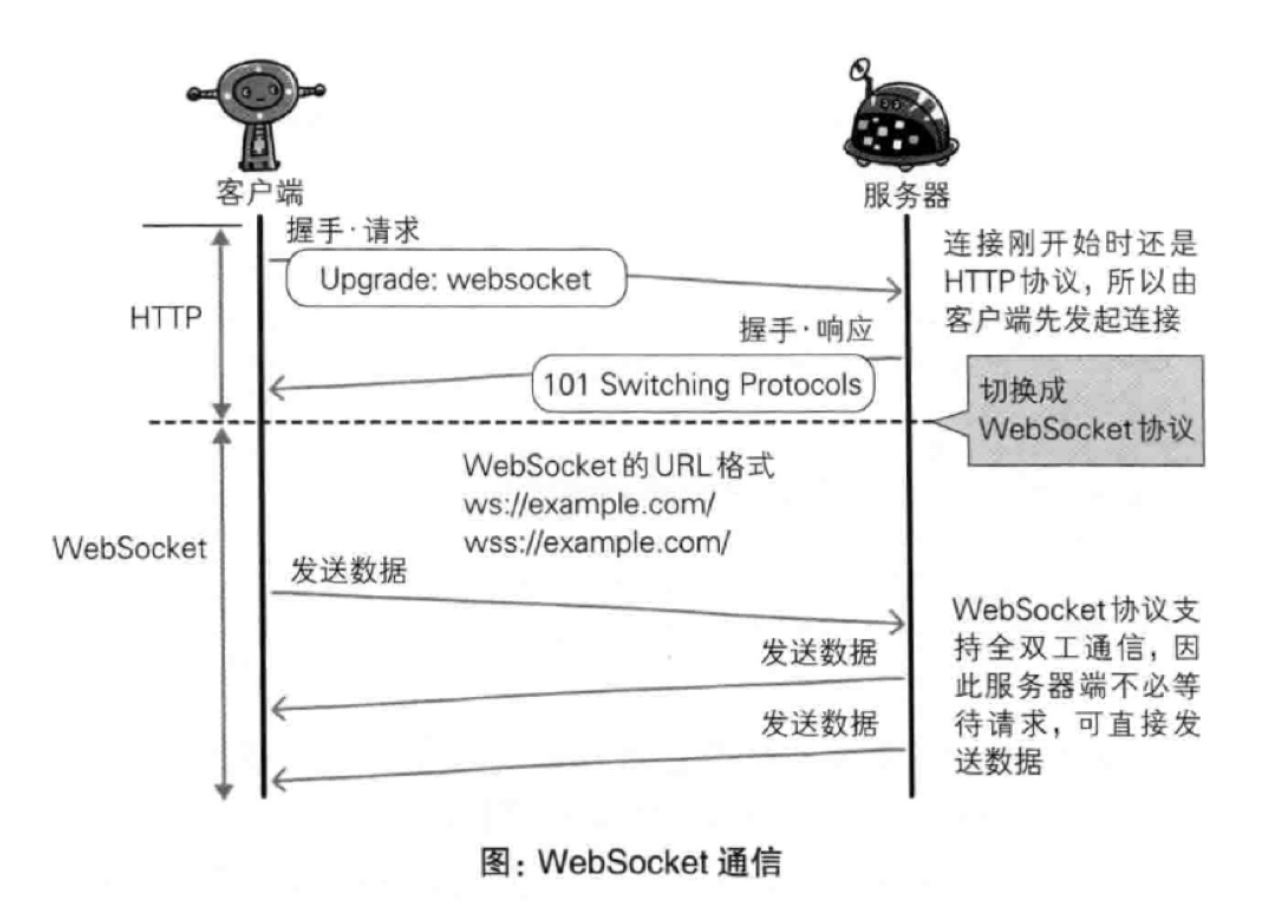
Websocket是基于HTTP協議的,或者說借用了HTTP的協議來完成一部分握手,它對應的 scheme 是 ws,加密的 WebSocket 對應的 scheme 就是 wss,域名、端口、路徑、參數則和 HTTP 協議的 URL一樣(`ws://example.com:80/some/path`)。WebSocket請求響應客戶端服務器交互過程如下:
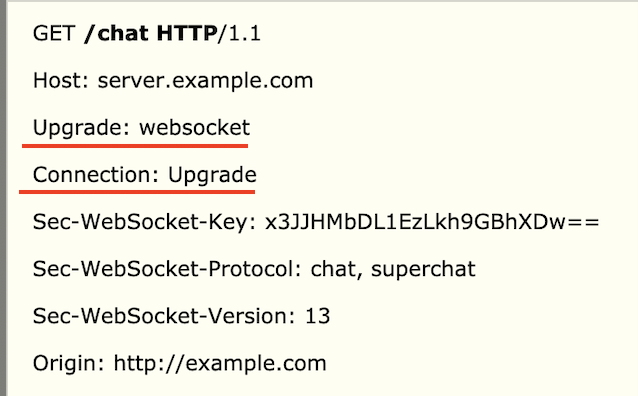
1. 請求階段:WebSocket 復用了 HTTP 的握手通道,要建立 WebSocket 通信,需要在連接發起方的 HTTP 請求報文中通過 Upgrade 字段告知服務器通信協議升級到 websocket,然后通過 Sec-WebSocket-\* 擴展字段提供 WebSocket 的協議、版本、鍵值等信息:
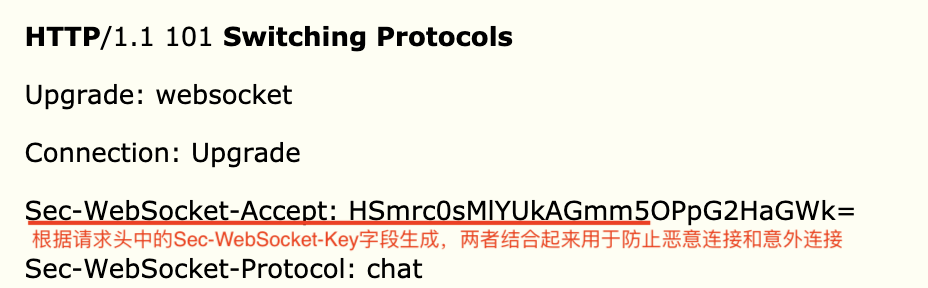
2. 響應階段:對于上述握手請求,服務器會返回 101 Switching Protocols 響應表示協議升級成功:
成功握手確立 WebSocket 連接后,后續通信就會使用 WebSocket 數據幀而不是 HTTP 數據幀——不同于HTTP報文的明文傳輸,WebSocket中所有發送數據使用幀【包含一個幀類型標識碼,一個負載長度和負載內容】的形式發送。
下面是 WebSocket 通信的時序圖:
### **WebSocket的作用**
WebSocket的主要使用場景有:**1. 即時通訊**,比如網頁QQ,聊天系統等;**2. 輪詢**,比如web開發中有些功能(掃碼登錄?)需要通過輪詢(比如每間隔5秒)去服務器讀取數據。對于這種需經常推送實時數據到客戶端的場景,以往的技術能力通常是采用ajax輪詢、Comet(long poll)技術解決:
- ajax輪詢:原理很簡單,客戶端隔個幾秒就發送一次ajax請求,詢問服務器是否有新信息。
- long poll:原理跟 ajax輪詢 差不多,也采用輪詢的方式,但采取的是阻塞模型——客戶端向服務器發送請求,服務器接到請求后hold住連接,直到有新消息才返回響應信息并關閉連接,客戶端處理完響應信息后再向服務器發送新的請求,周而復始。
從上面可以看出,這兩種方式都是非常消耗資源的,ajax輪詢 請求中有大半是無用,浪費帶寬和服務器資源,對服務器的處理速度也有所要求,而long poll的服務器hold連接會消耗資源,對服務器的并發能力也有所要求。這都是因為HTTP協議是非持久化的、單向的、被動的網絡協議。
WebSocket的出現可以彌補這一缺點。WebSocket只需要服務器和瀏覽器通過HTTP協議進行一個握手的動作,就可以單獨建立一條全雙工TCP的通信通道進行數據的傳送。在客戶端斷開 WebSocket 連接或 Server 端斷掉連接前,不需要客戶端和服務端重新發起連接請求。在海量并發及客戶端與服務器交互負載流量大的情況下,極大的節省了網絡帶寬資源的消耗,有明顯的性能優勢,且客戶端發送和接受消息是在同一個持久連接上發起,實時性優勢明顯。
> Socket是應用層與TCP/IP協議族通信的中間軟件抽象層,它是一組接口。相當于設計模式中的門面模式,它把復雜的TCP/IP協議族隱藏在Socket接口后面,對用戶來說,一組簡單的接口就是全部,讓Socket去組織數據,以符合指定的協議。
## **WebSocket服務器**
PHP 異步網絡通信引擎 Swoole 內置了對 WebSocket 的支持,通過幾行 PHP 代碼就可以寫出一個異步非阻塞多進程的WebSocket服務器:
```
<?php
// 初始化 WebSocket 服務器,在本地監聽 8000 端口
$server = new Swoole\WebSocket\Server("localhost", 8000);
// 建立連接時觸發
$server->on('open', function (Swoole\WebSocket\Server $server, $request) {
echo "server: handshake success with fd{$request->fd}\n";
});
// 收到消息時觸發推送
$server->on('message', function (Swoole\WebSocket\Server $server, $frame) {
echo "receive from {$frame->fd}:{$frame->data},opcode:{$frame->opcode},fin:{$frame->finish}\n";
$server->push($frame->fd, "this is server");
});
// 關閉 WebSocket 連接時觸發
$server->on('close', function ($ser, $fd) {
echo "client {$fd} closed\n";
});
// 啟動 WebSocket 服務器
$server->start();
```
編寫完成后,將這段 PHP 代碼保存到本地`websocket_server.php`文件。
## **WebSocket客戶端**
在客戶端,可以通過 JavaScript 調用瀏覽器內置的[WebSocket API](https://developer.mozilla.org/zh-CN/docs/Web/API/WebSockets_API)實現 WebSocket 客戶端,實現代碼和服務端差不多,無論服務端還是客戶端 WebSocket 都是通過事件驅動的,我們在一個 HTML 文檔中引入相應的 JavaScript 代碼:
```
<!DOCTYPE html>
<html>
<head>
<meta charset="UTF-8">
<title>Chat Client</title>
</head>
<body>
<script>
window.onload = function () {
var nick = prompt("Enter your nickname");
var input = document.getElementById("input");
input.focus();
// 初始化客戶端套接字并建立連接
var socket = new WebSocket("ws://localhost:8000");
// 連接建立時觸發
socket.onopen = function (event) {
console.log("Connection open ...");
}
// 接收到服務端推送時執行
socket.onmessage = function (event) {
var msg = event.data;
var node = document.createTextNode(msg);
var div = document.createElement("div");
div.appendChild(node);
document.body.insertBefore(div, input);
input.scrollIntoView();
};
// 連接關閉時觸發
socket.onclose = function (event) {
console.log("Connection closed ...");
}
input.onchange = function () {
var msg = nick + ": " + input.value;
// 將輸入框變更信息通過 send 方法發送到服務器
socket.send(msg);
input.value = "";
};
}
</script>
<input id="input" style="width: 100%;">
</body>
</html>
```
將這個 HTML 文檔命名為`websocket_client.html`。
## **WebSocket通信演示**
接下來,我們在命令行啟動 WebSocket 服務器:
~~~
php websocket.php
~~~
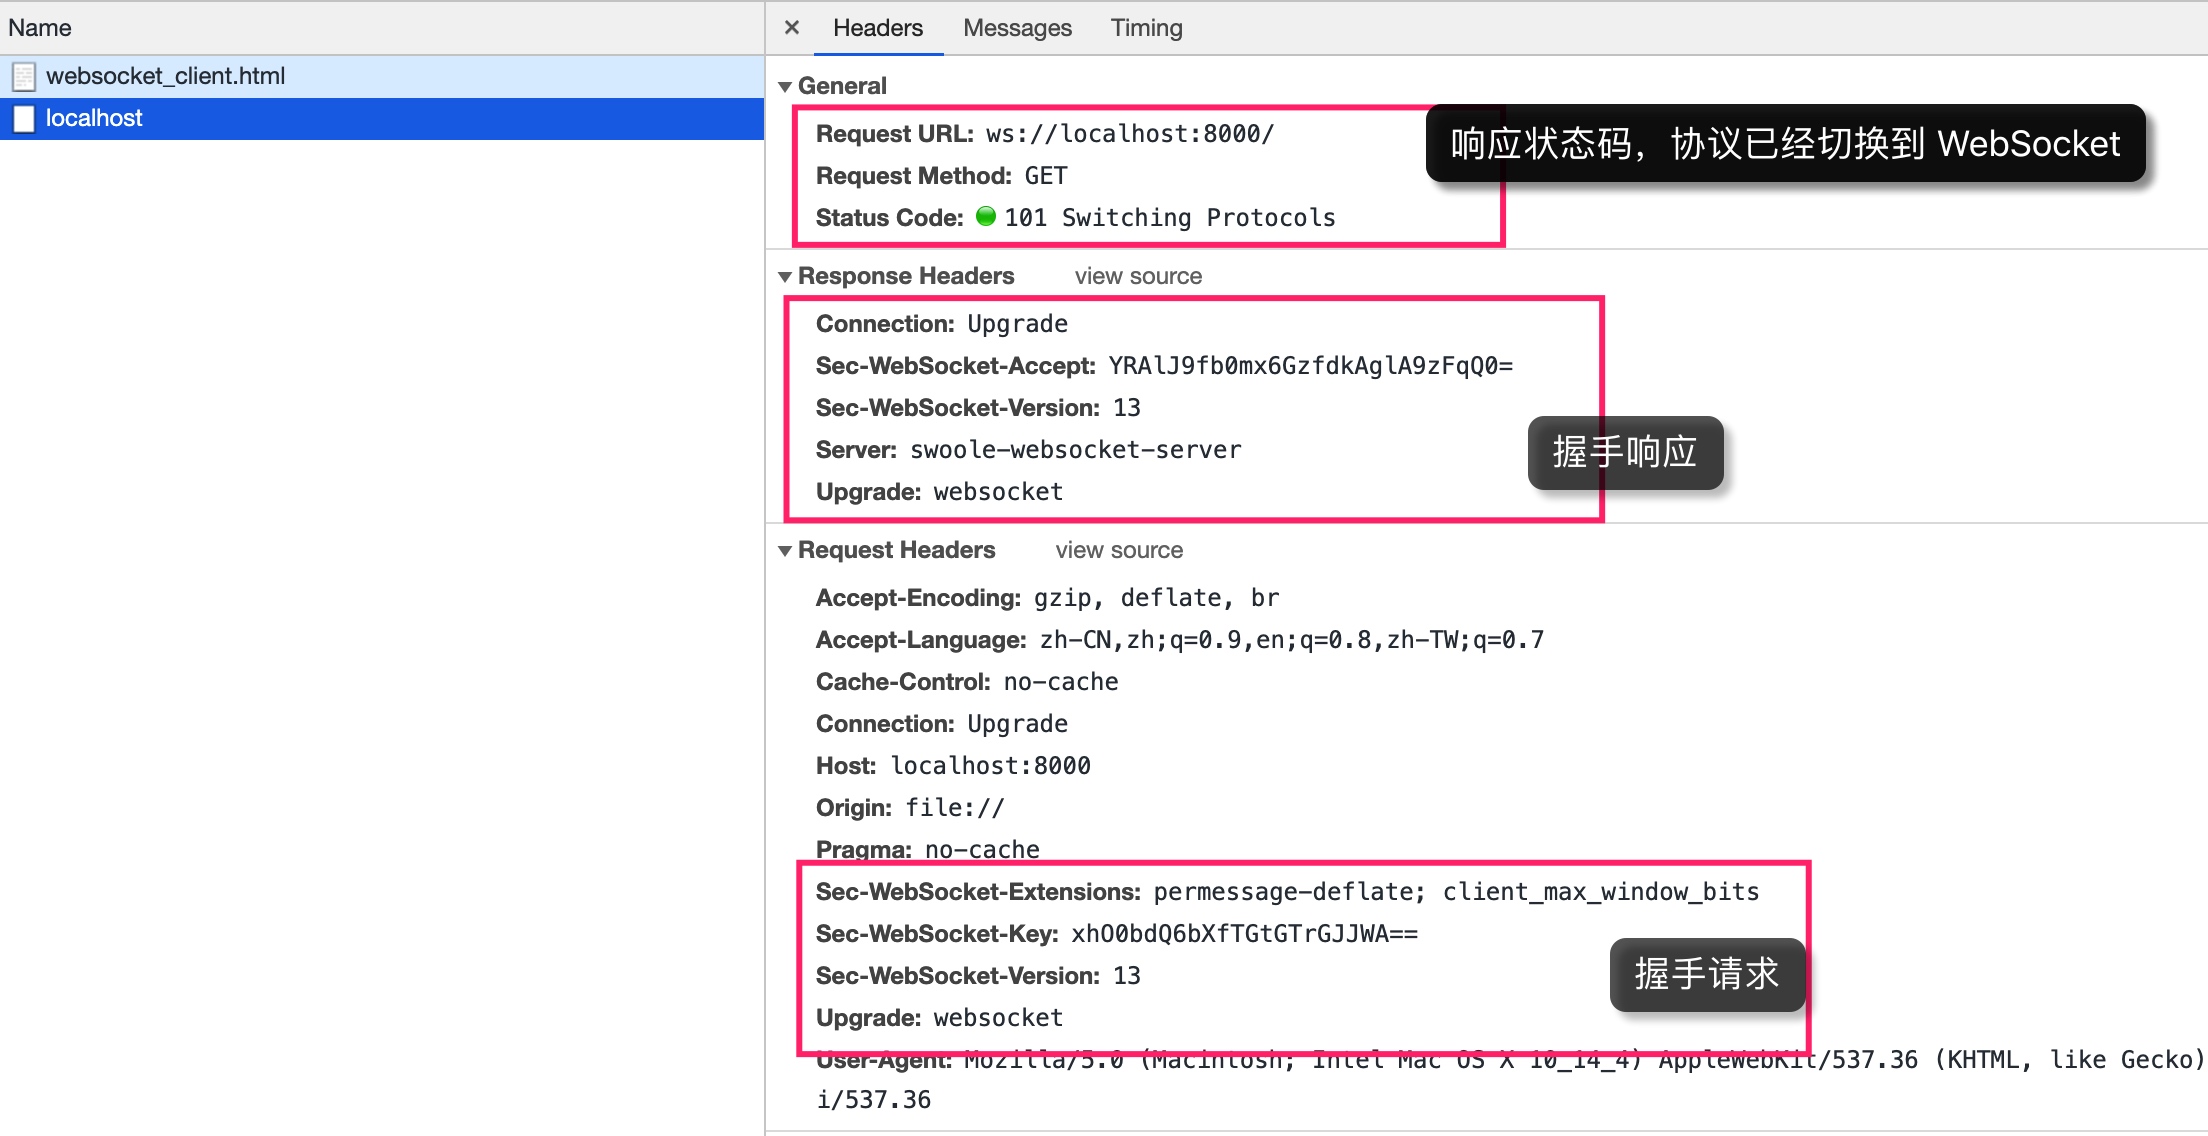
然后在瀏覽器中訪問`websocket_client.html`,首先會提示我們輸入昵稱,輸入之后點擊確定,JavaScript 代碼會繼續往下執行,讓輸入框獲取焦點,然后初始化 WebSocket 客戶端并連接到服務器,這個時候通過開發者工具可以看到 Console 標簽頁已經輸出了連接已建立日志:

在 Network 里面也可以看到 WebSocket 握手請求和響應:
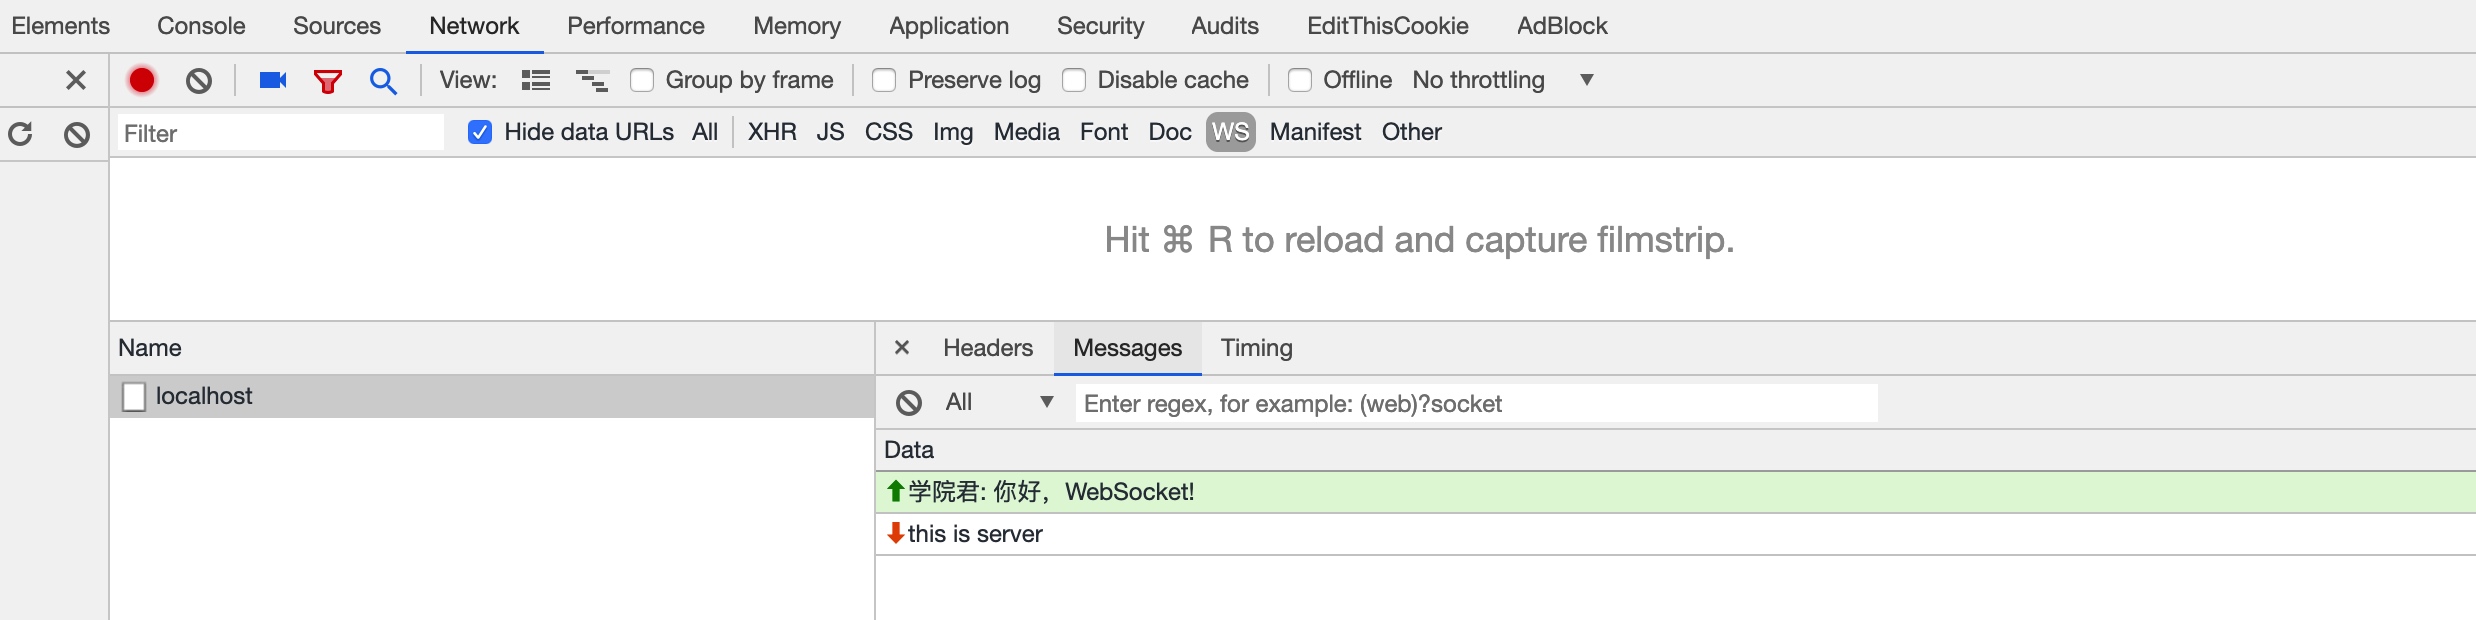
這個時候我們在輸入框中輸入「你好,WebSocket!」并回車,即可觸發客戶端發送該數據到服務器,服務器接收到消息后會將其顯示出來:

同時將「This is server」消息推送給客戶端,客戶端通過`onmessage`回調函數將獲取到的數據顯示出來。在開發者工具的 Network->WS 標簽頁可以查看 WebSocket 通信細節:
看起來,這個過程還是客戶端觸發服務器執行推送操作,但實際上,在建立連接并獲取到這個客戶端的唯一標識后,后續服務端資源有更新的情況下,仍然可以通過這個標識主動將更新推送給客戶端,而不需要客戶端發起拉取請求。WebSocket 服務器和客戶端在實際項目中的實現可能會更加復雜,但是基本原理是一致的。
## **在Laravel中集成Swoole實現WebSocket服務器**
我們將基于[LaravelS](https://github.com/hhxsv5/laravel-s)擴展包把 Swoole 集成到 Laravel 項目來實現 WebSocket 服務器,以便與客戶端進行 WebSocket 通信從而實現廣播功能。
### **創建WebSocketService類**
基于LaravelS擴展包實現WebSocket服務器,首先需要創建一個實現了`Hhxsv5\LaravelS\Swoole\WebSocketHandlerInterface`接口的`WebSocketService`類:
```
<?php
namespace App\Services;
use Hhxsv5\LaravelS\Swoole\WebSocketHandlerInterface;
use Illuminate\Support\Facades\Log;
use Swoole\Http\Request;
use Swoole\WebSocket\Frame;
use Swoole\WebSocket\Server;
class WebSocketService implements WebSocketHandlerInterface
{
public function __construct()
{
}
// 連接建立時觸發
public function onOpen(Server $server, Request $request)
{
// 在觸發 WebSocket 連接建立事件之前,Laravel 應用初始化的生命周期已經結束,你可以在這里獲取 Laravel 請求和會話數據
// 調用 push 方法向客戶端推送數據,fd 是客戶端連接標識字段
Log::info('WebSocket 連接建立');
$server->push($request->fd, 'Welcome to WebSocket Server built on LaravelS');
}
// 收到消息時觸發
public function onMessage(Server $server, Frame $frame)
{
// 調用 push 方法向客戶端推送數據
$server->push($frame->fd, 'This is a message sent from WebSocket Server at ' . date('Y-m-d H:i:s'));
}
// 關閉連接時觸發
public function onClose(Server $server, $fd, $reactorId)
{
Log::info('WebSocket 連接關閉');
}
}
```
在這個 WebSocket 服務器類中,需要實現接口中聲明的方法,其實就是 WebSocket 通信事件的回調函數,和上例中的WebSocket服務器基本一致,只是通過類進行了封裝而已。
### **修改配置文件**
接下來,打開配置文件`config/laravels.php`,啟用 WebSocket 通信并將剛剛創建的服務器類配置到對應的配置項:
~~~
'websocket' => [
'enable' => true,
'handler' => \App\Services\WebSocketService::class,
],
~~~
我們還可以在`swoole`配置項中配置 WebSocket 長連接的強制關閉邏輯:
~~~
'swoole' => [
...
// 每隔 60s 檢測一次所有連接,如果某個連接在 600s 內都沒有發送任何數據,則關閉該連接
'heartbeat_idle_time' => 600,
'heartbeat_check_interval' => 60,
...
],
~~~
### **配置Nginx支持WebSocket**
由于 WebSocket 通信是基于 HTTP 協議的,所以,我們還要配置 HTTP 服務器來支持 WebSocket 請求,以 Nginx 為例,我們在[基于 Swoole 實現 HTTP 服務器一節](#)中添加的 Nginx 配置文件基礎上進行 WebSocket 配置,為了與之前基于 PHP-FPM 作為進程管理器的站點配置區分開,創建一個新的站點配置`todoapp-s.conf`(基于待辦任務項目進行測試),編輯配置文件內容如下:
```
map $http_upgrade $connection_upgrade {
default upgrade;
'' close;
}
upstream laravels {
# Connect IP:Port
server 127.0.0.1 weight=5 max_fails=3 fail_timeout=30s;
keepalive 16;
}
server {
listen 80;
server_name todo-s.test;
root /var/www/todoapp/public;
error_log /var/log/nginx/todoapp_s_error.log;
access_log /var/log/nginx/todoapp_s_access.log;
index index.php index.html index.htm;
# Nginx handles the static resources(recommend enabling gzip), LaravelS handles the dynamic resource.
location / {
try_files $uri @laravels;
}
# Response 404 directly when request the PHP file, to avoid exposing public/*.php
#location ~* \.php$ {
# return 404;
#}
# Http and WebSocket are concomitant, Nginx identifies them by "location"
# !!! The location of WebSocket is "/ws"
# Javascript: var ws = new WebSocket("ws://todo-s.test/ws");
# 處理 WebSocket 通信
location =/ws {
# proxy_connect_timeout 60s;
# proxy_send_timeout 60s;
# proxy_read_timeout: Nginx will close the connection if the proxied server does not send data to Nginx in 60 seconds; At the same time, this close behavior is also affected by heartbeat setting of Swoole.
# proxy_read_timeout 60s;
proxy_http_version 1.1;
proxy_set_header X-Real-IP $remote_addr;
proxy_set_header X-Real-PORT $remote_port;
proxy_set_header X-Forwarded-For $proxy_add_x_forwarded_for;
proxy_set_header Host $http_host;
proxy_set_header Scheme $scheme;
proxy_set_header Server-Protocol $server_protocol;
proxy_set_header Server-Name $server_name;
proxy_set_header Server-Addr $server_addr;
proxy_set_header Server-Port $server_port;
proxy_set_header Upgrade $http_upgrade;
proxy_set_header Connection $connection_upgrade;
proxy_pass http://laravels;
}
location @laravels {
# proxy_connect_timeout 60s;
# proxy_send_timeout 60s;
# proxy_read_timeout 60s;
proxy_http_version 1.1;
proxy_set_header Connection "";
proxy_set_header X-Real-IP $remote_addr;
proxy_set_header X-Real-PORT $remote_port;
proxy_set_header X-Forwarded-For $proxy_add_x_forwarded_for;
proxy_set_header Host $http_host;
proxy_set_header Scheme $scheme;
proxy_set_header Server-Protocol $server_protocol;
proxy_set_header Server-Name $server_name;
proxy_set_header Server-Addr $server_addr;
proxy_set_header Server-Port $server_port;
proxy_pass http://laravels;
}
}
```
配置完成后,即可構建容器并重新啟動。
此外,記得在對應 Laravel 項目根目錄下`.env`環境配置文件中設置如下配置項:
~~~
LARAVELS_LISTEN_IP=127.0.0.1 // 這里的 IP 需要和 nginx upstream 中配置的監聽 IP 保持一致
LARAVELS_DAEMONIZE=true
~~~
### **演示基于Laravel的WebSocket通信**
在 Laravel 項目根目下啟動 Swoole 服務器:
~~~
php bin/laravels start
~~~
然后,修改上例`websocket_client.html`中WebSocket Server IP 和端口修改如下:
~~~
// 初始化 WebSocket 客戶端套接字并建立與服務器的連接
var socket = new WebSocket("ws://todo-s.test/ws");
~~~
在瀏覽器中訪問這個客戶端 HTML 文件,在彈出窗口輸入用戶名,然后點擊「確定」,即可開始建立與 Laravel WebSocket 服務器的通信:

同時,在`storage/logs`目錄下也可以看到通信連接建立與斷開的日志信息:
~~~
[2019-05-22 13:55:02] local.INFO: WebSocket 連接建立
[2019-05-22 13:55:10] local.INFO: WebSocket 連接關閉
[2019-05-22 13:56:25] local.INFO: WebSocket 連接建立
[2019-05-22 13:57:25] local.INFO: WebSocket 連接關閉
[2019-05-22 14:01:18] local.INFO: WebSocket 連接建立
[2019-05-22 14:02:20] local.INFO: WebSocket 連接關閉
~~~
