## 權限控制
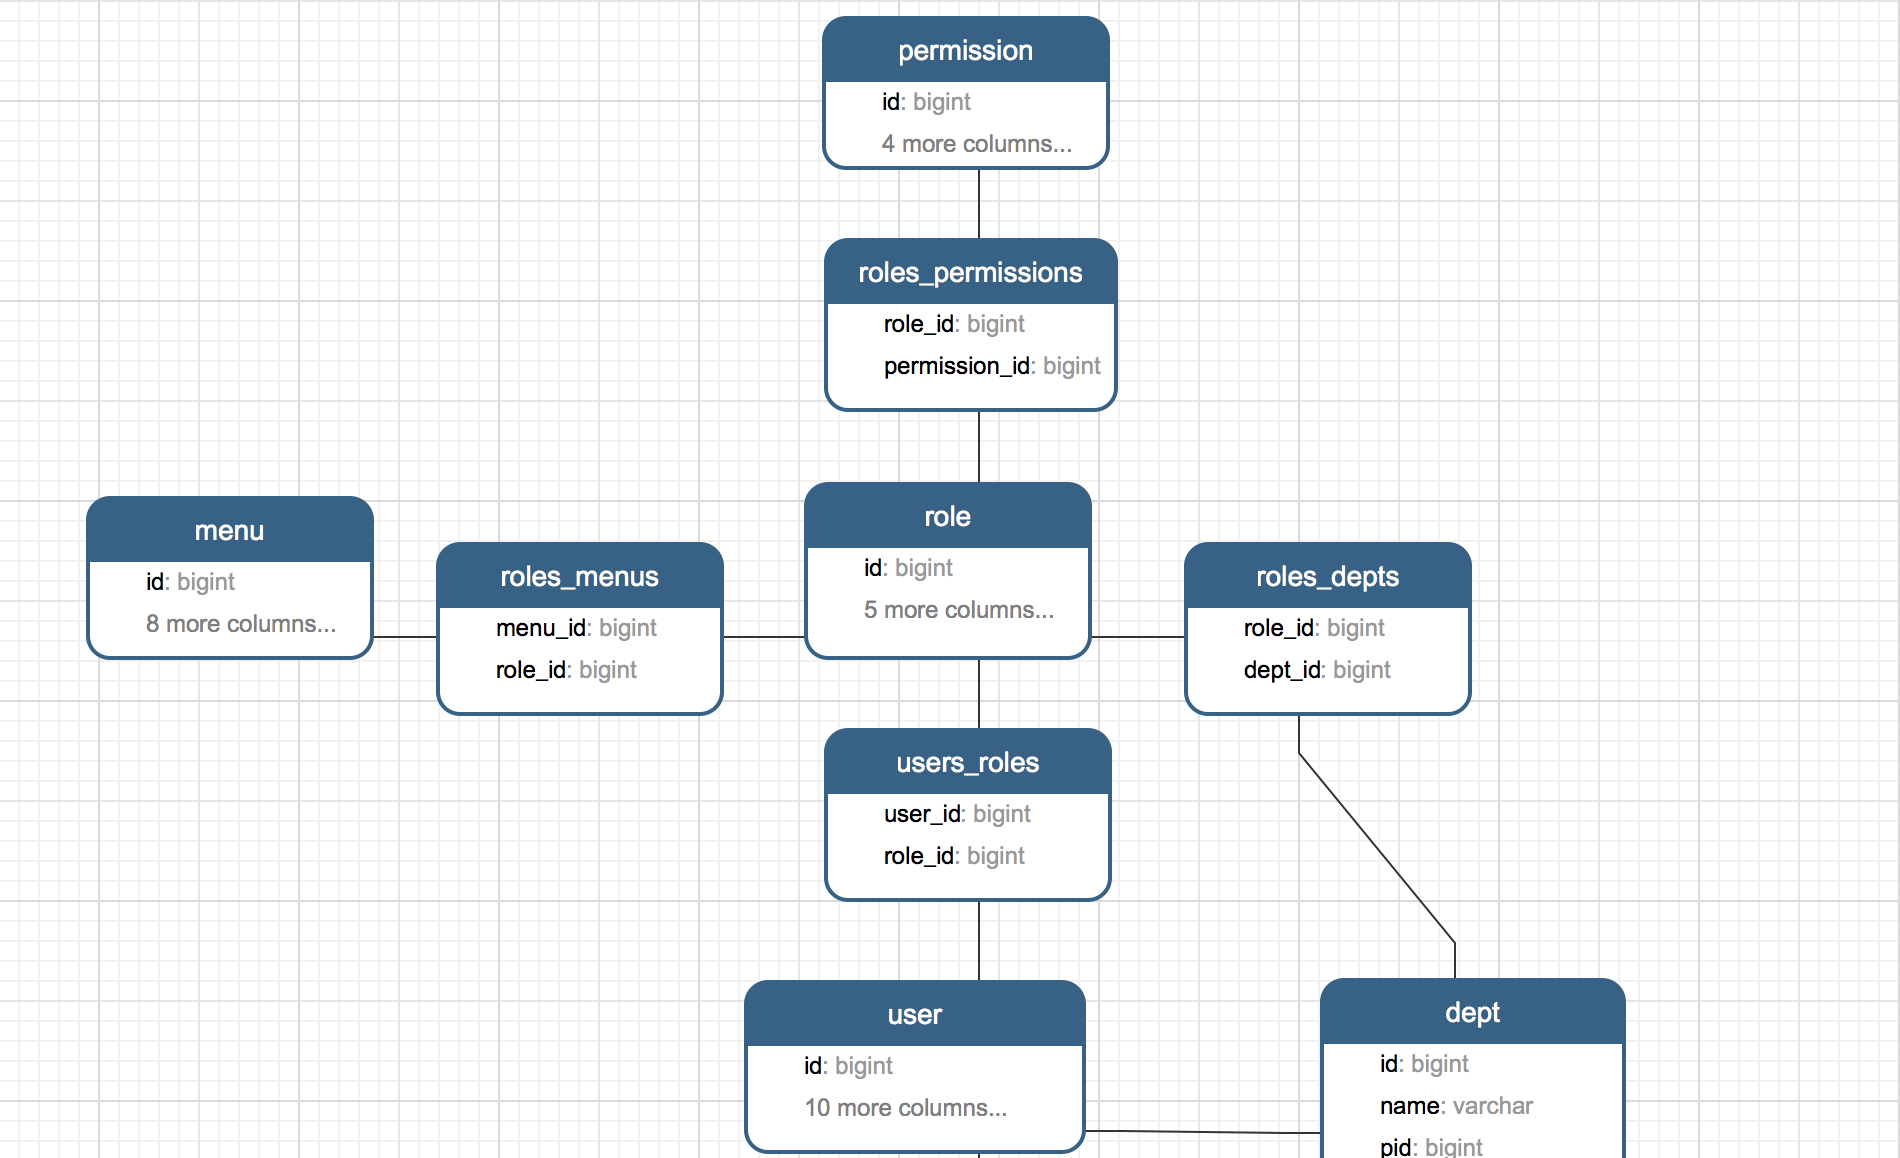
本系統權限控制采用`RBAC`思想。簡單地說,一個用戶擁有若干角色,每一個角色擁有若干權限,每一個角色擁有若干個菜單,這樣,就構造成“用戶-角色-權限”、“角色-菜單” 的授權模型。在這種模型中,用戶與角色、角色與權限、角色與菜單之間構成了多對多的關系,如下圖
#### 后端權限控制
本系統安全框架使用的是`Spring Security + Jwt Token`, 訪問后端接口需在請求頭中攜帶`token`進行訪問,請求頭格式如下:
~~~
# Authorization: Bearer 登錄時返回的token
Authorization: Bearer eyJhbGciOiJIUzUxMiJ9.eyJzdWIiOiJhZG1pbiIsImV4cCI6MTU1ODk2NzY0OSwiaWF0IjoxNTU4OTQ2MDQ5fQ.jsJvqHa1tKbJazG0p9kq5J2tT7zAk5B6N_CspdOAQLWgEICStkMmvLE-qapFTtWnnDUPAjqmsmtPFSWYaH5LtA
~~~
也可以過濾一些接口如:`Druid`監控,`swagger`文檔等。
配置文件位于:`skadmin-admin-service -> config -> SecurityConfig`
~~~
// 關鍵代碼,部分略
protected void configure(HttpSecurity httpSecurity) throws Exception {
httpSecurity
// 禁用 CSRF
.csrf().disable()
// 授權異常
.exceptionHandling().authenticationEntryPoint(unauthorizedHandler).and()
// 不創建會話
.sessionManagement().sessionCreationPolicy(SessionCreationPolicy.STATELESS).and()
.authorizeRequests()
.antMatchers("/druid/**").permitAll()
// swagger 文檔
.antMatchers("/swagger-ui.html").anonymous()
.antMatchers("/swagger-resources/**").anonymous()
.antMatchers("/webjars/**").anonymous()
.antMatchers("/*/api-docs").anonymous()
// 所有請求都需要認證
.anyRequest().authenticated();
httpSecurity
.addFilterBefore(authenticationTokenFilter, UsernamePasswordAuthenticationFilter.class);
}
~~~
`permitAll()`方法指所有登錄和未登錄人員都可以訪問,這個會經過`security filter`
`anonymous()`所有人都能訪問,但是這個不會經過`security filter`
#### 系統數據交互
用戶登錄 -> 后端驗證登錄返回`token`\-> 前端帶上`token`請求后端數據 -> 后端返回數據, 數據交互流程如下:

#### 接口權限控制
`Spring Security`提供了`Spring EL`表達式,允許我們在定義接口訪問的方法上面添加注解,來控制訪問權限,相關`EL`總結如下:
| 表達式 | 描述 |
| --- | --- |
| hasRole(\[role\]) | 當前用戶是否擁有指定角色。 |
| hasAnyRole(\[role1,role2\]) | 多個角色是一個以逗號進行分隔的字符串。如果當前用戶擁有指定角色中的任意一個則返回true。 |
| hasAuthority(\[auth\]) | 等同于hasRole |
| hasAnyAuthority(\[auth1,auth2\]) | 等同于hasAnyRole |
| Principle | 代表當前用戶的principle對象 |
| authentication | 直接從SecurityContext獲取的當前Authentication對象 |
| permitAll | 總是返回true,表示允許所有的 |
| denyAll | 總是返回false,表示拒絕所有的 |
| isAnonymous() | 當前用戶是否是一個匿名用戶 |
| isRememberMe() | 表示當前用戶是否是通過Remember-Me自動登錄的 |
| isAuthenticated() | 表示當前用戶是否已經登錄認證成功了。 |
| isFullyAuthenticated() | 如果當前用戶既不是一個匿名用戶,同時又不是通過Remember-Me自動登錄的,則返回true。 |
下面的接口表示用戶擁有`ADMIN`、`MENU_ALL`、`MENU_EDIT`三個權限中的任意一個就能能訪問`update`方法,如果方法不加`@preAuthorize`注解,意味著所有用戶都帶上有效的`token`后能訪問`update`方法
~~~
@Log(description = "修改菜單")
@PutMapping(value = "/menu")
@PreAuthorize("hasAnyRole('ADMIN','MENU_ALL','MENU_EDIT')")
public ResponseEntity update(@Validated @RequestBody Menu resources){
// 略
}
~~~
#### 通用查詢
本系統對Jpa的查詢進行了封裝,現可以通過注解方式實現簡單的查詢與復雜查詢,簡單查詢:`等于、大于等于、小于等于、模糊查詢、包含(IN)查詢等`,復雜查詢:`左連接、右連接`,如需使用復雜查詢,可以查看源碼中的`JobQueryCriteria`,下面介紹簡單查詢的使用方法
##### 使用方式
1、首先編寫查詢類,如日志查詢:
~~~
/**
* 日志查詢類
* @author Sinkiang
* @date 2019-6-8 09:23:07
*/
@Data
public class LogQuery {
@Query(type = Query.Type.LIKE)
private String username;
@Query
private String logType;
@Query(type = Query.Type.LIKE)
private String description;
}
~~~
2、Controller 中使用
~~~
public ResponseEntity<Object> getLog(LogQuery query, Pageable pageable){
return new ResponseEntity<>(logService.queryAll(query, pageable), HttpStatus.OK);
}
~~~
3、Service 中查詢
~~~
@Override
public Page<Log> queryAll(LogQuery query, Pageable pageable){
Page<Log> page = logRepository.findAll(((root, query, cb) -> .getPredicate(root, query, cb)), pageable);
return page;
}
~~~
這樣做的好處是,如果需要添加一個字段查詢,只需要在查詢類中添加就可以了,可以節省大量時間
#### 系統緩存
本系統緩存使用的是`redis`,默認使用`Spring`的注解對系統緩存進行操作,并且提供了可視化的`redis`緩存操作
#### 配置緩存
`redis`配置文件位于`skadmin-common - > redis`,部分配置文件如下:
~~~
public class RedisConfig extends CachingConfigurerSupport {
@Value("${spring.redis.host}")
private String host;
@Value("${spring.redis.port}")
private int port;
@Value("${spring.redis.timeout}")
private int timeout;
@Value("${spring.redis.jedis.pool.max-idle}")
private int maxIdle;
@Value("${spring.redis.jedis.pool.max-wait}")
private long maxWaitMillis;
@Value("${spring.redis.password}")
private String password;
/**
* 配置 redis 連接池
* @return
*/
@Bean
public JedisPool redisPoolFactory(){
JedisPoolConfig jedisPoolConfig = new JedisPoolConfig();
jedisPoolConfig.setMaxIdle(maxIdle);
jedisPoolConfig.setMaxWaitMillis(maxWaitMillis);
if (StrUtil.isNotBlank(password)) {
return new JedisPool(jedisPoolConfig, host, port, timeout, password);
} else {
return new JedisPool(jedisPoolConfig, host, port,timeout);
}
}
/**
* 設置 redis 數據默認過期時間
* 設置@cacheable 序列化方式
* @return
*/
@Bean
public RedisCacheConfiguration redisCacheConfiguration(){
FastJsonRedisSerializer<Object> fastJsonRedisSerializer = new FastJsonRedisSerializer<>(Object.class);
RedisCacheConfiguration configuration = RedisCacheConfiguration.defaultCacheConfig();
configuration = configuration.serializeValuesWith(RedisSerializationContext.SerializationPair.fromSerializer(fastJsonRedisSerializer)).entryTtl(Duration.ofHours(2));
return configuration;
}
@Bean(name = "redisTemplate")
@ConditionalOnMissingBean(name = "redisTemplate")
public RedisTemplate<Object, Object> redisTemplate(RedisConnectionFactory redisConnectionFactory) {
RedisTemplate<Object, Object> template = new RedisTemplate<>();
//序列化
FastJsonRedisSerializer fastJsonRedisSerializer = new FastJsonRedisSerializer(Object.class);
// value值的序列化采用fastJsonRedisSerializer
template.setValueSerializer(fastJsonRedisSerializer);
template.setHashValueSerializer(fastJsonRedisSerializer);
// 全局開啟AutoType,不建議使用
// ParserConfig.getGlobalInstance().setAutoTypeSupport(true);
// 建議使用這種方式,小范圍指定白名單
ParserConfig.getGlobalInstance().addAccept("com.dxj.admin.service.dto");
// key的序列化采用StringRedisSerializer
template.setKeySerializer(new StringRedisSerializer());
template.setHashKeySerializer(new StringRedisSerializer());
template.setConnectionFactory(redisConnectionFactory);
return template;
}
/**
* 自定義緩存key生成策略
* 使用方法 @Cacheable(keyGenerator="keyGenerator")
* @return
*/
@Bean
@Override
public KeyGenerator keyGenerator() {
return (target, method, params) -> {
StringBuilder sb = new StringBuilder();
sb.append(target.getClass().getName());
sb.append(method.getName());
for (Object obj : params) {
sb.append(obj.toString());
}
log.info(sb.toString());
return sb.toString();
};
}
}
~~~
#### 緩存注解
* @CacheConfig:主要用于配置該類中會用到的一些共用的緩存配置
* @Cacheable:主要方法的返回值將被加入緩存。在查詢時,會先從緩存中獲取,若不存在才再發起對數據庫的訪問
* @CachePut:主要用于數據新增和修改操作
* @CacheEvict:配置于函數上,通常用在刪除方法上,用來從緩存中移除相應數據
使用如下:
~~~
@CacheConfig(cacheNames = "qiNiu")
public interface QiNiuService {
/**
* 查配置
* @return
*/
@Cacheable(key = "'1'")
QiniuConfig find();
/**
* 修改配置
* @param qiniuConfig
* @return
*/
@CachePut(key = "'1'")
QiniuConfig update(QiniuConfig qiniuConfig);
/**
* 查詢文件,使用自定義key
* @param id
* @return
*/
@Cacheable(keyGenerator = "keyGenerator")
QiniuContent findByContentId(Long id);
/**
* 刪除文件
* @param content
* @param config
* @return
*/
@CacheEvict(allEntries = true)
void delete(QiniuContent content, QiniuConfig config);
}
~~~
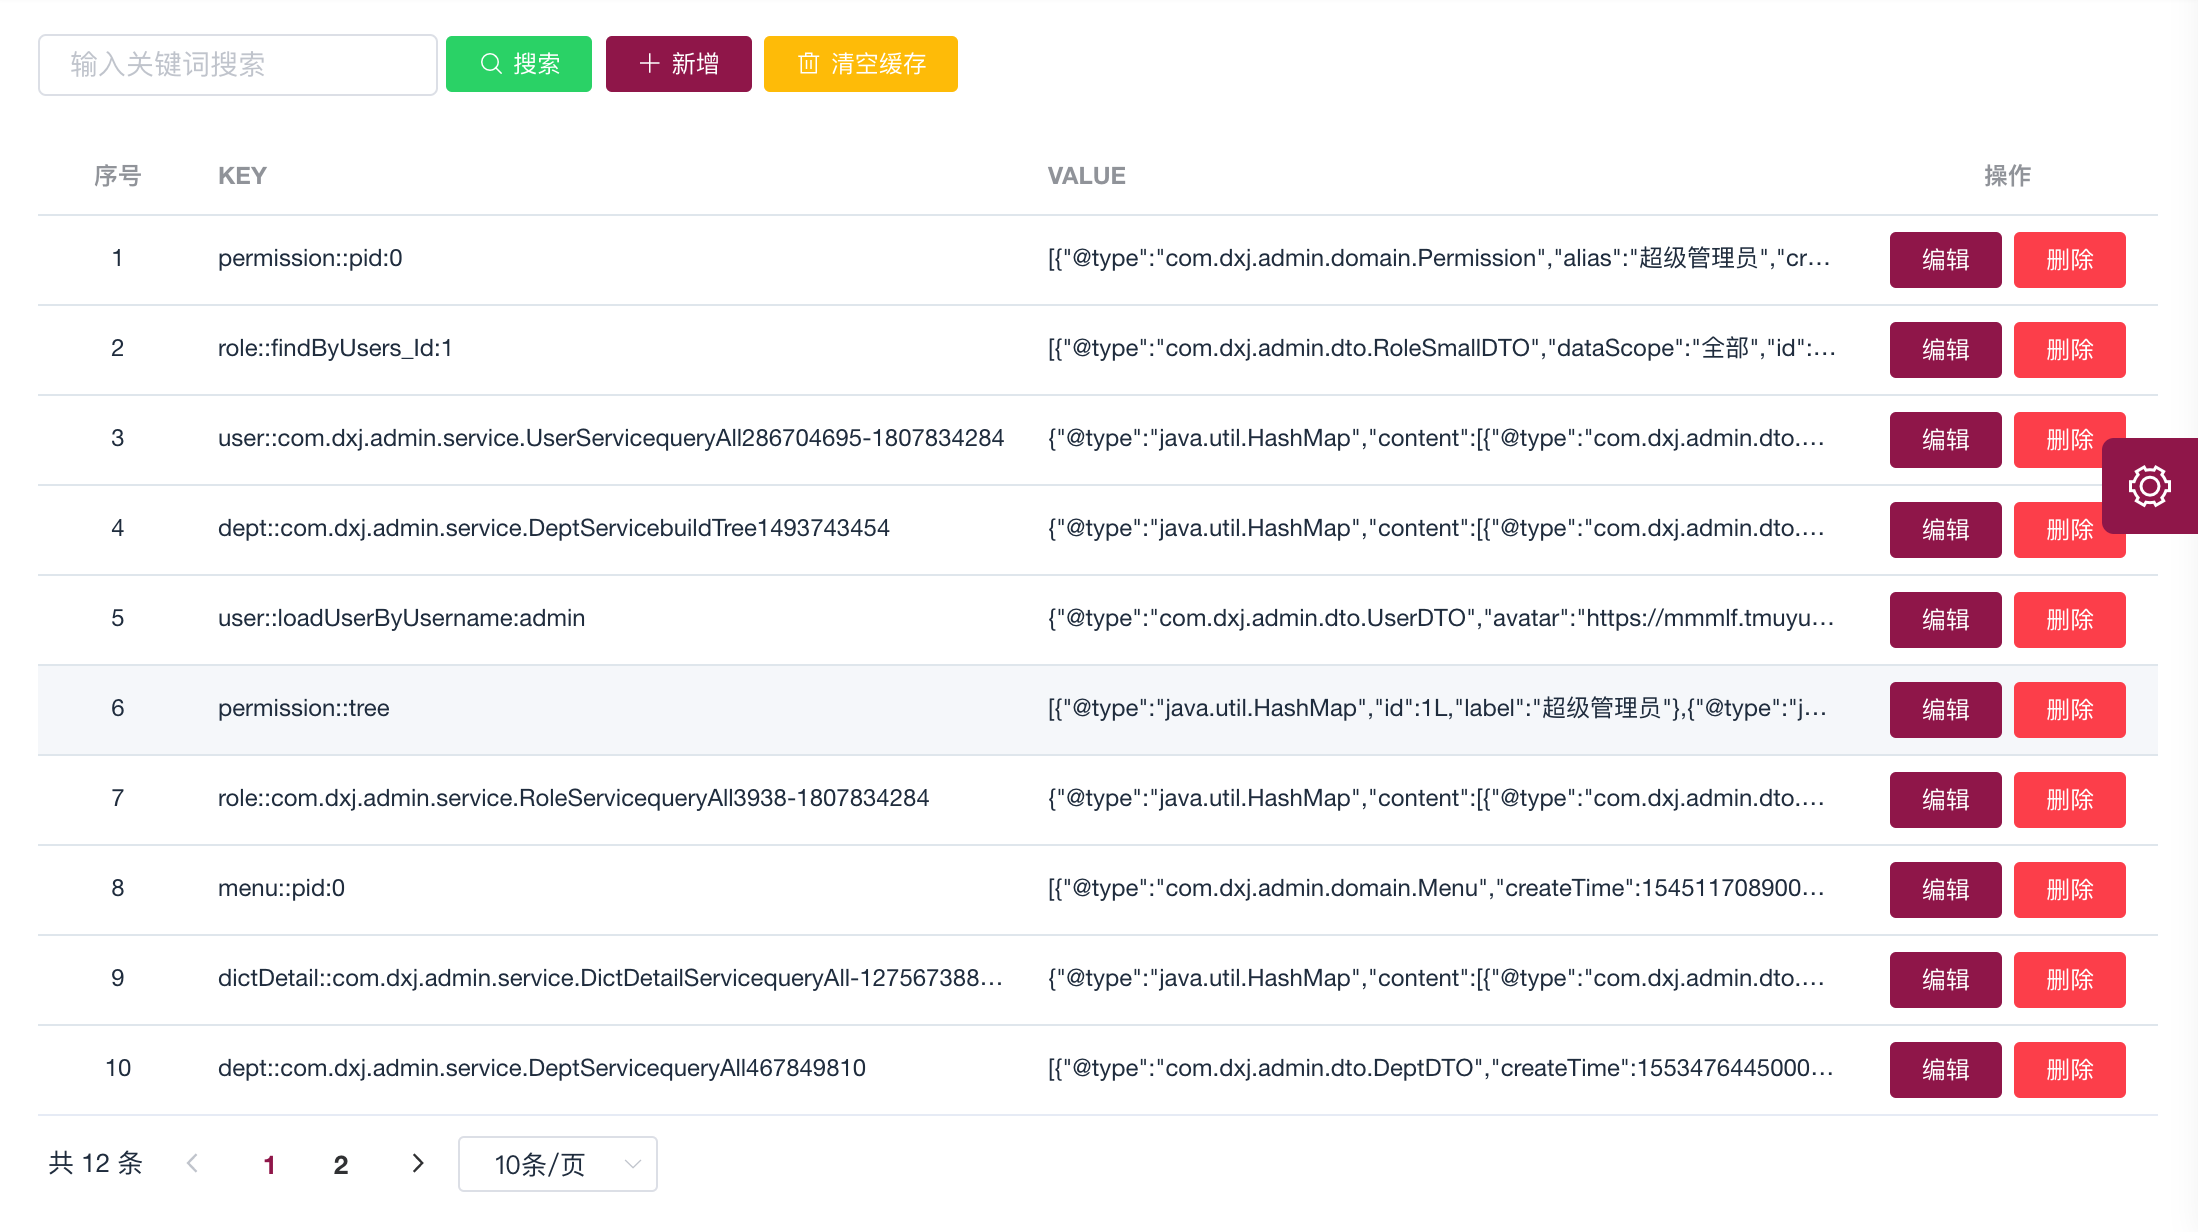
#### 可視化redis操作
#### 異常處理
我們開發項目的時,數據在請求過程中發生錯誤是非常常見的事情。如:權限不足、數據唯一異常、數據不能為空異常、義務異常等。這些異常如果不經過處理會對前端開發人員和使用者造成不便,因此我們就需要統一處理他們。
源碼位于:`skadmin-common - > exception`
#### 定義實體異常
~~~
@Data
class ApiError {
private Integer status;
@JsonFormat(pattern = "yyyy-MM-dd HH:mm:ss")
private LocalDateTime timestamp;
private String message;
private ApiError() {
timestamp = LocalDateTime.now();
}
public ApiError(Integer status,String message) {
this();
this.status = status;
this.message = message;
}
}
~~~
#### 封裝異常處理
#### 1、通用異常
封裝了`BadRequestException`,用于處理通用的異常
~~~
@Getter
public class BadRequestException extends RuntimeException{
private Integer status = BAD_REQUEST.value();
public BadRequestException(String msg){
super(msg);
}
public BadRequestException(HttpStatus status,String msg){
super(msg);
this.status = status.value();
}
}
~~~
#### 2、實體相關異常
(1) 實體不存在:`EntityNotFoundException`
(2) 實體已存在:`EntityExistException`
使用場景,刪除用戶的時候是根據ID刪除的,可判斷ID是否存在,拋出異常;新增用戶的時候用戶名是唯一的,可判斷用戶是否存在,拋出異常
#### 全局異常攔截
使用全局異常處理器`@RestControllerAdvice`處理請求發送的異常,部分代碼如下:
~~~
@RestControllerAdvice
public class GlobalExceptionHandler {
/**
* 處理所有不可知的異常
* @param e
* @return
*/
@ExceptionHandler(Throwable.class)
public ResponseEntity handleException(Throwable e){
// 打印堆棧信息
log.error(ThrowableUtil.getStackTrace(e));
ApiError apiError = new ApiError(BAD_REQUEST.value(),e.getMessage());
return buildResponseEntity(apiError);
}
/**
* 處理自定義異常
* @param e
* @return
*/
@ExceptionHandler(value = BadRequestException.class)
public ResponseEntity<ApiError> badRequestException(BadRequestException e) {
// 打印堆棧信息
log.error(ThrowableUtil.getStackTrace(e));
ApiError apiError = new ApiError(e.getStatus(),e.getMessage());
return buildResponseEntity(apiError);
}
/**
* 處理 EntityExist
* @param e
* @return
*/
@ExceptionHandler(value = EntityExistException.class)
public ResponseEntity<ApiError> entityExistException(EntityExistException e) {
// 打印堆棧信息
log.error(ThrowableUtil.getStackTrace(e));
ApiError apiError = new ApiError(BAD_REQUEST.value(),e.getMessage());
return buildResponseEntity(apiError);
}
/**
* 處理 EntityNotFound
* @param e
* @return
*/
@ExceptionHandler(value = EntityNotFoundException.class)
public ResponseEntity<ApiError> entityNotFoundException(EntityNotFoundException e) {
// 打印堆棧信息
log.error(ThrowableUtil.getStackTrace(e));
ApiError apiError = new ApiError(NOT_FOUND.value(),e.getMessage());
return buildResponseEntity(apiError);
}
/**
* 統一返回
* @param apiError
* @return
*/
private ResponseEntity<ApiError> buildResponseEntity(ApiError apiError) {
return new ResponseEntity(apiError, HttpStatus.valueOf(apiError.getStatus()));
}
}
~~~
#### 具體使用
~~~
throw new BadRequestException("發生了異常");
~~~
#### 系統日志
本系統使用`AOP`記錄用戶操作日志,只需要在`controller`的方法上使用`@Log("")`注解,就可以將用戶操作記錄到數據庫,源碼可查看`eladmin-logging`
模塊具體使用如下:
~~~
@Log("新增用戶")
@PostMapping(value = "/users")
@PreAuthorize("hasAnyRole('ADMIN','USER_ALL','USER_CREATE')")
public ResponseEntity create(@Validated @RequestBody User resources){
checkLevel(resources);
return new ResponseEntity(userService.create(resources),HttpStatus.CREATED);
}
~~~
頁面上可以看到`操作日志`和`異常日志`
##### 操作日志

##### 異常日志

#### 數據權限
本系統是基于部門做的一個簡單數據權限控制,也就是通過用戶角色中的數據權限控制用戶能看哪些數據。目前系統在`用戶管理`、`部門管理`、`崗位管理`中加入了數據權限供大家測試
##### 角色數據權限
系統提供了三種數據權限控制
* 全部數據權限 無數據權限限制
* 本級數據權限 限制只能看到本部門數據
* 自定義數據權限 可根據實際需要選擇部門控制數據權限

##### 修改后端代碼
這里用崗位管理來舉例,控制用戶能看到哪些崗位數據,首先崗位的實體中需要關聯部門,這里用的是一對一關聯
~~~
@OneToOne
@JoinColumn(name = "dept_id")
private Dept dept;
~~~
**(1)在控制器中注入**
~~~
@Autowired
private DataScope dataScope;
~~~
**(2)在查詢的方法中加入如下代碼獲取數據權限**
~~~
@Log("查詢崗位")
@GetMapping(value = "/job")
@PreAuthorize("hasAnyRole('ADMIN','USERJOB_ALL','USERJOB_SELECT','USER_ALL','USER_SELECT')")
public ResponseEntity getJobs(@RequestParam(required = false) String name,
@RequestParam(required = false) Long deptId,
@RequestParam(required = false) Boolean enabled,
Pageable pageable){
// 數據權限
Set<Long> deptIds = dataScope.getDeptIds();
return new ResponseEntity(jobQueryService.queryAll(name, enabled , deptIds, deptId, pageable),HttpStatus.OK);
}
~~~
**(3)修改QueryService**
~~~
@Override
public Predicate toPredicate(Root<Job> root, CriteriaQuery<?> criteriaQuery, CriteriaBuilder cb) {
List<Predicate> list = new ArrayList<Predicate>();
// 數據權限
Join<Dept, Job> join = root.join("dept", JoinType.LEFT);
if (!CollectionUtils.isEmpty(deptIds)) {
list.add(join.get("id").in(deptIds));
}
Predicate[] p = new Predicate[list.size()];
return cb.and(list.toArray(p));
}
~~~
#### 定時任務
對于簡單的定時任務用`Spring`的`@Scheduled`注解即可,如需要動態管理定時任務就需要使用到`Quartz`。本系統的動態定時任務源碼位于`skdamin-quartz`,使用流程如下
##### 編寫任務處理類
~~~
@Slf4j
@Component
public class TestTask {
public void run(){ log.info("執行成功"); }
public void run1(String str){ log.info("執行成功,參數為: {}" + str); }
}
~~~
##### 創建定時任務
打開定時任務頁面,點擊新增按鈕創建定時任務,部分參數解釋如下:
* Bean名稱:Spring Bean名稱,如: testTask
* 方法名稱:對應后臺任務方法名稱 方法參數:對應后臺任務方法名稱值,沒有可不填
* cron表達式:可查詢官方cron表達式介紹
* 狀態:是否啟動定時任務
##### 常用cron表達式
~~~
0 0 10,14,16 * * ? 每天上午10點,下午2點,4點
0 0/30 9-17 * * ? 朝九晚五工作時間內每半小時
0 0 12 ? * WED 表示每個星期三中午12點
"0 0 12 * * ?" 每天中午12點觸發
"0 15 10 ? * *" 每天上午10:15觸發
"0 15 10 * * ?" 每天上午10:15觸發
"0 15 10 * * ? *" 每天上午10:15觸發
"0 15 10 * * ? 2005" 2005年的每天上午10:15觸發
"0 * 14 * * ?" 在每天下午2點到下午2:59期間的每1分鐘觸發
"0 0/5 14 * * ?" 在每天下午2點到下午2:55期間的每5分鐘觸發
"0 0/5 14,18 * * ?" 在每天下午2點到2:55期間和下午6點到6:55期間的每5分鐘觸發
"0 0-5 14 * * ?" 在每天下午2點到下午2:05期間的每1分鐘觸發
"0 10,44 14 ? 3 WED" 每年三月的星期三的下午2:10和2:44觸發
"0 15 10 ? * MON-FRI" 周一至周五的上午10:15觸發
"0 15 10 15 * ?" 每月15日上午10:15觸發
"0 15 10 L * ?" 每月最后一日的上午10:15觸發
"0 15 10 ? * 6L" 每月的最后一個星期五上午10:15觸發
"0 15 10 ? * 6L 2002-2005" 2002年至2005年的每月的最后一個星期五上午10:15觸發
"0 15 10 ? * 6#3" 每月的第三個星期五上午10:15觸發
~~~
#### 代碼生成
本系統提供高靈活度的代碼生成功能,只需要在數據庫中設計好表結構,就能一鍵生成前后端代碼,是不是很nice,使用流程如下
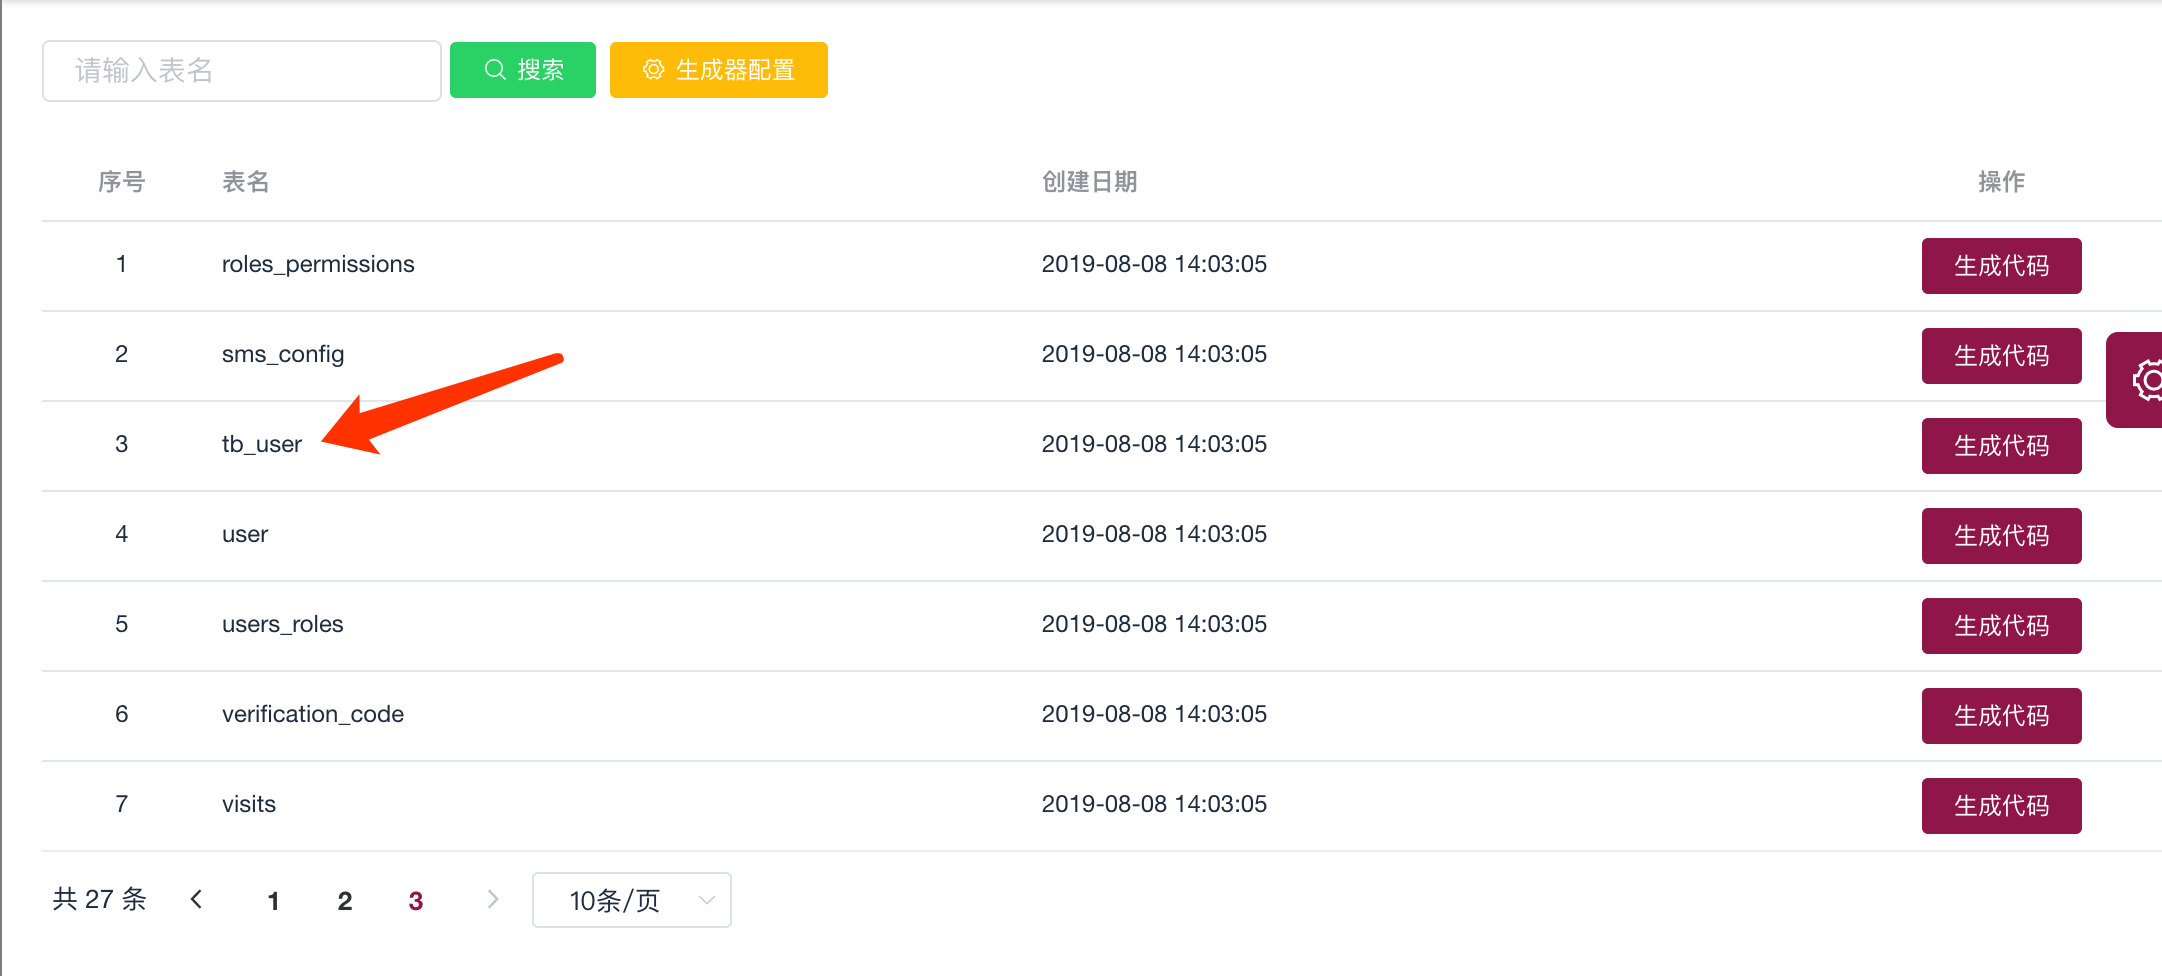
##### 設計表結構
1. 配置主鍵(字符串或者整形皆可,整形可不設置自增)
2. 可以設計字段是否為空(會根據這個進行表單驗證)
3. 設計注釋,`前端會根據注釋生成表格標題`
我們數據庫中表都能在這看到,需根據自己的需求進行`生成器配置`
##### 生成器配置
1. 模塊名稱:這個顧名思義就是模塊的名稱
2. 至于包下:這個的意思是`生成的代碼放到哪個包里面`
3. 前端路徑:前端代碼生成的路徑
4. API路徑:這個默認至于`src/api`目錄下
5. 是否覆蓋:危險操作,需謹慎
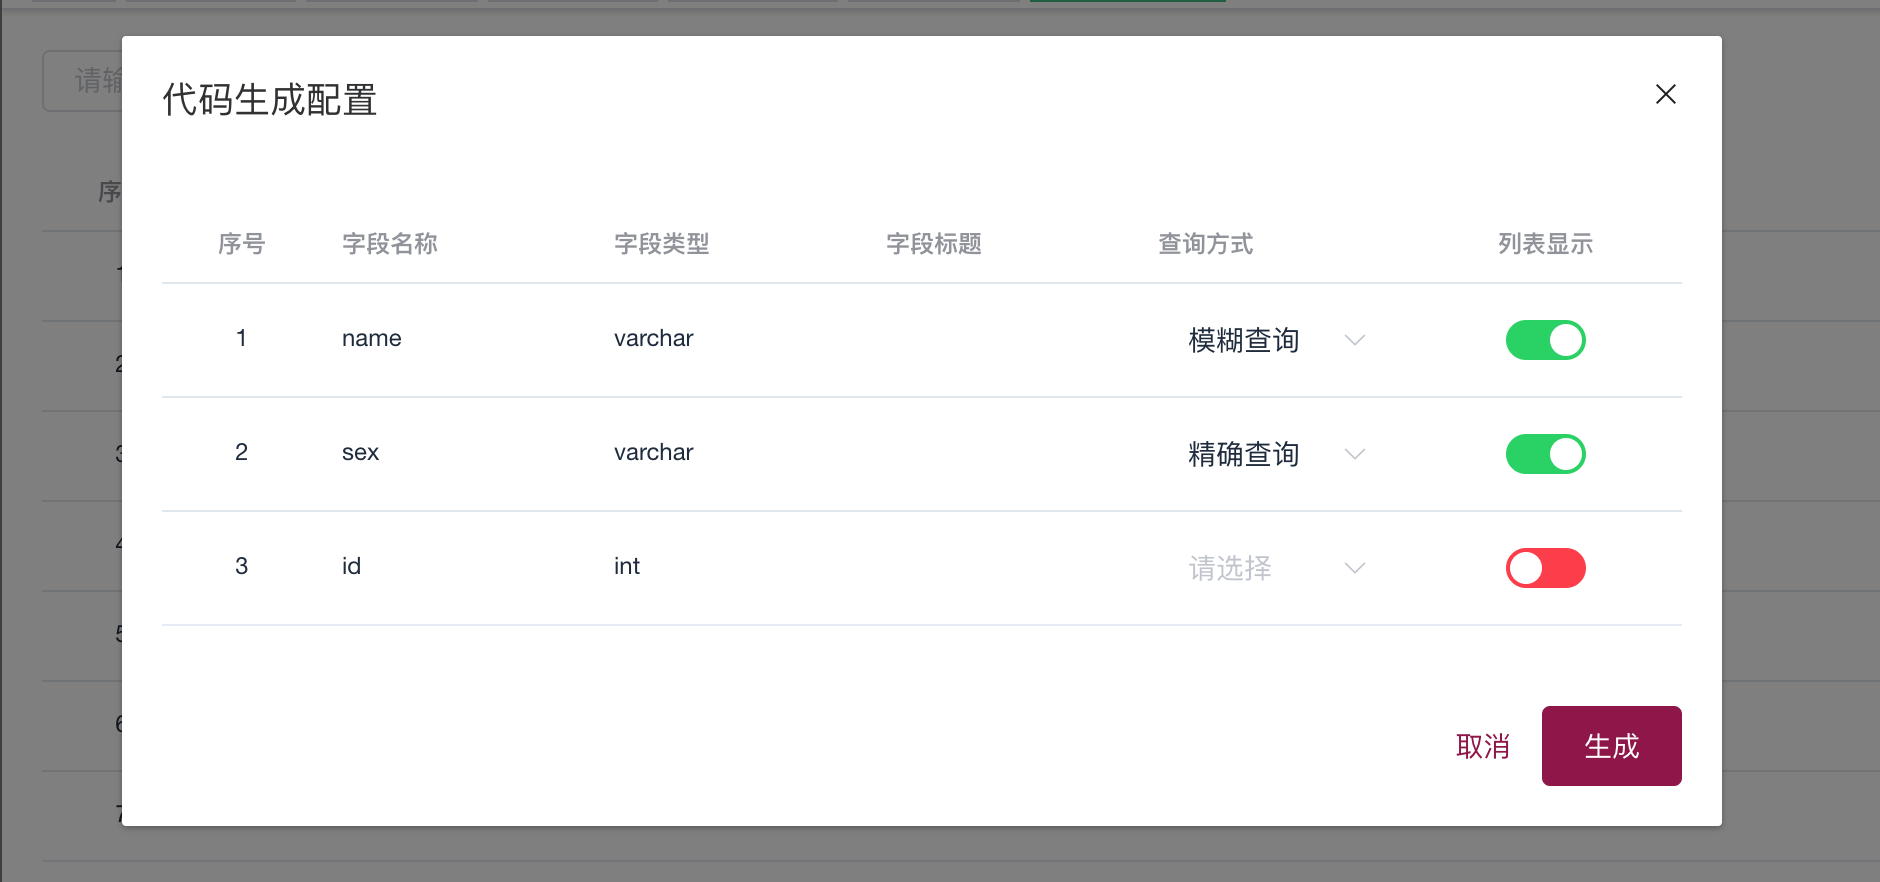
##### 代碼生成
我們配置好生成器后就能進行代碼生成啦,具體操作如下:
1. 點擊生成代碼按鈕
2. 可以臨時修改字段標題
3. 配置查詢方式,可選:精確或者模糊
4. 列表顯示:前端頁面是否顯示該字段
5. 點擊生成按鈕
##### 額外工作
代碼生成可以節省你`80%`左右的開發任務,部分是需要自己需求進行修改的,如:
1. 添加菜單:雖然代碼給你生成了,但是菜單還是需要自己手動添加的
2. 權限驗證:權限默認生成了,但是沒有添加進數據庫,需要自行添加
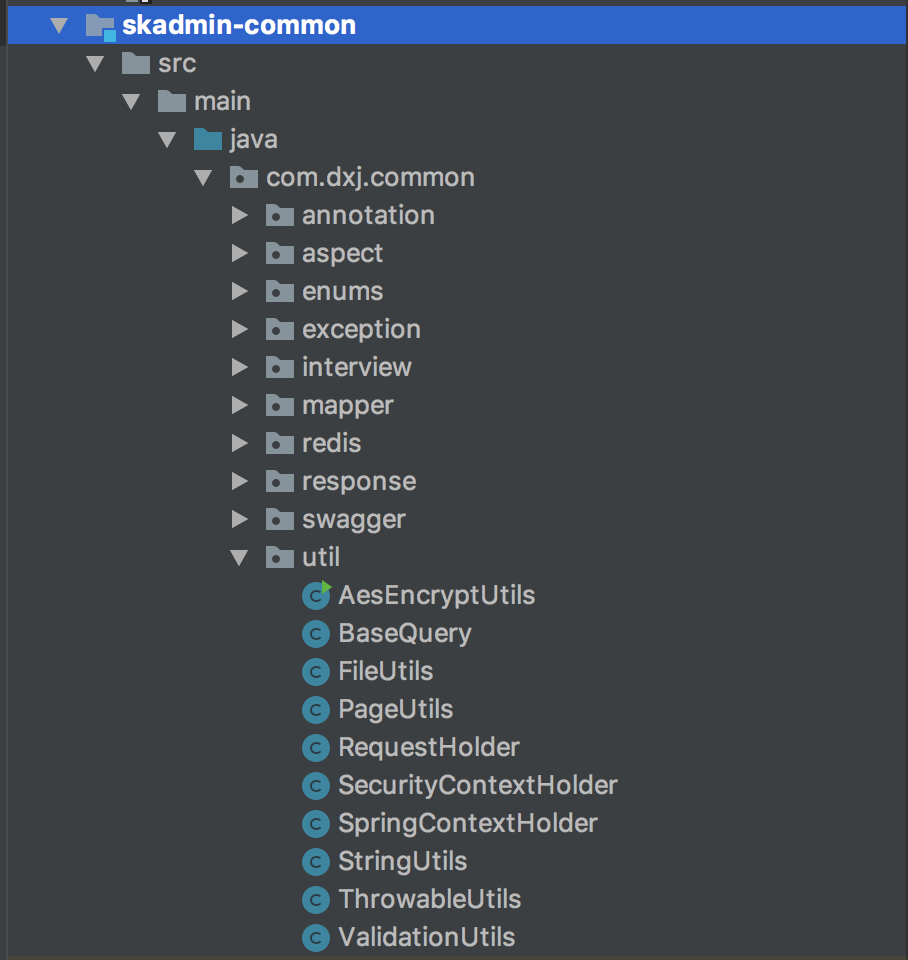
#### 系統工具
為了讓大家快速的熟悉該項目,這里列舉出項目中使用到的工具類
* SkAdminConstant:系統常用常量定義
* AesEncryptUtils:加密工具
* FileUtils:文件工具類
* PageUtils:分頁工具類
* RequestHolder:隨時獲取 HttpServletRequest
* SecurityUtils:獲取當前用戶
* SpringContextHolder:隨時獲取bean
* StringUtils:字符串工具類
* ThrowableUtils:異常工具,獲取堆棧信息
* ValidationUtils:驗證工具
##### 目錄如下