[TOC]
# 補十六 Python桌面應用開發
本章將介紹基于PyQt/PySide的Python桌面應用開發。
## XVI-1 示例程序
參考[Python GUI教程](https://zmister.com/archives/477.html)[1]
## XVI-2 QtDesigner設計界面
### XVI-2.1 示例界面-QStackedWidget
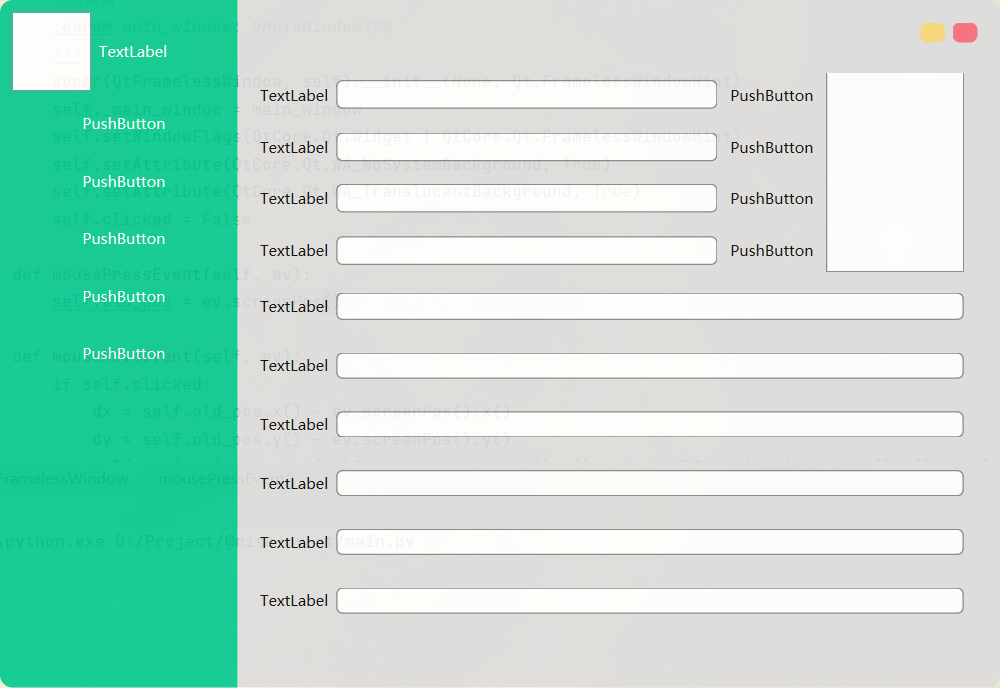
效果圖
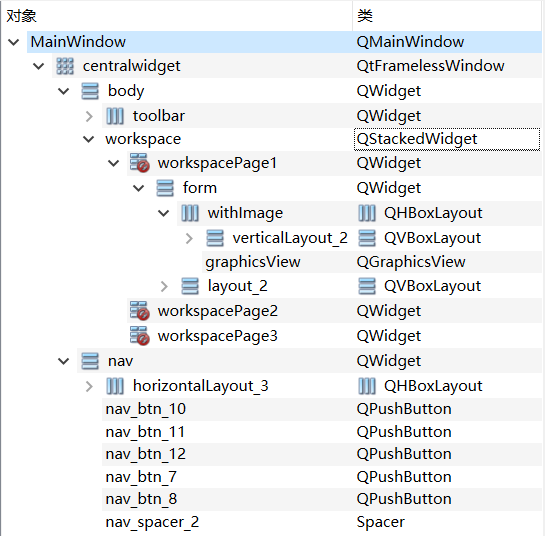
1、布局對象
2、畫出基本布局后,需實現通過點擊左側按鈕切換QStackedWidget。思路為將QPushButton的clicked信號綁定至切換QStackedWidget的切換工作區事件。
~~~~~~~~~~~~~~~~~~~~~~~~~~~~~~~~~~~~~~~~~~~~~~~~~~~~~~~~~~~~~~~~~~~~~~~~~ Python
widget.findChild(QPushButton, "nav_btn_1").clicked.connect(
lambda: widget.findChild(
QStackedWidget,
"workspace"
).setCurrentIndex(0)
)
~~~~~~~~~~~~~~~~~~~~~~~~~~~~~~~~~~~~~~~~~~~~~~~~~~~~~~~~~~~~~~~~~~~~~~~~~~~~~~~~
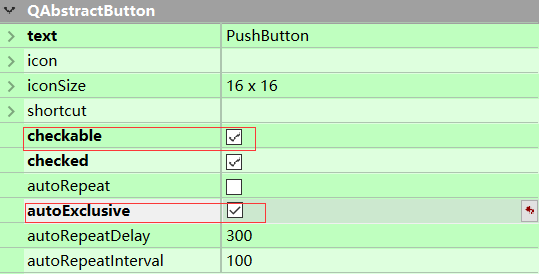
3、設置點下按鈕高亮。具體方法為將checkable、autoExclusive置為true,并設置QPushButton::checked高亮樣式。
~~~~~~~~~~~~~~~~~~~~~~~~~~~~~~~~~~~~~~~~~~~~~~~~~~~~~~~~~~~~~~~~~~~~~~~~~~~~ css
QPushButton::checked {
background: rgba(245, 245, 245, 0.4);
font-weight: bold;
}
~~~~~~~~~~~~~~~~~~~~~~~~~~~~~~~~~~~~~~~~~~~~~~~~~~~~~~~~~~~~~~~~~~~~~~~~~~~~~~~~
## XVI-3 QSS
QSS基本語法與CSS一致,下文將介紹QSS選擇器。
### XVI-3.1 QSS 選擇器
Qt 樣式表支持CSS2 中定義的所有選擇器。下表總結了常用的選擇器類型[2]。
| **選擇器** | **例子** | **解釋** |
|------------|---------------------------|-------------------------------------------------------------------------------------------|
| 通用選擇器 | \* | 匹配所有組件。 |
| 類型選擇器 | QPushButton | 匹配QPushButton及其子類的實例。 |
| 屬性選擇器 | QPushButton[flat="false"] | 匹配flat=false的QPushButton實例。此外,還支持特殊屬性,請參閱使用動態屬性[2]進行自定義。 |
| 類選擇器 | .QPushButton | 匹配QPushButton 的實例,但不匹配其子類。 這相當于\*[class\~="QPushButton"]. |
| ID 選擇器 | QPushButton\#okButton | 匹配對象名稱為 的所有QPushButton實例。okButton |
| 后代選擇器 | QDialog QPushButton | 匹配QDialog 的所有后代(子、孫等)的QPushButton實例。 |
| 子選擇器 | QDialog \> QPushButton | 匹配QDialog 的直接子級[QPushButton 的](https://doc.qt.io/qt-6/qpushbutton.html)所有實例。 |
### XVI-3.2 引用外聯式QSS
調用Application的setStyleSheet(qssStyle)方法即可引入外聯QSS,qssStyle為讀取qss文件內字符串。
~~~~~~~~~~~~~~~~~~~~~~~~~~~~~~~~~~~~~~~~~~~~~~~~~~~~~~~~~~~~~~~~~~~~~~~~~ python
app = QApplication([])
win = QMainWindow()
# SECTION 引入QSS [liuxl-20210915-2156]
styleFile = 'assets/style.qss'
qssStyle = ResourceUtils.getQss(styleFile)
app.setStyleSheet(qssStyle)
# !SECTION [liuxl-20210915-2156]
mainWindow = Ui_MainWindow()
mainWindow.setupUi(win)
win.show()
app.exec()
~~~~~~~~~~~~~~~~~~~~~~~~~~~~~~~~~~~~~~~~~~~~~~~~~~~~~~~~~~~~~~~~~~~~~~~~~~~~~~~~
## XVI-4信號與槽
## XVI-A 常見問題
### 引用qrc文件
在QtDesigner資源管理器中新增、編輯qrc文件后,需編譯為resources_rc.py才能被python代碼調用,編譯命令如下:
~~~~~~~~~~~~~~~~~~~~~~~~~~~~~~~~~~~~~~~~~~~~~~~~~~~~~~~~~~~~~~~~~~~~~~~~~~ shell
pyside6-rcc resources.qrc -o resources_rc
~~~~~~~~~~~~~~~~~~~~~~~~~~~~~~~~~~~~~~~~~~~~~~~~~~~~~~~~~~~~~~~~~~~~~~~~~~~~~~~~
### 無邊框窗口拖拽
隱藏系統邊框后,窗口將不能長按鼠標拖拽移動窗口。實現拖拽方法如下
1、編寫QtFramlessWindow類(繼承QWidget),重寫mouseMoveEvent方法。
~~~~~~~~~~~~~~~~~~~~~~~~~~~~~~~~~~~~~~~~~~~~~~~~~~~~~~~~~~~~~~~~~~~~~~~~~ python
class QtFramelessWindow(QWidget):
def __init__(self, main_window) -> None:
super(QtFramelessWindow, self).__init__(None, Qt.FramelessWindowHint)
self._main_window = main_window
self.setWindowFlags(QtCore.Qt.Widget | QtCore.Qt.FramelessWindowHint)
self.setAttribute(QtCore.Qt.WA_NoSystemBackground, True)
self.setAttribute(QtCore.Qt.WA_TranslucentBackground, True)
self.clicked = False
def mousePressEvent(self, ev):
self.old_pos = ev.screenPos()
def mouseMoveEvent(self, ev):
if self.clicked:
dx = self.old_pos.x() - ev.screenPos().x()
dy = self.old_pos.y() - ev.screenPos().y()
self._main_window.move(self._main_window.pos().x() - dx, self._main_window.pos().y() - dy)
self.old_pos = ev.screenPos()
self.clicked = True
return QWidget.mouseMoveEvent(self, ev)
~~~~~~~~~~~~~~~~~~~~~~~~~~~~~~~~~~~~~~~~~~~~~~~~~~~~~~~~~~~~~~~~~~~~~~~~~~~~~~~~
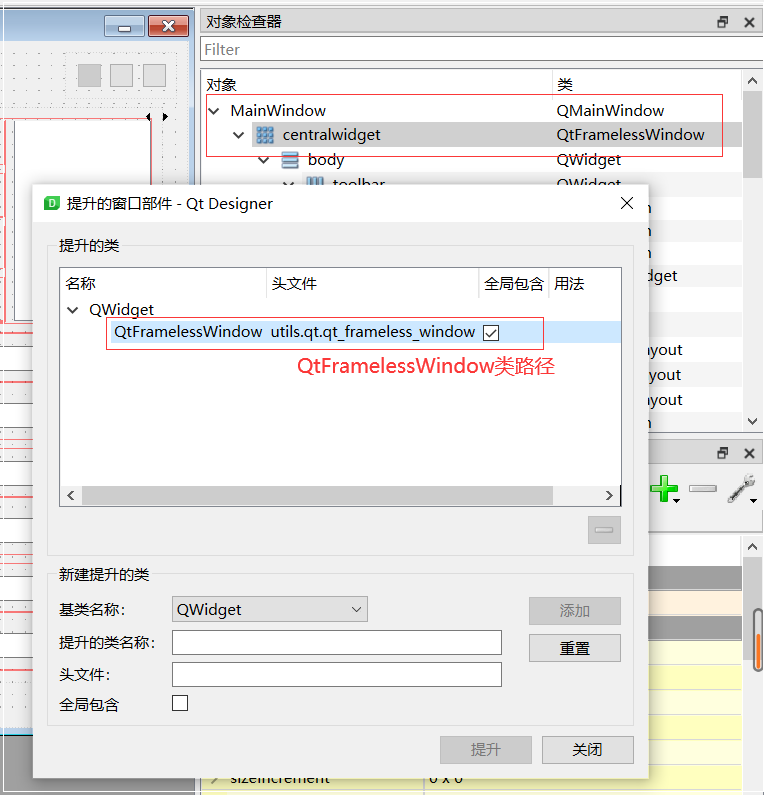
2、在QtDesigner中,將MainWindow的子元素提升為QtFramlessWindow。
# 參考文獻
[1] 佚名. Python GUI教程(十六):在PyQt5中美化和裝扮圖形界面 -
州的先生[EB/OL]([日期不詳])[2021–09–16]. https://zmister.com/archives/477.html.
[2] 佚名. The Style Sheet Syntax \| Qt Widgets
6.1.3[EB/OL]([日期不詳])[2021–09–16].
https://doc.qt.io/qt-6/stylesheet-syntax.html.
