[toc]
# 1. 前言
官網地址:[https://developer.android.google.cn/topic/libraries/architecture/livedata](https://developer.android.google.cn/topic/libraries/architecture/livedata)
其實在使用`ViewModel`和`LifeCycle`的時候,我們已經看見了`LiveData`這個組件。在這篇博客中將繼續來了解這個組件。其特點:
- `LiveData`是一種**可觀察的數據存儲器類**;
- 與常規的可觀察類不同,`LiveData`**具有生命周期感知能力**。其感知能力遵循其他組件(如 `Activity`、`Fragment` 或 `Service`)的生命周期;
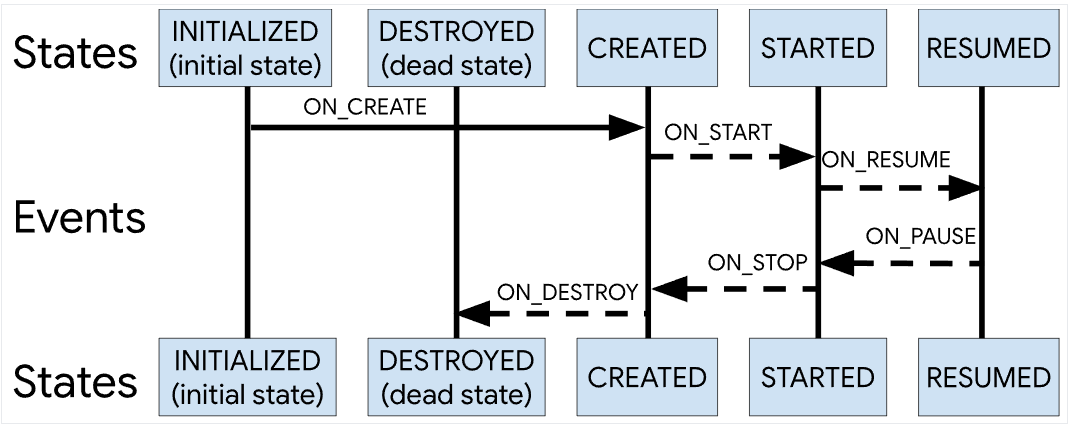
- 感知能力可確保`LiveData`**僅更新處于活躍生命周期狀態**的應用組件觀察者;活躍的觀察者對象聲明周期處于`STARTED `或 `RESUMED` 狀態;
- `LiveData`只會將更新通知給**活躍的觀察者**,非活躍觀察者不會收到更改通知;
- 當觀察者組件的`Lifecycle`對象的狀態變為 `DESTROYED` 時,便可移除此觀察者,不必擔心泄露(當 `Activity `和` Fragment `的生命周期被銷毀時,系統會立即退訂它們)。
不妨再次看下這個圖:
## 1.1 關于觀察者模式
我們知道觀察者模式,在`Java`中提供了`Observable`和`Observer`來定義被觀察者和觀察者對象。然后對于可觀察對象可以設置觀察者,來監聽其變化。而在`Android`的`Lifecycle`包中提供了對應的`LifecycleOwner`和`LifecycleObserver`,而在`Activity`、`Fragment` 或 `Service`等組件中已經實現了`LifecycleOwner`接口,我們在使用的時候,只需要實現`LifecycleObserver`來標識類是一個觀察者,以注冊觀察。在之前的博客:[【Android Jetpack】LifeCycle](https://mengfou.blog.csdn.net/article/details/124254857)一文中也曾提到過通過:
```kotlin
lifecycle.addObserver(myLocationObserver)
```
來為`lifecycle`來設置一個觀察者對象。類似的,前面提到了:`LiveData`也是一種可觀察的數據存儲器類。故而也可以設置觀察對象,比如:
~~~kotlin
// viewModel.get() 獲取的為LiveData對象
viewModel.get().observe(this, object : androidx.lifecycle.Observer<Int>{
override fun onChanged(value: Int?) {
livedataText.text = viewModel.getValue().toString()
}
})
~~~
# 2. LiveData 的優勢
- 確保界面符合數據狀態;`LiveData` 遵循觀察者模式。當底層數據發生變化時,`LiveData` 會通知 `Observer` 對象。您可以整合代碼以在這些 `Observer` 對象中更新界面。
- 不會發生內存泄漏;觀察者會綁定到 `Lifecycle` 對象,并在其關聯的生命周期遭到銷毀后進行自我清理。
- 不會因 `Activity` 停止而導致崩潰;如果觀察者的生命周期處于非活躍狀態,則它不會接收任何 `LiveData` 事件。
- 不再需要手動處理生命周期;
- 共享資源;可以使用單例模式擴展 `LiveData` 對象以封裝系統服務,以便在應用中共享它們。`LiveData` 對象連接到系統服務一次,然后需要相應資源的任何觀察者只需觀察 `LiveData` 對象。
更加通俗來說,`LiveData`是一個持有`Activity`、`Fragment`生命周期的數據容器。當數據源發生改變的時候,可以通知觀察者。
## 2.1 案例一:計時器效果
在`Activity`中定義一個文本,在該控件上每秒自動加一操作。且屏蔽設備配置發生改變后不影響其狀態。比如布局文件為`ConstraintLayout`下放置一個居中的`TextView`。
### 2.1.1 實現方式一:ViewModel+LiveData
- 因為需要屏蔽設備配置發生改變的影響,故而這里考慮直接使用`ViewModel`;
- 考慮代碼解耦,這里使用`LiveData`來設置觀察者,也即是我們需要在`ViewModel`中設置數據類型為`LiveData`;
自定義的`ViewModel`如下:
~~~kotlin
class MyNumberViewModel : ViewModel() {
private var number: MutableLiveData<Int> = MutableLiveData(0)
fun set(value: Int) {
number.value = value
}
// 工作線程需要使用Post
fun post(value: Int) {
number.postValue(value)
}
fun get(): LiveData<Int> {
return number
}
fun getValue(): Int{
return number.value?:0
}
}
~~~
因為我們需要使用`LiveData`對象來注冊觀察者對象,故而這里`get()`方法返回的是`LiveData`對象。且因為需要開啟定時任務,故而可以在工作線程完成,所以提供了`post`方法,然后在`Activity`中進行設置:
~~~kotlin
class LiveDataActivity : AppCompatActivity() {
private lateinit var viewModel: MyNumberViewModel
private val livedataText: TextView by lazy { findViewById(R.id.livedata_text)}
override fun onCreate(savedInstanceState: Bundle?) {
super.onCreate(savedInstanceState)
setContentView(R.layout.activity_live_data)
// 獲取到ViewModel
viewModel = ViewModelProvider(
this,
ViewModelProvider.NewInstanceFactory()
).get(MyNumberViewModel::class.java)
// 為TextView設置數據
livedataText.text = viewModel.get().toString()
// 開始定時任務
startTimer()
// 注冊一個觀察者,監聽到ViewModel中數據的變化,如果變化執行onChanged()方法
// viewModel.get() 獲取的為LiveData對象
viewModel.get().observe(this, object : androidx.lifecycle.Observer<Int>{
override fun onChanged(value: Int?) {
livedataText.text = viewModel.getValue().toString()
}
})
}
// 定時任務
private fun startTimer(){
Timer().schedule(
object : TimerTask() {
override fun run() {
viewModel.post(viewModel.getValue() + 1)
}
},
1000, 1000,
)
}
}
~~~
運行即可看見預想的效果。看完上述案例代碼之后是否會有疑惑?肯定是有的,因為這里是`LiveData`的案例,卻引入了`ViewModel`,且將`LiveData`放入了自定義的`ViewModel`類中,為什么需要這么做?`LiveData`對象本身就可以被觀察,為什么還需要放置到`ViewModel`中?
答:其實在剛開始的要求部分我已經做了引導,需要做到**屏蔽設備配置發生改變后不影響其狀態**,而很方便的`ViewModel`就可以輕松做到這一點。如果`LiveData`實例與特定的 `Activity` 或 `Fragment` 實例并沒有分離開,那么在 `Activity` 或 `Fragment` 經歷`onDestory`的時候,`LiveData`中的數據也就沒了。
且上述程序存在一個致命`Bug`,由于每次屏幕旋轉都會執行`onCreate`,故而會開啟多個定時任務,故而這里是不符合題意的。當然,可以加上標志處理,這里不再解決。
### 2.1.2 實現方式二:configChange
當然,上述使用`ViewModel`只是一種方式,也可以配置清單文件,設置`onConfigChange`屬性,這里來嘗試寫一下:
~~~xml
<activity
android:name=".LiveDataActivity"
android:configChanges="orientation|screenSize"
android:exported="true">
~~~
然后將`LiveData`直接定義在`Activity`中:
~~~kotlin
class LiveDataActivity : AppCompatActivity() {
private val livedataText: TextView by lazy { findViewById(R.id.livedata_text) }
private val liveData: MutableLiveData<Int> by lazy { MutableLiveData<Int>(0) }
override fun onCreate(savedInstanceState: Bundle?) {
super.onCreate(savedInstanceState)
setContentView(R.layout.activity_live_data)
// 為TextView設置數據
livedataText.text = liveData.value.toString()
// 開始定時任務
startTimer()
// 注冊一個觀察者,監聽到ViewModel中數據的變化,如果變化執行onChanged()方法
// viewModel.get() 獲取的為LiveData對象
liveData.observe(this) {
livedataText.text = liveData.value.toString()
}
}
override fun onConfigurationChanged(newConfig: Configuration) {
super.onConfigurationChanged(newConfig)
Log.e("TAG", "onConfigurationChanged: ")
}
// 定時任務
private fun startTimer() {
Timer().schedule(
object : TimerTask() {
override fun run() {
liveData.postValue((liveData.value ?: 0) + 1)
Log.e("TAG", "run: ${liveData.value ?: 0}", )
}
},
1000, 1000,
)
}
}
~~~
## 2.2 案例二:
