[TOC]
### 1. 下載xhprof源碼并安裝
> https://github.com/longxinH/xhprof.git
```
cd xhprof/extension/
phpize
./configure --with-php-config=/www/server/php/71/bin/php-config --enable-xhprof
make && make install
```
> 修改php.ini配置
```
[xhprof]
extension = xhprof.so
xhprof.output_dir = /tmp/xhprof
```
### 2. Yii2集成xhprof
> 將xhprof下的xhprof_html以及xhprof_lib拷貝至項目中
~~~
public function actionTest1()
{
error_reporting(E_ALL);
ini_set('display_errors', 'on');
$this->xhprofStart();
for ($i = 0; $i < 83000; $i++) {
$array[] = $i;
}
$this->haha();
$this->xhprofEnd();
}
public function haha(){
echo 'haha';
}
//xhprof監控開始
public function xhprofStart(){
xhprof_enable(XHPROF_FLAGS_CPU + XHPROF_FLAGS_MEMORY);
}
//xhprof監控結束
public function xhprofEnd(){
$xhprof_data = xhprof_disable();
dump($xhprof_data);
$xhprof_root = '/www/wwwroot/liwu4/frontend/web/';
include_once $xhprof_root."xhprof_lib/utils/xhprof_lib.php";
include_once $xhprof_root."xhprof_lib/utils/xhprof_runs.php";
$xhprof_runs = new \XHProfRuns_Default();
$route = \Yii::$app->controller->route;
$run_id = $xhprof_runs->save_run($xhprof_data, $route);
echo '統計<br>';
$domain = $_SERVER['SERVER_NAME'];
$url = "http://".$domain."/xhprof_html/index.php?run=$run_id&source=$route";
echo '<a target="_blank">'.$url.'</a>';
}
~~~
> 在運行的時候,可能會沒有監控數據,報Invalid Run Id的錯誤
> 解決辦法
```
chmod -R 777 /tmp/xhprof
```
> 修改xhprof_lib/utils/xhprof_runs.php中找到save_run()方法
~~~
$file_name = $this->file_name($run_id, $type); // 找到此代碼,新增以下代碼
// 增加以下創建文件夾的代碼,才能生成報表數據
$dir = dirname($file_name);
if (!is_dir($dir)) {
mkdir($dir, 0777, true);
}
~~~
### 3. 運行并測試
> http://www.xx.com/wangkun/test1
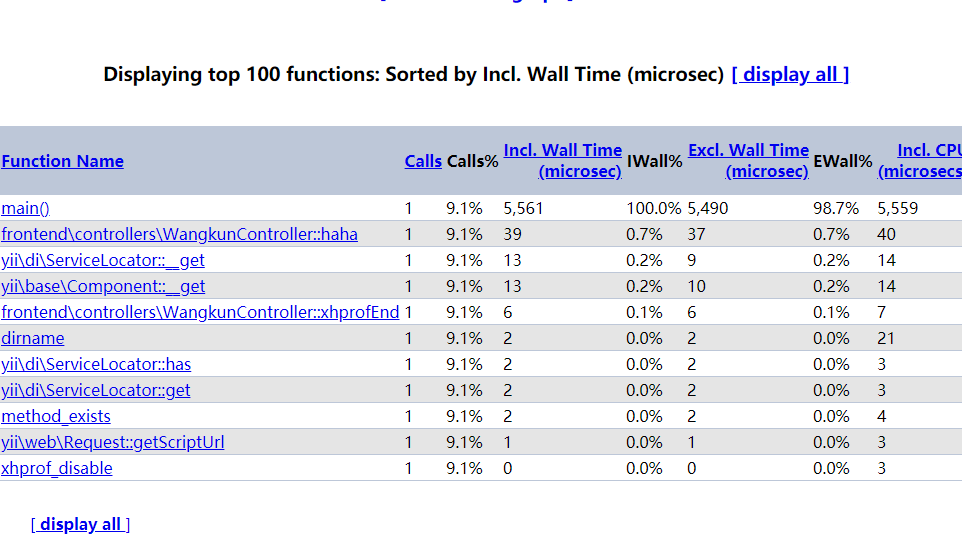
> 由于xhprof屬于非侵入性,可以運用到正式環境,常用URL中加入code方式,輸入正確的code情況下走xhprof
> xdebug屬于侵入式性能分析,安裝好了php插件后,頁面就自動開啟,只能運用在測試環境
> 參考此文 https://blog.csdn.net/maquealone/article/details/80434699
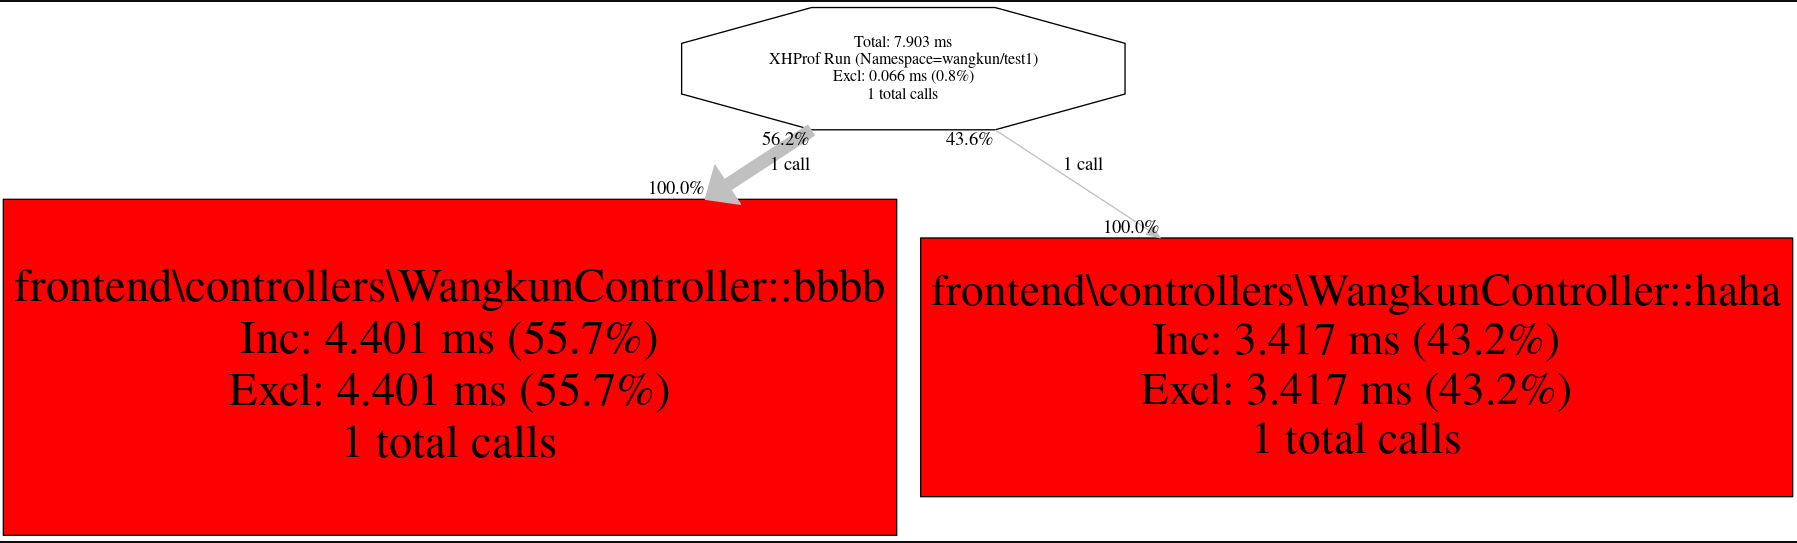
### 4. 圖形化結果
> 點擊[View Full Callgraph]可以看圖形化結果,會報錯“failed to execute cmd " dot -Tpng"”
> 解決辦法
~~~
yum install graphviz
~~~
> 安裝完擴展后,需要修改php.ini,在disable_functions中把proc_open去掉。
- 重點知識預覽
- 理解面向對象
- 魔術變量
- 魔法方法
- 面試題基礎篇
- PSR標準
- class (單繼承)
- trait (多繼承)
- 匿名函數
- 日期處理
- 文件處理
- 字符串處理
- BC Math
- 數組處理
- HTTP的各個狀態
- PHP環境變量
- session & cookie
- composer
- 變量的類型轉換和判斷類型方法
- PHP的錯誤和異常處理
- PHP的ob緩沖區
- PHP內存調試
- pcntl多進程
- PHP yield (生成器):節約內存
- Nginx負載均衡
- 同一臺服務器如何測試負載均衡
- 安全方面
- HTTPS實現
- PHP性能分析(xhprof)
- 高并發雪崩解決方法
- 接口加密設計(安全性)
- 數據庫(重要數據操作)日志記錄規范
- APP發版操作
- 緩存使用
- Memcache
- MYSQL緩存
- Redis
- 安裝與使用
- redis過期策略和內存淘汰機制
- Redis分布式鎖
- Redis雪崩、穿透、擊穿問題
- redis主從
- redis哨兵
- opcache
- 消息隊列
- Redis消息隊列
- Beanstalkd
- 數據庫匯總
- MYSQL哪些情況下會忽略索引
- MYSQL常用命令
- SQL高級運用
- MYSQL分布式集群使用
- 主從復制
- 同一臺服務器如何測試主從同步
- MYSQL索引類型
- MYSQL分區
- 鎖機制
- 事務隔離級別(臟讀、幻讀、不可重復讀)
- 分布式事務
- MYSQL性能優化
- swoole
- 安裝以及升級
- swoole進程初識
- TCP相關教程
- TCP數據傳輸DEMO(含同步、異步、長連接)
- Server異步投遞task任務
- TCP粘包問題
- websocket相關教程
- websocket初體驗DEMO
- websocket核心功能(心跳檢測、用戶校驗、重連機制)
- websocket用戶之間通信DEMO
- 定時器的使用
- 常駐內存以及如何避免內存泄漏
- max_request使用實例
- 守護進程、信號和平滑重啟
- 全文檢索工具
- MYSQL全文索引
- ElasticSearch全文檢索
- ES基礎知識
- Mapping及增刪改查
- DSL查詢語法
- 搜索建議 (completion)
- mysql轉dsl工具
- ES的安裝與PHP測試
- kibana可視化工具
- ELK日志管理系統
- PHP設計模式
- 創建型模式
- 工廠模式
- 單例模式
- 注冊器模式
- 工廠模式于策略模式的區別
- 結構型模式
- 適配器模式
- 橋接模式
- 裝飾器模式
- 行為型模式
- 觀察者模式
- 策略模式
- 高并發設計