# :-: Vue3 · 5 個常用的 API
Vue3之于Vue2最大的變化,當屬`composition API`了,而除了引入`composition API`外,一些我們在Vue2上經常使用的東西到了Vue3時也發生了不小的變化,本文將介紹一些有Vue2到Vue3中幾個比較重要且常用的知識點,歡迎感興趣的同學閱讀。
> 文中代碼示例使用`setup語法糖 + ts`
# v-model
## 支持多個v-model
在`Vue3`中,可以通過參數來達到一個組件支持多個`v-model`的能力。
~~~
//?父組件
<template>
??<child?v-model="name"?v-model:email="email"?/>
??<p>姓名:{{ name }}</p>
??<p>郵箱:{{ email }}</p>
</template>
<script?lang="ts"?setup>
import?child?from?'./child.vue'
import?{?ref?}?from?'vue'
const?name?=?ref<string>('張三')
const?email?=?ref<string>('666@qq.com')
</script>
~~~
~~~
//?子組件
<template>
??<button?@click="updateName">更新name</button>
??<button?@click="updateEmail">更新email</button>
</template>
<script?lang="ts"?setup>
//?定義emit
const?emits?=?defineEmits<{
??(e:?'update:modelValue',?value:?string):?void
??(e:?'update:email',?value:?string):?void
}>()
const?updateName?=?()?=>?{
??emits('update:modelValue',?'李四')
}
const?updateEmail?=?()?=>?{
??emits('update:email',?'123456@qq.com')
}
</script>
~~~
如果`v-model`沒有使用參數,則其默認值為`modelValue`,如上面的第一個`v-model`,注意此時不再是像Vue2那樣使用`$emit('input')`了,而是統一使用`update:xxx`的方式。
## 廢棄`.sync`
在Vue2中,由于一個組件只支持一個`v-model`,當我們還有另外的值也想要實現雙向綁定更新時,往往用`.sync`修飾符來實現,而在Vue3中該修飾符已被廢棄,因為`v-model`可以支持多個,所以`.sync`也就沒有存在的必要了。
# watch
## 不同數據類型的監聽
基礎數據類型的監聽:
~~~
const?name?=?ref<string>('張三')
watch(name,?(newValue,?oldValue)?=>?{
??console.log('watch===',?newValue,?oldValue)
})
~~~
復雜數據類型的監聽:
~~~
interface?UserInfo?{
??name:?string??age:?number
}
const?userInfo?=?reactive<UserInfo>({
??name:?'張三',
??age:?10
})
//?監聽整個對象
watch(userInfo,?(newValue,?oldValue)?=>?{
??console.log('watch?userInfo',?newValue,?oldValue)
})
//?監聽某個屬性
watch(()?=>?userInfo.name,??(newValue,?oldValue)?=>?{
??console.log('watch?name',?newValue,?oldValue)
})
~~~
## 支持監聽多個源
在`Vue3`里,`watch`多了一個特性,可以傳入一個數組同時偵聽多個數據,這比起`Vue2`確實優雅多了,以往在`Vue2`中為了實現同時監聽多個數據,往往需要借助computed,現在在Vue3里我們可以少一些不必要的代碼了。
~~~
const?name?=?ref<string>('張三')
const?userInfo?=?reactive({
??age:?18
})
//?同時監聽name和userInfo的age屬性
watch([name,?()?=>?userInfo.age],?([newName,?newAge],?[oldName,?oldAge])?=>?{
??//
})
~~~
# watchEffect
## watchEffect與watch的區別
相比`Vue2`,`Vue3多`了`watchEffect`這個API,`watchEffect`傳入一個函數參數,該函數會立即執行,同時會響應式的最終函數內的依賴變量,并在依賴發生改變時重新運行改函數。
~~~
const?name?=?ref<string>('張三')
const?age?=?ref<number>(18)
watchEffect(()?=>?{
??console.log(`${name.value}:${age.value}`)?//?張三:18
})
setTimeout(()?=>?{
??name.value?=?'李四'?//?李四:18
},?3000)
setTimeout(()?=>?{
??age.value?=?20?//?李四:20
},?5000)
~~~
***和watch的區別:***
* 運行時機不同,`watchEffect`會立即執行,相當于設置了`immediate: true`的`watch`。
* `watchEffect`無法獲取改變前后的值。
* 與`watch`顯示的指定依賴源不同,`watchEffect`會自動收集依賴源。
## 用`watchEffect`還是`watch`?
建議在大部分時間里使用`watch`,避免一些不必要的重復觸發。
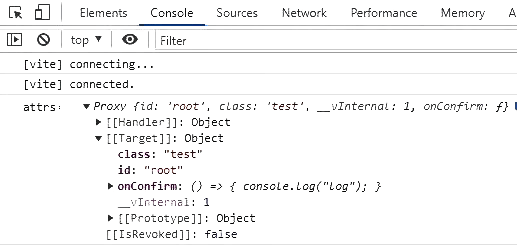
# $attrs
Vue3中,`$attrs`包含父組件中除props和自定義事件外的所有屬性集合。
不同于`Vue2`,`$attrs`包含了父組件的事件,因此`$listenners`則被移除了。
~~~
//?父組件
<template>
??<child?id="root"?class="test"?name="張三"?@confirm="getData"?/>
</template>
<script?lang="ts"?setup>
const?getData?=?()?=>?{
??console.log('log')
}
</script>
//?子組件
<template>
??<div>
????<span>hello:{{ props.name }}</span>
??</div>
</template>
<script?lang="ts">
export?default?{
??inheritAttrs:?false
}
</script>
<script?lang="ts"?setup>
const?props?=?defineProps(['name'])
const?attrs?=?useAttrs()
console.log('attrs',?attrs)
</script>
~~~
:-: 
使用`v-bind`即可實現組件屬性及事件透傳:
~~~
//?父組件
<template>
??<child?closeable?@close="onClose"?/>
</template>
<script?lang="ts"?setup>
const?onClose?=?()?=>?{
??console.log('close')
}
</script>
//?子組件
<template>
??<div>
????<el-tag?v-bind="attrs">標簽</el-tag>
??</div>
</template>
~~~
# 使用`ref`訪問子組件
在`Vue2`中,使用`ref`即可訪問子組件里的任意數據及方法,但在`Vue3`中則必須使用`defineExpose`暴露子組件內的方法或屬性才能被父組件所調用。
~~~
//?父組件
<template>
??<child?ref="childRef"?/>
</template>
<script?lang="ts"?setup>
import?{?ref,?onMounted?}?from?'vue'
const?childRef?=?ref()
onMounted(()?=>?{??childRef.value.getData()})
</script>
//?子組件
<script?lang="ts"?setup>
import?{?defineExpose?}?from?'vue'
const?getData?=?()?=>?{
?? console.log('getData')
}
const?name?=?ref('張三')
defineExpose({
?? getData,
?? name
})
</script>
~~~
