## 1.Apache安裝
* 安裝
```
yum install httpd
```
* 獲取rpm包詳細信息
```
[root@VM_0_11_centos system]# rpm -qi httpd
Name : httpd
Version : 2.4.6
Release : 89.el7.centos.1
Architecture: x86_64
Install Date: 2019年08月13日 星期二 15時11分52秒
Group : System Environment/Daemons
Size : 9817317
License : ASL 2.0
Signature : RSA/SHA256, 2019年07月31日 星期三 11時37分23秒, Key ID 24c6a8a7f4a80eb5
Source RPM : httpd-2.4.6-89.el7.centos.1.src.rpm
Build Date : 2019年07月30日 星期二 01時21分18秒
Build Host : x86-02.bsys.centos.org
Relocations : (not relocatable)
Packager : CentOS BuildSystem <http://bugs.centos.org>
Vendor : CentOS
URL : http://httpd.apache.org/
Summary : Apache HTTP Server
Description :
The Apache HTTP Server is a powerful, efficient, and extensible
web server.
```
* 查看進程狀態
```
[root@VM_0_11_centos ~]# ps -ef|grep httpd
apache 2046 15595 0 8月13 ? 00:00:00 /usr/sbin/httpd -DFOREGROUND
root 15595 1 0 8月13 ? 00:00:05 /usr/sbin/httpd -DFOREGROUND
apache 15596 15595 0 8月13 ? 00:00:00 /usr/sbin/httpd -DFOREGROUND
apache 15597 15595 0 8月13 ? 00:00:00 /usr/sbin/httpd -DFOREGROUND
apache 15598 15595 0 8月13 ? 00:00:00 /usr/sbin/httpd -DFOREGROUND
apache 15599 15595 0 8月13 ? 00:00:00 /usr/sbin/httpd -DFOREGROUND
apache 15600 15595 0 8月13 ? 00:00:00 /usr/sbin/httpd -DFOREGROUND
apache 23565 15595 0 8月13 ? 00:00:00 /usr/sbin/httpd -DFOREGROUND
root 23716 23670 0 23:32 pts/0 00:00:00 grep --color=auto httpd
```
* 啟動服務
* 由于centos7使用systemd ,所以重定向使用了systemctl命令。
```
[root@VM_0_11_centos ~]# sudo service httpd stop
Redirecting to /bin/systemctl stop httpd.service
```
* 也可以直接使用`systemctl start httpd.service` 開啟服務。
> 開啟之后就可以在瀏覽器訪問歡迎頁。
### 2. 虛擬主機配置
> 配置虛擬主機是為了我們可以使用不同的域名訪問當前服務器的不同項目。
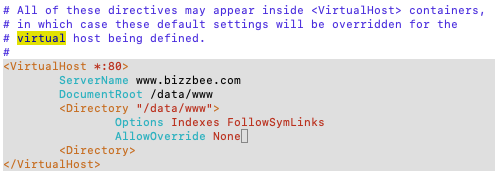
* 進入到`/etc/httpd/conf`目錄,打開`httpd.conf`文件。
* 打開文件,在普通模式下輸入/進行查找virtual關鍵字。
```
<VirtualHost *:80>
ServerName www.bizzbee.com
DocumentRoot /data/www
<Directory "/data/www">
Options Indexes FollowSymLinks
AllowOverride None
Require all granted
<Directory>
</VirtualHost>
```

* 修改host,把域名指向我的騰訊云服務器公網IP。(注意是修改瀏覽器所在的本機)
* 不要忘記在指定的根目錄創建index.html。
