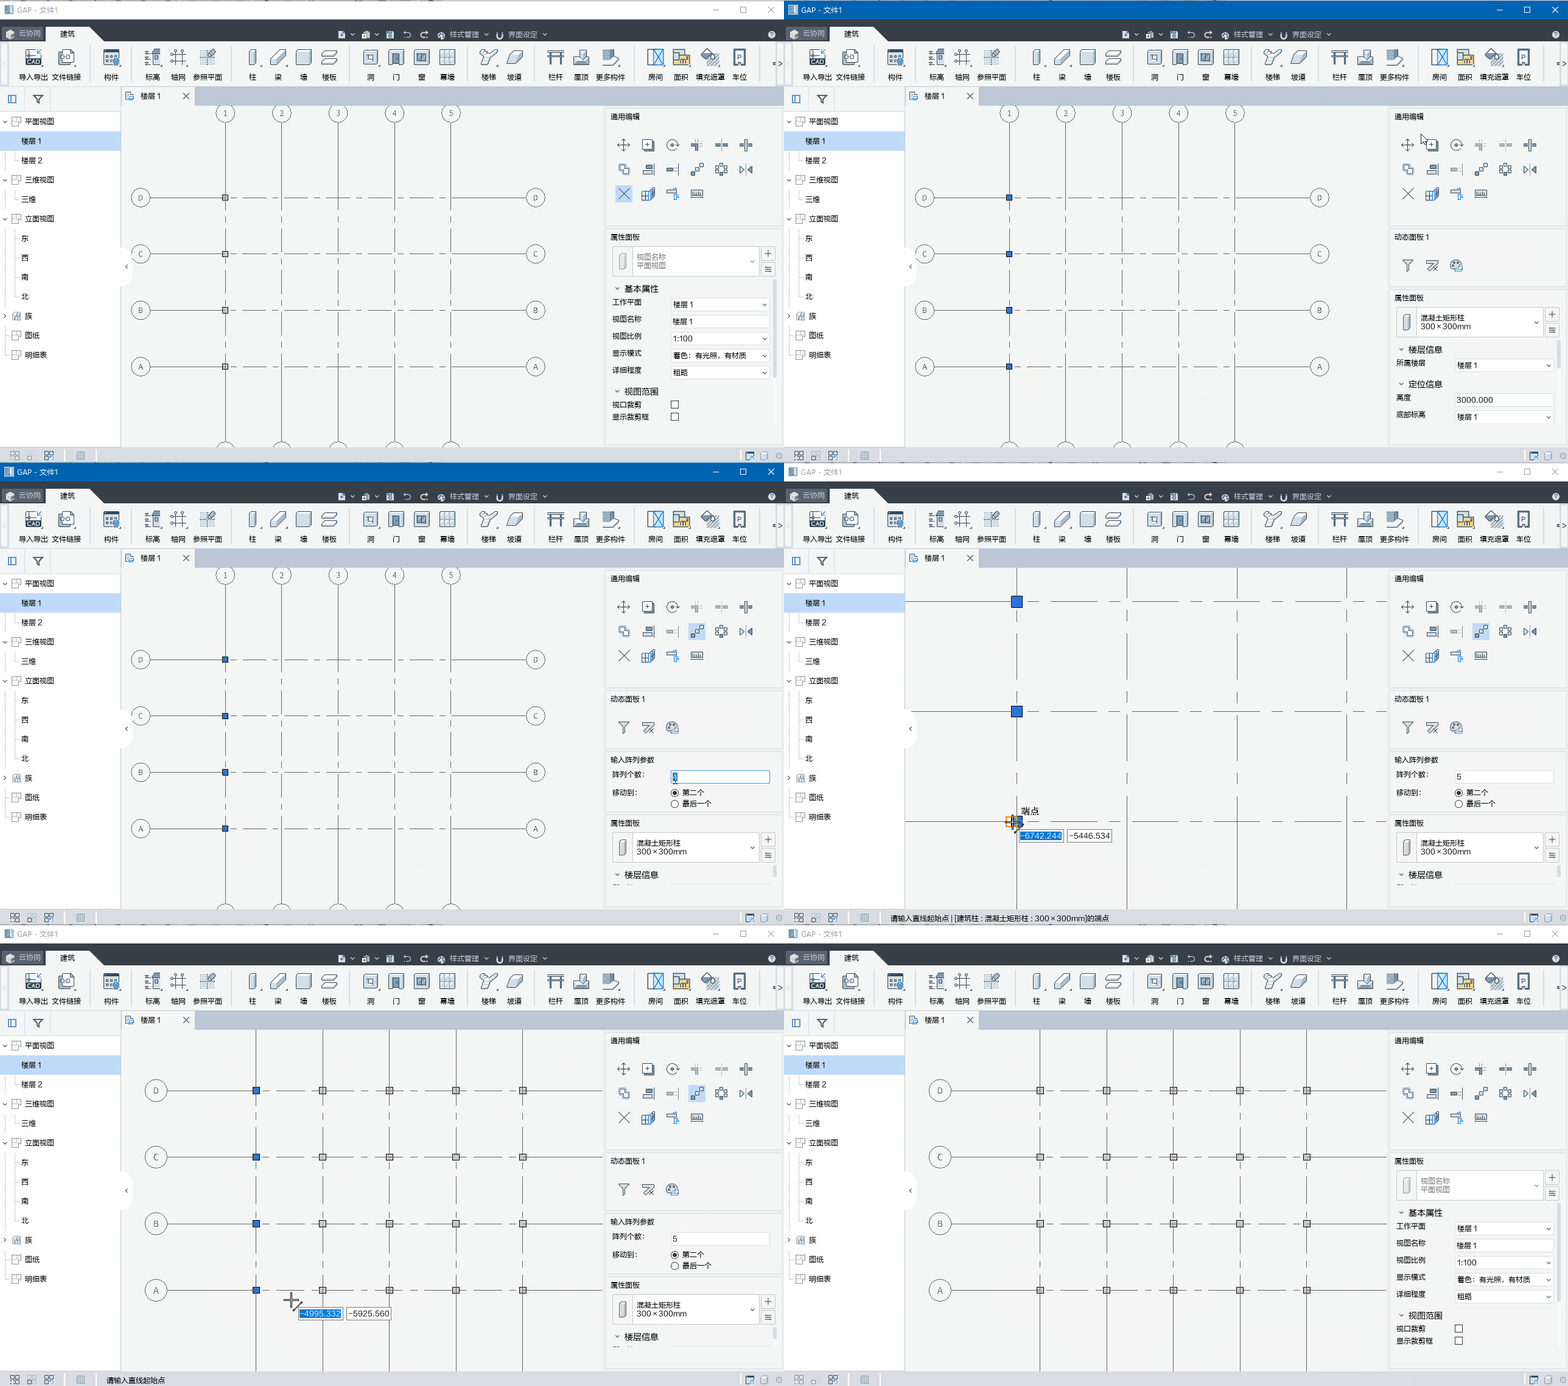
陣列的構件可以沿一條線(線性陣列),也可以沿一個弧形(半徑陣列)。
創建陣列時,請使用下列方法之一指定構件之間的間距:
* 指定第一個構件和第二個構件之間的間距(使用“移動到: 第二個”選項)。所有后續構件將使用相同的間距。
* 指定第一個構件和最后一個構件之間的間距 (使用“移動到: 最后一個”選項)。所有剩余的構件將在它們之間以相等間隔分布。
### 創建線性陣列
1. 選擇要陣列的構件并啟動命令,有以下兩種方式:
* 選中需要陣列的構件  單擊“助手對話框”工具;
* 單擊“助手對話框”工具  選中需要陣列的構件  按空格鍵(Space)或回車鍵(Enter)確認選擇集;
2. 選擇需要的陣列形式:移動到:第二個、最后一個 和陣列數
3. 在繪圖區域單擊指定移動的起點,再次單擊確定移動的終點,或輸入臨時尺寸進行精確定位移動的終點。
4. 完成后Esc退出陣列命令。
### 操作示例
**提示:**示例使用0.6.0版本錄制,使用版本不同,可能在界面顯示上略有不同****

注:動圖導出為PDF后可能無法播放,如需觀看請前往:
http://www.hmoore.net/glodon_garch/garch_r1/content
### 創建環形陣列
1. 選擇要環陣的構件并啟動命令,有以下兩種方式:
* 選中需要環陣的構件  單擊“助手對話框”工具;
* 單擊“助手對話框”工具  選中需要環陣的構件  按空格鍵(Space)或回車鍵(Enter)確認選擇集;
2. 設置需要的參數:旋轉中心、回默認點;陣列的個數以及陣列的方式:間隔角度和整體角度;
3. 單擊指定旋轉中心,再次單擊指定旋轉的起始射線,再次單擊確認旋轉的角度;
4. 按Esc 退出環列命令。
### 操作示例
**提示:**示例使用0.7.0版本錄制,使用版本不同,可能在界面顯示上略有不同****

注:動圖導出為PDF后可能無法播放,如需觀看請前往:
http://www.hmoore.net/glodon_garch/garch_r1/content
- 幫助主頁
- 更新說明(0.18.0)
- 歷史版本
- 更新說明(0.17.0)
- 更新說明(0.16.0)
- 更新說明(0.15.0)
- 更新說明(0.14.0)
- 更新說明(0.13.0)
- 更新說明(0.12.0)
- 更新說明(0.11.0)
- 更新說明(0.10.0)
- 更新說明(0.9.0)
- 更新說明(0.8.0)
- 更新說明(0.7.0)
- 更新說明(0.6.0)
- 推薦配置
- 軟件安裝和卸載
- 快速入門
- 界面介紹
- 項目案例
- 云協同
- 網頁端
- 登錄與創建項目
- 協同設置
- 項目級設置
- 軸網設置
- 空間和標高
- 項目構件庫
- 專業級設置
- 建筑
- 機電
- 工具端
- 登錄
- 項目
- 工作單元
- 協同參照
- 鏈接協同參照
- 重新篩選/刪除協同參照
- 編輯協同參照
- 問題列表
- 其他
- 項目創建及編輯
- 基本設置
- 項目管理
- 對象樣式
- 線樣式
- 線型
- 文字樣式
- 工程做法
- 視圖樣板
- DWG導出設置
- 導入對象管理
- 材料庫管理
- 自定義扣減
- 自動扣減
- 手動扣減
- 協同扣減
- 清理
- 清理緩存
- 子項
- 項目定位
- 系統設置
- 捕捉設置
- 快捷鍵設置
- 自動緩存設置
- 界面風格設置
- 正交模式
- 軸號懸浮
- 顯示/隱藏線寬
- 顯示/隱藏項目坐標原點
- 項目視圖
- 平面視圖
- 創建平面視圖
- 平面視圖范圍
- 平面視圖屬性
- 立面視圖
- 創建立面視圖
- 立面視圖屬性
- 剖面視圖
- 創建剖面視圖
- 剖面視圖屬性
- 三維視圖
- 創建三維視圖
- 三維視圖屬性
- 旋轉三維視圖
- 局部三維視圖
- 創建局部三維視圖
- 局部三維視圖的屬性
- 使用和管理視圖
- 使用視圖
- 關于組織視圖
- 顯示或打開視圖
- 重命名視圖
- 視圖復制
- 管理視圖
- 視圖對象樣式的控制
- 項目視圖中對象的可見性
- 常用編輯工具
- 通用編輯
- 移動和偏移
- 復制
- 對齊
- 旋轉
- 鏡像
- 刪除
- 線性陣列和環列
- 延伸和修剪
- 修角
- 打斷
- 扣減
- 批量扣減
- 去除扣減
- 連接線消隱
- 測量長度
- 剪切板
- 復制到剪切板
- 帶基點復制
- 剪切
- 粘貼
- 粘貼到標高
- 粘貼到視圖
- 構件隱藏與顯示
- 選擇過濾
- 拾取過濾
- 顯示過濾
- 選擇同特征實例
- 幕墻連接
- 墻連接
- 參照定位設計
- 標高
- 標高的繪制
- 樓層標高
- 輔助標高
- 標高的編輯
- 在視圖中編輯標高線
- 標高線長批量調整
- 標高的刪除
- 標高的參數
- 標高尺寸標注
- 提交為項目級標高
- 更新項目標高
- 軸網
- 軸網的繪制
- 繪制單根軸線
- 批量繪制軸網
- 正交軸網
- 輻射軸網
- 軸網的編輯
- 批量調整
- 軸號重排
- 軸網的參數
- 軸網標注
- 提交為項目級軸網
- 更新項目級軸網
- 一軸多號
- 參照平面
- 參照平面的繪制
- 參照平面的編輯
- 參照平面的參數
- 建筑構件設計
- 墻
- 墻的繪制
- 變截面墻的繪制
- 墻的編輯
- 墻附著與分離
- 墻的參數
- 柱
- 柱的繪制
- 斜柱的繪制
- 自定義截面柱的繪制
- 柱的編輯
- 柱的參數
- 梁
- 梁的繪制
- 變截面梁的繪制
- 自定義截面梁的繪制
- 梁的編輯
- 梁的參數
- 樓板
- 樓板的繪制
- 傾斜樓板的繪制
- 樓板的分割
- 樓板的編輯
- 樓板的參數
- 屋頂
- 屋頂的繪制
- 屋頂的編輯
- 屋頂的參數
- 門
- 門的繪制
- 門的編輯
- 門的參數
- 窗
- 窗的繪制
- 窗的編輯
- 窗的參數
- 幕墻
- 幕墻的繪制
- 幕墻參數網格設置
- 幕墻手動添加/編輯網格
- 幕墻連接與編輯
- 幕墻的參數
- 樓梯
- 雙跑樓梯
- 雙跑樓梯的繪制
- 雙跑樓梯的編輯
- 雙跑樓梯的參數
- 剪刀梯
- 剪刀梯的繪制
- 剪刀梯的編輯
- 剪刀梯的參數
- 自由樓梯
- 自由樓梯的繪制
- 自由樓梯的編輯
- 自由樓梯的參數
- 創建自由樓梯注意事項
- 臺階
- 臺階的繪制
- 臺階的編輯
- 臺階的參數
- 欄桿
- 欄桿的繪制
- 欄桿的編輯
- 欄桿的參數
- 坡道
- 坡道的繪制
- 坡道的編輯
- 坡道的參數
- 女兒墻
- 女兒墻的繪制
- 矩形女兒墻的繪制
- 自定義女兒墻的繪制
- 女兒墻的編輯
- 女兒墻的參數
- 墻洞
- 墻洞的繪制
- 墻洞的編輯
- 墻洞的參數
- 板洞
- 板洞的繪制
- 板洞的編輯
- 豎井
- 豎井的繪制
- 豎井的編輯
- 豎井的參數
- 散水
- 散水的繪制
- 散水的編輯
- 散水的參數
- 反檐
- 矩形反檐的繪制
- 自定義反檐的繪制
- 反檐的編輯
- 反檐的參數
- 車位
- 車位的繪制
- 車位點式布置
- 車位沿線布置
- 模塊化設計
- 創建模塊
- 模塊的編輯
- 模塊解組
- 刪除模塊類型
- 構件
- 項目構件
- 查看構件
- 添加構件
- 刪除構件
- 使用構件
- 編輯構件
- 更新構件
- 替換構件
- 載入構件
- 放置載入的構件
- 創建構件
- 構件編輯器界面
- 構件樣板
- 形體
- 約束與參數
- 關聯工作平面
- 構件創建案例教程
- 在位創建
- 空間區域設計
- 房間
- 房間的布置
- 分割面的布置
- 房間注釋
- 批量房間注釋
- 房間的參數
- 防火分區
- 防火分區的創建
- 防火分區的編輯
- 防火分區的參數
- 面積
- 面積的繪制
- 面積的編輯
- 面積的參數
- 注釋出圖設計
- 填充遮罩
- 填充遮罩的繪制
- 填充遮罩的編輯
- 填充遮罩的參數
- 尺寸標注
- 線性尺寸標注
- 線性標注
- 對齊標注
- 弧長標注
- 線性尺寸標注參數
- 徑向尺寸標注
- 直徑標注
- 半徑標注
- 徑向尺寸標注參數
- 角度標注
- 創建角度標注
- 角度標注參數
- 標高標注
- 創建標高標注
- 標高標注參數
- 修改尺寸標注
- 修改標注值文字
- 移動尺寸標注的文字
- 移動尺寸線的位置
- 修改尺寸界線的長度
- 修改尺寸標注的主體
- 增刪尺寸界線
- 刪除尺寸區間
- 連接尺寸區間
- 符號標注
- 符號庫
- 引出標注
- 框選索引
- 剖切索引
- 指向索引
- 坡度標注
- 指北針
- 折斷線
- 文字
- 創建文字
- 編輯文字
- 文字屬性
- 線段
- 二維線
- 門窗編號
- 門窗編號的繪制
- 門窗編號的編輯
- 門窗編號的參數
- 明細表
- 門窗表
- 生成標準門窗表
- 制作門窗表
- 編輯門窗表
- 圖紙目錄
- 面積統計表
- 制作面積統計表
- 編輯面積統計表
- 門窗大樣圖
- 創建門窗大樣圖視圖
- 繪制門窗大樣
- 更新布圖區域
- 門窗大樣注釋
- 圖紙
- 創建圖紙
- 放置視口
- 放置表格
- 生成門窗大樣
- 導入導出與鏈接
- 導入圖紙
- 清除圖紙
- 導出圖像
- 導出DWG
- 導出3DS
- 鏈接本地模型
- 鏈接管理
- 版本更新
- 常見問題
- 軟件出現崩潰怎么辦?
- 如何給族添加材質?
- 如何自定義門窗?
- 異形墻如何創建?
- 房間、區域面積對象顯示異常狀態怎么辦?
- 電腦怎么設置只使用獨立顯卡?
