
[TOC]
## 1.環境信息
| 服務器1 | 服務器2 | 服務器3 |
| --- | --- | ---|
| 192.168.86.131 | 192.168.86.132 | 192.168.86.133 |
| mongos | mongos | mongos |
| config server | config server | config server |
| shard server1 主節點 | shard server1 副節點 | shard server1 仲裁 |
| shard server2 仲裁| shard server2 主節點 | shard server2 副節點 |
| shard server3 副節點 | shard server3 仲裁 | shard server3 主節點 |
## 2.端口分配
mongos:20000
config:21000
shard1:27001
shard2:27002
shard3:27003
## 3.下載安裝mongodb
```
wget https://fastdl.mongodb.org/linux/mongodb-linux-x86_64-amazon-4.0.9.tgz
tar -xzvf mongodb-linux-x86_64-amazon-4.0.9.tgz? -C /usr/local/
```
## 4.建立軟連接并配置path
```
cd /usr/local/
ln -s? /usr/local/mongodb-linux-x86_64-amazon-4.0.9?/usr/local/mongodb
```
編輯/etc/profile
```
export MONGODB_HOME=/usr/local/mongodb
export PATH=$MONGODB_HOME/bin:$PATH
```
```
source /etc/profile
```
## 5.創建日志和數據目錄
```
mkdir -p /usr/local/mongodb/conf \
mkdir -p /usr/local/mongodb/mongos/log \
mkdir -p /usr/local/mongodb/config/data \
mkdir -p /usr/local/mongodb/config/log \
mkdir -p /usr/local/mongodb/shard1/data \
mkdir -p /usr/local/mongodb/shard1/log \
mkdir -p /usr/local/mongodb/shard2/data \
mkdir -p /usr/local/mongodb/shard2/log \
mkdir -p /usr/local/mongodb/shard3/data \
mkdir -p /usr/local/mongodb/shard3/log
```
## 6.config server 配置服務器
**mongodb3.4版本之后要求配置服務器也創建副本集,不然集群搭建不成功。**
```
vi /usr/local/mongodb/conf/config.conf
```
```
## 配置文件內容
pidfilepath = /usr/local/mongodb/config/log/configsrv.pid
dbpath = /usr/local/mongodb/config/data
logpath = /usr/local/mongodb/config/log/configsrv.log
logappend = true
bind_ip = 0.0.0.0
port = 21000
fork = true
#declare this is a config db of a cluster;
configsvr = true
#副本集名稱
replSet = configs
#設置最大連接數
maxConns = 20000
```
啟動三臺服務器的config server
```
mongod -f /usr/local/mongodb/conf/config.conf
```
登錄任意一臺配置服務器,初始化配置副本集
```
#連接MongoDB
mongo --port 21000
```
配置config變量
```
config = {
_id : "configs",
members : [
{ _id : 0, host : "192.168.86.131:21000" },
{ _id : 1, host : "192.168.86.132:21000" },
{ _id : 2, host : "192.168.86.133:21000" }
]
}
```
初始化副本集
```
rs.initiate(config)
```
其中`"_id" : "configs"`應與配置文件中replication.replSetName一致,"members"中的"host"為三個節點的ip和port
響應內容如下
```
config = {
_id : "configs",
members: [
{ _id : 0, host : "192.168.86.131:21000" },
{ _id : 1, host : "192.168.86.132:21000" },
{ _id : 2, host : "192.168.86.133:21000" }
]
}
{
"_id" : "configs",
"members" : [
{
"_id" : 0,
"host" : "192.168.86.131:21000"
},
{
"_id" : 1,
"host" : "192.168.86.132:21000"
},
{
"_id" : 2,
"host" : "192.168.86.133:21000"
},
]
}
> rs.initiate(config);
{
"ok"?:?1,
"operationTime"?: Timestamp(1517369899,?1),
"$gleStats"?: {
"lastOpTime"?: Timestamp(1517369899,?1),
"electionId"?: ObjectId("000000000000000000000000")
????},
"$clusterTime"?: {
"clusterTime"?: Timestamp(1517369899,?1),
"signature"?: {
"hash"?: BinData(0,"AAAAAAAAAAAAAAAAAAAAAAAAAAA="),
"keyId"?: NumberLong(0)
????????}
????}
}
configs:SECONDARY>
```
## 7.配置分片服務器
### 7.1.設置第一個分片服務器
三臺服務器都需要配置
```
vi /usr/local/mongodb/conf/shard1.conf
```
```
#配置內容
pidfilepath = /usr/local/mongodb/shard1/log/shard1.pid
dbpath = /usr/local/mongodb/shard1/data
logpath = /usr/local/mongodb/shard1/log/shard1.log
logappend =?true
bind_ip =?0.0.0.0
port =?27001
fork =?true
#副本集名稱
replSet = shard1
#declare?this?is a shard db of a cluster;
shardsvr =?true
#設置最大連接數
maxConns =?20000
```
啟動三臺服務器的shard1 server
```
mongod -f /usr/local/mongodb/conf/shard1.conf
```
登錄任意一臺服務器,初始化副本集(除了192.168.86.133),**因為仲裁服務器沒有訪問權限,會初始化失敗。**
連接mongodb
```
mongo --port 27001
```
```
# 使用admin數據庫,定義副本集配置
> use admin
> config = {
_id : "shard1",
members : [
{_id :?0, host :?"192.168.86.131:27001"?},
?????????{_id :?1, host :?"192.168.86.132:27001"?},
?????????{_id :?2, host :?"192.168.86.133:27001"?, arbiterOnly:?true?}
]
}
#初始化副本集配置
rs.initiate(config)
```
響應內容如下
```
> use admin
switched to db admin
> config = {
...???? _id :?"shard1",
...????? members : [
...????????? {_id :?0, host :?"192.168.86.131:27001"?},
...????????? {_id :?1, host :?"192.168.86.132:27001"?},
...????????? {_id :?2, host :?"192.168.86.133:27001"?, arbiterOnly:?true?}
...????? ]
...? }
{
"_id"?:?"shard1",
"members"?: [
????????{
"_id"?:?0,
"host"?:?"192.168.86.131:27001"
????????},
????????{
"_id"?:?1,
"host"?:?"192.168.86.132:27001"
????????},
????????{
"_id"?:?2,
"host"?:?"192.168.86.133:27001",
"arbiterOnly"?:?true
????????}
????]
}
> rs.initiate(config)
{?"ok"?:?1?}
```
### 7.2.設置第二和第三個分片服務器
第二、第三個服務器配置過程同上,只需將配置文件中的服務器名稱改為shard2、shard3,將端口改為27002,27003即可,仲裁服務器分別選擇第二個和第三個。
## 8.配置路由服務器 mongos
### 8.1.配置并初始化
三臺服務器都需要操作
先啟動配置服務器和分片服務器,后啟動路由實例
```
vi /usr/local/mongodb/conf/mongos.conf
```
```
pidfilepath = /usr/local/mongodb/mongos/log/mongos.pid
logpath = /usr/local/mongodb/mongos/log/mongos.log
logappend =?true
bind_ip =?0.0.0.0
port =?20000
fork =?true
#監聽的配置服務器,只能有1個或者3個 configs為配置服務器的副本集名字
configdb = configs/192.168.86.131:21000,192.168.86.132:21000,192.168.86.133:21000
#設置最大連接數
maxConns =?20000
```
啟動三臺服務器的mongos server
```
mongos -f /usr/local/mongodb/conf/mongos.conf
```
### 8.2.串聯路由服務器
目前搭建了mongodb配置服務器、路由服務器,各個分片服務器,不過應用程序連接到mongos路由服務器并不能使用分片機制,還需要在程序里設置分片配置,讓分片生效。
登錄任意一臺mongos
```
mongo --port 20000
# 使用admin數據庫
use admin
# 串聯路由服務器與分配副本集
sh.addShard("shard1/192.168.86.131:27001,192.168.86.132:27001,192.168.86.123:27001");
sh.addShard("shard2/192.168.86.131:27002,192.168.86.132:27002,192.168.86.133:27002");
sh.addShard("shard3/192.168.86.131:27003,192.168.86.132:27003,192.168.86.133:27003");
# 查看集群狀態
sh.status()
# 響應內容如下
mongos> sh.status()
--- Sharding Status ---
??sharding version: {
"_id"?:?1,
"minCompatibleVersion"?:?5,
"currentVersion"?:?6,
"clusterId"?: ObjectId("5a713a37d56e076f3eb47acf")
??}
??shards:
????????{??"_id"?:?"shard1",??"host"?:?"shard1/192.168.86.131:27001,192.168.86.132:27001",??"state"?:?1?}
????????{??"_id"?:?"shard2",??"host"?:?"shard2/192.168.86.132:27002,192.168.86.133:27002",??"state"?:?1?}
????????{??"_id"?:?"shard3",??"host"?:?"shard3/192.168.86.131:27003,192.168.86.133:27003",??"state"?:?1?}
??active mongoses:
"4.0.9"?:?3
??autosplit:
????????Currently enabled: yes
??balancer:
????????Currently enabled:? yes
????????Currently running:? no
????????Failed balancer rounds in last?5?attempts:??0
????????Migration Results?for?the last?24?hours:
????????????????No recent migrations
??databases:
????????{??"_id"?:?"config",??"primary"?:?"config",??"partitioned"?:?true?}
mongos>
```
## 9.啟用集合分片
目前配置服務、路由服務、分片服務、副本集服務都已經串聯起來了,但我們的目的是希望插入數據,數據能夠自動分片。連接在mongos上,準備讓指定的數據庫、指定的集合分片生效。
登錄任意一臺mongos
```
mongo --port 20000
# 使用admin數據庫
use admin
```
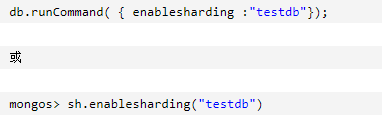
指定testdb分片生效,如下圖:
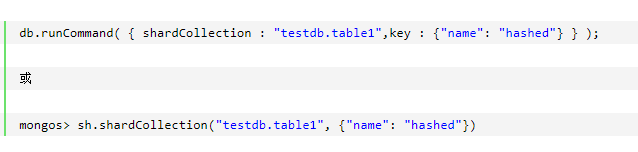
指定數據庫里需要分片的集合和片鍵,哈希id分片(注意:分片的字段數據應該是變化的,不然分片不成功),如下圖:
```
#切換到testdb數據庫
use testdb;
# 插入測試數據
for(i=1;i<=100000;i++){db.table1.insert({"id":i,"name":"sunlei"+i})};
# 查看總條數
db.table1.aggregate([{$group : {_id :?"$name", total : {$sum :?1}}}])
# 查看分片情況
db.table1.stats()
```
結論:數據基本均勻
- Golang
- 基礎知識
- 基本數據類型
- 運算符
- 變量&常量
- 流程控制
- 數組
- 切片
- string操作
- Map及實現原理
- Go其他
- CLI命令
- Golang內置類型和函數
- init函數和main函數
- 網絡編程
- 互聯網協議
- socket編程
- 單元測試
- 并發編程
- channel
- 優雅地關閉channel
- Mutex
- GMP原理與調度
- Go Web
- HTTP Server
- gin框架
- 快速入門
- HTML渲染
- JSONP
- Multipart/Urlencoded綁定
- PureJSON
- gin路由
- beego框架
- Bee工具安裝
- 配置模塊
- Web模塊
- 路由
- 數據操作
- Go操作Mysql數據庫
- Go操作redis
- mongo-driver
- sqlx庫
- 操作etcd
- msgpack
- 網絡爬蟲
- 獲取頁面
- 標準庫
- IO操作
- 文件操作
- fmt
- 格式化輸出
- flag
- log
- time
- strconv
- template
- os
- sync.Mutex
- Context
- 第三方庫
- zap庫
- viper
- validator參數校驗
- GORM
- 基礎
- CRUD接口
- INI
- GoFrame
- 快速開始
- 微服務
- go-kit
- gRPC
- Protocol Buffers 語法指南
- go-zero
- 相關名詞解釋
- 數據結構和算法
- 基礎知識
- 鏈表
- Golang GUI
- fyne基礎
- 顯示時間
- RabbitMQ-Go
- centos7 安裝rabbitmq-server
- RabbitMQ介紹
- 工作隊列
- Go設計模式
- 設計模式的分類
- 簡單工廠模式
- golang自舉編譯
- 了解sync.Once
- 知識碎片
- 常見問題
- 開源項目
- Python
- Anaconda
- 介紹、使用教程
- Python基礎知識
- Python之禪
- 變量和類型
- 流程控制
- Python運維
- Python內置工具
- 命令行工具
- 包管理工具pip
- 小爬蟲筆記
- I/O操作
- requests庫
- requests基本使用
- BeautifulSoup庫
- BeautifulSoup基本使用
- Scrapy框架
- 數據可視化
- Django
- Django起步
- OpenCV
- OpenCV入門
- 前端
- HTML
- CSS
- CSS權重計算
- Javascript
- 基礎
- JS基礎知識
- 監聽事件
- 字符串操作
- 數組操作
- 輸入輸出
- 定時器
- 樣式操作
- 獲取url參數
- Typescript
- Pick 與 Omit TS內置類型
- Vue.js
- Vue.js介紹
- Vue.js基礎
- Vue指令
- v-model
- v-for
- 指令修飾符
- Q&A
- 命令
- Vue3
- node.js
- node.js基礎
- npm遇到的問題
- 相關工具安裝
- nvm使用教程
- 工程化webpack
- Linux
- Linux基礎
- 符號鏈接
- Shell
- 腳本執行方式
- 數據的輸入輸出
- 腳本執行中的問題
- tcpdump
- 正則表達式
- Elasticsearch
- Docker
- Docker的基礎概念與操作
- Docker 安裝
- 容器技術原理
- Docker核心概念
- Docker基本操作
- 鏡像相關操作
- 容器相關操作
- 鏡像加速器
- Dockerfile
- COPY復制文件
- Docker所遇問題
- ansible
- ansible入門
- k8s
- 安裝工具
- kubectl
- Git
- gitlab
- gitlab備份與恢復
- gitlab基本使用
- git使用
- git常用命令
- git提交問題
- git提交規范
- 數據庫
- MySQL
- MySQL介紹
- mariadb安裝
- 主主復制
- 數據庫問題集結
- 開啟binlog
- MySQL常用命令
- SQL總結
- MySQL性能優化系列
- 第一章 初始化安裝和簡單安全加固
- 第二章 認識performance_schema
- 第三章 MySQL體系結構
- MySQL配置模板
- Redis
- Redis簡單使用
- Redis常見問題
- Redis集群
- Redis Cluster概述
- 數據分布
- 搭建集群
- MongoDB
- mongodb分片
- MongoDB分片集群設置密碼驗證
- TiDB
- 單機模擬部署生產環境集群
- 服務器
- CentOS
- 配置阿里云的yum源和epel源
- centos7 實現NFS文件共享
- rsync
- centos7 源碼編譯rsync
- rsync實現文件同步
- 添加刪除swap分區
- 清除buff/cache
- 配置ntp時間同步
- centos7安裝pip
- centos7虛擬機啟動報xfs錯誤
- centos7常用命令
- centos7安裝mysql
- centos7安裝python3.x
- centos7升級gcc、g++
- centos7安裝nginx
- centos7部署Nexus
- centos7離線安裝python3
- centos7.6編譯mariadb10.5.22
- CentOS8
- 銀河麒麟V4
- nginx編譯
- 銀河麒麟V10_x86
- 安裝VNC
- 單用戶模式
- UOS
- 配置本地apt源
- apt安裝vnc-server
- UOS單用戶模式
- UOS創建自啟動腳本
- 源碼編譯
- oniguruma編譯
- Proxmox VE
- PVE基本使用
- PVE故障
- KVM
- KVM相關命令
- 銀河麒麟V10_x86安裝kvm
- UOS_arm64安裝kvm
- yum、rpm、apt
- dpkg、apt-get、yum和rpm的區別
- rpm打包
- yum相關問題
- 內建銀河麒麟的apt源
- 其他軟件
- JuiceFS
- nacos
- 常見命令
- 硬盤分區
- Linux常見問題
- 測試
- sysbench
- 其他
- Cloc代碼統計工具
- onlyoffice 在線文檔編輯
- onlyoffice添加中文字體
- 遇到的問題
- 網絡通信協議
- 部署相關記錄
- Vmware workstation虛擬機遷移到PVE指南
- 小操作