在本節中,我們將開發新增產品所需的功能。我們的大致思路如下:
定義新的應用服務方法來獲取類別和創建產品。
1. 定義應用服務的獲取類別和創建產品方法。
2. 在 UI 部分,使用 ABP 的動態表單功能,基于 C# 類自動生成產品創建表單。
## 定義應用接口
讓我們從給`IProductAppService`接口添加兩個新方法開始:
```
Task CreateAsync(CreateUpdateProductDto input);
Task<ListResultDto<CategoryLookupDto>> GetCategoriesAsync();
```
在創建產品時,我們使用`GetCategoriesAsync`方法獲取產品類別的下拉數據。我們定義了兩個新的 DTO。
`CreateUpdateProductDto`用于創建和更新產品(我們將在*編輯產品*時候重復使用它)。我們在*ProductManagement.Application.Contracts項目*的*Products*文件夾中定義它:
```
using System;
using System.ComponentModel.DataAnnotations;
namespace ProductManagement.Products
{
????public class CreateUpdateProductDto
????{
????????public Guid CategoryId { get; set; }
????????[Required]
????????[StringLength(ProductConsts.MaxNameLength)]
????????public string Name { get; set; }
????????public float Price { get; set; }
????????public bool IsFreeCargo { get; set; }
????????public DateTime ReleaseDate { get; set; }
????????public ProductStockState StockState { get; set; }
????}
}
```
接下來,在*ProductManagement.Application.Contracts*項目的*Categories*文件夾中定義一個`CategoryLookupDto`類:
```
using System;
namespace ProductManagement.Categories
{
????public class CategoryLookupDto
????{
????????public Guid Id { get; set; }
????????public string Name { get; set; }
????}
}
```
定了接口相關類,現在我們可以在應用層實現接口了。
## 實現應用服務
在`ProductAppService`中實現`CreateAsync`和`GetCategoriesAsync`方法(*ProductManagement.Application*項目中),如下代碼塊:
```
public async Task CreateAsync(CreateUpdateProductDto input)
{
????await _productRepository.InsertAsync(
????????ObjectMapper.Map<CreateUpdateProductDto, Product>(input)
????);
}
public async Task<ListResultDto<CategoryLookupDto>> GetCategoriesAsync()
{
????var categories = await _categoryRepository.GetListAsync();
????return new ListResultDto<CategoryLookupDto>(
????????ObjectMapper.Map<List<Category>, List<CategoryLookupDto>>(categories)
????);
}
```
這里,`_categoryRepository`屬于`IRepository<Category, Guid>`服務類型,通過構造函數注入,方法實現很簡單,無需解釋。
我們已經在上面的兩個地方使用了對象映射,現在我們必須配置映射。打開`ProductManagementApplicationAutoMapperProfile.cs`文件(在*ProductManagement.Application*項目中),添加以下代碼:
```
CreateMap<CreateUpdateProductDto, Product>();
CreateMap<Category, CategoryLookupDto>();
```
## 用戶界面
在[*ProductManagement.Web*](http://ProductManagement.Web)項目的*Pages/Products*文件夾下創建一個`CreateProductModal.cshtml`Razor 頁面。打開`CreateProductModal.cshtml.cs`文件,更改`CreateProductModalModel`代碼:
```
using System.Linq;
using System.Threading.Tasks;
using Microsoft.AspNetCore.Mvc;
using Microsoft.AspNetCore.Mvc.Rendering;
using ProductManagement.Products;
namespace ProductManagement.Web.Pages.Products
{
????Public class CreateProductModalModel:ProductManagementPageModel
????{
????????[BindProperty]
????????public CreateEditProductViewModel Product { get;?set; }
????????public SelectListItem[] Categories { get; set; }
????????private readonly IProductAppService ?_productAppService;
????????public CreateProductModalModel(IProductAppService productAppService)
????????{
????????????_productAppService = productAppService;
????????}
????????public async Task OnGetAsync()
????????{
????????????// TODO
????????}
????????public async Task<IActionResult> OnPostAsync()
????????{
????????????// TODO
????????}
????}
}
```
這里的`ProductManagementPageModel`是基類。你可以繼承它來創建`PageModel`類。`[BindProperty]`是一個標準的 [ASP.NET](http://ASP.NET) Core 屬性,在HTTP Post 請求時,會將數據綁定到`Product`屬性。`Categories`將用于顯示下拉列表中的類別。我們通過注入`IProductAppService`接口以使用之前定義的方法。
目前使用到的`CreateEditProductViewModel`還沒定義,我們將其定義在與`CreateProductModal.cshtml`相同的文件夾下:
```
using ProductManagement.Products;
using System;
using System.ComponentModel;
using System.ComponentModel.DataAnnotations;
using Volo.Abp.AspNetCore.Mvc.UI.Bootstrap.TagHelpers.Form;
namespace ProductManagement.Web.Pages.Products
{
????public class CreateEditProductViewModel
????{
????????[SelectItems("Categories")]
????????[DisplayName("Category")]
????????public Guid CategoryId { get; set; }
????????[Required]
????????[StringLength(ProductConsts.MaxNameLength)]
????????public string Name { get; set; }
????????public float Price { get; set; }
????????public bool IsFreeCargo { get; set; }
????????[DataType(DataType.Date)]
????????public DateTime ReleaseDate { get; set; }
????????public ProductStockState StockState { get; set; }
????}
}
```
`SelectItems`告訴我們`CategoryId`屬性將從`Categories`列表中選擇。我們將在編輯模式對話框中重用此類。這就是我為什么命名它為`CreateEditProductViewModel`。
#### DTO 與 ViewModel
定義視圖模型`CreateEditProductViewModel`似乎沒有必要,因為它與 `CreateUpdateProductDto`DTO非常相似。當然你也可以在視圖里復用DTO。但是,考慮到這些類具有不同的用途,并且隨著時間的推移會向不同的方向發展,所更推薦的辦法是將每個關注點分開。例如,`[SelectItems("Categories")]`屬性指向 Razor Page 模型,它在應用層沒有任何意義。
現在,我們可以在`CreateProductModalModel`類中實現`OnGetAsync`方法:
```
public async Task OnGetAsync()
{
????Product = new CreateEditProductViewModel
????{
????????ReleaseDate = Clock.Now,
????????StockState = ProductStockState.PreOrder
????};
????
????var categoryLookup = await _productAppService.GetCategoriesAsync();
????Categories = categoryLookup.Items.Select(x => new SelectListItem(x.Name,?x.Id.ToString())).ToArray();
}
```
我們使用默認值創建`Product`類,然后使用產品應用服務填充`Categories`列表。`Clock`是 ABP 框架提供的服務,用于獲取當前時間(在不處理時區和本地/UTC 時間的情況下),這里我們不再使用`DateTime.Now`。具體內容這將在\[*第 8 章*\] *使用 ABP 的功能和服務中*進行解釋。
我們接著實現`OnPostAsync`代碼塊:
```
public async Task<IActionResult> OnPostAsync()
{
????await _productAppService.CreateAsync(
????????ObjectMapper.Map<CreateEditProductViewModel,CreateUpdateProductDto> (Product)
????);
????return NoContent();
}
```
由于我們要映射`CreateEditProductViewModel`到`CreateProductDto`,所以需要定義映射配置。我們[*在ProductManagement.Web*](http://xn--ProductManagement-6793a.Web)項目中打開`ProductManagementWebAutoMapperProfile`類,并更改以下代碼塊內容:
```
public class ProductManagementWebAutoMapperProfile : Profile
{
????public ProductManagementWebAutoMapperProfile()
????{
????????CreateMap<CreateEditProductViewModel,?CreateUpdateProductDto>();
????}
}
```
我們已經完成了產品創建 UI 的 C# 端,接下來可以開始構建 UI 和 JavaScript 代碼。打開`CreateProductModal.cshtml`文件,并將內容更改如下:
```
@page
@using Microsoft.AspNetCore.Mvc.Localization
@using ProductManagement.Localization
@using Volo.Abp.AspNetCore.Mvc.UI.Bootstrap.TagHelpers.Modal
@model ProductManagement.Web.Pages.Products.CreateProductModalModel
@inject IHtmlLocalizer<ProductManagementResource> L
@{
????Layout = null;
}
<abp-dynamic-form abp-model="Product" asp-page="/Products/CreateProductModal">
????<abp-modal>
????????<abp-modal-header title="@L["NewProduct"].Value"></abp-modal-header>
????????<abp-modal-body>
????????????<abp-form-content />
????????</abp-modal-body>
????????<abp-modal-footer buttons="@(AbpModalButtons.Cancel|AbpModalButtons.Save)"></abp-modal-footer>
????</abp-modal>
</abp-dynamic-form>
```
在這里,`abp-dynamic-form`會根據 C# 模型類自動創建表單元素。`abp-form-content`是呈現表單元素的地方。`abp-modal`用于創建模態對話框。
您也可以使用標準的 Bootstrap HTML 元素和 [ASP.NET](http://ASP.NET) Core 的綁定來創建表單元素。但是,ABP 的 Bootstrap 和動態表單標簽助手大大簡化了 UI 代碼。我們將在\[*第 12 章*\] *使用 MVC/Razor 頁面*中介紹 ABP 標簽助手。
我們已經完成創建產品的模態窗口代碼。現在,我們將在產品頁面添加一個**新產品**按鈕以打開該窗口。打開*Pages/Products*文件夾中的`Index.cshtml`文件,然后將`abp-card-header`部分更改如下:
```
<abp-card-header>
????<abp-row>
????????<abp-column size-md="_6">
????????????<abp-card-title>@L["Menu:Products"]</abp-card-title>
????????</abp-column>
????????<abp-column size-md="_6" class="text-end">
????????????<abp-button id="NewProductButton"
????????????????????????text="@L["NewProduct"].Value"
????????????????????????icon="plus"
????????????????????????button-type="Primary"/>
????????</abp-column>
????</abp-row>
</abp-card-header>
```
我添加了 2 列,其中每列都有一個`size-md="_6"`屬性(即 12 列 Bootstrap 網格的一半)。左側設置卡片標題,右側放置了一個按鈕。
之后,我添加以下代碼到`Index.cshtml.js`文件末尾(在`})`之前):
```
var createModal = new abp.ModalManager(abp.appPath + 'Products/CreateProductModal');
createModal.onResult(function () {
????dataTable.ajax.reload();
});
$('#NewProductButton').click(function (e) {
????e.preventDefault();
????createModal.open();
});
```
* `abp.ModalManager`用于在客戶端管理模式對話框。在內部,它使用 Twitter Bootstrap 的標準模態組件,封裝了很多細節,并提供了一個簡單的 API。當模型觸發保存時會返回一個回調函數`createModal.onResult()`。
* `createModal.open()`用于打開模態對話框。
最后,我們需要在`en.json`文件中定義一些本地化文本(.Domain.Shared項目的*Localization/ProductManagement* *文件*夾下):
```
"NewProduct": "New Product",
"Category": "Category",
"IsFreeCargo": "Free Cargo",
"ReleaseDate": "Release Date"
```
再次運行 Web 嘗試創建新產品
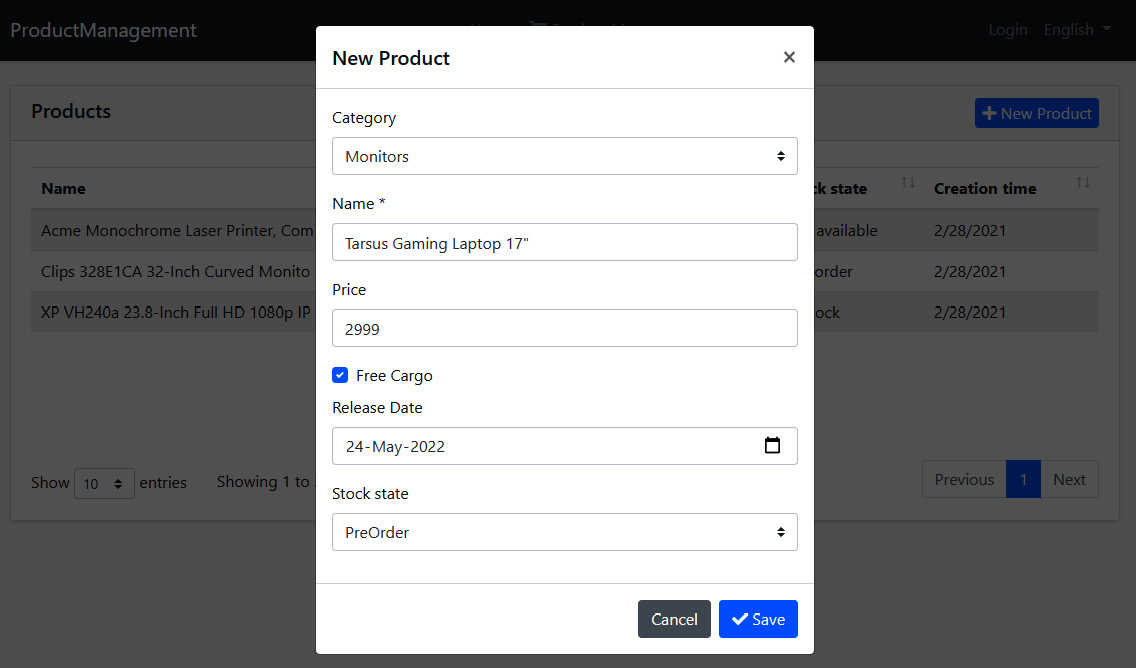
ABP基于 C# 類模型自動創建表單字段。本地化和驗證也可以通過讀取屬性和使用約定來自動工作。我們將在\[*第 12 章*\] *使用 MVC/Razor 頁面* 中更詳細地介紹驗證和本地化主題。
我們現在可以在 UI 上創建產品了。
- 前言
- 第一部分
- 第1章 現代軟件開發和 ABP 框架
- 企業級 Web 開發的挑戰
- ABP框架的能力清單
- 第2章 ABP框架入門
- 安裝 ABP CLI
- 創建新解決方案
- 運行解決方案
- 探索預構建模塊
- 第3章 逐步開發開發ABP應用
- 創建解決方案
- 定義領域對象
- EFCore和數據庫映射
- 定義應用服務
- 測試產品
- 產品列表
- 創建產品
- 編輯產品
- 刪除產品
- 第4章 探索 EventHub解決方案
- 應用介紹
- 架構探索
- 方案運行
- 第二部分
- 第5章 探索ABP基礎架構
- 了解模塊化
- 使用依賴注入系統
- 配置應用程序
- 實現選項模式
- 日志系統
- 第6章 數據訪問基礎架構
- 定義實體
- 定義倉儲庫
- EF Core集成
- 了解 UoW
- 第7章 探索橫切關注點
- 認證授權
- 用戶驗證
- 異常處理
- 第8章 體驗 ABP 的功能和服務
- 獲取當前用戶
- 使用數據過濾
- 控制審計日志
- 緩存數據
- 本地化用戶界面
- 第三部分
- 第9章 理解領域驅動設計
- 介紹 DDD
- 構建基于 DDD 的 解決方案
- 處理多個應用程序
- 了解執行流程
- DDD的通用原則
- 第10章 領域層 Domain
- 領域事件案例分析
- 聚合和實體的設計原則和實踐
- 實現領域服務
- 落地存儲庫
- 構建規約(Specification)
- 領域事件
- 第11章 應用層 Application
- 落地應用服務
- 設計 DTO
- 理解各層的職責
- 第四部分
- 第12章 MVC/Razor 頁面
- 主題系統
- 綁定和壓縮
- 導航菜單
- Bootstrap標簽助手
- 創建表單并驗證
- 使用模態窗口
- 使用JS API
- 調用HTTP API
- 第13章 Blazor WebAssembly UI
- 什么是Blazor
- ABP Blazor UI
- 驗證用戶身份
- 理解主題系統
- 使用菜單
- 使用基本服務
- 使用UI服務
- 消費HTTP API
- 使用全局腳本和樣式
- 第14章 HTTP API 和實時服務
- 構建HTTP API
- 使用HTTP API
- 使用SignalR
- 第五部分
- 第15章 落地模塊化
- 理解模塊化
- 構建支付模塊
- 安裝模塊
- 第16章 實現多租戶
- 理解多租戶
- 多租戶基礎設施
- 使用功能系統
- 何時使用多租戶
- 第17章 構建自動化測試
- 了解ABP測試基礎設施
- 構建單元測試
- 構建集成測試