

*****
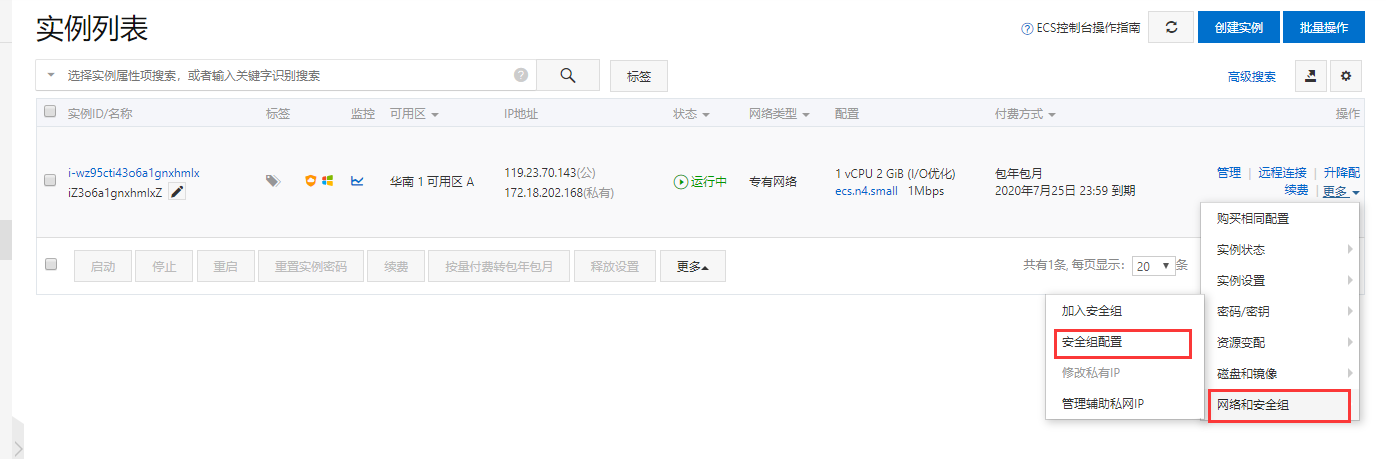
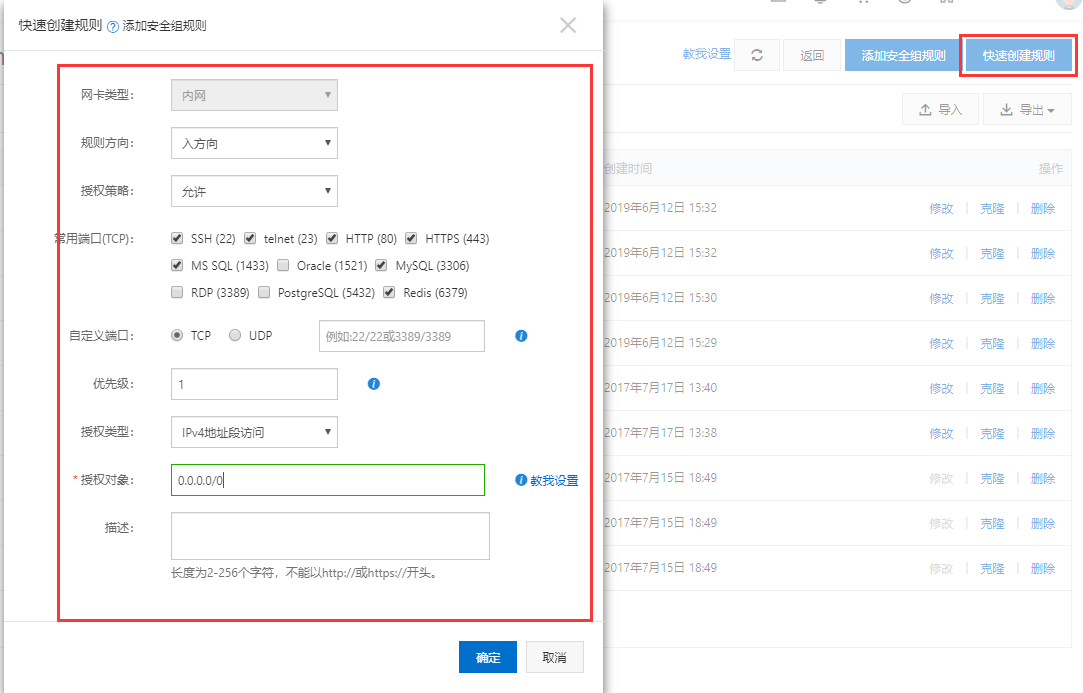
## 阿里云安全組規則
端口范圍
80/80
3306/3306
6379/6379
23/23
443/433
22/22
80/80
3389/3389
### nginx + uwsgi
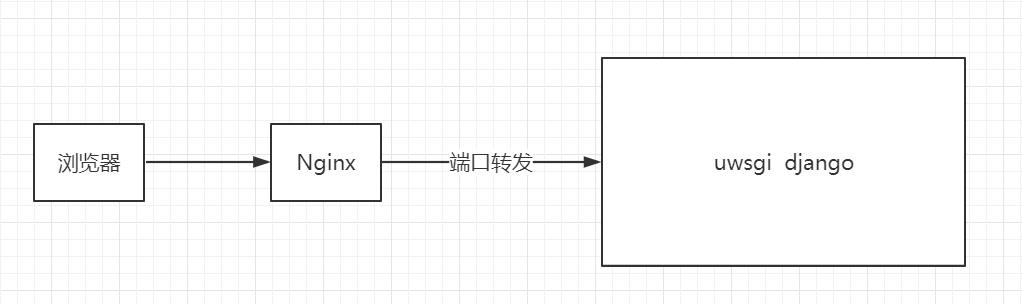
Nginx默認是80端口
### 1.安裝Python3.7
1.安裝依賴包
```
yum install opensll-devel bzip2-devel expat-devel gdbm-devel readline-devel sqlite-devel gcc gcc-c++ opensll-devel libffi-devel python-devel mariadb-devel
```
2.下載Python源碼
```
wget https://www.python.org/ftp/python/3.7.3/Python-3.7.3.tgz
tar -xzvf Python-3.7.3.tgz -C /tmp
cd /tmp/Python-3.7.3
```
3.把Python3.7安裝到 /usr/local目錄
```
./configure --prefix=/usr/local
make
make altinstall # 這一步比較耗時
```
4.更改/usr/bin/python鏈接
```
ln -s /usr/local/bin/python3.7 /usr/bin/python3
ln -s /usr/local/bin/pip3.7 /usr/bin/pip3
```
### 2.maridb和redis
mariadb跟MySQL是一樣的,centos中已經集成了,安裝非常簡單
1.安裝
```
sudo yum install mariadb-server
```
2.啟動,重啟
```
sudo systemctl start mariadb
sudo systemctl restart mariadb
```
設置安全規則,配置MySQL端口
```
訪問MySQL mysql -uroot
```
3.設置bind-ip
```
vim /etc/my.cnf
在[mysqld]: 下面加一行
bind-address = 0.0.0.0
```
4.設置外部ip可以訪問
```
先進入MySQL才能運行下面命令
GRANT ALL PRIVILEGES ON *.* TO 'root'@'%' IDENTIFIED BY '123456' WITH GRANT OPTION;
GRANT ALL PRIVILEGES ON *.* TO 'root'@'localhost' IDENTIFIED BY '123456' WITH GRANT OPTION;
FLUSH PRIVILEGES;
```
5.設置阿里云的對外端口
6.安裝mysqlcilent出問題
```
centos 7: yum install python-devel mariadb-devel -y
pip install mysqlclient
```
將本地的數據庫文件傳到服務器上
6.安裝redis
```
yum install redis
service redis start
```
### 3.安裝Nginx
```
sudo yum install epel-release
sudo yum install nginx
sudo systemctl start nginx
```
### 4.安裝virtualenvwrapper
```
export VIRTUALENVWRAPPER_PYTHON=/usr/bin/python3
yum install python-setuptools python-devel
pip install virtualenvwrapper
```
編輯.bashrc文件
```
vim ~/.bashrc
export WORKON_HOME=$HOME/.virtualenvs
source /usr/local/bin/virtualenvwrapper.sh
```
重新加載.bashrc文件
```
source ~/.bashrc
```
如果報錯,就查找一下文件,將查找到的文件路徑復制到source中
```
sudo find / -name virtualenvwrapper.sh
```
新建虛擬環境
```
mkvirtualenv logic_online
mkvirtualenv -p python3 logic_online # 用Python3新建虛擬環境
```
進入虛擬環境
```
workon logic_online
```
退出虛擬環境
```
deactivate
```
如果安裝虛擬環境報錯,先更新pip
```
pip3 install -i https://pypi.douban.com/simple --upgrade pip
```
安裝pip包
```
將requireements.txt文件上傳到服務器之后運行
pip install -r requireements.txt
安裝依賴包
```
### 4.安裝uwsgi
```
pip install uwsgi
```
### 6.測試uwsgi
```
uwsgi --http :8000 --module logic_online.wsgi
```
### 7.配置Nginx
```
新建uc_nginx.cong
# the upstream component nginx needs to connect to
upstream django {
# server unix:///path/to/your/mysite/mysite.sock; # for a file socket
server 127.0.0.1:8001; # for a web port socket (we'll use this first)
}
# configuration of the server
server {
# the port your site will be served on
listen 80;
# the domain name it will serve for
server_name 47.106.209.215; # substitute your machine's IP address or FQDN
charset utf-8;
# max upload size
client_max_body_size 75M; # adjust to taste
# Django media
location /media {
alias /root/logic_online/media; # 指向django的media目錄
}
location /static {
alias /root/logic_online/static; # 指向django的static目錄
}
# Finally, send all non-media requests to the Django server.
location / {
uwsgi_pass django;
include uwsgi_params; # the uwsgi_params file you installed
}
}
```
### 8.將改配置文件加入到Nginx的啟動配置文件中
```
sudo ln -s 你的目錄/logic_online/conf/nginx/uc_nginx.conf /etc/nginx/conf.d/
```
### 9.拉取所有需要的static file到同一目錄
```
在django的setting文件中,添加下面一行內容
STATIC_ROOT = os.path.join(BASE_DIR, "static/")
運行命令
python manage.py collectstatic
```
### 10.運行Nginx
```
sudo /usr/sbin/nginx
```
這里注意一定是直接用Nginx命令啟動,不要用systemctl啟動Nginx不然會有權限問題
### 11.通過配置文件啟動uwsgi
新建uwsgi.ini配置文件
```
# mysite_uwsgi.ini file
[uwsgi]
# Django-related settings
# the base directory (full path)
chdir = /root/logic_online
# Django's wsgi file
module = logic_online.wsgi
# the virtualenv (full path)
# process-related settings
# master
master = true
# maximum number of worker processes
processes = 10
# the socket (use the full path to be safe
socket = 127.0.0.1:8001
# ... with appropriate permissions - may be needed
# chmod-socket = 664
# clear environment on exit
vacuum = true
virtualenv = /root/.virtualenvs/logic_online
#logto = /tmp/mylog.log
注:
chdir:表示需要操作的目錄,也就是項目的目錄
module:wsgi文件的路徑
processes:進程數
virtualenv:虛擬環境的目錄
workon logic_online
uwsgi -i 你的目錄/logic_online/conf/uwsgi.ini &
```
### 12.訪問
```
http://你的IP地址/
```
- 空白目錄
- 1-Django前導知識
- 1-1-虛擬環境
- 1-2-Django框架介紹與環境搭建
- 2-URL與視圖
- 2-1-URL與視圖
- 3-模板
- 3-1-模板介紹
- 3-2-模板變量
- 3-3-常用標簽
- 3-4-模板常用過濾器
- 3-5-模板結構優化
- 3-6-加載靜態文件
- 4-數據庫
- 4-1-操作數據庫
- 4-2-圖書管理系統
- 4-3-ORM模型介紹
- 4-4-ORM模型的增刪改查
- 4-5-模型常用屬性
- 4-6-外鍵和表
- 4-7-查詢操作
- 4-8-QuerySet的方法
- 4-9-ORM模型練習
- 4-10-ORM模型遷移
- 5-視圖高級
- 1-Django限制請求method
- 2-頁面重定向
- 3-HttpRequest對象
- 4-HttpResponse對象
- 5-類視圖
- 6-錯誤處理
- 6-表單
- 1-用表單驗證數據
- 2-ModelForm
- 3-文件上傳
- 7-session和cookie
- 1-session和cookie
- 8-memcached
- 1-memcached
- 9-阿里云部署
- 阿里云部署