# 監聽器
[TOC]
## 導學
之前我們學習過過濾器,過濾器是針對于請求過濾。而今天我們要學習的監聽器,就像汽車的自動剎停技術,監聽汽車與前方物體的距離,從而采取措施。JavaWeb中的監聽器也是如此,監聽事物變化,從而采取措施。
## 監聽器入門
**監聽器介紹**
* 監聽器(Listener)是J2EE Servlet模塊下的組件
* Listener的作用對Web應用對象的行為進行監控
* 通過Listener監聽Web應用對象功能狀態的變化,自動觸發指定的功能代碼
**三種監聽對象**
* ServletContext-對全局ServletContext及其屬性進行監聽
* HttpSession-對用戶會話及其屬性操作進行監聽
* ServletRequest-對請求及屬性操作進行監聽
**過濾器與監聽器的區別**
* 過濾器(Filter)的職責是對URL進行過濾攔截,是主動的執行
* 監聽器(Listener)的職責是對Web對象進行監聽,是被動觸發
## 監聽器開發
1. 實現XxxListener接口,不同接口對應不同監聽對象
2. 實現每個接口中獨有的方法,實現觸發監聽的后續操作
3. 在web.xml中配置`<listener>`使監聽器生效
~~~
/**
* 針對ServletContext對象進行監聽,不同接口對應不同監聽對象
**/
//@WebListener
//只要這個注解就可以了,無需其他的屬性。更推薦使用配置的形式
public class FirstListener implements ServletContextListener{
//因為ServletContext在Web應用啟動時創建,所以該監聽器在應用啟動的時候就進行監聽
@Override
public void contextInitialized(ServletContextEvent sce) {
System.out.println("ServletContext已初始化");
}
@Override
public void contextDestroyed(ServletContextEvent sce) {
System.out.println("ServletContext已銷毀");
}
}
~~~
~~~
<?xml version="1.0" encoding="UTF-8"?>
<web-app xmlns:xsi="http://www.w3.org/2001/XMLSchema-instance" xmlns="http://xmlns.jcp.org/xml/ns/javaee" xsi:schemaLocation="http://xmlns.jcp.org/xml/ns/javaee http://xmlns.jcp.org/xml/ns/javaee/web-app_3_1.xsd" id="WebApp_ID" version="3.1">
<display-name>first-listener</display-name>
<welcome-file-list>
<welcome-file>index.html</welcome-file>
<welcome-file>index.htm</welcome-file>
<welcome-file>index.jsp</welcome-file>
<welcome-file>default.html</welcome-file>
<welcome-file>default.htm</welcome-file>
<welcome-file>default.jsp</welcome-file>
</welcome-file-list>
<listener>
<listener-class>com.dodoke.listener.FirstListener</listener-class>
</listener>
</web-app>
~~~
## 對象監聽器與屬性監聽器
監聽器的實現需要實現監聽器接口,每種監聽器接口對應不同的監聽器對象。其實在監聽器中存在六種監聽器接口:
**內置對象監聽器接口**
1. ServletContextListener - 監聽ServletContext對象創建、銷毀等操作
2. HttpSessionListener - 監聽HttpSession對象創建、銷毀等操作
3. ServletRequestListener - 監聽HttpServletRequest對象創建、銷毀
**屬性監聽接口**
1. ServletContextAttributeListener - 監聽全局屬性操作
2. HttpSessionAttributeListener- 監聽用戶會話屬性操作
3. ServletRequestAttributeListener- 監聽請求屬性操作
~~~
@WebServlet("/hello")
public class HelloServlet extends HttpServlet {
private static final long serialVersionUID = 1L;
public HelloServlet() {
super();
}
protected void doGet(HttpServletRequest request, HttpServletResponse response) throws ServletException, IOException {
response.getWriter().println("Hello World!");
//在ServletContext,HttpSession,HttpServletRequest對象中添加刪除屬性
request.getServletContext().setAttribute("sc-attr1", "sc-attr-value1");
request.getServletContext().removeAttribute("sc-attr1");
request.getSession().setAttribute("session-attr1", "session-attr-value1");
request.setAttribute("request-attr1", "request-attr-value1");
}
protected void doPost(HttpServletRequest request, HttpServletResponse response) throws ServletException, IOException {
doGet(request, response);
}
}
~~~
~~~
public class WebAttributeListener implements ServletContextAttributeListener,HttpSessionAttributeListener ,ServletRequestAttributeListener{
@Override
public void attributeAdded(ServletContextAttributeEvent event) {
System.out.println("ServletContext新增屬性:" + event.getName() + "->" + event.getValue());
}
@Override
public void attributeRemoved(ServletContextAttributeEvent event) {
}
@Override
public void attributeReplaced(ServletContextAttributeEvent event) {
}
@Override
public void attributeAdded(HttpSessionBindingEvent event) {
System.out.println("HttpSession新增屬性:" + event.getName() + "->" + event.getValue());
}
@Override
public void attributeRemoved(HttpSessionBindingEvent event) {
}
@Override
public void attributeReplaced(HttpSessionBindingEvent event) {
}
@Override
public void attributeAdded(ServletRequestAttributeEvent srae) {
System.out.println("Request新增屬性:" + srae.getName() + "->" + srae.getValue());
}
@Override
public void attributeRemoved(ServletRequestAttributeEvent srae) {
}
@Override
public void attributeReplaced(ServletRequestAttributeEvent srae) {
}
}
~~~
~~~
public class WebListener implements ServletContextListener,HttpSessionListener,ServletRequestListener{
@Override
public void contextInitialized(ServletContextEvent sce) {
System.out.println("ServletContext已初始化");
}
@Override
public void contextDestroyed(ServletContextEvent sce) {
System.out.println("ServletContext已被銷毀");
}
@Override
public void sessionCreated(HttpSessionEvent se) {
HttpSession session = se.getSession();
System.out.println("Session已被創建,SessionId:" + session.getId());
}
@Override
public void sessionDestroyed(HttpSessionEvent se) {
System.out.println("Session已被銷毀");
}
@Override
public void requestDestroyed(ServletRequestEvent sre) {
System.out.println("HttpServletRequest已被銷毀");
}
@Override
public void requestInitialized(ServletRequestEvent sre) {
HttpServletRequest request = (HttpServletRequest)sre.getServletRequest();
System.out.println("HttpServletRequest已被創建,URI:" + request.getRequestURI());
}
}
~~~
~~~
<?xml version="1.0" encoding="UTF-8"?>
<web-app xmlns:xsi="http://www.w3.org/2001/XMLSchema-instance" xmlns="http://xmlns.jcp.org/xml/ns/javaee" xsi:schemaLocation="http://xmlns.jcp.org/xml/ns/javaee http://xmlns.jcp.org/xml/ns/javaee/web-app_3_1.xsd" id="WebApp_ID" version="3.1">
<display-name>listener-interface</display-name>
<welcome-file-list>
<welcome-file>index.html</welcome-file>
<welcome-file>index.htm</welcome-file>
<welcome-file>index.jsp</welcome-file>
<welcome-file>default.html</welcome-file>
<welcome-file>default.htm</welcome-file>
<welcome-file>default.jsp</welcome-file>
</welcome-file-list>
<listener>
<listener-class>com.dodoke.listener.WebListener</listener-class>
</listener>
<listener>
<listener-class>com.dodoke.listener.WebAttributeListener</listener-class>
</listener>
</web-app>
~~~
**web應用程序執行過程**
* [ ] 一個請求時 tomcat處理的過程:Web應用啟動時,ServletContext被初始化,啟動成功后訪問地址時,一個HttpServletRequest對象被創建。同時因為是一個新的瀏覽器窗口,所以tomcat會創建一個session對象,網頁處理完成后HttpServletRequest被銷毀。
* [ ] 第二次請求(當瀏覽器窗口刷新后),session 并沒有被創建,因為session id 已存在,通過確認session id 的存在,所以并不會創建新的session。此時,HttpServletRequest 又經歷了一次創建與銷毀的過程。
* [ ] 當瀏覽器關閉重新打開一個新的窗口,再次訪問這個網址,這時一個新的session被創建。原因是新的瀏覽器并沒有包含任何session id,所以由新的瀏覽器窗口向tomcat發送請求后,會為其創建一個對應的session,原有的session并不會消失,只是原有的sessionid的憑證不存在了,30分鐘后自然過期,或程序代碼人為關閉。
* [ ] 當關閉應用時,ServletContext 才被銷毀。
## 案例:請求流量分析
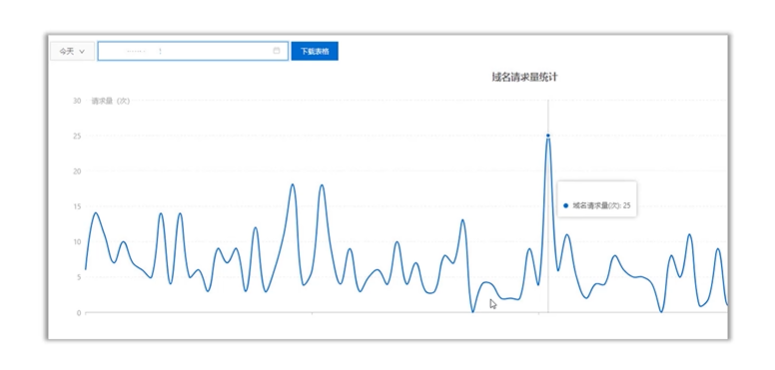
請求流量分析統計的統計功能實現:
1. 利用全局對象監聽器在啟動應用創建全局對象時往對象添加兩個屬性,分別是請求對象的初始化的時間記錄表和初始化的次數統計表,兩者一一對應(存放時間的位置在次數統計表中對應的是該時間的請求次數)。
2. 利用請求對象監聽器在請求到來時對全局對象里的兩個屬性進行修改。
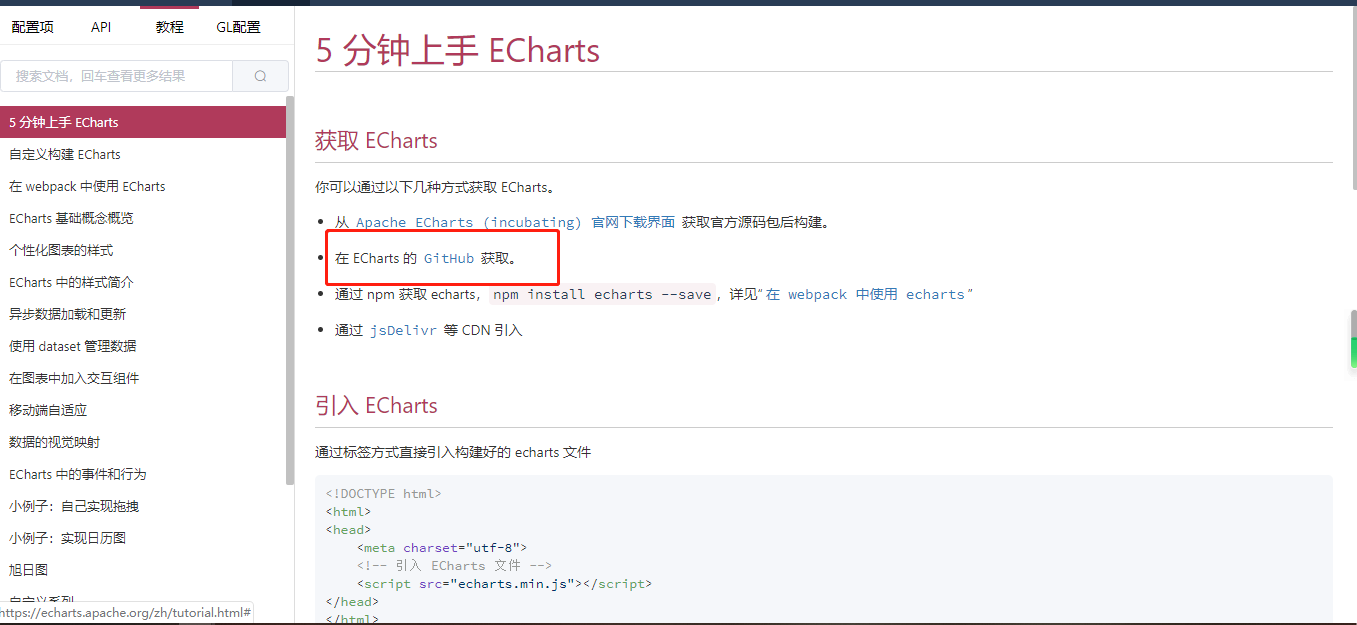
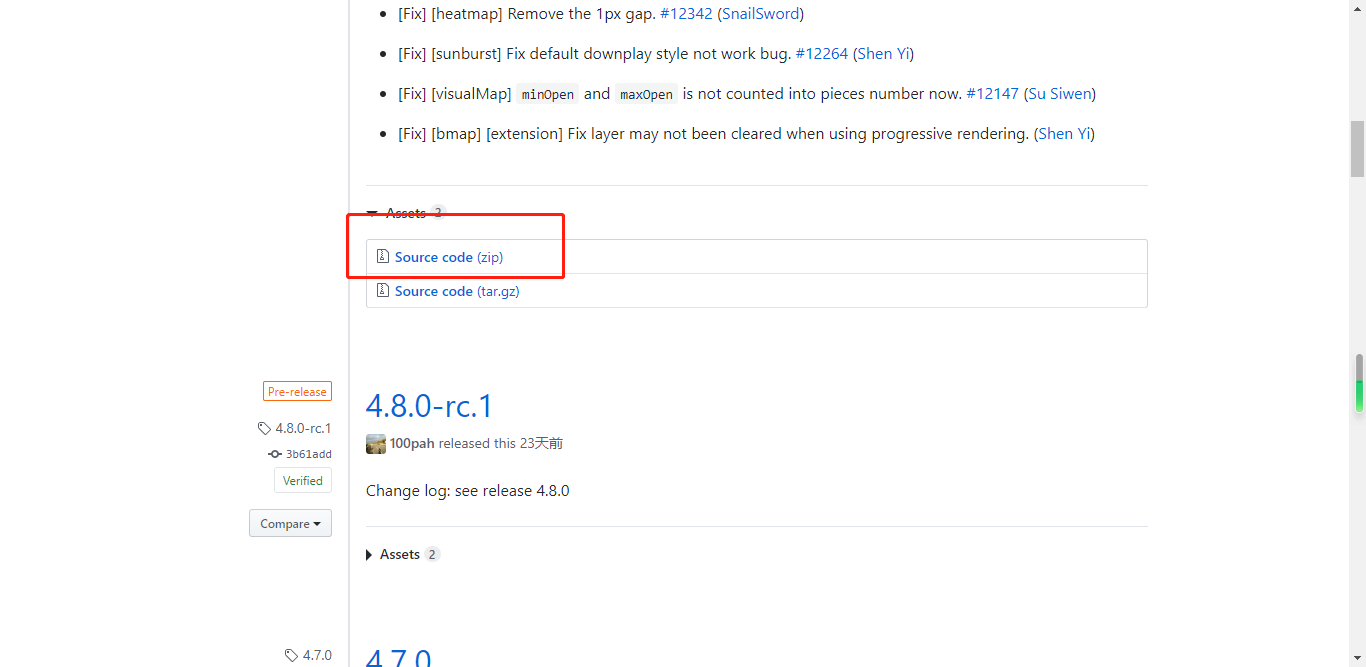
補充:采用圖表展現數據,可以使用百度開發的echarts組件,該組件開源免費,并已加入Apache基金會開源項目。
**訪問請求測試頁面:**
~~~
<!DOCTYPE html>
<html>
<head>
<meta charset="UTF-8">
<title>Test Page</title>
</head>
<body>
<h1>I'm test page 1</h1>
</body>
</html>
~~~
可以多設置幾個不同的測試頁面
**請求統計監聽器**
~~~
public class RequestTotalListener implements ServletContextListener,ServletRequestListener{
@Override
public void requestDestroyed(ServletRequestEvent sre) {
}
@Override
public void requestInitialized(ServletRequestEvent sre) {
//流量統計頁面的請求不計入流量的統計
HttpServletRequest request = (HttpServletRequest)sre.getServletRequest();
String url = request.getRequestURL().toString();
if(url.endsWith("/rt") == true) {
return;
}
//先取出存放在全局對象中的時間和次數數據
//TimeList: 10:02 10:03 10:04 10:05
//ValueList: 5 7 10 2
List<String> timeList = (List)sre.getServletContext().getAttribute("timeList");
List<Integer> valueList = (List)sre.getServletContext().getAttribute("valueList");
//產生請求時,獲取當前時間
Date date = new Date();
SimpleDateFormat sdf = new SimpleDateFormat("HH:mm");
String time = sdf.format(date);
//10:05
//實現記錄每分鐘的請求次數
//原理:判斷時間表中是否存在當前時間字符串,如果存在證明該次請求還是發生在一分鐘內,進入代碼段2,只針對次數加一
//如果不存在,則證明本次請求為當前一分鐘內的第一次請求,所以記錄當前時間,并添加次數記錄。
if(timeList.indexOf(time) == -1) {
//代碼段1
timeList.add(time);
valueList.add(1);
sre.getServletContext().setAttribute("timeList", timeList);
sre.getServletContext().setAttribute("valueList", valueList);
}else {
//代碼段2
int index = timeList.indexOf(time);
int value = valueList.get(index);
valueList.set(index, value+1);
sre.getServletContext().setAttribute("valueList", valueList);
}
}
@Override
public void contextDestroyed(ServletContextEvent sce) {
}
@Override
public void contextInitialized(ServletContextEvent sce) {
//在全局對象初始化的時候,就設置請求時間和數據的存放表,并加入全局對象
//時間數據
List timeList = new ArrayList();
//具體時間訪問量數據
List valueList = new ArrayList();
//將這兩個數據存放表存放到全局對象中
sce.getServletContext().setAttribute("timeList", timeList);
sce.getServletContext().setAttribute("valueList", valueList);
}
}
~~~
**獲取統計數據**
~~~
@WebServlet("/rt")
public class RequestTotalServlet extends HttpServlet {
private static final long serialVersionUID = 1L;
public RequestTotalServlet() {
super();
}
protected void doGet(HttpServletRequest request, HttpServletResponse response) throws ServletException, IOException {
ServletContext context = request.getServletContext();
List<String> timeList = (List)context.getAttribute("timeList");
List<Integer> valueList = (List)context.getAttribute("valueList");
response.setContentType("text/html;charset=utf-8");
/*response.getWriter().println(timeList.toString());
response.getWriter().println("<br/>");
response.getWriter().println(valueList.toString());*/
//echarts要求x軸數據和series中數據一一對應
Map result = new HashMap();
result.put("timeList", timeList);
result.put("valueList", valueList);
String json = JSON.toJSONString(result);
response.getWriter().println(json);
}
protected void doPost(HttpServletRequest request, HttpServletResponse response) throws ServletException, IOException {
doGet(request, response);
}
}
~~~
**統計數據展示頁面**
~~~
<!DOCTYPE html>
<html>
<head>
<meta charset="UTF-8">
<title>Insert title here</title>
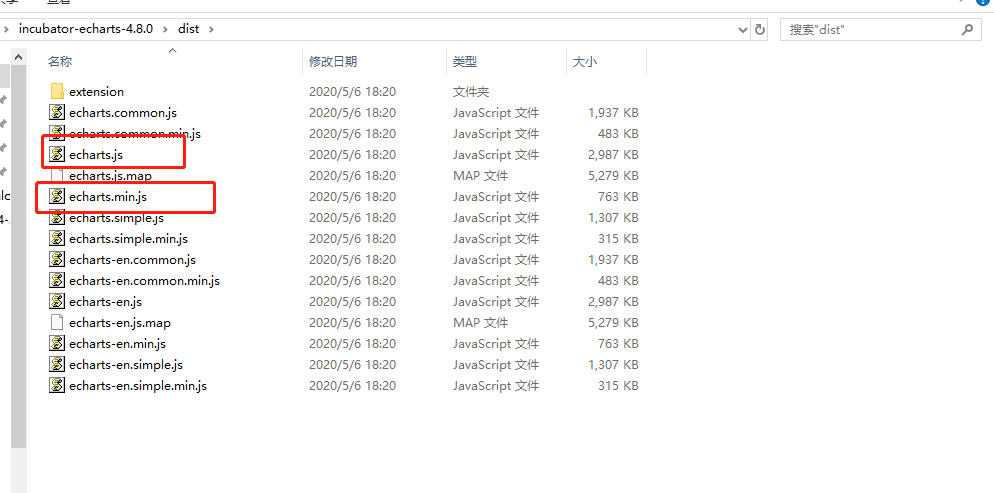
<script type="text/javascript" src="js/echarts.min.js"></script>
<script type="text/javascript" src="js/jquery.3.3.1.min.js"></script>
</head>
<body>
<div id="main" style="width: 600px; height: 400px;"></div>
<script type="text/javascript">
function showChart(){
$.ajax({
url:"./rt",
type:"get",
dataType:"json",
success : function(json){
console.log(json.timeList);
console.log(json.valueList);
// 基于準備好的dom,初始化echarts實例
var myChart = echarts.init(document.getElementById('main'));
// 指定圖表的配置項和數據
var option = {
title : {//標題項
text : '請求流量分析統計'//標題文本
},
tooltip : {},
legend : {
data : [ '訪問量' ]
},
xAxis : {//X坐標項
data : json.timeList//X坐標數據
},
yAxis : {},//y軸沒有設置,代表顯示默認的數值
series : [ {
name : '訪問量',
type : 'line',//代表以折線圖顯示
data : json.valueList//每個X軸數據對應的Y軸數據
} ]
};
// 使用剛指定的配置項和數據顯示圖表。
myChart.setOption(option);
}
})
}
window.setInterval("showChart()",1000);
</script>
</body>
</html>
~~~
## 案例:靜態數據預處理
在工程中,對于一些長期不會改變的數據,可以在服務器每次啟動的時候利用上下文監聽器在全局屬性中寫入。可以避免每次加載頁面時都要從數據庫獲取數據
~~~
//頻道類
public class Channel {
private String channelName;
private String url;
public Channel(String channelName, String url) {
super();
this.channelName = channelName;
this.url = url;
}
public String getChannelName() {
return channelName;
}
public void setChannelName(String channelName) {
this.channelName = channelName;
}
public String getUrl() {
return url;
}
public void setUrl(String url) {
this.url = url;
}
}
~~~
~~~
public class StaticDataListener implements ServletContextListener{
@Override
public void contextInitialized(ServletContextEvent sce) {
List list = new ArrayList();
list.add(new Channel("Java" , "my Java"));
list.add(new Channel("UI" , "my UI"));
list.add(new Channel("Video" , "my Video"));
sce.getServletContext().setAttribute("channelList", list);
}
@Override
public void contextDestroyed(ServletContextEvent sce) {
}
}
~~~
~~~
<%@ page language="java" contentType="text/html; charset=UTF-8"
pageEncoding="UTF-8"%>
<%@ taglib prefix="c" uri="http://java.sun.com/jsp/jstl/core" %>
<!DOCTYPE html>
<html>
<head>
<meta charset="UTF-8">
<title>Insert title here</title>
</head>
<body>
<c:forEach items="${applicationScope.channelList }" var="c">
<a href="${c.url }">${c.channelName }</a> |
</c:forEach>
<hr/>
</body>
</html>
~~~
