<ruby id="bdb3f"></ruby>

    <p id="bdb3f"><cite id="bdb3f"></cite></p>

      <p id="bdb3f"><cite id="bdb3f"><th id="bdb3f"></th></cite></p><p id="bdb3f"></p>
        <p id="bdb3f"><cite id="bdb3f"></cite></p>

          <pre id="bdb3f"></pre>
          <pre id="bdb3f"><del id="bdb3f"><thead id="bdb3f"></thead></del></pre>

          <ruby id="bdb3f"><mark id="bdb3f"></mark></ruby><ruby id="bdb3f"></ruby>
          <pre id="bdb3f"><pre id="bdb3f"><mark id="bdb3f"></mark></pre></pre><output id="bdb3f"></output><p id="bdb3f"></p><p id="bdb3f"></p>

          <pre id="bdb3f"><del id="bdb3f"><progress id="bdb3f"></progress></del></pre>

                <ruby id="bdb3f"></ruby>

                ??一站式輕松地調用各大LLM模型接口,支持GPT4、智譜、豆包、星火、月之暗面及文生圖、文生視頻 廣告
                ## 第一個測試例子 1:創建test\_開頭或_test結尾.py文件,創建一個方法、一個用例 ~~~ def func(x): return x + 1 def test_answer(): assert func(4) == 5 ~~~ 
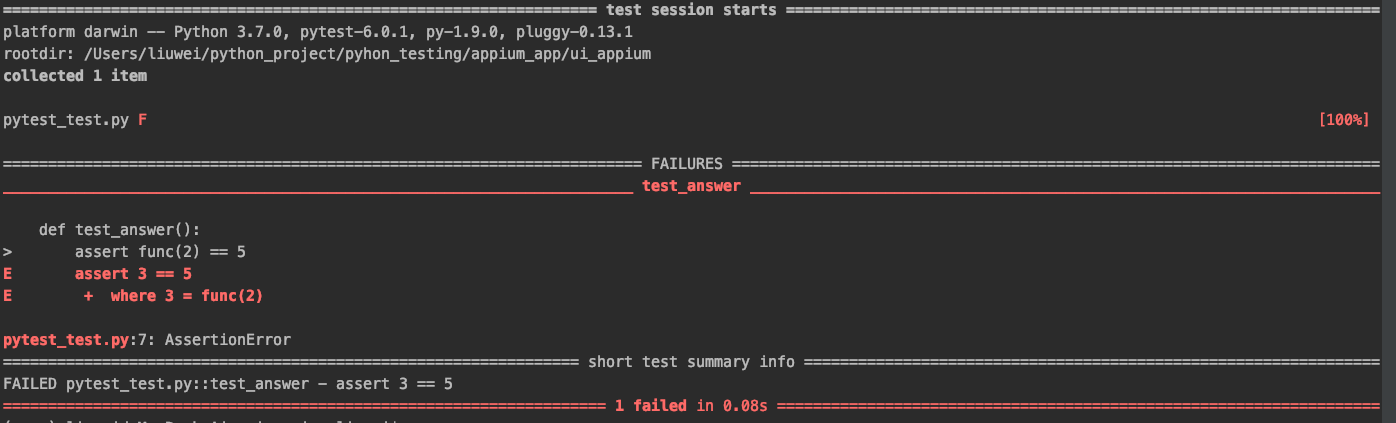
2:用例執行`pytest pytest_test.py`pytest后面的pytest_test是一個文件名,我這里執行的就是將整個文件中的用例執行 ![](https://img.kancloud.cn/ae/59/ae5949a687b8750c945377c0aa2fc951_1394x202.png) 參數修改后,我們看一下報錯信息,將func(4)修改為func(2) ![](https://img.kancloud.cn/9b/16/9b16ddfe76e0700db4b8af034c6570be_1396x423.png)
                  <ruby id="bdb3f"></ruby>

                  <p id="bdb3f"><cite id="bdb3f"></cite></p>

                    <p id="bdb3f"><cite id="bdb3f"><th id="bdb3f"></th></cite></p><p id="bdb3f"></p>
                      <p id="bdb3f"><cite id="bdb3f"></cite></p>

                        <pre id="bdb3f"></pre>
                        <pre id="bdb3f"><del id="bdb3f"><thead id="bdb3f"></thead></del></pre>

                        <ruby id="bdb3f"><mark id="bdb3f"></mark></ruby><ruby id="bdb3f"></ruby>
                        <pre id="bdb3f"><pre id="bdb3f"><mark id="bdb3f"></mark></pre></pre><output id="bdb3f"></output><p id="bdb3f"></p><p id="bdb3f"></p>

                        <pre id="bdb3f"><del id="bdb3f"><progress id="bdb3f"></progress></del></pre>

                              <ruby id="bdb3f"></ruby>

                              哎呀哎呀视频在线观看