[TOC]
pytest支持以xUnit格式型的測試模型(setup/teardown),但還與python自帶的unittest還是有一點差別,如下
* 模塊形式----使用setup\_module/teardown\_module ?
* 函數形式----使用setup\_function/teardown\_function
* 類形式----使用setup\_class/teardown\_class
* 方法形式---使用setup\_method/teardown\_method
**注意:**
**1.pytest也可以直接運行unittest模式的測試用例**
**2.如果你在pytest模式中使用setupClass()函數是不行的,不會識別,但如果用例類繼承之unittest.Testcase,還是可以識別的**
<br>
<br>
## 1、fixture scope的范圍參數
之前使用@pytest.fixture(scope='module')來定義框架,scope的參數有以下幾種
* ?function ? 每一個用例都執行
* class ? ? ? ?每個類執行
* module ? ? 每個模塊執行(函數形式的用例)
* session ? ? 每個session只運行一次,在自動化測試時,登錄步驟可以使用該session
<br>
<br>
## **2、調用fixture的三種方法**
<br>
<br>
### **2.1函數或類里面方法直接傳fixture的函數參數名稱**
~~~
from __future__ import print_function
import pytest
@pytest.fixture(scope='module')
def resource_a_setup(request):
print('\nresources_a_setup()')
def resource_a_teardown():
print('\nresources_a_teardown()')
request.addfinalizer(resource_a_teardown)
def test_one(resource_a_setup):
print('test_one()')
def test_tow():
print('\ntest_tow()')
def test_three(resource_a_setup):
print('\ntest_three()')
~~~
使用-s -v運行查看結果

<br>
<br>
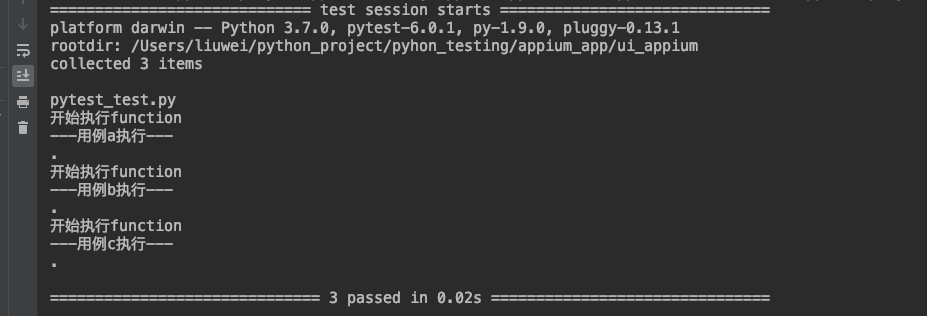
### **2.2@pytest.mark.usefixtures()**
**2.2使用裝飾器@pytest.mark.usefixtures()修飾需要運行的用例**
~~~python
import pytest
@pytest.fixture()
def test1():
print('\n開始執行function')
@pytest.mark.usefixtures('test1')
def test_a():
print('---用例a執行---')
@pytest.mark.usefixtures('test1')
class TestCase:
def test_b(self):
print('---用例b執行---')
def test_c(self):
print('---用例c執行---')
if __name__ == '__main__':
pytest.main(['-s', 'pytest_test.py'])
~~~
<br>
<br>
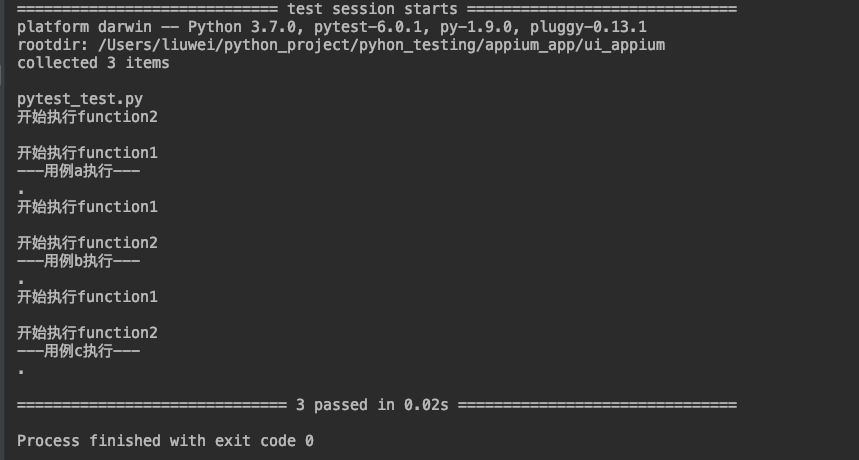
### 2.3**疊加usefixtures**
如果一個方法或者一個class用例想要同時調用多個fixture,可以使用@pytest.mark.usefixture()進行疊加。注意疊加順序,先執行的放底層,后執行的放上層
~~~
import pytest
@pytest.fixture()
def test1():
print('\n開始執行function1')
@pytest.fixture()
def test2():
print('\n開始執行function2')
@pytest.mark.usefixtures('test1')
@pytest.mark.usefixtures('test2')
def test_a():
print('---用例a執行---')
@pytest.mark.usefixtures('test2')
@pytest.mark.usefixtures('test1')
class TestCase:
def test_b(self):
print('---用例b執行---')
def test_c(self):
print('---用例c執行---')
if __name__ == '__main__':
pytest.main(['-s', 'pytest_test.py'])
~~~
<br>
<br>
## 3.**usefixtures與傳fixture區別**
如果fixture有返回值,那么usefixture就無法獲取到返回值,這個是裝飾器usefixture與用例直接傳fixture參數的區別。
當fixture需要用到return出來的參數時,只能講參數名稱直接當參數傳入,不需要用到return出來的參數時,兩種方式都可以。
<br>
<br>
## **4.fixture自動使用autouse=True**
當用例很多的時候,每次都傳這個參數,會很麻煩。fixture里面有個參數autouse,默認是False沒開啟的,可以設置為True開啟自動使用fixture功能,這樣用例就不用每次都去傳參了
autouse設置為True,自動調用fixture功能
~~~
import pytest
@pytest.fixture(scope='module', autouse=True)
def test1():
print('\n開始執行module')
@pytest.fixture(scope='class', autouse=True)
def test2():
print('\n開始執行class')
@pytest.fixture(scope='function', autouse=True)
def test3():
print('\n開始執行function')
def test_a():
print('---用例a執行---')
def test_d():
print('---用例d執行---')
class TestCase:
def test_b(self):
print('---用例b執行---')
def test_c(self):
print('---用例c執行---')
if __name__ == '__main__':
pytest.main(['-s', 'pytest_test.py'])
~~~
<br>
<br>
## **5.conftest.py的作用范圍**
一個工程下可以建多個conftest.py的文件,一般在工程根目錄下設置的conftest文件起到全局作用。在不同子目錄下也可以放conftest.py的文件,作用范圍只能在改層級以及以下目錄生效。
**項目實例:**
**目錄結構:**

### 5.1conftest在不同的層級間的作用域不一樣
~~~
import pytest
@pytest.fixture(scope='session', autouse=True)
def login():
print('----準備登錄----')
# conftest層級展示/sougou_login/conftest
import pytest
@pytest.fixture(scope='session', autouse=True)
def bai_du():
print('-----登錄百度頁面-----')
# conftest層級展示/sougou_login/login_website
import pytest
class TestCase:
def test_login(self):
print('hhh,成功登錄百度')
if __name__ == '__main__':
pytest.main(['-s', 'pytest_test.py'])
~~~
<br>
<br>
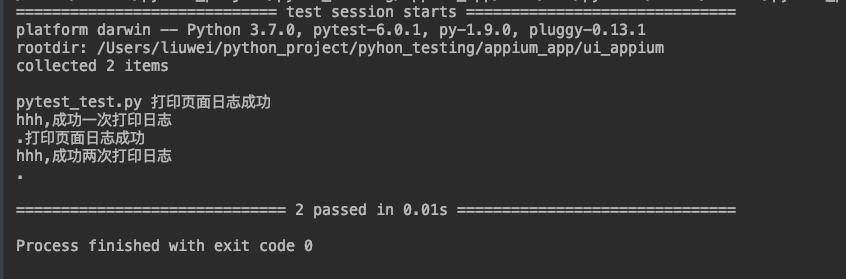
### 5.2conftest是不能跨模塊調用的(這里沒有使用模塊調用)
~~~python
import pytest
@pytest.fixture(scope='function', autouse=True)
def log_web():
print('打印頁面日志成功')
# conftest層級演示/log/log_website.py
import pytest
def test_web():
print('hhh,成功一次打印日志')
def test_web1():
print('hhh,成功兩次打印日志')
if __name__ == '__main__':
pytest.main(['-s', 'pytest_test.py'])
~~~