<ruby id="bdb3f"></ruby>

    <p id="bdb3f"><cite id="bdb3f"></cite></p>

      <p id="bdb3f"><cite id="bdb3f"><th id="bdb3f"></th></cite></p><p id="bdb3f"></p>
        <p id="bdb3f"><cite id="bdb3f"></cite></p>

          <pre id="bdb3f"></pre>
          <pre id="bdb3f"><del id="bdb3f"><thead id="bdb3f"></thead></del></pre>

          <ruby id="bdb3f"><mark id="bdb3f"></mark></ruby><ruby id="bdb3f"></ruby>
          <pre id="bdb3f"><pre id="bdb3f"><mark id="bdb3f"></mark></pre></pre><output id="bdb3f"></output><p id="bdb3f"></p><p id="bdb3f"></p>

          <pre id="bdb3f"><del id="bdb3f"><progress id="bdb3f"></progress></del></pre>

                <ruby id="bdb3f"></ruby>

                # 一、下載安裝文件 Wampserver 3.2.3 內含Apache 2.4.46、PHP 5.6.40/7.3.21/7.4.9、MySQL 5.7.31|8.0.21、MariaDB 10.3.23|10.4.13|10.5.4。 軟件僅支持Windows系統,Windows XP系統請安裝[Wampserver2.4](https://wampserver.site/package/531.html),Windows7用戶如果不是SP1版本的,也只能安裝[Wampserver2.4](https://wampserver.site/package/531.html)。 下載地址:[點擊跳轉到下載頁](https://wampserver.site/package/643.html "點擊跳轉到下載頁") # 二、安裝 ## 1.運行安裝文件 打開下載好的安裝程序文件 ![安裝程序文件](https://attachment.wampserver.site/images/2020/09/16/imagef8506d1c2d525656.png) ## 2.選擇語言 選擇默認的英語(English)即可,然后點確認(OK) ![選擇語言](https://attachment.wampserver.site/images/2020/09/16/image7071251ffcecc9ce.png "選擇語言") ## 3.安裝協議 選中我同意此協議(I accept the agreement),然后點下一步(Next) ![安裝協議](https://attachment.wampserver.site/images/2020/09/16/imageb8c41e20cccb9301.png "安裝協議") ## 4.安裝前提示信息 安裝之前,必須安裝好最新版本的VC++運行庫或升級VC++運行庫到最新版本。可以閱讀《[VC++運行庫安裝](VC++%E8%BF%90%E8%A1%8C%E5%BA%93%E5%AE%89%E8%A3%85.md)》 并且,電腦的80端口和3306端口未被其它應用程序所占用。 確保以上兩項沒問題后,點下一步(Next)繼續安裝。 ![安裝前提示信息](https://attachment.wampserver.site/images/2020/09/16/image2ca1469252f43bb3.png "安裝前提示信息") ## 5.選中安裝路徑 默認是安裝在系統盤根目錄,如果要安裝在其它盤,更改下盤符即可,但該盤的文件系統必須是`NTFS`。 如果要更改安裝路徑,安裝路徑不能有中文、空格或其它特殊符號,否則安裝之后也是使用不了。 確認沒問題后,點下一步(Next)繼續安裝。 ![選擇安裝路徑](https://attachment.wampserver.site/images/2020/09/16/image5071206fb1d21c12.png "選擇安裝路徑") ## 6.選擇需要安裝的組件 根據需要,選擇下MariaDB和MySQL的版本,如果還需要 PHP7.0 / 7.1 / 7.2 也可以勾選上。 選擇好之后,點下一步(Next)繼續安裝。 ![選擇需要安裝的軟件](https://attachment.wampserver.site/images/2020/09/16/image29850aee57585159.png "選擇需要安裝的軟件") ## 7.選擇開始菜單目錄 ![開始菜單目錄](https://attachment.wampserver.site/images/2020/09/16/imagedc30b6f5c8e7f3e8.png "開始菜單目錄") ## 8.確認安裝信息 確認信息沒錯的話,點安裝(Install)開始安裝。
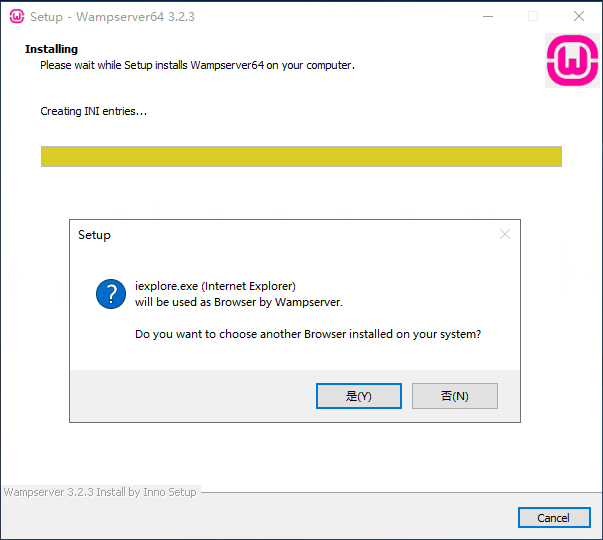
 ![確認選擇的組件](https://attachment.wampserver.site/images/2020/09/16/image3422f007b60cd475.png "確認選擇的組件") ## 9.選擇瀏覽器 在Wampmanger打開[localhost](http://localhost "localhost")或者[PHPMyAdmin](http://localhost/phpmyadmin "PHPMyAdmin")時,會使用該瀏覽器打開。 默認是使用IE瀏覽器,如果需要自定義,點擊“是”選擇瀏覽器,如果不需要自定義,直接點“否” ![是否使用其它瀏覽器](https://attachment.wampserver.site/images/2020/09/16/image1d89db0616a2540b.png) ## 10.選擇編輯器 在Wampmanger打開配置文件或日志文件時,會使用該編輯器打開。 默認是使用記事本,如果需要自定義,點擊“是”選擇編輯器,如果不需要自定義,直接點“否” ![選擇編輯器](https://attachment.wampserver.site/images/2020/09/16/image59fe51f6ca2ca218.png "選擇編輯器") ## 11.使用信息 ![使用信息](https://attachment.wampserver.site/images/2020/09/16/image84467889569e55c6.png "使用信息") ## 12.完成安裝 點完成(Finish)完成安裝 ![完成安裝](https://attachment.wampserver.site/images/2020/09/16/image9fe9e17b3e4e6ac7.png "完成安裝") # 結語 到此,安裝就完成了。
                  <ruby id="bdb3f"></ruby>

                  <p id="bdb3f"><cite id="bdb3f"></cite></p>

                    <p id="bdb3f"><cite id="bdb3f"><th id="bdb3f"></th></cite></p><p id="bdb3f"></p>
                      <p id="bdb3f"><cite id="bdb3f"></cite></p>

                        <pre id="bdb3f"></pre>
                        <pre id="bdb3f"><del id="bdb3f"><thead id="bdb3f"></thead></del></pre>

                        <ruby id="bdb3f"><mark id="bdb3f"></mark></ruby><ruby id="bdb3f"></ruby>
                        <pre id="bdb3f"><pre id="bdb3f"><mark id="bdb3f"></mark></pre></pre><output id="bdb3f"></output><p id="bdb3f"></p><p id="bdb3f"></p>

                        <pre id="bdb3f"><del id="bdb3f"><progress id="bdb3f"></progress></del></pre>

                              <ruby id="bdb3f"></ruby>

                              哎呀哎呀视频在线观看