## Compile
`compile` 編譯可以分成 `parse`、`optimize` 與 `generate` 三個階段,最終需要得到 render function。這部分內容不算 Vue.js 的響應式核心,只是用來編譯的,筆者認為在精力有限的情況下不需要追究其全部的實現細節,能夠把握如何解析的大致流程即可。

由于解析過程比較復雜,直接上代碼可能會導致不了解這部分內容的同學一頭霧水。所以筆者準備提供一個 template 的示例,通過這個示例的變化來看解析的過程。但是解析的過程及結果都是將最重要的部分抽離出來展示,希望能讓讀者更好地了解其核心部分的實現。
```
<div :class="c" class="demo" v-if="isShow">
<span v-for="item in sz">{{item}}</span>
</div>
```
```
var html = '<div :class="c" class="demo" v-if="isShow"><span v-for="item in sz">{{item}}</span></div>';
```
接下來的過程都會依賴這個示例來進行。
## parse
首先是 `parse`,`parse` 會用正則等方式將 template 模板中進行字符串解析,得到指令、class、style等數據,形成 AST([在計算機科學中,抽象語法樹(abstract syntax tree或者縮寫為AST),或者語法樹(syntax tree),是源代碼的抽象語法結構的樹狀表現形式,這里特指編程語言的源代碼。](https://zh.wikipedia.org/wiki/%E6%8A%BD%E8%B1%A1%E8%AA%9E%E6%B3%95%E6%A8%B9))。
這個過程比較復雜,會涉及到比較多的正則進行字符串解析,我們來看一下得到的 AST 的樣子。
```
{
/* 標簽屬性的map,記錄了標簽上屬性 */
'attrsMap': {
':class': 'c',
'class': 'demo',
'v-if': 'isShow'
},
/* 解析得到的:class */
'classBinding': 'c',
/* 標簽屬性v-if */
'if': 'isShow',
/* v-if的條件 */
'ifConditions': [
{
'exp': 'isShow'
}
],
/* 標簽屬性class */
'staticClass': 'demo',
/* 標簽的tag */
'tag': 'div',
/* 子標簽數組 */
'children': [
{
'attrsMap': {
'v-for': "item in sz"
},
/* for循環的參數 */
'alias': "item",
/* for循環的對象 */
'for': 'sz',
/* for循環是否已經被處理的標記位 */
'forProcessed': true,
'tag': 'span',
'children': [
{
/* 表達式,_s是一個轉字符串的函數 */
'expression': '_s(item)',
'text': '{{item}}'
}
]
}
]
}
```
最終得到的 AST 通過一些特定的屬性,能夠比較清晰地描述出標簽的屬性以及依賴關系。
接下來我們用代碼來講解一下如何使用正則來把 template 編譯成我們需要的 AST 的。
### 正則
首先我們定義一下接下來我們會用到的正則。
```
const ncname = '[a-zA-Z_][\\w\\-\\.]*';
const singleAttrIdentifier = /([^\s"'<>/=]+)/
const singleAttrAssign = /(?:=)/
const singleAttrValues = [
/"([^"]*)"+/.source,
/'([^']*)'+/.source,
/([^\s"'=<>`]+)/.source
]
const attribute = new RegExp(
'^\\s*' + singleAttrIdentifier.source +
'(?:\\s*(' + singleAttrAssign.source + ')' +
'\\s*(?:' + singleAttrValues.join('|') + '))?'
)
const qnameCapture = '((?:' + ncname + '\\:)?' + ncname + ')'
const startTagOpen = new RegExp('^<' + qnameCapture)
const startTagClose = /^\s*(\/?)>/
const endTag = new RegExp('^<\\/' + qnameCapture + '[^>]*>')
const defaultTagRE = /\{\{((?:.|\n)+?)\}\}/g
const forAliasRE = /(.*?)\s+(?:in|of)\s+(.*)/
```
## advance
因為我們解析 template 采用循環進行字符串匹配的方式,所以每匹配解析完一段我們需要將已經匹配掉的去掉,頭部的指針指向接下來需要匹配的部分。
```
function advance (n) {
index += n
html = html.substring(n)
}
```
舉個例子,當我們把第一個 div 的頭標簽全部匹配完畢以后,我們需要將這部分除去,也就是向右移動 43 個字符。

調用 `advance` 函數
```
advance(43);
```
得到結果

### parseHTML
首先我們需要定義個 `parseHTML` 函數,在里面我們循環解析 template 字符串。
```
function parseHTML () {
while(html) {
let textEnd = html.indexOf('<');
if (textEnd === 0) {
if (html.match(endTag)) {
//...process end tag
continue;
}
if (html.match(startTagOpen)) {
//...process start tag
continue;
}
} else {
//...process text
continue;
}
}
}
```
`parseHTML` 會用 `while` 來循環解析 template ,用正則在匹配到標簽頭、標簽尾以及文本的時候分別進行不同的處理。直到整個 template 被解析完畢。
### parseStartTag
我們來寫一個 `parseStartTag` 函數,用來解析起始標簽("<div :class="c" class="demo" v-if="isShow">"部分的內容)。
```
function parseStartTag () {
const start = html.match(startTagOpen);
if (start) {
const match = {
tagName: start[1],
attrs: [],
start: index
}
advance(start[0].length);
let end, attr
while (!(end = html.match(startTagClose)) && (attr = html.match(attribute))) {
advance(attr[0].length)
match.attrs.push({
name: attr[1],
value: attr[3]
});
}
if (end) {
match.unarySlash = end[1];
advance(end[0].length);
match.end = index;
return match
}
}
}
```
首先用 `startTagOpen` 正則得到標簽的頭部,可以得到 `tagName`(標簽名稱),同時我們需要一個數組 `attrs` 用來存放標簽內的屬性。
```
const start = html.match(startTagOpen);
const match = {
tagName: start[1],
attrs: [],
start: index
}
advance(start[0].length);
```
接下來使用 `startTagClose` 與 `attribute` 兩個正則分別用來解析標簽結束以及標簽內的屬性。這段代碼用 `while` 循環一直到匹配到 `startTagClose` 為止,解析內部所有的屬性。
```
let end, attr
while (!(end = html.match(startTagClose)) && (attr = html.match(attribute))) {
advance(attr[0].length)
match.attrs.push({
name: attr[1],
value: attr[3]
});
}
if (end) {
match.unarySlash = end[1];
advance(end[0].length);
match.end = index;
return match
}
```
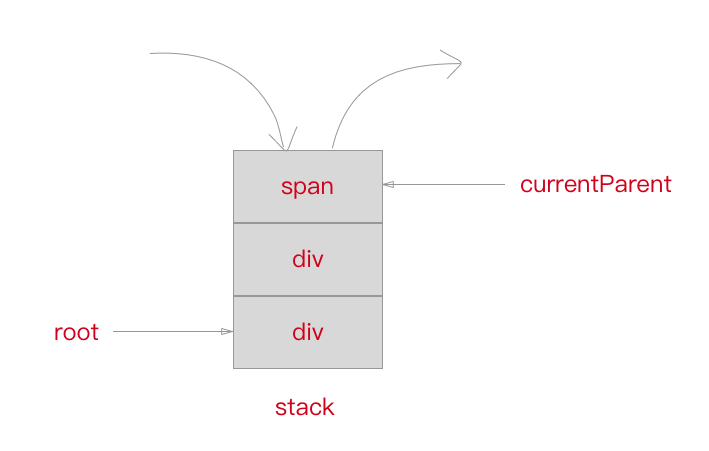
## stack
此外,我們需要維護一個 **stack** 棧來保存已經解析好的標簽頭,這樣我們可以根據在解析尾部標簽的時候得到所屬的層級關系以及父標簽。同時我們定義一個 `currentParent` 變量用來存放當前標簽的父標簽節點的引用, `root` 變量用來指向根標簽節點。
```
const stack = [];
let currentParent, root;
```
知道這個以后,我們優化一下 `parseHTML` ,在 `startTagOpen` 的 `if` 邏輯中加上新的處理。
```
if (html.match(startTagOpen)) {
const startTagMatch = parseStartTag();
const element = {
type: 1,
tag: startTagMatch.tagName,
lowerCasedTag: startTagMatch.tagName.toLowerCase(),
attrsList: startTagMatch.attrs,
attrsMap: makeAttrsMap(startTagMatch.attrs),
parent: currentParent,
children: []
}
if(!root){
root = element
}
if(currentParent){
currentParent.children.push(element);
}
stack.push(element);
currentParent = element;
continue;
}
```
我們將 `startTagMatch` 得到的結果首先封裝成 `element` ,這個就是最終形成的 AST 的節點,標簽節點的 type 為 1。
```
const startTagMatch = parseStartTag();
const element = {
type: 1,
tag: startTagMatch.tagName,
attrsList: startTagMatch.attrs,
attrsMap: makeAttrsMap(startTagMatch.attrs),
parent: currentParent,
children: []
}
```
然后讓 `root` 指向根節點的引用。
```
if(!root){
root = element
}
```
接著我們將當前節點的 `element` 放入父節點 `currentParent` 的 `children` 數組中。
```
if(currentParent){
currentParent.children.push(element);
}
```
最后將當前節點 `element` 壓入 stack 棧中,并將 `currentParent` 指向當前節點,因為接下去下一個解析如果還是頭標簽或者是文本的話,會成為當前節點的子節點,如果是尾標簽的話,那么將會從棧中取出當前節點,這種情況我們接下來要講。
```
stack.push(element);
currentParent = element;
continue;
```
其中的 `makeAttrsMap` 是將 attrs 轉換成 map 格式的一個方法。
```
function makeAttrsMap (attrs) {
const map = {}
for (let i = 0, l = attrs.length; i < l; i++) {
map[attrs[i].name] = attrs[i].value;
}
return map
}
```
### parseEndTag
同樣,我們在 `parseHTML` 中加入對尾標簽的解析函數,為了匹配如“</div>”。
```
const endTagMatch = html.match(endTag)
if (endTagMatch) {
advance(endTagMatch[0].length);
parseEndTag(endTagMatch[1]);
continue;
}
```
用 `parseEndTag` 來解析尾標簽,它會從 stack 棧中取出最近的跟自己標簽名一致的那個元素,將 `currentParent` 指向那個元素,并將該元素之前的元素都從 stack 中出棧。
這里可能有同學會問,難道解析的尾元素不應該對應 stack 棧的最上面的一個元素才對嗎?
其實不然,比如說可能會存在自閉合的標簽,如“<br />”,或者是寫了“<span>”但是沒有加上“< /span>”的情況,這時候就要找到 stack 中的第二個位置才能找到同名標簽。
```
function parseEndTag (tagName) {
let pos;
for (pos = stack.length - 1; pos >= 0; pos--) {
if (stack[pos].lowerCasedTag === tagName.toLowerCase()) {
break;
}
}
if (pos >= 0) {
stack.length = pos;
currentParent = stack[pos];
}
}
```
### parseText
最后是解析文本,這個比較簡單,只需要將文本取出,然后有兩種情況,一種是普通的文本,直接構建一個節點 push 進當前 `currentParent` 的 children 中即可。還有一種情況是文本是如“{{item}}”這樣的 Vue.js 的表達式,這時候我們需要用 `parseText` 來將表達式轉化成代碼。
```
text = html.substring(0, textEnd)
advance(textEnd)
let expression;
if (expression = parseText(text)) {
currentParent.children.push({
type: 2,
text,
expression
});
} else {
currentParent.children.push({
type: 3,
text,
});
}
continue;
```
我們會用到一個 `parseText` 函數。
```
function parseText (text) {
if (!defaultTagRE.test(text)) return;
const tokens = [];
let lastIndex = defaultTagRE.lastIndex = 0
let match, index
while ((match = defaultTagRE.exec(text))) {
index = match.index
if (index > lastIndex) {
tokens.push(JSON.stringify(text.slice(lastIndex, index)))
}
const exp = match[1].trim()
tokens.push(`_s(${exp})`)
lastIndex = index + match[0].length
}
if (lastIndex < text.length) {
tokens.push(JSON.stringify(text.slice(lastIndex)))
}
return tokens.join('+');
}
```
我們使用一個 `tokens` 數組來存放解析結果,通過 `defaultTagRE` 來循環匹配該文本,如果是普通文本直接 `push` 到 `tokens` 數組中去,如果是表達式({{item}}),則轉化成“\_s(${exp})”的形式。
舉個例子,如果我們有這樣一個文本。
```
<div>hello,{{name}}.</div>
```
最終得到 `tokens`。
```
tokens = ['hello,', _s(name), '.'];
```
最終通過 `join` 返回表達式。
```
'hello' + _s(name) + '.';
```
### processIf與processFor
最后介紹一下如何處理“`v-if`”以及“`v-for`”這樣的 Vue.js 的表達式的,這里我們只簡單介紹兩個示例中用到的表達式解析。
我們只需要在解析頭標簽的內容中加入這兩個表達式的解析函數即可,在這時“`v-for`”之類指令已經在屬性解析時存入了 `attrsMap` 中了。
```
if (html.match(startTagOpen)) {
const startTagMatch = parseStartTag();
const element = {
type: 1,
tag: startTagMatch.tagName,
attrsList: startTagMatch.attrs,
attrsMap: makeAttrsMap(startTagMatch.attrs),
parent: currentParent,
children: []
}
processIf(element);
processFor(element);
if(!root){
root = element
}
if(currentParent){
currentParent.children.push(element);
}
stack.push(element);
currentParent = element;
continue;
}
```
首先我們需要定義一個 `getAndRemoveAttr` 函數,用來從 `el` 的 `attrsMap` 屬性或是 `attrsList` 屬性中取出 `name` 對應值。
```
function getAndRemoveAttr (el, name) {
let val
if ((val = el.attrsMap[name]) != null) {
const list = el.attrsList
for (let i = 0, l = list.length; i < l; i++) {
if (list[i].name === name) {
list.splice(i, 1)
break
}
}
}
return val
}
```
比如說解析示例的 div 標簽屬性。
```
getAndRemoveAttr(el, 'v-for');
```
可有得到“item in sz”。
有了這個函數這樣我們就可以開始實現 `processFor` 與 `processIf` 了。
“v-for”會將指令解析成 `for` 屬性以及 `alias` 屬性,而“v-if”會將條件都存入 `ifConditions` 數組中。
```
function processFor (el) {
let exp;
if ((exp = getAndRemoveAttr(el, 'v-for'))) {
const inMatch = exp.match(forAliasRE);
el.for = inMatch[2].trim();
el.alias = inMatch[1].trim();
}
}
function processIf (el) {
const exp = getAndRemoveAttr(el, 'v-if');
if (exp) {
el.if = exp;
if (!el.ifConditions) {
el.ifConditions = [];
}
el.ifConditions.push({
exp: exp,
block: el
});
}
}
```
到這里,我們已經把 `parse` 的過程介紹完了,接下來看一下 `optimize`。
## optimize
`optimize` 主要作用就跟它的名字一樣,用作「優化」。
這個涉及到后面要講 `patch` 的過程,因為 `patch` 的過程實際上是將 VNode 節點進行一層一層的比對,然后將「差異」更新到視圖上。那么一些靜態節點是不會根據數據變化而產生變化的,這些節點我們沒有比對的需求,是不是可以跳過這些靜態節點的比對,從而節省一些性能呢?
那么我們就需要為靜態的節點做上一些「標記」,在 `patch` 的時候我們就可以直接跳過這些被標記的節點的比對,從而達到「優化」的目的。
經過 `optimize` 這層的處理,每個節點會加上 `static` 屬性,用來標記是否是靜態的。
得到如下結果。
```
{
'attrsMap': {
':class': 'c',
'class': 'demo',
'v-if': 'isShow'
},
'classBinding': 'c',
'if': 'isShow',
'ifConditions': [
'exp': 'isShow'
],
'staticClass': 'demo',
'tag': 'div',
/* 靜態標志 */
'static': false,
'children': [
{
'attrsMap': {
'v-for': "item in sz"
},
'static': false,
'alias': "item",
'for': 'sz',
'forProcessed': true,
'tag': 'span',
'children': [
{
'expression': '_s(item)',
'text': '{{item}}',
'static': false
}
]
}
]
}
```
我們用代碼實現一下 `optimize` 函數。
### isStatic
首先實現一個 `isStatic` 函數,傳入一個 node 判斷該 node 是否是靜態節點。判斷的標準是當 type 為 2(表達式節點)則是非靜態節點,當 type 為 3(文本節點)的時候則是靜態節點,當然,如果存在 `if` 或者 `for`這樣的條件的時候(表達式節點),也是非靜態節點。
```
function isStatic (node) {
if (node.type === 2) {
return false
}
if (node.type === 3) {
return true
}
return (!node.if && !node.for);
}
```
### markStatic
`markStatic` 為所有的節點標記上 `static`,遍歷所有節點通過 `isStatic` 來判斷當前節點是否是靜態節點,此外,會遍歷當前節點的所有子節點,如果子節點是非靜態節點,那么當前節點也是非靜態節點。
```
function markStatic (node) {
node.static = isStatic(node);
if (node.type === 1) {
for (let i = 0, l = node.children.length; i < l; i++) {
const child = node.children[i];
markStatic(child);
if (!child.static) {
node.static = false;
}
}
}
}
```
### markStaticRoots
接下來是 `markStaticRoots` 函數,用來標記 `staticRoot`(靜態根)。這個函數實現比較簡單,簡單來將就是如果當前節點是靜態節點,同時滿足該節點并不是只有一個文本節點左右子節點(作者認為這種情況的優化消耗會大于收益)時,標記 `staticRoot` 為 true,否則為 false。
```
function markStaticRoots (node) {
if (node.type === 1) {
if (node.static && node.children.length && !(
node.children.length === 1 &&
node.children[0].type === 3
)) {
node.staticRoot = true;
return;
} else {
node.staticRoot = false;
}
}
}
```
### optimize
有了以上的函數,就可以實現 `optimize` 了。
```
function optimize (rootAst) {
markStatic(rootAst);
markStaticRoots(rootAst);
}
```
## generate
`generate` 會將 AST 轉化成 render funtion 字符串,最終得到 render 的字符串以及 staticRenderFns 字符串。
首先帶大家感受一下真實的 Vue.js 編譯得到的結果。
```
with(this){
return (isShow) ?
_c(
'div',
{
staticClass: "demo",
class: c
},
_l(
(sz),
function(item){
return _c('span',[_v(_s(item))])
}
)
)
: _e()
}
```
看到這里可能會納悶了,這些 `_c`,`_l` 到底是什么?其實他們是 Vue.js 對一些函數的簡寫,比如說 `_c` 對應的是 `createElement` 這個函數。沒關系,我們把它用 VNode 的形式寫出來就會明白了,這個對接上一章寫的 VNode 函數。
首先是第一層 div 節點。
```
render () {
return isShow ? (new VNode('div', {
'staticClass': 'demo',
'class': c
}, [ /*這里還有子節點*/ ])) : createEmptyVNode();
}
```
然后我們在 `children` 中加上第二層 span 及其子文本節點節點。
```
/* 渲染v-for列表 */
function renderList (val, render) {
let ret = new Array(val.length);
for (i = 0, l = val.length; i < l; i++) {
ret[i] = render(val[i], i);
}
}
render () {
return isShow ? (new VNode('div', {
'staticClass': 'demo',
'class': c
},
/* begin */
renderList(sz, (item) => {
return new VNode('span', {}, [
createTextVNode(item);
]);
})
/* end */
)) : createEmptyVNode();
}
```
那我們如何來實現一個 `generate` 呢?
### genIf
首先實現一個處理 `if` 條件的 `genIf` 函數。
```
function genIf (el) {
el.ifProcessed = true;
if (!el.ifConditions.length) {
return '_e()';
}
return `(${el.ifConditions[0].exp})?${genElement(el.ifConditions[0].block)}: _e()`
}
```
### genFor
然后是處理 `for` 循環的函數。
```
function genFor (el) {
el.forProcessed = true;
const exp = el.for;
const alias = el.alias;
const iterator1 = el.iterator1 ? `,${el.iterator1}` : '';
const iterator2 = el.iterator2 ? `,${el.iterator2}` : '';
return `_l((${exp}),` +
`function(${alias}${iterator1}${iterator2}){` +
`return ${genElement(el)}` +
'})';
}
```
### genText
處理文本節點的函數。
```
function genText (el) {
return `_v(${el.expression})`;
}
```
### genElement
接下來實現一下 `genElement`,這是一個處理節點的函數,因為它依賴 `genChildren` 以及g `enNode` ,所以這三個函數放在一起講。
genElement會根據當前節點是否有 `if` 或者 `for` 標記然后判斷是否要用 `genIf` 或者 `genFor` 處理,否則通過 `genChildren` 處理子節點,同時得到 `staticClass`、`class` 等屬性。
`genChildren` 比較簡單,遍歷所有子節點,通過 `genNode` 處理后用“,”隔開拼接成字符串。
`genNode` 則是根據 `type` 來判斷該節點是用文本節點 `genText` 還是標簽節點 `genElement` 來處理。
```
function genNode (el) {
if (el.type === 1) {
return genElement(el);
} else {
return genText(el);
}
}
function genChildren (el) {
const children = el.children;
if (children && children.length > 0) {
return `${children.map(genNode).join(',')}`;
}
}
function genElement (el) {
if (el.if && !el.ifProcessed) {
return genIf(el);
} else if (el.for && !el.forProcessed) {
return genFor(el);
} else {
const children = genChildren(el);
let code;
code = `_c('${el.tag},'{
staticClass: ${el.attrsMap && el.attrsMap[':class']},
class: ${el.attrsMap && el.attrsMap['class']},
}${
children ? `,${children}` : ''
})`
return code;
}
}
```
### generate
最后我們使用上面的函數來實現 `generate`,其實很簡單,我們只需要將整個 AST 傳入后判斷是否為空,為空則返回一個 div 標簽,否則通過 `generate` 來處理。
```
function generate (rootAst) {
const code = rootAst ? genElement(rootAst) : '_c("div")'
return {
render: `with(this){return ${code}}`,
}
}
```
經歷過這些過程以后,我們已經把 template 順利轉成了 render function 了,接下來我們將介紹 `patch` 的過程,來看一下具體 VNode 節點如何進行差異的比對。
注:本節代碼參考[《template 模板是怎樣通過 Compile 編譯的》](https://github.com/answershuto/VueDemo/blob/master/%E3%80%8Atemplate%20%E6%A8%A1%E6%9D%BF%E6%98%AF%E6%80%8E%E6%A0%B7%E9%80%9A%E8%BF%87%20Compile%20%E7%BC%96%E8%AF%91%E7%9A%84%E3%80%8B.js)。
