
>[info] 用戶從windows接入
1. 下載安裝 git.exe
下載地址:https://git-scm.com/downloads
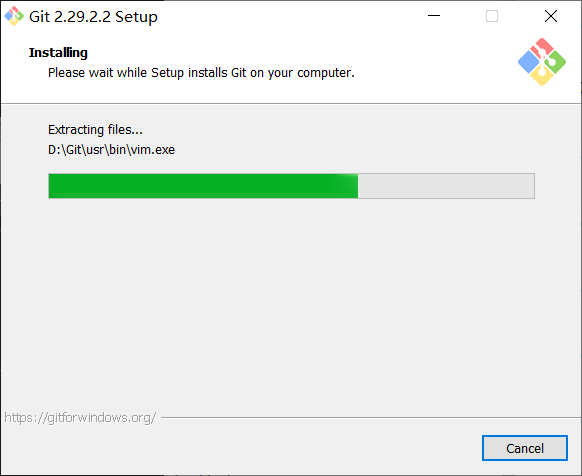
雙擊git.exe安裝git(一直點下一步,直到完成) 點擊電腦桌面空白地方右鍵看到如下兩行即安裝成功。
*****
2. 登錄 gitlab 網頁
```
http://192.168.83.130:800
```
*****
3. 設置ssh
**生成密匙:**
打開本地git bash,使用如下命令生成密匙
```
# 詳解:(-C 參數是你的郵箱地址) 然后一路回車
ssh-keygen -t rsa -C '420029810@qq.com'
```
*****
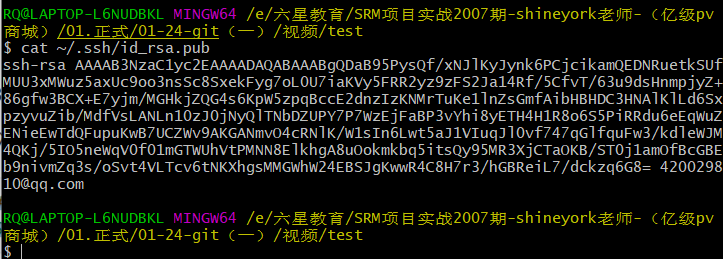
**查看密匙:**
```
# ~表示用戶目錄,比如我的windows就是C:\\Users\\Administrator,并復制其中的內容
cat ~/.ssh/id_rsa.pub
```
*****
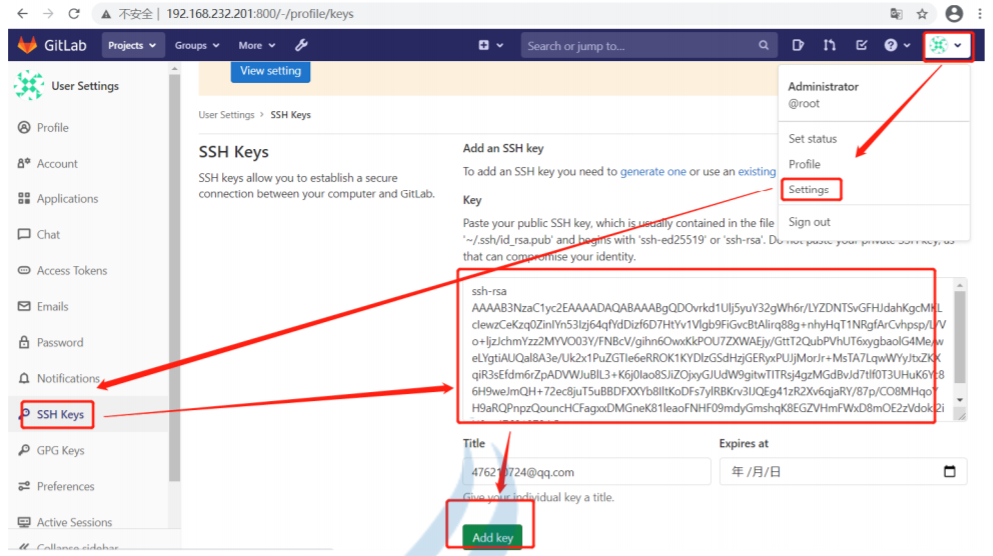
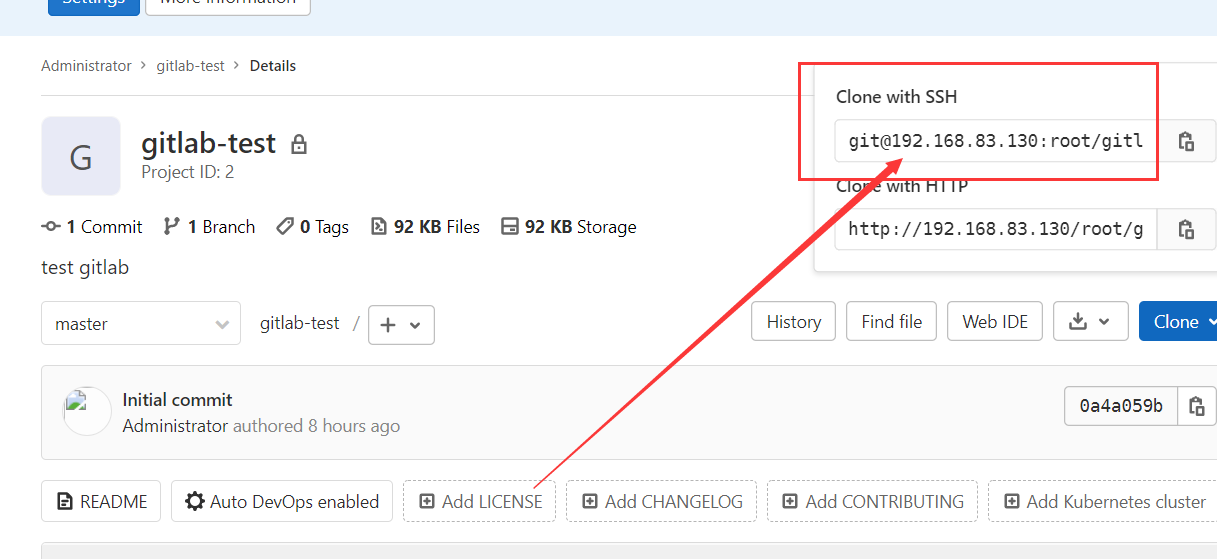
**復制密匙,添加密匙到gitlab:**
打開gitlab,找到Profile Settings-->SSH Keys--->Add SSH Key,并把上一步中復制的內容粘貼到Key所對應的文本框
*****
>[info] 設置用戶名和郵箱
```
git config --global user.name "初心"
git config --global user.email "420029810@qq.com"
```
>[info] 從gitlab克隆代碼
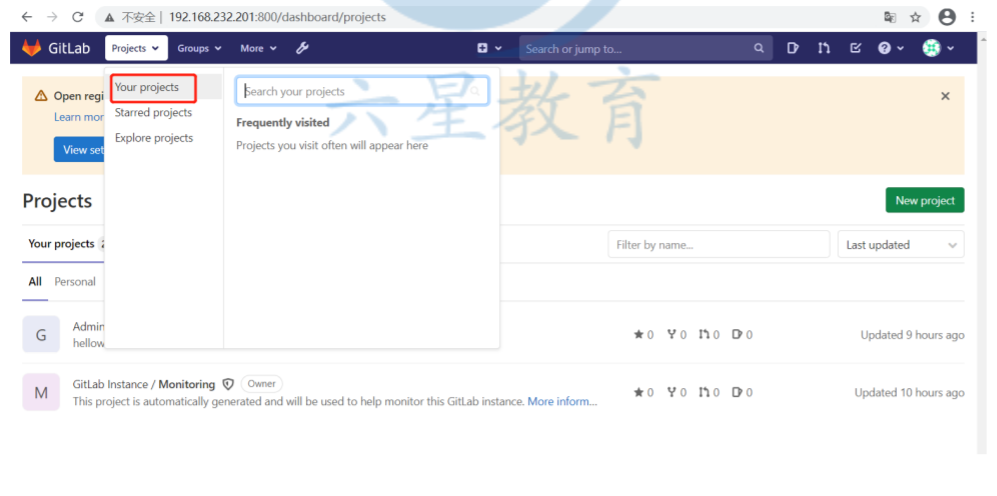
1. .回到gitlab頁面點擊projects -> your projects
*****
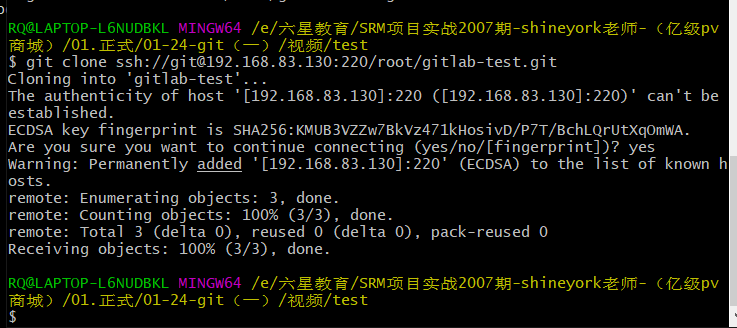
2. .選擇一個需要克隆的項目,進入,復制下載地址,記得加 **端口號 800**
```
git clone ssh://git@192.168.83.130:220/root/gitlab-test.git
```
*****
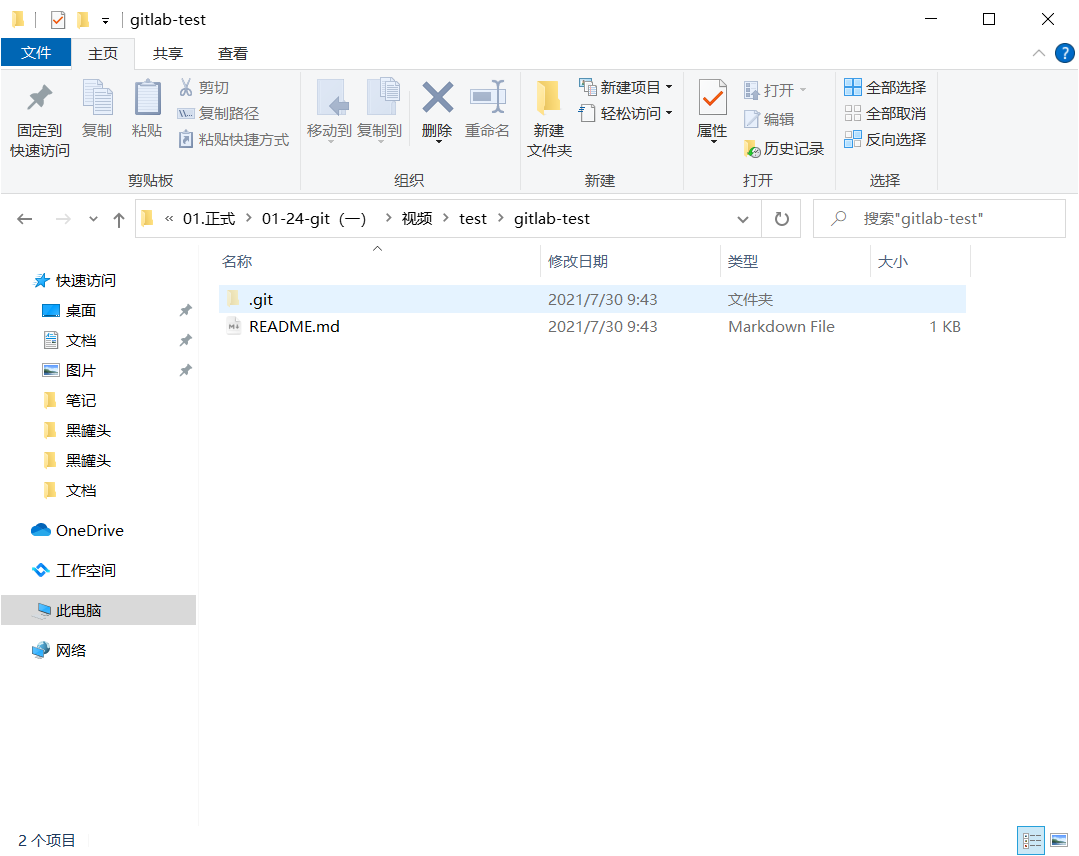
3. .查看文件夾,項目已經克隆下來了
>[info] 提交代碼到gitlab
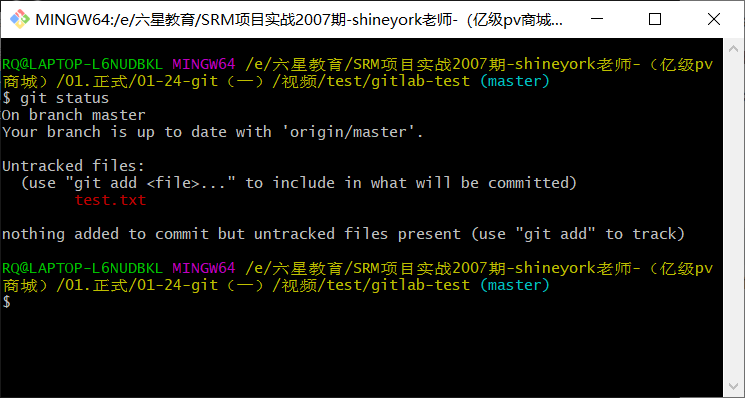
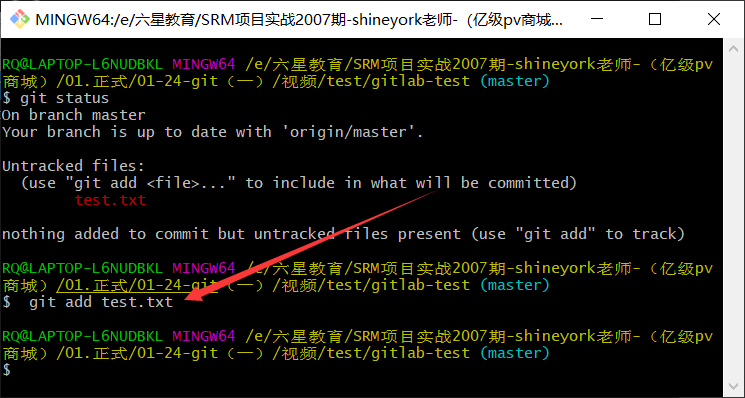
1. 基于以上步驟,在克隆的項目文件夾下新增一個測試文件 **test.txt**
2. 查看同步狀態 在項目文件夾下右鍵點擊->Git Bash Here
3. 輸入命令
```
git status
```
可以看到紅色部分有需要提交的文件
4. .提交代碼
(“git add“后加“.”則添加全部文件,也可以加"*.txt"表示添加全部需要提交的txt文件 )
```
git add test.txt
```
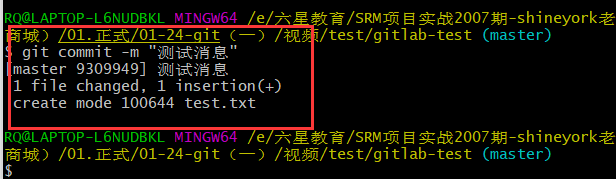
5. 然后輸入以下命令提交并添加提交信息
```
git commit -m "測試消息"
```
*****
5. 最后輸出以下命令提交到gitlab
```
git push origin master
```
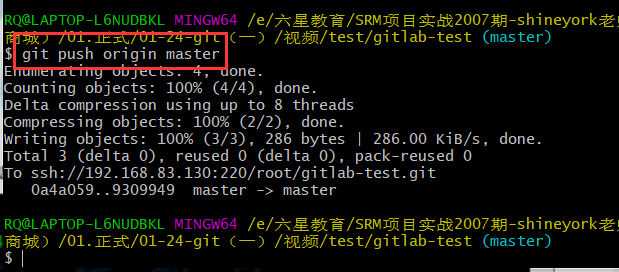
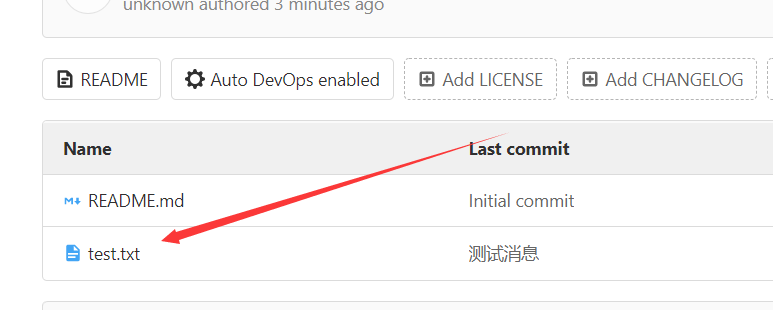
提交完成啦 再回到gitlab上看該項目就可以看到多了一個txt測試文件
*****
- PHP
- ThinkPHP5
- 變量修飾符:input()
- 常用函數封裝
- 01. 數據集轉為樹(Tree)
- 02. 生成訂單號
- 03. 將時間戳轉換為日期時間
- 04. 將字節轉換為可讀文本
- 05. 首字母頭像
- 06. 隨機小數/截取小數
- 07. 判斷字符串是否序列化
- 08. 根據生日計算年齡
- 09. 判斷是PC或WAP端
- 10. 請求網頁返回code碼狀態
- 11. 計算代碼執行時間
- 12. String 字符處理類
- 13. Http 請求類
- 14. StrRand 隨機生成字符類
- 15. 獲取當天開始時間和結束時間
- 16. 手機郵箱身份證
- 17. jsonEncode和jsonDecode助手函數
- 18. tp6跨域檢測
- 19.日期轉換為時間戳
- 20.excel導入日期格式問題
- 21.取整數函數常用的四種方法
- 22.PHPExcel導入導出
- 23.計算文件大小
- 24.計算按天數
- 25.文件夾不存在則創建
- 26.遞歸獲取部門所有子級id
- 27.根據用戶名生成默認文字頭像
- 28.生成短信驗證碼
- 29.數據脫敏
- 30.根據身份證判斷禁止未成年人下單
- 31.數組向指定位置插入元素
- 32.從字符串中獲取城市名稱
- 33.收貨地址拆分省市區
- 34.根據時間戳獲取本月開始-結束日期
- 35.循環每次查詢指定數據集
- 36.判斷日期是否符合范圍
- Laravel6
- 01.Dingo API 2.0.0 擴展包
- 01.laravel 安裝擴展包
- 02.創建端點
- 03.響應
- 04.api認證
- 監聽sql 語句
- 安裝easywechat
- 路由分組
- ThinkPHP6
- ThinkPHP6讀寫分離
- 定時計劃任務
- 偽靜態
- 多應用模式
- Join關聯查詢
- 跨域中間件
- extend擴展
- 1.操縱文件類
- 2.壓縮包驅動
- Xdebug調試
- Easy Task開發文檔
- 01.EasyTask介紹
- 02.EasyTask環境安裝
- 03.EasyTask基礎入門
- EasySwoole
- 999.狀態類
- 01.EasySwoole快速開始
- 1.EasySwoole介紹
- 2.EasySwoole快速上手
- 3.EasySwoole基本管理命令
- 4.EasySwoole基礎開始示例(CURD)
- 02.EasySwoole協程操作指南
- 1.什么是協程
- MySQL
- MySQL批量修改表前綴
- 重置【主鍵ID】
- 查看【文件存儲位置】
- MySQL主從同步
- 添加用戶權限
- MySQL主從復制集群
- 01.主從復制技術原理介紹
- 02.基于 binlog 主從復制搭建
- 03.基于binlog不影響業務搭建主從
- 04.主從復制 binlog 格式
- 05.主從復制過濾規則
- 06.在線增加從服務器
- 07.MySQL 雙主復制
- 08.雙主如何防止和解決主鍵沖突
- keepalived+haproxy+mysql雙主高可用
- lvs+keepalived+雙主mysql負載均衡
- MyCAT實現MySQL讀寫分離
- 09.多線程復制
- MHA
- 1.理解MHA高可用
- 2.搭建MySQL一主二從
- 3.建立節點互信
- 4.構建MHA
- 5.啟動并測試MHA
- 6.修復宕機的Master
- 重置root密碼
- MySQL 開發規范
- mycat
- 01.mycat 簡介與安裝
- 02.mycat 配置詳解
- 03.mycat 切片規則
- 常用SQL語句大全
- 01.取數騷SQL
- 02.評估表數據體量SQL
- Linux
- Contos 7
- 常用命令
- 解壓【zip】
- vmhgfs 掛載
- 跨主機免密碼認證
- 寶塔Linux面板
- 01.寶塔專業/企業版一鍵腳本破解版
- Windows
- 服務器
- 調出【桌面圖標】
- 查看【端口使用】
- 查看【操作日志】
- 查看【本地組策略】
- HTML
- URL編碼參照表
- RabbitMQ
- 01.rabbitMQ 快速入門
- 1. 認識 RabbitMQ
- 4. 消費者生產者代碼實例
- 3. 安裝 amqp 擴展
- 2. RabbitMQ安裝和啟動
- 02.rabbitMQ 高級特性
- 1. 高級特性前言
- 2. 高級特性之一ack comfirm機制
- 3. 高級特性之二如何保證消息的100%接收(一)
- 4. 高級特性之二如何保證消息的100%接收(二)
- 5. 高級特性之三冪等性
- 6. 高級特性之四 return機制
- 7. 高級特性之五 限流機制
- 8. 高級特性之六 重回隊列
- 9. 高級特性之七 TTL
- 10. 高級特性之八 死信隊列
- 03.tp6簡單應用 RabbitMQ
- 04.fanout 訂閱/廣播模式
- 05.topic 通配符模式
- Composer
- Composer 鏡像
- Compsoer 基礎使用
- Composer require 忽略依賴
- 微信公眾號
- 返回錯誤代碼說明
- 福利專區
- layuiAdmin框架模板
- Swoole
- 01.快速入門
- 1.swoole的概念介紹
- 2.安裝swoole
- 3. 快速運用swoole與理解
- 02.快速上手swoole與網絡協議
- 1.阻塞與非阻塞,同步與異步
- 2.HttpServer 加速php框架
- 3.WebSocket 簡單運用
- 4.tcp 與 upd 與 定時器
- 5.理解進程-非詳細
- 6.swoole結構
- 03.連接與tcp和upd
- 1.短鏈接與長連接
- 2.健康檢查
- 3.tcp 和 udp對比
- 4.tcp粘包的問題
- 5.tcp粘包問題的處理
- 04.理解網絡模型
- 1.linux內核與用戶空間調度
- 2.網絡io模型
- 3.構建worker結構iostar
- 4.理解stream系列函數
- 05.阻塞模型與非阻塞模型
- 1.構建基礎worker結構
- 2.搭建工程的結構
- 3.實現基礎版本的worker
- 4.完善worker模型
- 5.非阻塞模型與stream_select函數
- 6.補充
- 06.實現io復用與信號模型
- 07.實現異步io模型與Reactor模型
- 08.實現多進程reactor
- 09.詳解task進程
- 10.swostar之http與websocket
- 11.think-swoole使用
- 12.swostar之構建基礎核心結構
- 99.其他
- 西部數碼
- 01.NginxSLB搭建
- 02.windows 服務器取消多登錄
- PHP中高級面試題
- PHP基礎面試題
- MySQL面試題
- Redis面試題
- es面試題
- rqbbitMQ面試題
- 魔鬼訓練營
- 現場解答課-面試解答
- Laravel技術社區(干貨題庫匯總)
- 01.干貨題庫(一)
- 02.干貨題庫(二)
- 03.MySQL 常見面試題(1-25)
- 04.MySQL 常見面試題(26-58)
- Redis(2010期)
- 01.認識redis和安裝
- 02.Redis數據類型與string類型與list類型
- 03.Redis數據類型之hash類型與zset類型
- 04.Redis數據類型之set類型與性能檢測
- 05.Redis事務
- 06.Redis發布訂閱與stream應用
- 07.Redis-lua腳本
- 08.緩存擊穿,失效以及維度劃分
- 09.緩存穿透,雪崩問題
- 10.Redis緩存問題以及分布式鎖實現
- 11.redis持久化
- 1.redis-rdb持久化
- 2.redis-aof持久化
- 3.aof 和 rdb對比
- 12.redis主從復制
- 1.主從配置及原理
- 2.全量復制 和 部分復制
- 3.主從問題
- 13.redis哨兵機制
- 1.哨兵初識
- 2.redis哨兵原理
- 3.redis哨兵配置
- 4.redis哨兵問題
- 14.redis集群
- 1.集群搭建
- 2.故障轉移
- 3.redis集群伸縮
- 999.redis 常用命令
- key
- string(字符串)
- hash(哈希)
- list(列表)
- set(集合)
- zset(有序集合)
- Stream
- Redis 發布訂閱
- 事例
- Docker
- 1.docker快速入門
- 01.docker 了解
- 02.docker核心概念介紹
- 2.docker安裝
- 3.docker基本使用
- 01.常用命令(鏡像容器)
- 999.docker基本使用(示例)
- 01.docker部署es
- 02.docker部署lnmp
- 4.portainer可視化面板安裝
- 5.docker鏡像原理
- 01.docker鏡像聯合文件系統
- 02.docker分層理解
- 6.commit鏡像
- 7.docker容器數據卷
- 01.容器數據卷基本使用
- 02.容器數據卷示例
- 03.容器數據卷具名掛載和匿名掛載
- 04.多個容器數據卷數據共享
- 8.dockerFile
- 01.Dockerfile介紹
- 02.Dockerfile指令說明
- 03.發布鏡像到dockerhub
- 04.發布鏡像到阿里云
- 999.Dockerfile示例
- 01.Dockerfile構建 centos 鏡像
- 02.Dockerfile構建 tomcat 鏡像
- 03.Dockerfile構建 redis 鏡像
- 04.Dockerfile構建 lnmp 鏡像
- 9.docker網絡
- 01.理解docker0
- 02.容器互聯-link
- 03.自定義網絡
- 04.網絡互通
- 999.redis集群部署實戰
- 10.docker composer容器編排
- 01.docker-compose 介紹
- 02.安裝docker-compose
- 03.docker-compose 基本命令
- 04.docker-compose yml 常用命令
- 999.docker-compose示例
- 01.構建 nginx 鏡像(docker-compose)
- 02.構建 lnmp 鏡像(docker-compose)
- 11.docker swarm集群
- 12.ci/cd之jenkins
- 01.jenkins介紹
- 02.jenkins安裝(docker-compose)
- 13.k8s
- 01.什么是k8s
- 02.k8s使用場景
- 03.k8s部署架構分析
- 04.k8s運行架構分析
- Git
- 01.git理論和特點
- 02.gitlab安裝配置以及項目創建
- 03.用戶從windows接入并拉取+提交+修改代碼提交
- 04.如何把團隊弄進來一起開發
- 05.git基礎操作,練習命令
- 06.如果你讓三毛自己新建分支,并在上面開發這個時候三毛該怎么辦呢?
- 07.在分支開發完畢之后,如何合并到master
- 08.2個分支合并,發生沖突的演示,以及如何解決?
- 09.為什么要用git工作流,git工作流的好處
- 999.git常用命令
- phpstudy
- localhsot不顯示目錄
- tp6獲取不到header頭Authorization問題(apache)
- 分布式架構
- elk日志系統
- 01.elk為何而生
- 02.標準的日志系統包括哪些
- 03.什么是elk
- 04.架構設計分析
- 05.elk實操部署
- elasticsearch(簡稱:es)
- 01.es的簡介
- 02.es的安裝前提與安裝
- 03.es-head 與 kibana安裝
- 04.es的概念
- 05.ik分詞器
- 06.es對于restful的基本操作
- 07.es花式查詢
- 07.01 基本使用增刪改查
- 07.02 高級查詢
- 07.00 es花式搜索示例
- 01.大型互聯網架構演進過程
- 1.何為大型互聯網架構
- 2.分布式架構的演變過程
- 02.分布式通信技術介紹
- 1.分布式億級架構實戰
- 2.分布式-集群-微服務
- 3.分布式通信
- 4.分布式通信協議
- 03.分布式通信-實戰
- 1.分布式隊列原理
- 2.分布式隊列實戰
- 3.RPC代碼實戰
- 04.主流分布式架構設計詳解
- 1.分布式架構特性
- 2.CAP理論
- 3.BASE理論
- 05.consul服務注冊發現
- 1.consul的工作原理
- 2.consul集群實戰與操作
- 06.consul配置中心與實戰
- 1.配置中心是個什么
- 2.consul實現配置中心
- 3.consul的基本實戰操作
- 4.實戰跨服務調用
- 07.分布式數據庫
- 1.為什么要分庫分表
- 2.動態伸縮
- 08.分布式實戰數據庫實戰
- 09.分布式-分庫分表實戰
- 10.分布式事務
- 1.分布式事務
- 2.2PC-兩階段提交
- 3.3PC-三階段提交
- 4.TCC
- 5.MQ事務最終一致性
- 11.分布式實戰
- 12.elastic
- 13.elastic實戰
- 14.elastic場景實戰分析
- 15.elk
- 16.rabbitMQ
- 17.Kafka
- Redis、Nginx優化(2004期)
- 新能源汽車
- 數據表介紹
- 汽車租賃后臺管理
- 微信小程序授權
- 微信小程序接口
- Go
- Beego 框架
- 命令行大全
- go_zero
- 01.基礎部分
- 1.環境安裝并輸出HelloWorld
- 2.基礎語法與數據類型
- 3.Go語言變量常量定義
- 4.Go語言作用域
- 5.Go常用占位符
- 6.Go異常處理
- 7.Go中的包
- 8.指針與fmt
- 9.下劃線
- 10.數組(Array)
- 11.切片(Slice)
- 12.指針
- 13.Map
- 14.結構體
- 第三方庫
- 01.strconv
- 02.json
- 03.air實時加載
- 04.gjson
- 05.lo
- 06.time
- 07.reflect(反射)
- 08.retry-go(重試機制)
- 09.strings
- 數據庫操作
- 1.go操作mysql
- 2.go操作redis
- MongoDB
- 1.MongoDB 簡介
- 2.MongoDB 安裝
- 3.MongoDB 簡單CURD
- 4.MongoDB 條件操作符
- 5.MongoDB Limit/Skip/Sort方法
- 6.MongoDB 索引
- 7.MongoDB 聚合與管道
- 8.MongoDB 復制(副本集)
- 99. 客戶端安裝與PHP操作
- Swoft
- 01.框架安裝
- simpledingtalk修改點
- ThinkPHP6API基礎模板
- uniapp
- 01.微信小程序獲取頁面路由參數
- 02.通用提示
- 03.緩存
- 04.日期轉時間戳
- 05.VConsole調試
- Tailwind CSS
- 01.安裝以及基礎配置
- Vue
- 助手函數
- 1.時間戳格式化日期倒計時
- 2.獲取不重復的id
- 3.獲取正確的url路經
- 4.Object對象格式化為Query語法
- 5.數組轉Tree
- 6.Tree轉數組
- 7.判斷值是否為空
- 9.數字前置補零
- 10.在線時間
- 11.html轉義
- 12.pid形式數據轉children形式
- 13.遍歷children形式數據
- 14.全屏切換
- 15.獲取屏幕寬高度
- 16.獲取設備信息
- 17.百度高德地圖坐標轉換
- 18.深度克隆
- 19.獲取變量類型
- 20.播放音頻
- 21.導出excel
- 22.數字千分位
- 23.判斷是否是外鏈
- 24.獲取url參數
- ElementUI
- 1.表單驗證
- 模板
- Yii2
- 01.SQL慢查詢分塊