# 代碼檢查
2019 年 1 月,[TypeScirpt 官方決定全面采用 ESLint](https://www.oschina.net/news/103818/future-typescript-eslint) 作為代碼檢查的工具,并創建了一個新項目 [typescript-eslint][],提供了 TypeScript 文件的解析器 [@typescript-eslint/parser](https://github.com/typescript-eslint/typescript-eslint/blob/master/packages/parser) 和相關的配置選項 [@typescript-eslint/eslint-plugin](https://github.com/typescript-eslint/typescript-eslint/blob/master/packages/eslint-plugin) 等。而之前的兩個 lint 解決方案都將棄用:
- [typescript-eslint-parser](https://github.com/eslint/typescript-eslint-parser) 已停止維護
- [TSLint](https://palantir.github.io/tslint/) 將提供遷移工具,并在 typescript-eslint 的功能足夠完整后停止維護 TSLint(Once we consider ESLint feature-complete w.r.t. TSLint, we will deprecate TSLint and help users migrate to ESLint<sup>[1](https://medium.com/palantir/tslint-in-2019-1a144c2317a9)</sup>)
綜上所述,目前以及將來的 TypeScript 的代碼檢查方案就是 [typescript-eslint][]。
## 什么是代碼檢查
代碼檢查主要是用來發現代碼錯誤、統一代碼風格。
在 JavaScript 項目中,我們一般使用 [ESLint][] 來進行代碼檢查,它通過插件化的特性極大的豐富了適用范圍,搭配 [typescript-eslint][] 之后,甚至可以用來檢查 TypeScript 代碼。
## 為什么需要代碼檢查
有人會覺得,JavaScript 非常靈活,所以需要代碼檢查。而 TypeScript 已經能夠在編譯階段檢查出很多問題了,為什么還需要代碼檢查呢?
因為 TypeScript 關注的重心是類型的檢查,而不是代碼風格。當團隊的人員越來越多時,同樣的邏輯不同的人寫出來可能會有很大的區別:
- 縮進應該是四個空格還是兩個空格?
- 是否應該禁用 `var`?
- 接口名是否應該以 `I` 開頭?
- 是否應該強制使用 `===` 而不是 `==`?
這些問題 TypeScript 不會關注,但是卻影響到多人協作開發時的效率、代碼的可理解性以及可維護性。
下面來看一個具體的例子:
```ts
var myName = 'Tom';
console.log(`My name is ${myNane}`);
console.log(`My name is ${myName.toStrng()}`);
```
以上代碼你能看出有什么錯誤嗎?
分別用 tsc 編譯和 eslint 檢查后,報錯信息如下:
```ts
var myName = 'Tom';
// eslint 報錯信息:
// Unexpected var, use let or const instead.eslint(no-var)
console.log(`My name is ${myNane}`);
// tsc 報錯信息:
// Cannot find name 'myNane'. Did you mean 'myName'?
// eslint 報錯信息:
// 'myNane' is not defined.eslint(no-undef)
console.log(`My name is ${myName.toStrng()}`);
// tsc 報錯信息:
// Property 'toStrng' does not exist on type 'string'. Did you mean 'toString'?
```
| 存在的問題 | `tsc` 是否報錯 | `eslint` 是否報錯 |
| --- | --- | --- |
| 應該使用 `let` 或 `const` 而不是 `var` | ? | ? |
| `myName` 被誤寫成了 `myNane` | ? | ? |
| `toString` 被誤寫成了 `toStrng` | ?? | ? |
上例中,我們使用了 `var` 來定義一個變量,但其實 ES6 中有更先進的語法 `let` 和 `const`,此時就可以通過 `eslint` 檢查出來,提示我們應該使用 `let` 或 `const` 而不是 `var`。
對于未定義的變量 `myNane`,`tsc` 和 `eslint` 都可以檢查出來。
由于 `eslint` 無法識別 `myName` 存在哪些方法,所以對于拼寫錯誤的 `toString` 沒有檢查出來。
由此可見,`eslint` 能夠發現出一些 `tsc` 不會關心的錯誤,檢查出一些潛在的問題,所以代碼檢查還是非常重要的。
## 在 TypeScript 中使用 ESLint
### 安裝 ESLint
ESLint 可以安裝在當前項目中或全局環境下,因為代碼檢查是項目的重要組成部分,所以我們一般會將它安裝在當前項目中。可以運行下面的腳本來安裝:
```bash
npm install --save-dev eslint
```
由于 ESLint 默認使用 [Espree](https://github.com/eslint/espree) 進行語法解析,無法識別 TypeScript 的一些語法,故我們需要安裝 [`@typescript-eslint/parser`](https://github.com/typescript-eslint/typescript-eslint/tree/master/packages/parser),替代掉默認的解析器,別忘了同時安裝 `typescript`:
```bash
npm install --save-dev typescript @typescript-eslint/parser
```
接下來需要安裝對應的插件 [@typescript-eslint/eslint-plugin](https://github.com/typescript-eslint/typescript-eslint/tree/master/packages/eslint-plugin) 它作為 eslint 默認規則的補充,提供了一些額外的適用于 ts 語法的規則。
```bash
npm install --save-dev @typescript-eslint/eslint-plugin
```
### 創建配置文件
ESLint 需要一個配置文件來決定對哪些規則進行檢查,配置文件的名稱一般是 `.eslintrc.js` 或 `.eslintrc.json`。
當運行 ESLint 的時候檢查一個文件的時候,它會首先嘗試讀取該文件的目錄下的配置文件,然后再一級一級往上查找,將所找到的配置合并起來,作為當前被檢查文件的配置。
我們在項目的根目錄下創建一個 `.eslintrc.js`,內容如下:
```js
module.exports = {
parser: '@typescript-eslint/parser',
plugins: ['@typescript-eslint'],
rules: {
// 禁止使用 var
'no-var': "error",
// 優先使用 interface 而不是 type
'@typescript-eslint/consistent-type-definitions': [
"error",
"interface"
]
}
}
```
以上配置中,我們指定了兩個規則,其中 `no-var` 是 ESLint 原生的規則,`@typescript-eslint/consistent-type-definitions` 是 `@typescript-eslint/eslint-plugin` 新增的規則。
規則的取值一般是一個數組(上例中的 `@typescript-eslint/consistent-type-definitions`),其中第一項是 `off`、`warn` 或 `error` 中的一個,表示關閉、警告和報錯。后面的項都是該規則的其他配置。
如果沒有其他配置的話,則可以將規則的取值簡寫為數組中的第一項(上例中的 `no-var`)。
關閉、警告和報錯的含義如下:
- 關閉:禁用此規則
- 警告:代碼檢查時輸出錯誤信息,但是不會影響到 exit code
- 報錯:發現錯誤時,不僅會輸出錯誤信息,而且 exit code 將被設為 1(一般 exit code 不為 0 則表示執行出現錯誤)
### 檢查一個 ts 文件
創建了配置文件之后,我們來創建一個 ts 文件看看是否能用 ESLint 去檢查它。
創建一個新文件 `index.ts`,將以下內容復制進去:
```ts
var myName = 'Tom';
type Foo = {};
```
然后執行以下命令:
```bash
./node_modules/.bin/eslint index.ts
```
則會得到如下報錯信息:
```bash
/path/to/index.ts
1:1 error Unexpected var, use let or const instead no-var
3:6 error Use an `interface` instead of a `type` @typescript-eslint/consistent-type-definitions
? 2 problems (2 errors, 0 warnings)
2 errors and 0 warnings potentially fixable with the `--fix` option.
```
上面的結果顯示,剛剛配置的兩個規則都生效了:禁止使用 `var`;優先使用 `interface` 而不是 `type`。
需要注意的是,我們使用的是 `./node_modules/.bin/eslint`,而不是全局的 `eslint` 腳本,這是因為代碼檢查是項目的重要組成部分,所以我們一般會將它安裝在當前項目中。
可是每次執行這么長一段腳本頗有不便,我們可以通過在 `package.json` 中添加一個 `script` 來創建一個 npm script 來簡化這個步驟:
```json
{
"scripts": {
"eslint": "eslint index.ts"
}
}
```
這時只需執行 `npm run eslint` 即可。
### 檢查整個項目的 ts 文件
我們的項目源文件一般是放在 `src` 目錄下,所以需要將 `package.json` 中的 `eslint` 腳本改為對一個目錄進行檢查。由于 `eslint` 默認不會檢查 `.ts` 后綴的文件,所以需要加上參數 `--ext .ts`:
```json
{
"scripts": {
"eslint": "eslint src --ext .ts"
}
}
```
此時執行 `npm run eslint` 即會檢查 `src` 目錄下的所有 `.ts` 后綴的文件。
### 在 VSCode 中集成 ESLint 檢查
在編輯器中集成 ESLint 檢查,可以在開發過程中就發現錯誤,甚至可以在保存時自動修復錯誤,極大的增加了開發效率。
要在 VSCode 中集成 ESLint 檢查,我們需要先安裝 ESLint 插件,點擊「擴展」按鈕,搜索 ESLint,然后安裝即可。
VSCode 中的 ESLint 插件默認是不會檢查 `.ts` 后綴的,需要在「文件 => 首選項 => 設置 => 工作區」中(也可以在項目根目錄下創建一個配置文件 `.vscode/settings.json`),添加以下配置:
```json
{
"eslint.validate": [
"javascript",
"javascriptreact",
"typescript"
],
"typescript.tsdk": "node_modules/typescript/lib"
}
```
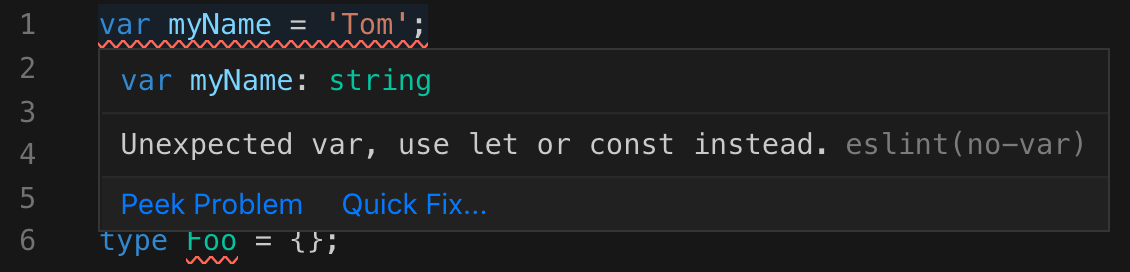
這時再打開一個 `.ts` 文件,將鼠標移到紅色提示處,即可看到這樣的報錯信息了:
我們還可以開啟保存時自動修復的功能,通過配置:
```json
{
"eslint.autoFixOnSave": true,
"eslint.validate": [
"javascript",
"javascriptreact",
{
"language": "typescript",
"autoFix": true
},
],
"typescript.tsdk": "node_modules/typescript/lib"
}
```
就可以在保存文件后,自動修復為:
```ts
let myName = 'Tom';
interface Foo {}
```
### 使用 Prettier 修復格式錯誤
ESLint 包含了一些代碼格式的檢查,比如空格、分號等。但前端社區中有一個更先進的工具可以用來格式化代碼,那就是 [Prettier](https://prettier.io/)。
Prettier 聚焦于代碼的格式化,通過語法分析,重新整理代碼的格式,讓所有人的代碼都保持同樣的風格。
首先需要安裝 Prettier:
```bash
npm install --save-dev prettier
```
然后創建一個 `prettier.config.js` 文件,里面包含 Prettier 的配置項。Prettier 的配置項很少,這里我推薦大家一個配置規則,作為參考:
```js
// prettier.config.js or .prettierrc.js
module.exports = {
// 一行最多 100 字符
printWidth: 100,
// 使用 4 個空格縮進
tabWidth: 4,
// 不使用縮進符,而使用空格
useTabs: false,
// 行尾需要有分號
semi: true,
// 使用單引號
singleQuote: true,
// 對象的 key 僅在必要時用引號
quoteProps: 'as-needed',
// jsx 不使用單引號,而使用雙引號
jsxSingleQuote: false,
// 末尾不需要逗號
trailingComma: 'none',
// 大括號內的首尾需要空格
bracketSpacing: true,
// jsx 標簽的反尖括號需要換行
jsxBracketSameLine: false,
// 箭頭函數,只有一個參數的時候,也需要括號
arrowParens: 'always',
// 每個文件格式化的范圍是文件的全部內容
rangeStart: 0,
rangeEnd: Infinity,
// 不需要寫文件開頭的 @prettier
requirePragma: false,
// 不需要自動在文件開頭插入 @prettier
insertPragma: false,
// 使用默認的折行標準
proseWrap: 'preserve',
// 根據顯示樣式決定 html 要不要折行
htmlWhitespaceSensitivity: 'css',
// 換行符使用 lf
endOfLine: 'lf'
};
```
接下來安裝 VSCode 中的 Prettier 插件,然后修改 `.vscode/settings.json`:
```json
{
"files.eol": "\n",
"editor.tabSize": 4,
"editor.formatOnSave": true,
"editor.defaultFormatter": "esbenp.prettier-vscode",
"eslint.autoFixOnSave": true,
"eslint.validate": [
"javascript",
"javascriptreact",
{
"language": "typescript",
"autoFix": true
}
],
"typescript.tsdk": "node_modules/typescript/lib"
}
```
這樣就實現了保存文件時自動格式化并且自動修復 ESLint 錯誤。
需要注意的是,由于 ESLint 也可以檢查一些代碼格式的問題,所以在和 Prettier 配合使用時,我們一般會把 ESLint 中的代碼格式相關的規則禁用掉,否則就會有沖突了。
### 使用 AlloyTeam 的 ESLint 配置
ESLint 原生的規則和 `@typescript-eslint/eslint-plugin` 的規則太多了,而且原生的規則有一些在 TypeScript 中支持的不好,需要禁用掉。
這里我推薦使用 [AlloyTeam ESLint 規則中的 TypeScript 版本](https://github.com/AlloyTeam/eslint-config-alloy#typescript),它已經為我們提供了一套完善的配置規則,并且與 Prettier 是完全兼容的(eslint-config-alloy 不包含任何代碼格式的規則,代碼格式的問題交給更專業的 Prettier 去處理)。
安裝:
```bash
npm install --save-dev eslint typescript @typescript-eslint/parser @typescript-eslint/eslint-plugin eslint-config-alloy
```
在你的項目根目錄下創建 `.eslintrc.js`,并將以下內容復制到文件中即可:
```js
module.exports = {
extends: [
'alloy',
'alloy/typescript',
],
env: {
// 您的環境變量(包含多個預定義的全局變量)
// Your environments (which contains several predefined global variables)
//
// browser: true,
// node: true,
// mocha: true,
// jest: true,
// jquery: true
},
globals: {
// 您的全局變量(設置為 false 表示它不允許被重新賦值)
// Your global variables (setting to false means it's not allowed to be reassigned)
//
// myGlobal: false
},
rules: {
// 自定義您的規則
// Customize your rules
}
};
```
更多的使用方法,請參考 [AlloyTeam ESLint 規則](https://github.com/AlloyTeam/eslint-config-alloy)
### 使用 ESLint 檢查 tsx 文件
如果需要同時支持對 tsx 文件的檢查,則需要對以上步驟做一些調整:
#### 安裝 `eslint-plugin-react`
```bash
npm install --save-dev eslint-plugin-react
```
#### package.json 中的 scripts.eslint 添加 `.tsx` 后綴
```json
{
"scripts": {
"eslint": "eslint src --ext .ts,.tsx"
}
}
```
#### VSCode 的配置中新增 typescriptreact 檢查
```json
{
"files.eol": "\n",
"editor.tabSize": 4,
"editor.formatOnSave": true,
"editor.defaultFormatter": "esbenp.prettier-vscode",
"eslint.autoFixOnSave": true,
"eslint.validate": [
"javascript",
"javascriptreact",
{
"language": "typescript",
"autoFix": true
},
{
"language": "typescriptreact",
"autoFix": true
}
],
"typescript.tsdk": "node_modules/typescript/lib"
}
```
#### 使用 AlloyTeam ESLint 規則中的 TypeScript React 版本
[AlloyTeam ESLint 規則中的 TypeScript React 版本](https://github.com/AlloyTeam/eslint-config-alloy#typescript-react)
## Troubleshootings
### Cannot find module '@typescript-eslint/parser'
你運行的是全局的 eslint,需要改為運行 `./node_modules/.bin/eslint`。
### VSCode 沒有顯示出 ESLint 的報錯
1. 檢查「文件 => 首選項 => 設置」中有沒有配置正確
2. 檢查必要的 npm 包有沒有安裝
3. 檢查 `.eslintrc.js` 有沒有配置
4. 檢查文件是不是在 `.eslintignore` 中
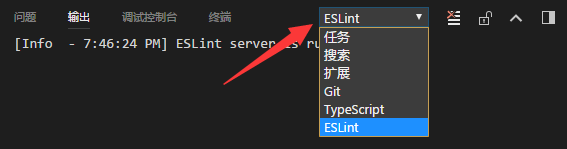
如果以上步驟都不奏效,則可以在「文件 => 首選項 => 設置」中配置 `"eslint.trace.server": "messages"`,按 `Ctrl`+`Shift`+`U` 打開輸出面板,然后選擇 ESLint 輸出,查看具體錯誤。
### 為什么有些定義了的變量(比如使用 `enum` 定義的變量)未使用,ESLint 卻沒有報錯?
因為無法支持這種變量定義的檢查。建議在 `tsconfig.json` 中添加以下配置,使 `tsc` 編譯過程能夠檢查出定義了未使用的變量:
```json
{
"compilerOptions": {
"noUnusedLocals": true,
"noUnusedParameters": true
}
}
```
### 啟用了 noUnusedParameters 之后,只使用了第二個參數,但是又必須傳入第一個參數,這就會報錯了
第一個參數以下劃線開頭即可,參考 https://github.com/Microsoft/TypeScript/issues/9458
[ESLint]: https://eslint.org/
[typescript-eslint]: https://github.com/typescript-eslint/typescript-eslint
---
- [上一章:工程](README.md)
- [下一章:編譯選項](./compiler-options.md)
