JAR部署方案
===
>[info] Version: 2.4+ 版本
[TOC]
## 正式環境部署
>[info] - 后端服務通過JAR方式運行
> - 前端項目build的dist,部署到nginx
### 一、jeecg-boot項目打JAR包
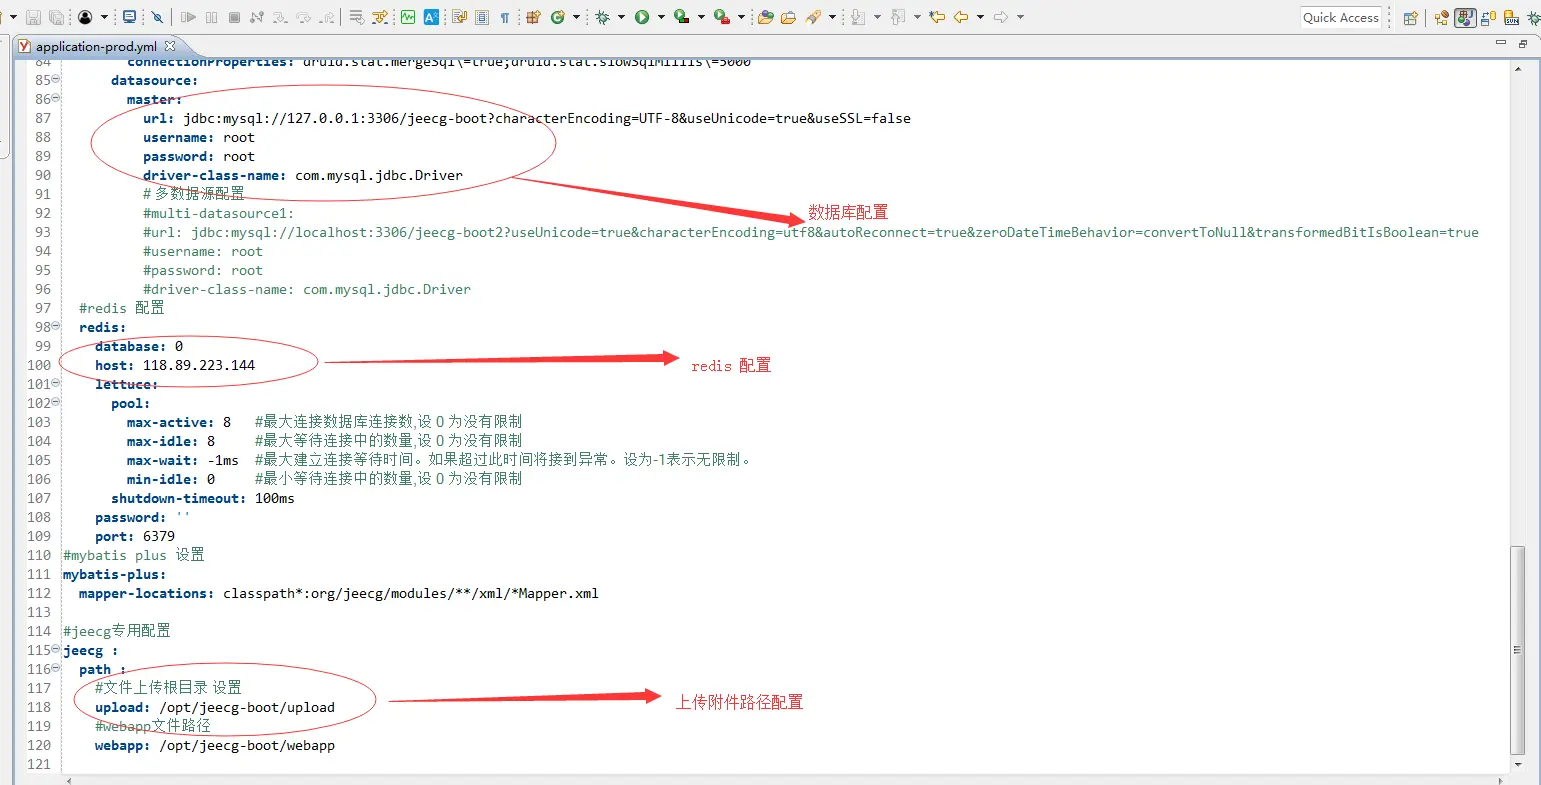
- 1、修改配置文件 application-prod.yml
>[warning] 修改 數據庫連接、緩存redis、上傳附件等配置
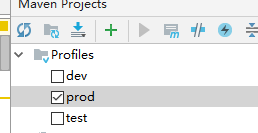
- 2、切換Maven為生產模式
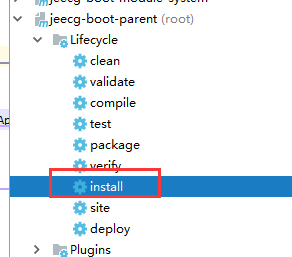
- 3、通過jeecg-boot-parent打包
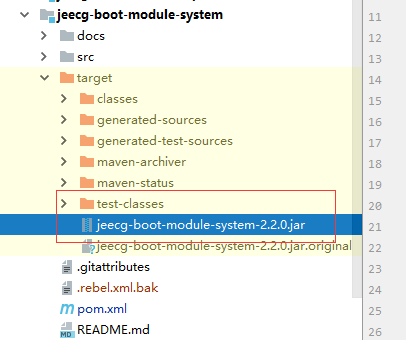
- 4、拿到 `jeecg-boot-module-system-{版本號}.jar` 包
### 二、通過JAR方式啟動后臺
通過命令啟動項目
```
Window啟動命令:
java -jar D:\jeecg-boot-module-system-2.0.0.jar
Linux下后臺進程啟動命令:
nohup java -jar jeecg-boot-module-system-2.0.0.jar >catalina.out 2>&1 &
關掉項目:
ps -ef|grep java
kill 進程號
```
### 三、前臺項目build打包
- 1、修改接口地址配置 ` .env.production`
```
NODE_ENV=production
VUE_APP_API_BASE_URL=https://bootapi.jeecg.com
VUE_APP_CAS_BASE_URL=http://localhost:8888/cas
VUE_APP_ONLINE_BASE_URL=http://fileview.jeecg.com/onlinePreview
```
- 2、build打包
使用build命令打包項目
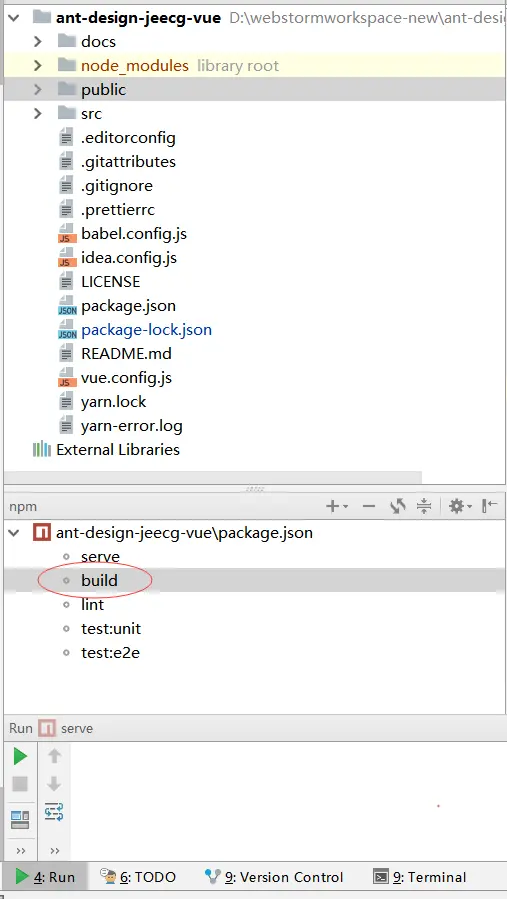
build完成后 ,會生成一個dist的目錄。
- 3、nginx部署前端項目
拷貝dist下的代碼到nginx安裝目錄下html目錄中,即可
### 四、nginx配置(conf/nginx.conf)
nginx監聽80端口
```
server {
listen 80;
server_name 你的域名;
#后臺服務配置,配置了這個location便可以通過http://域名/jeecg-boot/xxxx 訪問
location ^~ /jeecg-boot {
proxy_pass http://127.0.0.1:8080/jeecg-boot/;
proxy_set_header Host 127.0.0.1;
proxy_set_header X-Real-IP $remote_addr;
proxy_set_header X-Forwarded-For $proxy_add_x_forwarded_for;
}
#解決Router(mode: 'history')模式下,刷新路由地址不能找到頁面的問題
location / {
root html;
index index.html index.htm;
if (!-e $request_filename) {
rewrite ^(.*)$ /index.html?s=$1 last;
break;
}
}
}
```
提醒: 有的版本nginx配置需要加上 Upgrade 和Connection 協議頭,不然WebSocket會404
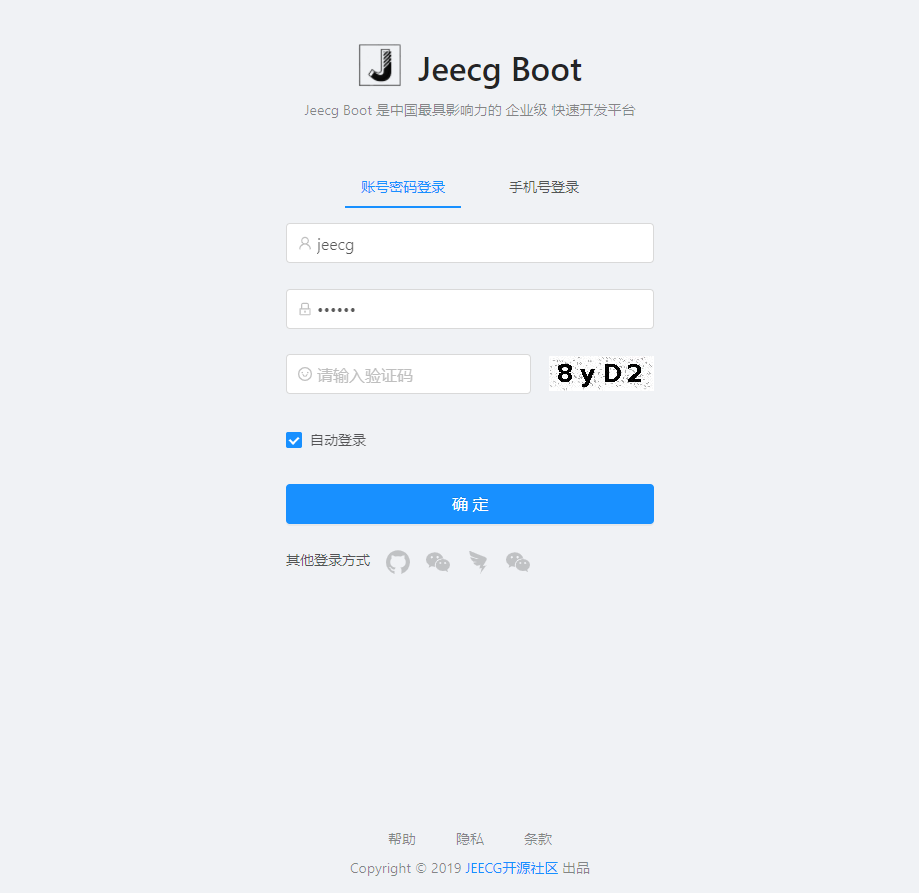
### 五、訪問應用
通過:http://你的域名 訪問項目,出現如下頁面,使用賬戶/密碼:admin/123456 登錄成功即可
### 六、其他說明
服務器只能開放80端口,不能開放8080端口問題?
> 方案:單獨配置一個java?api的服務域名 例如 `api.jeecg.com`,通過ngnix映射此域名到8080端口
> vue前端配置接口到域名`api.jeecg.com`。
- 項目介紹
- 新手入門教程
- 開發環境準備
- 基礎環境要求
- 開發環境安裝
- IDEA導入項目
- 通過IDEA啟動項目
- VUE2前端文檔
- Vue2前端快速啟動
- Docker啟動Vue2前端
- Vue2前端多環境
- 切換Vue2路由菜單表
- Docker啟動單體后臺
- 切換其他數據庫
- Maven私服設置
- Docker安裝軟件
- docker搭建開發環境
- Docker中安裝Elasticsearch
- 連接達夢數據庫
- 達夢數據庫多數據源
- 老版本文檔
- 通過IDEA啟動項目3.3
- 前端快速啟動3.3
- IDEA導入項目3.3
- 快速開始
- HelloWorld
- 上線發布
- JAR部署方案
- JAR分離打包部署
- WAR部署方案
- 開啟Nginx壓縮
- swagger使用
- 老版本發布文檔
- JAR部署方案3.3
- JAR分離打包部署3.3
- Docker單體啟動項目3.3
- WAR部署方案2.4
- JAR部署方案3.4.1
- 代碼生成器
- 代碼生成器簡介
- Online代碼生成器
- GUI代碼生成器
- 代碼生成常見問題
- 發布后配置代碼生成
- 代碼生成器配置
- 代碼生成器配置文件
- Online導入表過濾規則
- 自定義開發
- 生成器模板介紹
- 自定義一套模板
- 生成代碼優化
- 快速生成模塊
- 老版生成器文檔
- 微服務開發
- 微服務解決方案
- 單體升級為微服務3.4.1+
- archetype生成微服務模塊3.4+
- docker啟動微服務項目3.4.1+
- 微服務項目結構說明3.4.1
- jeecg-server-cloud微服務中間件
- Sentinel集成和規則配置用法
- Admin監控用法
- Gateway網關高級配置3.4
- jeecg-boot-starter項目實戰
- jeecg-boot-starter目錄結構
- xxl-job定時任務集成2.4+
- rabitmq消息隊列集成2.4+
- 消息總線用法2.4+
- Redisson分布式鎖集成2.4+
- 防止重復提交2.4+
- 分庫分表ShardingSphere3.4+
- 分庫分表ShardingSphere2.4
- 分布式事務Seata集成
- 上線部署
- 微服務部署文檔
- 老版本
- 單體升級為微服務2.4~3.1
- docker-compose部署3.0
- 微服務安裝與快速啟動
- docker-compose部署3.1
- 老版微服務文檔
- 單體升級為微服務3.4
- archetype生成微服務模塊3.4
- docker啟動微服務項目3.4
- jeecg-cloud-module目錄結構3.4
- 單體升級為微服務3.2+
- archetype生成微服務模塊3.2+
- Docker啟動微服務3.3+
- Gateway網關高級配置3.2
- 實戰技巧
- 實戰微服務模塊分層
- 微服務之間調用免Token方案
- 微服務單獨配置數據源3.4+
- 微服務單獨配置nacos 3.4+
- 微服務單獨配置數據源3.2
- 微服務單獨配置nacos 3.2
- 系統日志表跨庫問題
- nacos配置實現動態刷新
- 高級應用
- 微服務Feign調用示例
- skywarking鏈路跟蹤
- 微服務和單體定義切換接口
- 安裝@Redis集群搭建
- 安裝@RabbitMq創建交換機
- 3.2之前限流用法
- 微服務熔斷/降級/限流2.4+
- HystrixCommand配置參數詳解
- 動態feign客戶端
- 常見問題
- gateway接口文檔不通
- 訪問gateway超時
- 系統監控跨域問題修復
- gateway請求返回400
- 后端開發技巧
- 常用問題匯總
- 數據庫支持說明
- 自定義注解用法
- Spring緩存注解@Cacheable
- 字典翻譯注解@Dict
- 數據權限注解@PermissionData
- 日志記錄注解@AutoLog
- 菜單路由配置
- 菜單配置說明
- 帶參數路由菜單
- 路由菜單規則
- 菜單快速SQL
- 聚合路由菜單
- 數據快照功能如何用?
- 快速創建module模塊
- 查詢過濾器用法
- 系統日志怎么插入?
- 自定義sql分頁實現
- redis 如何使用?
- 事務如何使用?
- 動態數據源使用
- 定時任務如何開發?
- 平臺消息推送接口
- 接口敏感數據安全
- 批量插入效率建議
- 短信接口配置(阿里大魚短信)
- 自定義注解限制重復提交
- 郵箱配置文檔
- 積木報表設計器數據集使用
- 父子編碼使用說明
- 我的文檔安全配置
- 文檔預覽
- 在線多數據源
- 導入校驗工具類
- druid數據庫密碼加密
- 自定義首頁的用法
- 系統安全模式
- 數據脫敏注解
- Long類型主鍵導致精度丟失問題
- sql黑名單配置
- 系統文件上傳
- 統一文件上傳規則
- MinIO配置
- 阿里云OSS配置
- Minio版本6.0.13升級到8.0.3修改記錄
- 文件上傳大小限制
- VUE2前端開發
- 如何更改默認主題
- Form表單開發特殊性
- Icon圖標擴展方法
- vuex使用詳解
- vue路由帶參總結
- 全局配置文件
- 列表自定義列實現
- 國際化改造方案
- 常用命令
- 報表開發
- 報表開發技術點
- 自定義報表組件
- 源碼解讀
- 自定義組件
- 前端技巧
- components包下文件描述
- JDictSelectTag字典標簽
- duplicateCheck表單字段重復校驗通用JS
- JVxeTable行編輯
- 組件配置文檔
- 自定義組件
- 封裝自定義組件
- 自定義組件增強
- 多級聯動配置
- 使用示例
- 常見問題解答
- JEditableTable幫助文檔
- JMultiSelectTag多選組件
- JPopup彈窗選擇組件
- JSearchSelectTag字典表的搜索組件
- JSelectDepart部門選擇組件
- JSelectMultiUser用戶多選組件
- JSelectUserByDep根據部門選擇用戶
- JTreeDict分類字典樹形下拉組件
- JTreeSelect樹形下拉框 (異步加載)
- JInput 查詢組件
- JCron 幫助文檔
- JCategorySelect 幫助文檔
- JUpload上傳組件
- JImageUpload圖片上傳組件
- JSuperQuery高級查詢組件
- JAreaLinkage省市縣三級聯動
- JEllipsis超長截取顯示
- JDate 日期組件
- JCheckbox組件
- JCodeEditor組件
- JSelectMultiple多選下拉組件
- JTreeSelect樹形下拉組件
- JImportModal組件
- JAsyncTreeList異步樹表格
- JFormContainer使用文檔
- JMarkdownEditor使用文檔
- 前端開發坑(一定要注意)
- 按需加載方案
- 按需加載@減小打包
- JeecgBoot實戰-按需加載方案
- 表格的換行與不換行
- 舊:表格的換行與不換行
- 主子表子表下拉框、時間框彈框被遮擋優化
- 前端依賴包package.json
- 如何實現多列表單
- 前端字典緩存用法
- 自定義首頁
- 門戶首頁Portal權限控制
- Form升級為FormModel用法
- 動態覆蓋env配置文件(新)
- 上傳組件使用kkfileview實現文件預覽
- 系統權限用法
- JAVA請求權限控制
- 頁面按鈕權限用法
- 數據表格列字段控制
- 表單權限
- 顯示隱藏控制
- 禁用控制用法一
- 禁用控制用法二
- 子表行字段的禁用和隱藏控制
- 數據權限
- 數據權限規則篇
- 數據權限用法篇
- 編碼對接數據權限(未用查詢過濾器)
- 權限配置自定義SQL
- 子表數據權限
- 二級部門權限管理
- 填值規則(編碼生成)
- 校驗規則(高級校驗)
- 列表列字段導出權限示例
- 備份
- 通過URL方式配置數據權限
- Online表單VUE2版
- Online開發初體驗
- Online表單的菜單配置
- Online表單配置
- Online表單配置參數說明
- Online表單一對多表單配置
- Online樹列表表單配置
- Online表單查詢配置說明
- Online功能如何配置成菜單
- Online表單填值規則配置
- Online表單排版
- Online樹列表表單配置(個性化)
- Online表單標準字段說明
- Online表單刪除說明
- Online對接積木報表
- Online查詢排序配置
- Online聯合查詢配置
- Online導入導出值轉換器
- Online表單視圖功能
- Online自定義查詢配置
- Online表單控件
- 下拉框@多選框@單選框
- 下拉多選
- 下拉搜索
- Popup控件
- 富文本控件
- 時間控件
- 用戶選擇器
- 部門選擇器
- 自定義樹控件
- 分類字典樹控件
- Online之popup使用
- 下拉聯動組件
- markdown編輯器
- 省市區組件
- 開關控件
- 字段排列順序調整
- 字段顯示隱藏控制
- 控件配置Href
- 字段校驗規則使用
- 控件默認值表達式
- 控件擴展參數用法
- Online權限配置
- 字段權限配置與授權
- 按鈕權限配置與授權
- 數據權限配置與授權
- 聯合查詢數據權限規則說明
- 在線開發(增強)
- Online 自定義按鈕
- Online自定義按鈕基礎篇
- Online自定義按鈕表達式
- Online基礎篇-SQL增強
- Online JS增強
- 基礎篇-JS增強
- 基礎篇-JS增強(表單渲染)
- 列表JS API
- 表單JS API
- JS增強自定義彈窗
- JS增強 實戰示例
- 表單按鈕 動態顯隱字段
- 表單按鈕 改變控件的值
- 修改控件值【單表/主表】
- 表單按鈕修改子表數據
- 修改控件值【從表】
- 修改控件值【從改主】
- JS增強實現下拉聯動
- 表單前置事件(提交/編輯/刪除)
- 初始化表單默認值
- 獲取vuex緩存
- Online Java增強
- online基礎篇-java增強
- Online java增強 導入
- Online java增強 導出
- Online java增強 查詢
- Online Java增強 http-api
- 表單類
- 列表類
- 對接表單設計器后需注意
- Online java增強配置說明
- 備份2.4
- Online java增強 導入2.4
- online java 增強 http-api
- 通過字段Href實現三級聯動
- 導入數據庫表支持排除表
- edu
- Online表單專題課程1
- Online表單專題課程2
- 備注
- Online權限配置(作廢—老版本)
- 列表字段權限(顯示與隱藏)
- 表單字段權限(隱藏和禁用)
- 列表按鈕權限(隱藏)
- 列表數據權限
- 樹形表單數據權限配置
- Online表單權限配置(作廢—老版本)
- 功能描述
- 列表權限
- 列表字段的顯示或隱藏
- 列表操作按鈕的顯示或隱藏
- 列表自定義按鈕的顯示或隱藏
- 表單權限
- 表單字段的顯示或隱藏
- 表單字段的禁用或可編輯
- online表單使用常見問題
- online AI自動化測試數據制作
- Online導入開啟校驗用法
- Online AI模型測試用例功能詳情
- Online Al模型智能測試數據制作文檔
- online表單API接口
- Online報表VUE2版
- Online報表
- online報表-使用步驟
- online報表-動態參數
- 如何配置報表菜單
- Online報表權限配置
- Online報表系統變量應用
- 參數說明
- Online報表排序
- 字段href
- 字典配置
- online報表-合計
- online報表-配置分組標題
- online報表導出
- 高級實戰技巧
- Websocket業務對接
- WebSocket的集成
- SAAS多租戶用法
- 如何集成積木報表
- 使用jdk14啟動項目【內測】
- 全局監聽使用示例
- 微前端高級改造
- 邏輯刪除方案
- 升級springboot2.6.3問題匯總
- postgresql數據庫兼容問題
- 單體架構集成分庫分表
- CAS單點登錄
- CAS單點登錄服務端準備
- 單點登錄流程圖
- 單點登錄配置說明(2.3.1+)
- 單點登錄配置說明(vue3)
- archive
- 2.JeecgBoot后端對接CAS步驟
- 3.JeecgBoot前端項目對接CAS步驟(2.3.0)
- 第三方登錄
- 企業微信配置
- 釘釘配置
- 企業微信集成方案
- 微信第三方集成
- 釘釘和企業微信打通
- 配置開關
- 釘釘集成流程
- 企業微信集成流程
- 小技巧
- 同步部門規則
- 同步用戶規則
- 同步到本地開關
- OAuth2登錄(應用集成)
- 釘釘OAuth2登錄
- 企業微信OAuth2登錄
- JeecgUniapp開發
- 開發環境搭建
- 項目簡介
- 編寫Hello World頁面
- 打包項目
- APP打包
- 微信小程序打包
- H5打包
- 小程序發布
- APP首頁排版設計
- API接口配置
- uniapp推送
- 后臺定時unipush推送配置
- websocket消息推送修改
- HBuilderX打包APP
- 1.Build-JeecgBoot項目
- 2.HBuilderX 打包APP
- HBuilder打包APP手機端安裝配置教程
- bak_vant
- 小結
- 后臺推送消息移動端
- 如何安裝新依賴
- 代碼生成列表和表單
- AutoPOI(Excel工具)
- 快速文檔
- 單表數據導出多表頭示例
- 單表數據多表頭導入注意bak
- 導出自定義選擇列導出
- @excel注解使用
- excel根據模板導出
- 一對多導出needMerge
- 單表數據導出多sheet實例
- autopoi升級到4.0版本修改記錄
- 大數據量處理
- 大數據量導出示例
- 編碼規范
- 代碼規范
- 建表規范
- 代碼格式化插件安裝
- 代碼質量掃描
- 更多商業功能介紹
- 表單設計器
- 儀表盤設計器
- 流程設計器
- 工作流引擎
- 大屏設計器
- 低代碼應用
- 門戶設計器
- APP移動辦公
- APP布局設計
- OA辦公
- Online圖表