<ruby id="bdb3f"></ruby>

    <p id="bdb3f"><cite id="bdb3f"></cite></p>

      <p id="bdb3f"><cite id="bdb3f"><th id="bdb3f"></th></cite></p><p id="bdb3f"></p>
        <p id="bdb3f"><cite id="bdb3f"></cite></p>

          <pre id="bdb3f"></pre>
          <pre id="bdb3f"><del id="bdb3f"><thead id="bdb3f"></thead></del></pre>

          <ruby id="bdb3f"><mark id="bdb3f"></mark></ruby><ruby id="bdb3f"></ruby>
          <pre id="bdb3f"><pre id="bdb3f"><mark id="bdb3f"></mark></pre></pre><output id="bdb3f"></output><p id="bdb3f"></p><p id="bdb3f"></p>

          <pre id="bdb3f"><del id="bdb3f"><progress id="bdb3f"></progress></del></pre>

                <ruby id="bdb3f"></ruby>

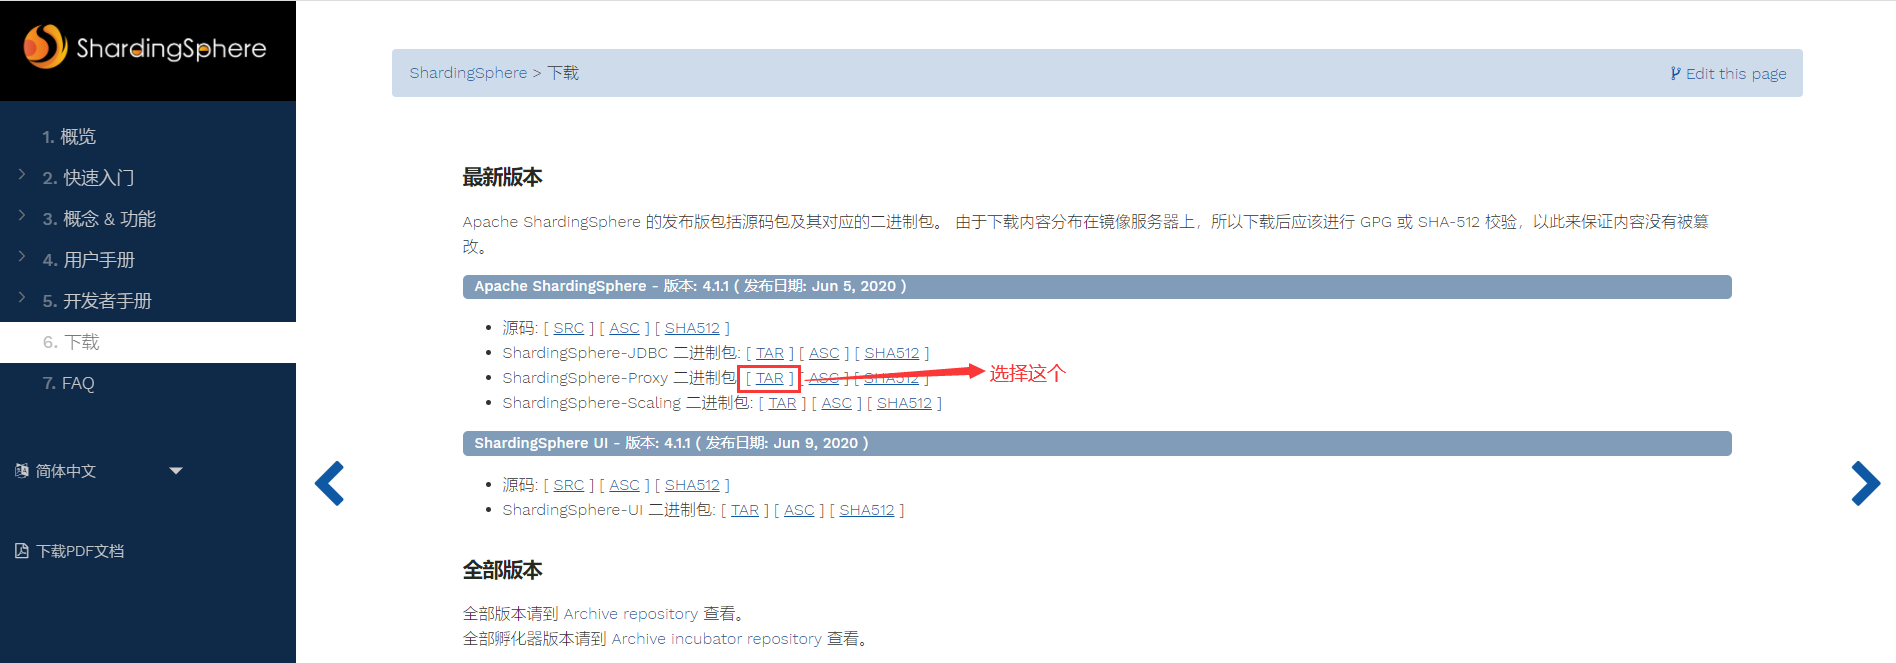
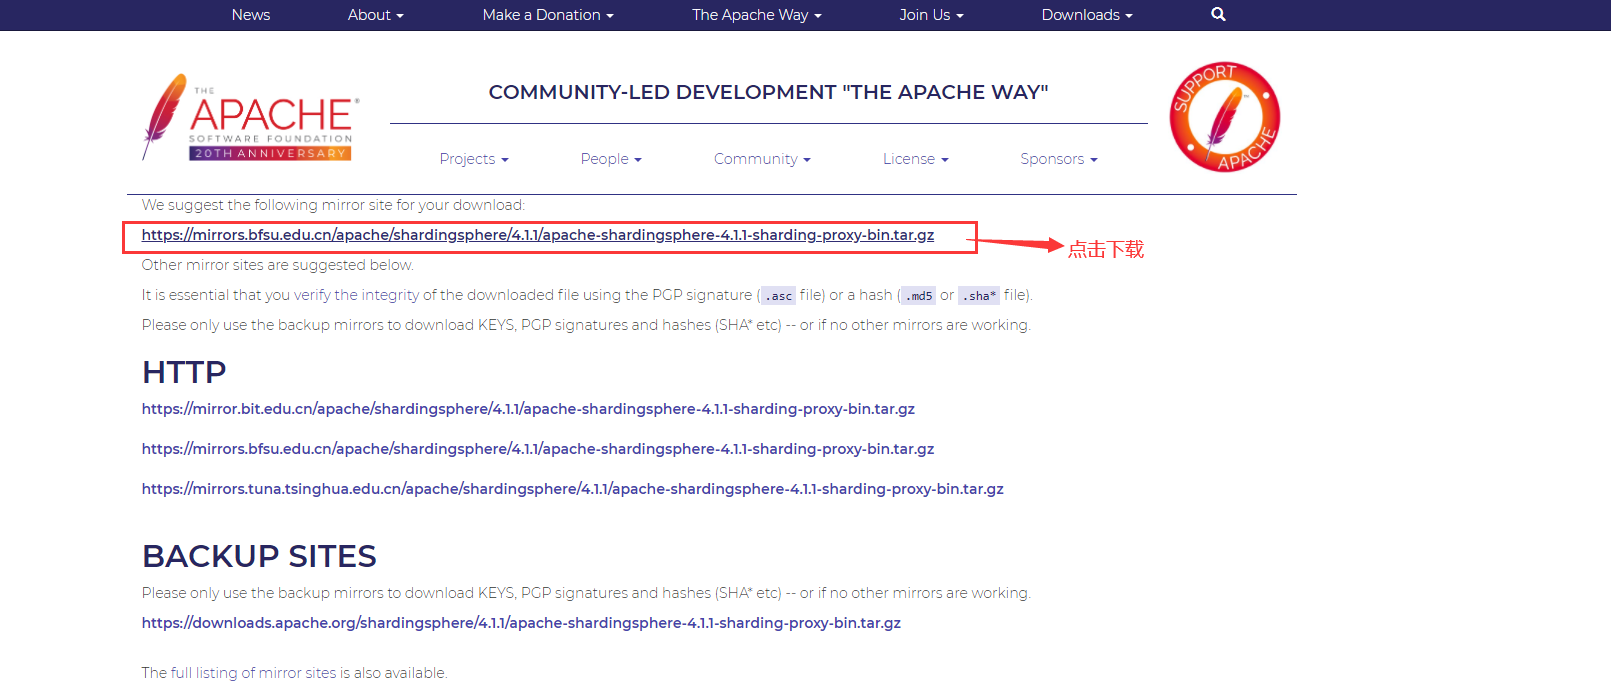
                ## **1. 官網下載sharding-porxy,下載最新版本的二進制包** 下載地址:[https://shardingsphere.apache.org/document/current/cn/downloads/](https://shardingsphere.apache.org/document/current/cn/downloads/) ![](https://img.kancloud.cn/01/85/0185bb45216e586aed1cd3891f78ad83_1896x663.png) ![](https://img.kancloud.cn/5c/1a/5c1a655561d4286ef565d57b5130685a_1611x691.png) ## **2. 上傳服務器并解壓** ``` tar zxvf apache-shardingsphere-4.1.1-sharding-proxy-bin.tar.gz -C /data/ ``` ![](https://img.kancloud.cn/0b/f2/0bf2fdfe8c1572b3faa4786d4118f38f_663x36.png) ![](https://img.kancloud.cn/70/f4/70f438484bdd0de4b086ac40002ad168_1050x188.png) ## **3. 重命名** ``` mv /data/apache-shardingsphere-4.1.1-sharding-proxy-bin /data/sharding ``` ![](https://img.kancloud.cn/6e/2c/6e2ccb06109b21ca08615f6395046cab_752x32.png) ![](https://img.kancloud.cn/3c/ee/3cee9e58b8f242e489873ea22f8f6835_1045x228.png) ## **
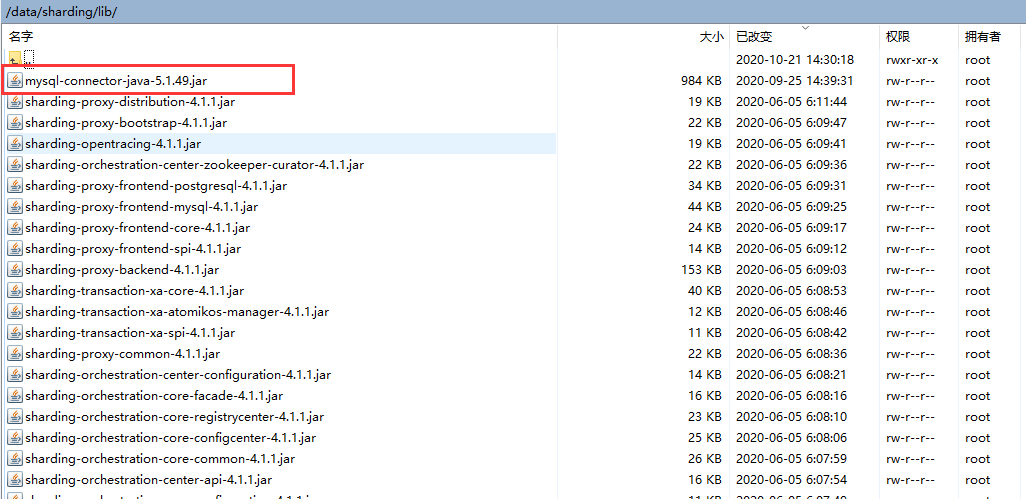
4. 把運行需要的mysql驅動mysql-connector-java.jar復制到sharding proxy的lib/下** 下載地址:[https://mvnrepository.com/artifact/mysql/mysql-connector-java](https://mvnrepository.com/artifact/mysql/mysql-connector-java) ![](https://img.kancloud.cn/d0/8f/d08f4dd7b8d6ccc08bca8c3c0cdfaf37_1026x499.png) ## **5. 配置** 進入到sharding-proxy的conf目錄,我們所有的數據源、分片規則、讀寫分離等都在此目錄下配置。 修改server.yaml文件 ![](https://img.kancloud.cn/99/bb/99bbe93235683708436a090a12668989_962x636.png) 修改config-sharding.yaml文件
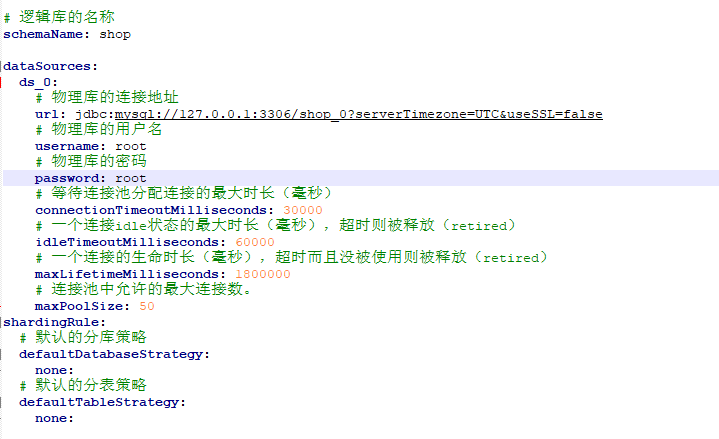
 ![](https://img.kancloud.cn/dc/57/dc57c45221e28c3a500b6100dd1d0e58_719x439.png) 說明: ![](https://img.kancloud.cn/fd/0f/fd0f47f02604393f67afaea01b3c2e03_767x137.png) * logback.xml是日志的配置。 * server.yaml是Sharding-Proxy的一些基礎配置,比如:賬號、密碼、注冊中心等。 * 剩下的所有以config開頭的yaml文件,都是一個邏輯數據源,我們可以看到最常見的兩個config-sharding.yaml(分片的配置),config-master\_slave.yaml(讀寫分離的配置)。 ## **6. 啟動服務** 物理庫必須要先創建好,否則啟動失敗 ``` cd /data/sharding/bin # 默認是3307端口;當然你也可以指定端口,在后面加上參數即可,比如./start.sh 3308 ./start.sh 3307 ``` ![](https://img.kancloud.cn/79/ff/79ffdff0c2355ccb57cd71e8eaf78a85_768x76.png) 查看3307端口是否正常啟動 ``` lsof -i:3307 ``` ![](https://img.kancloud.cn/f8/f0/f8f04886a7e4ccf122ed77e0d6ae0019_762x48.png) 啟動的時候,查看日志發現有錯誤: ``` com.mysql.jdbc.jdbc2.optional.MysqlXAException: XAER_RMERR: Fatal error occurred in the transaction branch - check your data for consistency ``` 解決方案:當前訪問mysql的賬號缺少XA_RECOVER_ADMIN權限導致,執行以下sql語句授權即可 ``` GRANT XA_RECOVER_ADMIN ON *.* TO zq@'%' ; ``` ## **7. Navicat連接測試** 輸入root的賬號和密碼 ![](https://img.kancloud.cn/e0/65/e06587c4c8eb1eded763b677b19ffd15_552x554.png) ![](https://img.kancloud.cn/b0/28/b028e2f9b46f95f90b5ab55fd4a58d0a_326x145.png) 
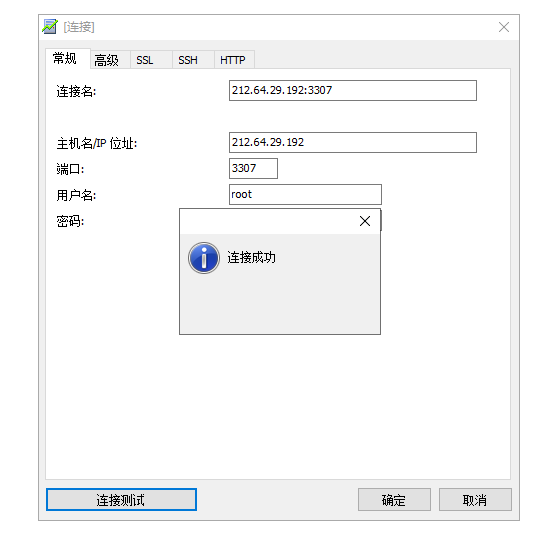
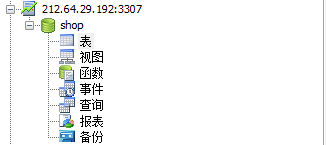
邏輯庫shop已存在,至此,sharding-porxy已安裝啟動完成。
                  <ruby id="bdb3f"></ruby>

                  <p id="bdb3f"><cite id="bdb3f"></cite></p>

                    <p id="bdb3f"><cite id="bdb3f"><th id="bdb3f"></th></cite></p><p id="bdb3f"></p>
                      <p id="bdb3f"><cite id="bdb3f"></cite></p>

                        <pre id="bdb3f"></pre>
                        <pre id="bdb3f"><del id="bdb3f"><thead id="bdb3f"></thead></del></pre>

                        <ruby id="bdb3f"><mark id="bdb3f"></mark></ruby><ruby id="bdb3f"></ruby>
                        <pre id="bdb3f"><pre id="bdb3f"><mark id="bdb3f"></mark></pre></pre><output id="bdb3f"></output><p id="bdb3f"></p><p id="bdb3f"></p>

                        <pre id="bdb3f"><del id="bdb3f"><progress id="bdb3f"></progress></del></pre>

                              <ruby id="bdb3f"></ruby>

                              哎呀哎呀视频在线观看