
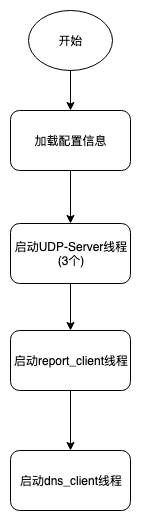
首先我們要在主線程中,啟動3個UDP Server線程,這個是提供業務層/API層的服務。然后分別啟動report_client線程,用來和reporter Service進行通信,將請求上報信息發送給Reporter Service。 然后再啟動dns_client線程,用來和dns service通信。
> lars_loadbalance_agent/include/main_server.h
```c
#pragma once
#include "lars_reactor.h"
#include "lars.pb.h"
//與report_client通信的thread_queue消息隊列
extern thread_queue<lars::ReportStatusRequest>* report_queue;
//與dns_client通信的thread_queue消息隊列
extern thread_queue<lars::GetRouteRequest>* dns_queue;
// 啟動udp server服務,用來接收業務層(調用者/使用者)的消息
void start_UDP_servers(void);
// 啟動lars_reporter client 線程
void start_report_client(void);
// 啟動lars_dns client 線程
void start_dns_client(void);
```
> lars_loadbalance_agent/src/main_server.cpp
```c
#include "main_server.h"
#include "lars.pb.h"
//與report_client通信的thread_queue消息隊列
thread_queue<lars::ReportStatusRequest>* report_queue = NULL;
//與dns_client通信的thread_queue消息隊列
thread_queue<lars::GetRouteRequest>* dns_queue = NULL;
int main(int argc, char **argv)
{
//1 加載配置文件
//2 啟動udp server服務,用來接收業務層(調用者/使用者)的消息
start_UDP_servers();
//3 啟動lars_reporter client 線程
report_queue = new thread_queue<lars::ReportStatusRequest>();
if (report_queue == NULL) {
fprintf(stderr, "create report queue error!\n");
exit(1);
}
start_report_client();
//4 啟動lars_dns client 線程
dns_queue = new thread_queue<lars::GetRouteRequest>();
if (dns_queue == NULL) {
fprintf(stderr, "create dns queue error!\n");
exit(1);
}
start_dns_client();
std::cout <<"done!" <<std::endl;
while (1) {
sleep(10);
}
return 0;
}
```
這里我們分別在main()中 ,開啟以上線程。
? 其中`report_client`線程需要攜帶`thread_queue<lars::ReportStatusRequest>`消息隊列通道。`agent`負責將上報請求消息`lars::ReportStatusRequest`通過thread_queue發送給reporter service。
? 其中`dns_client`線程需要攜帶`thread_queue<lars::GetRouteRequest>`。`agent`負責將請求modid/cmdid的route消息`lars::GetRouteRequest`通過thread_queue發送給dns service。
3個udp server的線程開辟實現如下:
> lars_loadbalance_agent/src/agent_udp_server.cpp
```c
#include "lars_reactor.h"
#include "main_server.h"
void * agent_server_main(void * args)
{
int *index = (int*)args;
short port = *index + 8888;
event_loop loop;
udp_server server(&loop, "0.0.0.0", port);
//TODO 給server注冊消息分發路由業務
printf("agent UDP server :port %d is started...\n", port);
loop.event_process();
return NULL;
}
void start_UDP_servers(void)
{
for (int i = 0; i < 3; i ++) {
pthread_t tid;
int ret = pthread_create(&tid, NULL, agent_server_main, &i);
if (ret == -1) {
perror("pthread_create");
exit(1);
}
pthread_detach(tid);
}
}
```
reporter thread創建實現如下:
> lars_loadbalance_agent/src/reporter_client.cpp
```
#include "lars_reactor.h"
#include "main_server.h"
#include <pthread.h>
void *report_client_thread(void* args)
{
printf("report client thread start\n");
#if 0
event_loop loop;
//1 加載配置文件得到repoter ip + port
std::string ip = config_file::instance()->GetString("reporter", "ip", "");
short port = config_file::instance()->GetNumber("reporter", "port", 0);
//2 創建客戶端
tcp_client client(&loop, ip.c_str(), port, "reporter client");
//3 將 thread_queue消息回調事件,綁定到loop中
report_queue->set_loop(&loop);
report_queue->set_callback()
//4 啟動事件監聽
loop.event_process();
#endif
return NULL;
}
void start_report_client()
{
//開辟一個線程
pthread_t tid;
//啟動線程業務函數
int ret = pthread_create(&tid, NULL, report_client_thread, NULL);
if (ret == -1) {
perror("pthread_create");
exit(1);
}
//設置分離模式
pthread_detach(tid);
}
```
dns thread創建實現如下:
> lars_loadbalance_agent/src/dns_client.cpp
```c
#include "lars_reactor.h"
#include "main_server.h"
#include <pthread.h>
void *dns_client_thread(void* args)
{
printf("dns client thread start\n");
return NULL;
}
void start_dns_client()
{
//開辟一個線程
pthread_t tid;
//啟動線程業務函數
int ret = pthread_create(&tid, NULL, dns_client_thread, NULL);
if (ret == -1) {
perror("pthread_create");
exit(1);
}
//設置分離模式
pthread_detach(tid);
}
```
### 2.3 測試lb_agentV0.1開發
編譯,然后我們簡單啟動一下`./bin/lars_lb_agent`
```bash
$ ./bin/lars_lb_agent
dns client thread start
report client thread start
done!
msg_router init...
server on 0.0.0.0:8888 is running...
agent UDP server :port 8888 is started...
msg_router init...
server on 0.0.0.0:8888 is running...
agent UDP server :port 8888 is started...
msg_router init...
server on 0.0.0.0:8888 is running...
agent UDP server :port 8888 is started...
...
```
---
### 關于作者:
作者:`Aceld(劉丹冰)`
mail: [danbing.at@gmail.com](mailto:danbing.at@gmail.com)
github: [https://github.com/aceld](https://github.com/aceld)
原創書籍: [http://www.hmoore.net/@aceld](http://www.hmoore.net/@aceld)

>**原創聲明:未經作者允許請勿轉載, 如果轉載請注明出處**
- 一、Lars系統概述
- 第1章-概述
- 第2章-項目目錄構建
- 二、Reactor模型服務器框架
- 第1章-項目結構與V0.1雛形
- 第2章-內存管理與Buffer封裝
- 第3章-事件觸發EventLoop
- 第4章-鏈接與消息封裝
- 第5章-Client客戶端模型
- 第6章-連接管理及限制
- 第7章-消息業務路由分發機制
- 第8章-鏈接創建/銷毀Hook機制
- 第9章-消息任務隊列與線程池
- 第10章-配置文件讀寫功能
- 第11章-udp服務與客戶端
- 第12章-數據傳輸協議protocol buffer
- 第13章-QPS性能測試
- 第14章-異步消息任務機制
- 第15章-鏈接屬性設置功能
- 三、Lars系統之DNSService
- 第1章-Lars-dns簡介
- 第2章-數據庫創建
- 第3章-項目目錄結構及環境構建
- 第4章-Route結構的定義
- 第5章-獲取Route信息
- 第6章-Route訂閱模式
- 第7章-Backend Thread實時監控
- 四、Lars系統之Report Service
- 第1章-項目概述-數據表及proto3協議定義
- 第2章-獲取report上報數據
- 第3章-存儲線程池及消息隊列
- 五、Lars系統之LoadBalance Agent
- 第1章-項目概述及構建
- 第2章-主模塊業務結構搭建
- 第3章-Report與Dns Client設計與實現
- 第4章-負載均衡模塊基礎設計
- 第5章-負載均衡獲取Host主機信息API
- 第6章-負載均衡上報Host主機信息API
- 第7章-過期窗口清理與過載超時(V0.5)
- 第8章-定期拉取最新路由信息(V0.6)
- 第9章-負載均衡獲取Route信息API(0.7)
- 第10章-API初始化接口(V0.8)
- 第11章-Lars Agent性能測試工具
- 第12章- Lars啟動工具腳本