# 數據建模-數據集加載
*****
**以下內容均按照作者的個人思路去編排,如果有更好的想法等,則以自己的優先**
*****
## 利用**Open CV2**讀取、加載數據集
> 個人猜測,比賽中“**數據集的加載與代碼了解**”是合二為一的,所以首先得弄懂如何加載
*****
### **零、準備**
1. 提前下載好圖片數據,并最好跟自己的代碼文件放在**同一目錄**下
> ①這里使用的數據集是來自Kaggle的Intel圖像分類
> ②“Intel圖像分類”數據集已分為Train、Test和Val,我們將僅使用訓練數據集學習如何使用不同的庫加載數據集【注:Train:訓練集 Test:測試集 Val:驗證集】
2. 了解深度學習模型加載自定義數據集的典型步驟
> ① 打開圖像文件。文件的格式可以是JPEG、PNG、BMP等。
> ② 調整圖像大小以匹配深度學習模型的輸入層的輸入大小。
> ③ 將圖像像素轉換為浮點數據類型。
> ④ 將圖像標準化,使像素值在0到1之間。
> ⑤ 深度學習模型的圖像數據應該是一個numpy數組或一個張量對象【張量:(人工智能領域:多維數組】。
3. 分析圖片數據中包含哪些內容
> 易知圖片數據中的每個類都是一個文件夾,其中包含該特定類的圖像,如"buildings-建筑物圖片"
*****
### **一、加載**【包含"深度學習模型加載自定義數據集的典型步驟"】
1. 導入所需的庫
```
【適用于Tensorflow 1.X】:
import pandas as pd
import numpy as np
import os
import cv2
from matplotlib import pyplot as plt
import matplotlib.image as mpimg
%matplotlib inline
----------------------------------------------------------------------------------------------------------------------
【適用于Tensorflow 2.X】:
import?pandas?as?pd
import?numpy?as?np
import?os
import?cv2
from??matplotlib?import?pyplot?as?plt
import?matplotlib.image?as?mpimg
%matplotlib?inline
```
2. 從其中一個文件夾中隨機輸出五張圖像
~~~text
import random
plt.figure(figsize=(20,20)) #【創建自定義圖像的寬與高】
img_folder=r'CV\Intel_Images\seg_train\seg_train\forest' #【自定義目錄】
for i in range(5):
file = random.choice(os.listdir(img_folder)) #【在自定義目錄里隨機抽圖,賦給file】
image_path= os.path.join(img_folder, file) #【將自定義目錄的路徑與file拼接】
img=mpimg.imread(image_path) #【讀取自定義目錄下的圖像】
ax=plt.subplot(1,5,i+1) #【把顯示界面分割成1*5的網格,其中,第一個參數是行數,第二個參數是列數,第三個參數表示圖形的編號,之后賦予ax】
ax.title.set_text(file) #【ax的標題設置為抽取的圖像名稱】
plt.imshow(img) #【展示】
~~~
**如圖**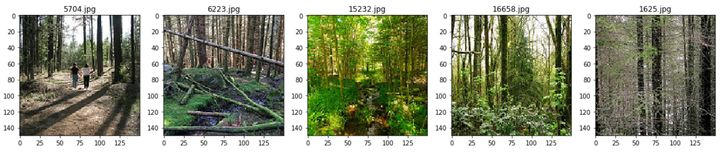
3. 設置用于加載數據集的圖像維度和源文件夾
~~~text
IMG_WIDTH=200 #【設置圖像寬度為200】
IMG_HEIGHT=200 #【設置圖像高度為200】
img_folder=r'CV\Intel_Images\seg_train\seg_train\' #【圖像路徑設置】
~~~
*****
### **二、設置**
從文件夾中的圖像創建圖像數據和標簽
~~~text
def create_dataset(img_folder): #【定義 create_dataset函數(即創建圖像數據)】
img_data_array=[] #【圖像數據用數組保存】
class_name=[] #【類名用數組保存】
for dir1 in os.listdir(img_folder): #【返回指定(這里是'img_folder')的文件夾包含的文件或文件夾的名字的文件夾為dir1】
for file in os.listdir(os.path.join(img_folder, dir1)): #【返回指定(這里是'img_folder'和'dir1'拼接在一起)的文件夾包含的文件或文件夾的名字的文件夾為file】
image_path= os.path.join(img_folder, dir1, file) #【將'img_folder'、'dir1'、'file'目錄拼接在一起,賦予image_path】
image= cv2.imread( image_path, cv2.COLOR_BGR2RGB) #【讀取'image_path'里的圖片,并將其由BGR模式轉為RGB模式】
image=cv2.resize(image, (IMG_HEIGHT, IMG_WIDTH),interpolation = cv2.INTER_AREA) #【將圖像進行縮放,讀取'image'里的內容,高與寬為之前設定的圖像維度的值,利用'像素區域關系進行重采樣’進行插值】
image=np.array(image) #【將image的數據存儲到數組中】
image = image.astype('float32') #【將數據類型強制轉換為float32】
image /= 255 #【將圖像數組歸一化,使值在0和1之間,這有助于更快地收斂。】
img_data_array.append(image) #【呈現image數組中的數據】
class_name.append(dir1) #【呈現dir1的類名】
return img_data_array, class_name #【返回'img_data_array','claa_name'】
img_data, class_name =create_dataset(r'CV\Intel_Images\seg_train\seg_train') #【提取圖像數組和類名】
~~~
知識補充:
> * 插值:利用已知鄰近像素點的灰度值(或rgb圖像中的三色值)來產生未知像素點的灰度值,以便由原始圖像再生出具有更高分辨率的圖像。
> * 計算機里存儲圖片是按照’先行后列‘存儲,也符合數組的規律形式
*****
### **三、劃分**
選取訓練數據集、測試數據集
```
# -*- coding: utf-8 -*-
"""
將數據集劃分為訓練集,驗證集,測試集
"""
import os
import random
import shutil
# 創建保存圖像的文件夾
def makedir(new_dir):
if not os.path.exists(new_dir):
os.makedirs(new_dir)
random.seed(1) # 隨機種子
# 1.確定原圖像數據集路徑
dataset_dir = "D:\Source Code\Python\Conda\AI\exampls\seg_train\seg_train" ##原始數據集路徑
# 2.確定數據集劃分后保存的路徑
split_dir = "D:/Source Code/Python/Conda/AI/exampls/test" ##劃分后保存路徑【!一定是反斜杠!】
train_dir = os.path.join(split_dir, "train")
valid_dir = os.path.join(split_dir, "val")
test_dir = os.path.join(split_dir, "test")
# 3.確定將數據集劃分為訓練集,驗證集,測試集的比例
train_pct = 0.9
valid_pct = 0.1
test_pct = 0
# 4.劃分
for root, dirs, files in os.walk(dataset_dir):
for sub_dir in dirs: # 遍歷0,1,2,3,4,5...9文件夾
imgs = os.listdir(os.path.join(root, sub_dir)) # 展示目標文件夾下所有的文件名
imgs = list(filter(lambda x: x.endswith('.jpg'), imgs)) # 取到所有以.jpg結尾的文件,如果改了圖片格式,這里需要修改
random.shuffle(imgs) # 亂序圖片路徑
img_count = len(imgs) # 計算圖片數量
train_point = int(img_count * train_pct) # 0:train_pct
valid_point = int(img_count * (train_pct + valid_pct)) # train_pct:valid_pct
for i in range(img_count):
if i < train_point: # 保存0-train_point的圖片到訓練集
out_dir = os.path.join(train_dir, sub_dir)
elif i < valid_point: # 保存train_point-valid_point的圖片到驗證集
out_dir = os.path.join(valid_dir, sub_dir)
else: # 保存valid_point-結束的圖片到測試集
out_dir = os.path.join(test_dir, sub_dir)
makedir(out_dir) # 創建文件夾
target_path = os.path.join(out_dir, imgs[i]) # 指定目標保存路徑
src_path = os.path.join(dataset_dir, sub_dir, imgs[i]) #指定目標原圖像路徑
shutil.copy(src_path, target_path) # 復制圖片
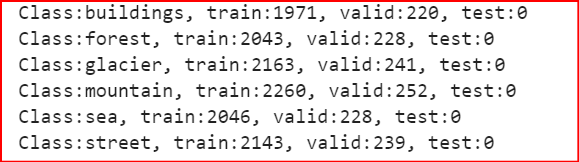
print('Class:{}, train:{}, valid:{}, test:{}'.format(sub_dir, train_point, valid_point-train_point,
img_count-valid_point))
```
結果為: