
[TOC]
` `TinyCoreLinux,這是Linux一個最小的發行版,但是麻雀雖小五臟俱全,在個人電腦上玩虛擬化的時候,TinyCore是一個非常好的選擇。
` `但是TinyCore在默認情況下,是沒有將系統安裝到硬盤的選項的。so,我們先將TinyCore Linux安裝到硬盤中,以便實現我們后面的遷移等功能。
## 設置網絡信息
* [ ] 選擇Control Panel

* [ ] 選擇network
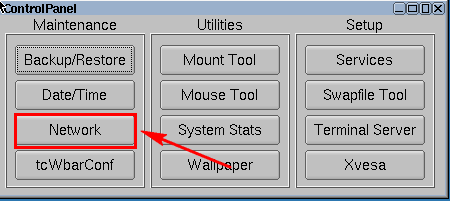
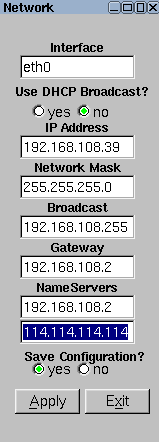
* [ ] 配置網絡信息,然后選擇【Apply】--【exit】
## 將Tiny Core安裝到硬盤
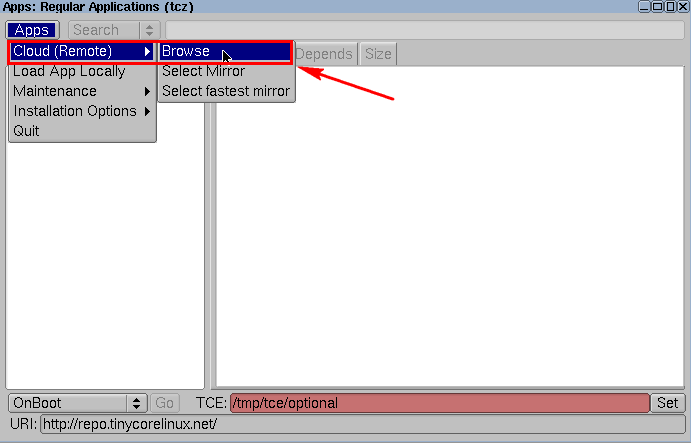
* [ ] 選擇apps

* [ ] 選擇Cloud(Remote)->Browse
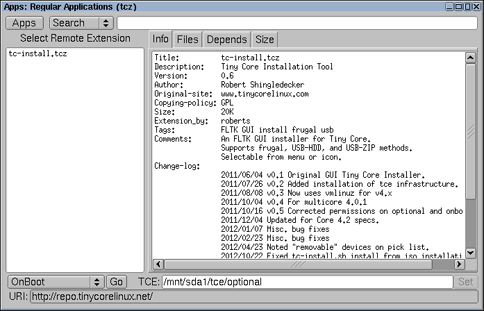
* [ ] 選擇tc-install,然后選擇【GO】
* [ ] 一系列的安裝包

* [ ] 安裝完之后,會發現下面有【tc-install】,點擊它

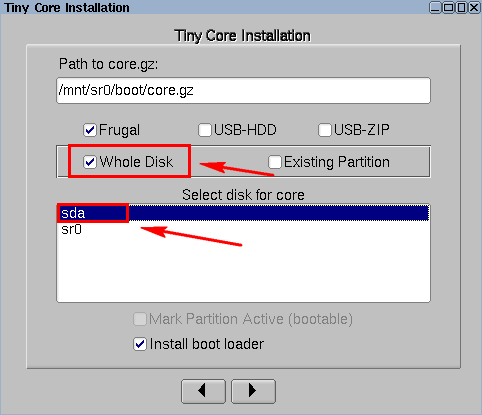
* [ ] 選擇【Whole Disk】--【安裝系統的盤】,然后下一步
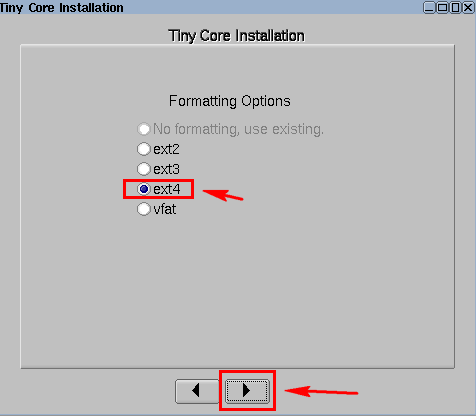
* [ ] 選擇磁盤格式,然后下一步
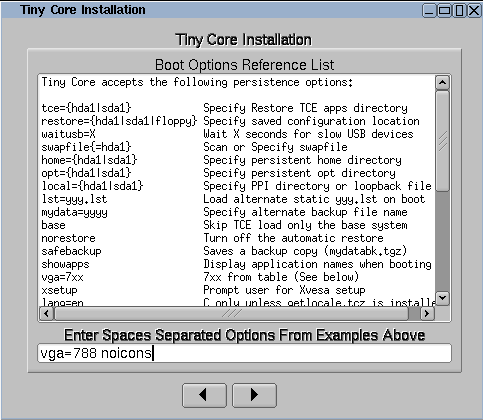
* [ ] 輸入一下字符,選擇下一步
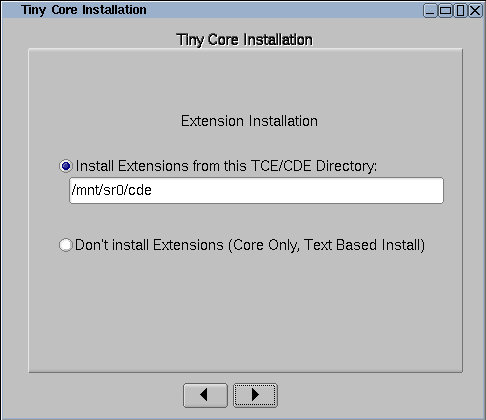
* [ ] 默認,下一步
* [ ] 選擇Proceed開始安裝

* [ ] 安裝完成
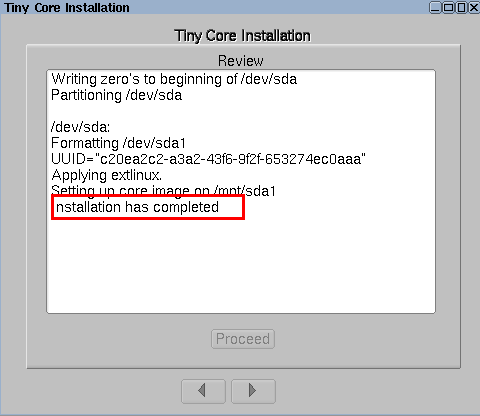
* [ ] 使用shutdown關機,將光盤取出,然后開機即可。
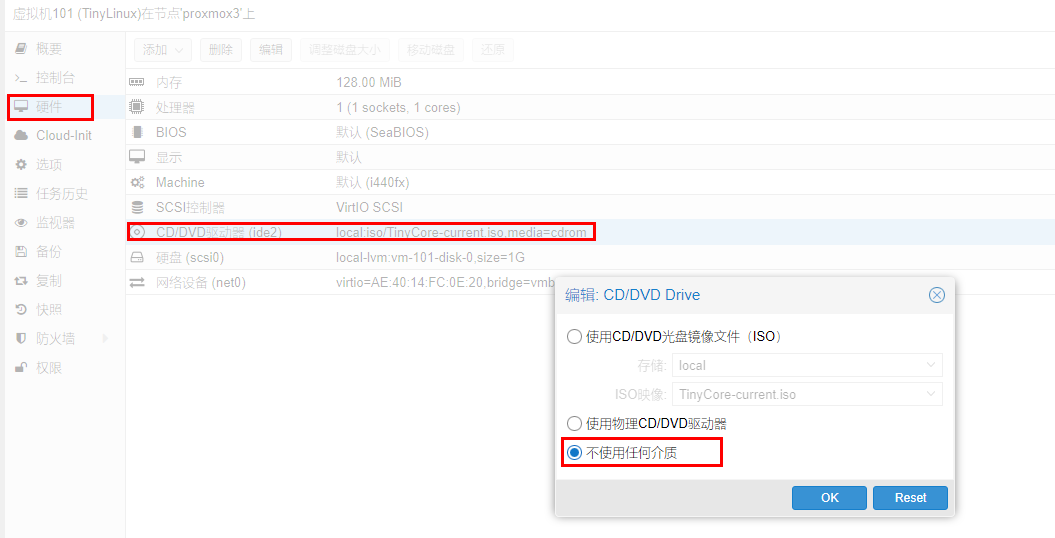
* [ ] 在proxmox中,選擇硬件,然后選擇光盤,不使用光盤即可
- 0 工具
- 0.1 圖片無損放大
- 1 deepin系統
- 1.1 deepin系統安裝
- 1.2 deepin創建desktop文件
- 1.3 瀏覽器運行虛擬機
- 1.4 linux的百度網盤突然打不
- 1.5 deepin安裝后個人配置
- 1.5.1 安裝公式編輯器AxMath
- 1.5.2 Deepin標題欄太高的解決辦法(自定義高度)
- 1.5.3 linux下配置VS Code的標題欄風格
- 1.5.4 安裝腳本解釋器fish
- 1.6 關于軟件安裝
- 1.6.1 rpm和deb包想換轉換的方法
- 1.7 deepin開機自啟的設置方法
- 2 tiny core系統
- 2.1 安裝系統到硬盤
- 2.2 系統軟件安裝介紹
- 2.3 安裝控制臺計算器bc
- 2.4 關機保存的方法
- 2.5 linux文件結構說明
- 2.6 為tinycore配置ssh
- 3 使用Linux中的一些技巧
- 3.1 軟連接的使用
- 3.2 LInux下解壓
- 3.3 刪除操作
- 3.4 Zenity-在命令行和Shell腳本中創建圖形(GTK +)對話框
- 3.4.1 列表框
- 3.4.2 口令對話框
- 3.4.3 消息對話框
- 3.4.3.1 信息對話框
- 3.4.3.2 錯誤框
- 3.4.3.3 問題對話框
- 3.4.3.4 警告對話框
- 3.4.4 范圍對話框(滑條)
- 3.4.5 文件選擇對話框
- 3.4.6 表單對話框
- 3.4.7 文本信息框
- 3.4.8 進度框
- 3.4.9 文本輸入框
- 3.4.10 通知區域圖標
- 3.4.11 日歷對話框
- 3.4.12 顏色對話框
- 3.4.13 上述對話框測試文件
- 3.4.14 使用C++調用zenity
- 3.5 Linux whereis、find和locate命令
- 3.6 字體下載
- 3.7 使用Electron 創建跨平臺的應用程序
- 3.8 shell的使用
- 3.8.1 $$,$?等表示什么
- 3.8.2 shell隨機產生某一個范圍內的整數
- 3.8.3 寫shel腳本的一些使用操作
- 3.8.4 linux shell操作二進制文件
- 3.8.5 shell中的一些實用技巧
- 3.8.5.1 列出當前路徑下的所有文件夾
- 3.8.5.2 列出當前路徑下所有文件
- 3.8.5.3 獲取當前虛擬終端的大小
- 3.8.5.4 判斷輸入字符串是否為數字
- 3.8.5.5 bash中的數學運算
- 3.8.5.6 按照文件創建時間順序列出文件
- 3.8.5.7 echo輸出含空格不換行的設置方法
- 3.8.5.8 find 遞歸/不遞歸 查找子目錄的方法
- 3.8.5.9 echo顯示顏色設置
- 3.8.5.10 bash中使用${}字符操作方法
- 3.8.5.11 ls查找目錄,文件,軟連接等的方法
- 3.8.5.12 檢測某個程序是否在運行
- 3.8.5.13 bash/shell 解析命令行參數工具:getopts/getopt
- 3.8.5.14 獲取腳本的絕對路徑
- 3.8.6 使用bash寫的腳本管理腳本
- 3.9 Linux創建自定義命令
- 3.10 deepin掛載遠程文件夾到本地
- 3.11 linux root用戶添加用戶
- 3.12 實用腳本或者命令
- 3.12.1 命令行 將ppt轉換為 pdf
- 3.12.2 deepin上實現自定義命令
- 4 slitaz系統
- 4.1 系統安裝
- 4.2 安裝軟件命令tazpkg
- 4.3 使用說明
- 4.4 用 tazlito 構建 livecd自制linux系統
- 4.5 英文顯示支持設置方法
- 4.6 配置ssh
- 5 busybox的編譯使用
- 5.1 busybox介紹
- 5.2 busybox編譯使用
- 6 配置自己的linux
- 6.1 在deepin上編譯linux內核
- 7 每天一個linux命令
- 7.1 文件管理類
- 7.1.1 cat--接文件并打印到標準輸出設備上
- 7.1.2 chattr--改變文件屬性
- 7.1.3 chgrp--變更文件或目錄的所屬群組
- 7.1.4 chmod --控制文件如何被他人所調
- 7.1.5 chown命令--指定文件的擁有者改為指定的用戶或組
- 7.1.6 grep命令--用于查找文件里符合條件的字符串
- 7.1.7 其他
- 7.2 文檔編輯類
- 7.2.1 col--過濾控制字符
- 7.2.2 colrm--濾掉指定的行
- 7.2.3 comm --比較兩個已排過序的文件
- 7.2.4 awk--一種處理文本文件的語言,是一個強大的文本分析工具
- 7.2.5 sed命令
- 7.3 文件傳輸類
- 7.3.1 prm--將一個工作由打印機貯列中移除
- 7.4 磁盤管理類
- 7.4.1 cd--切換當前工作目錄至 dirName(目錄參數)。
- 7.4.2 df--顯示目前在Linux系統上的文件系統的磁盤使用情況統計
- 7.4.3 dirs--顯示目錄記錄
- 7.4.5 du--顯示目錄或文件的大小
- 8 其他系統
- 8.1 Alpine Liunx
- 8.1.2 簡介
- 8.1.2 本地安裝
- 8.1.3 apk軟件包管理
- 8.1.4 配置ssh