
# DIY組件/頁面開發
第三方開發者可以開發DIY組件擴展裝修功能。
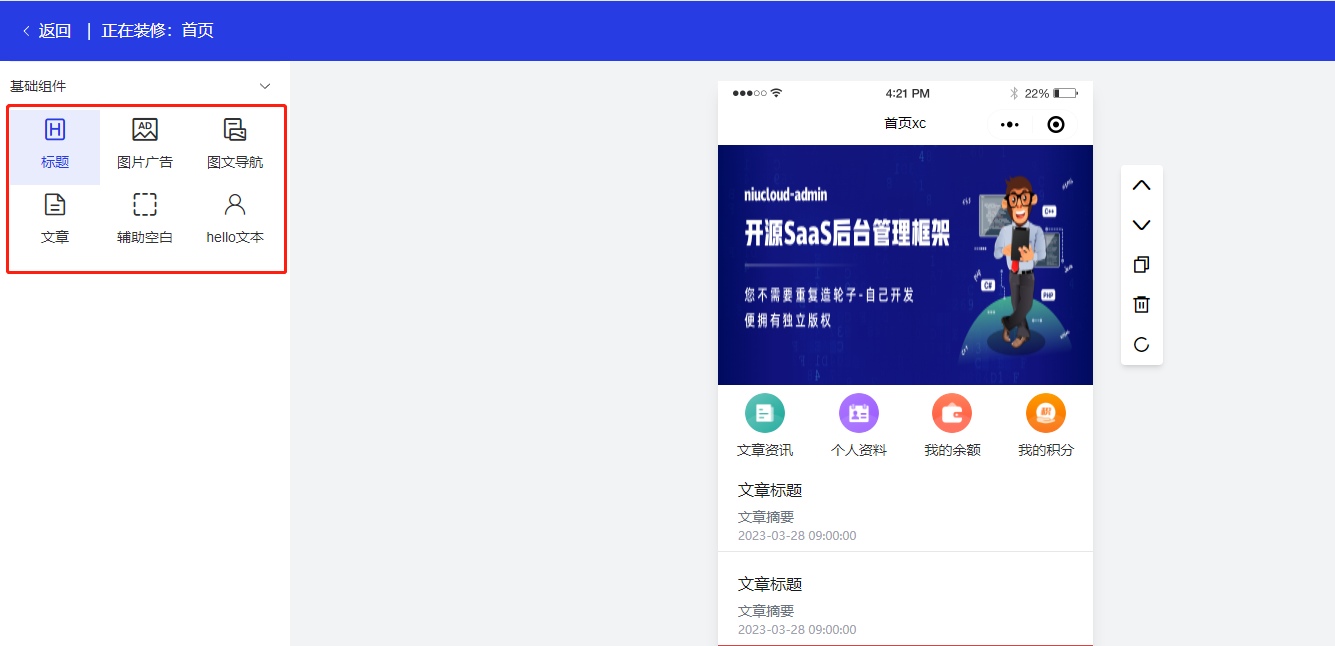
什么是DIY組件?我們把可以添加到自定義頁面上的每個小功能叫做組件
這些DIY小組件可以自己使用,也可以開放給其他用戶(開發者,最終用戶)使用。DIY組件的擴展一般是通過在第三方插件中自定義來實現。一個插件,可以是一個功能完備的業務系統,也可以是小到僅僅包括一個DIY小組件,或者幾個DIY頁面組件的小插件。
<br>
**開發DIY頁面組件步驟**
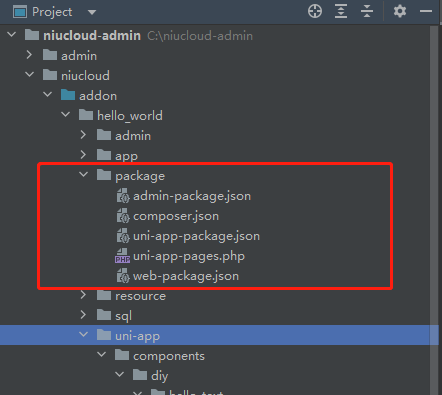
1. 建立一個自定義插件的目錄,位置在niucloud\addon\ 比如叫hello_world, 則最終組件根目錄就是niucloud\addon\hello_world
2. 在addon\hello_world\app\dict\diy目錄下,建立components.php文件(如果以上目錄不存在,則手工創建)
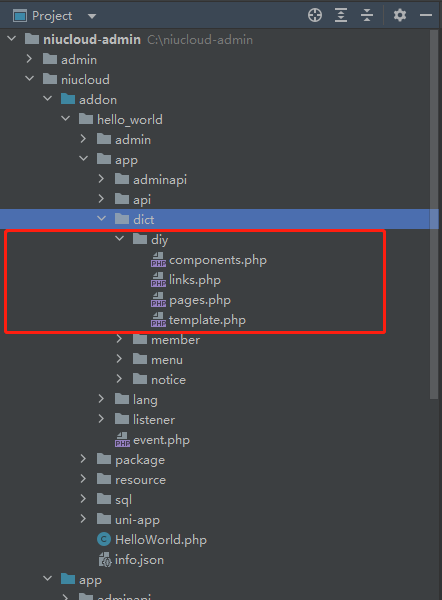
這里有幾個相關文件要說明一下
```
components.php DIY頁面組件的字典定義
links.php 超級鏈接的字典定義
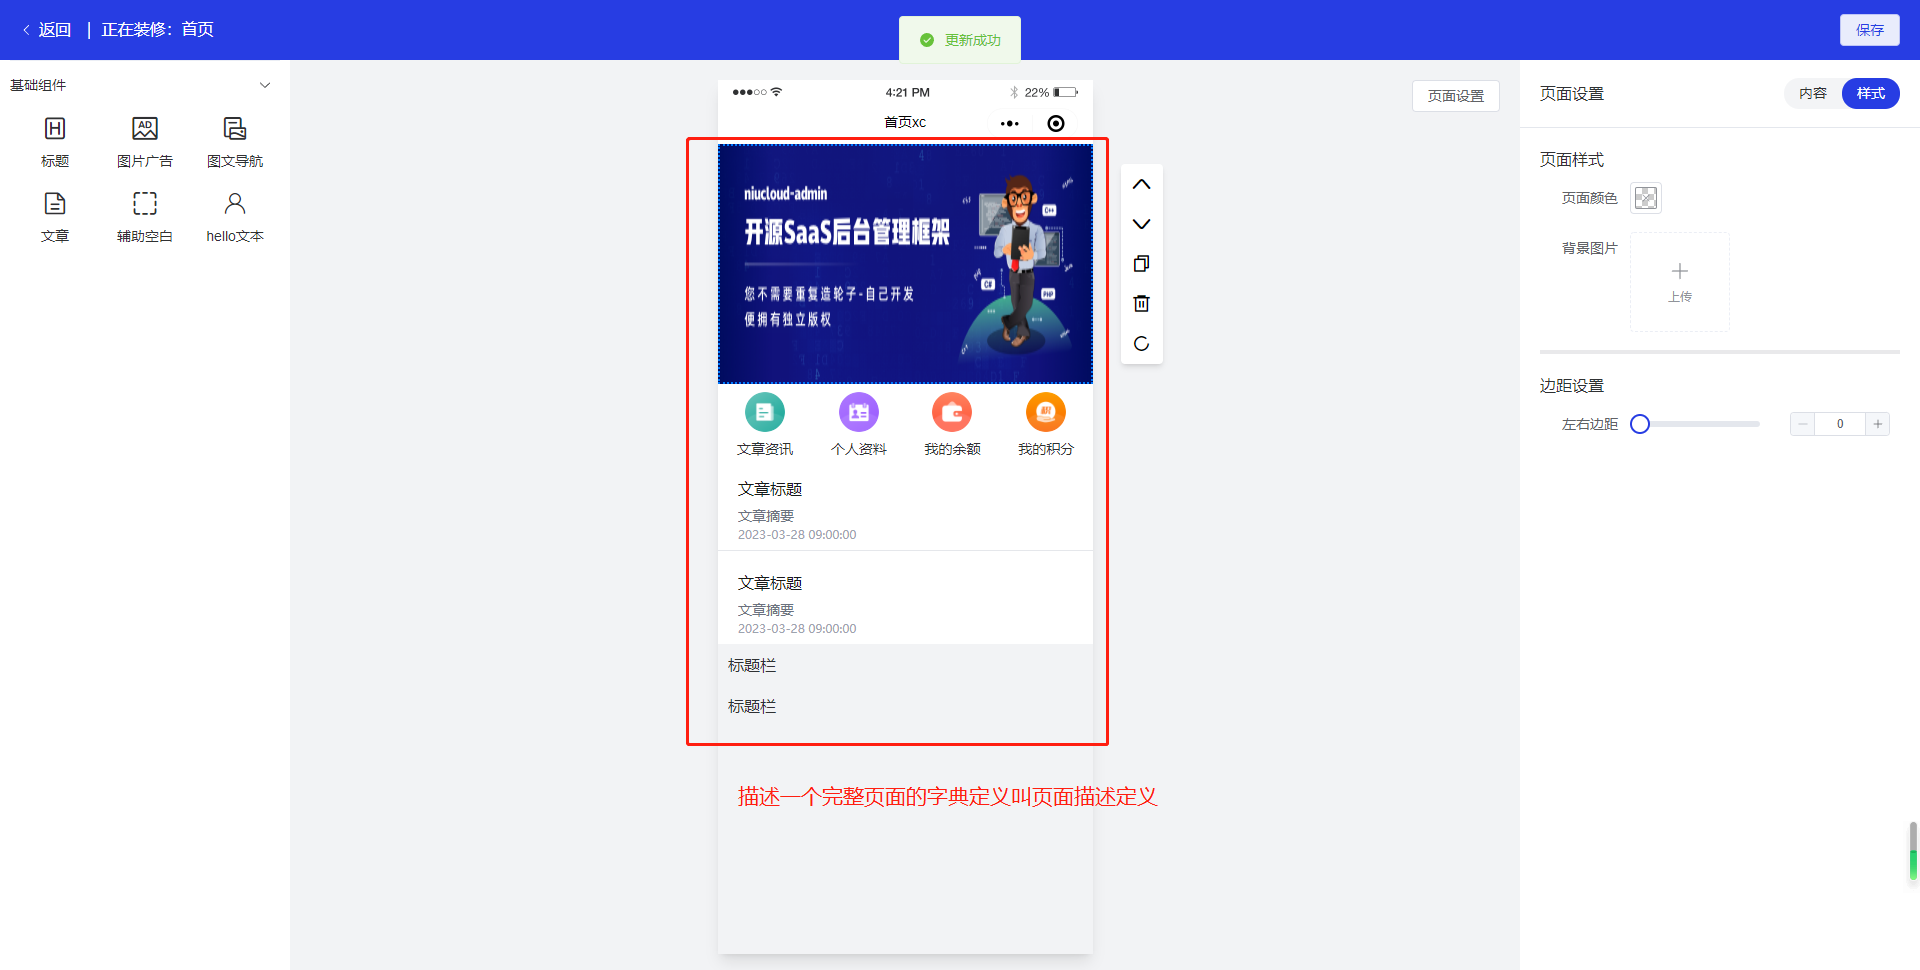
pages.php DIY頁面描述定義,也叫頁面數據定義
template.php DIY模版定義
```
打開components.php文件,進行編輯
```
return [
'BASIC' => [
'title' => get_lang('dict_diy.component_type_basic'),
'list' => [
'HelloText' => [
'title' => 'hello文本',
'icon' => 'iconfont-iconhuiyuanzhongxin',
'path' => 'edit-hello-text',
'support_page' => [],
'uses' => 0,
'sort' => 10007,
'value' => [
'height' => 20
],
],
],
],
];
```
結構說明:
BASIC為該組件需要放置的分類。BASIC默認為系統標準分類。用戶可以自定義分類,這個分類會在DIY頁面時,自動出現分類自己定義的分類名稱。
title節表示自己定義的組件希望放置的分類的名稱,下面的代碼是通過語言包來加載的(參考語言包的使用方法),開發者也可以直接書寫為'title' => '我寫的DIY組件'
~~~
'title' => get_lang('dict_diy.component_type_basics')
~~~
list節是一個數組結構。可以同時包括多個DIY組件。
這里HelloText就是我寫的組件的名字。
title 組件標題
icon 組件圖標
path 組件路徑(第5步驟文件的位置)
support_page 表示該組件可以在哪些DIY頁面模板出現并使用,如果是空表示任何自定義頁面都可以加載并使用該組件
uses 組件在頁面中添加的個數。當=0,頁面可以添加任意個該組件。當=1,頁面只能添加一個組件
sort 組件的排序號
**value** 定義組件的字段和參數
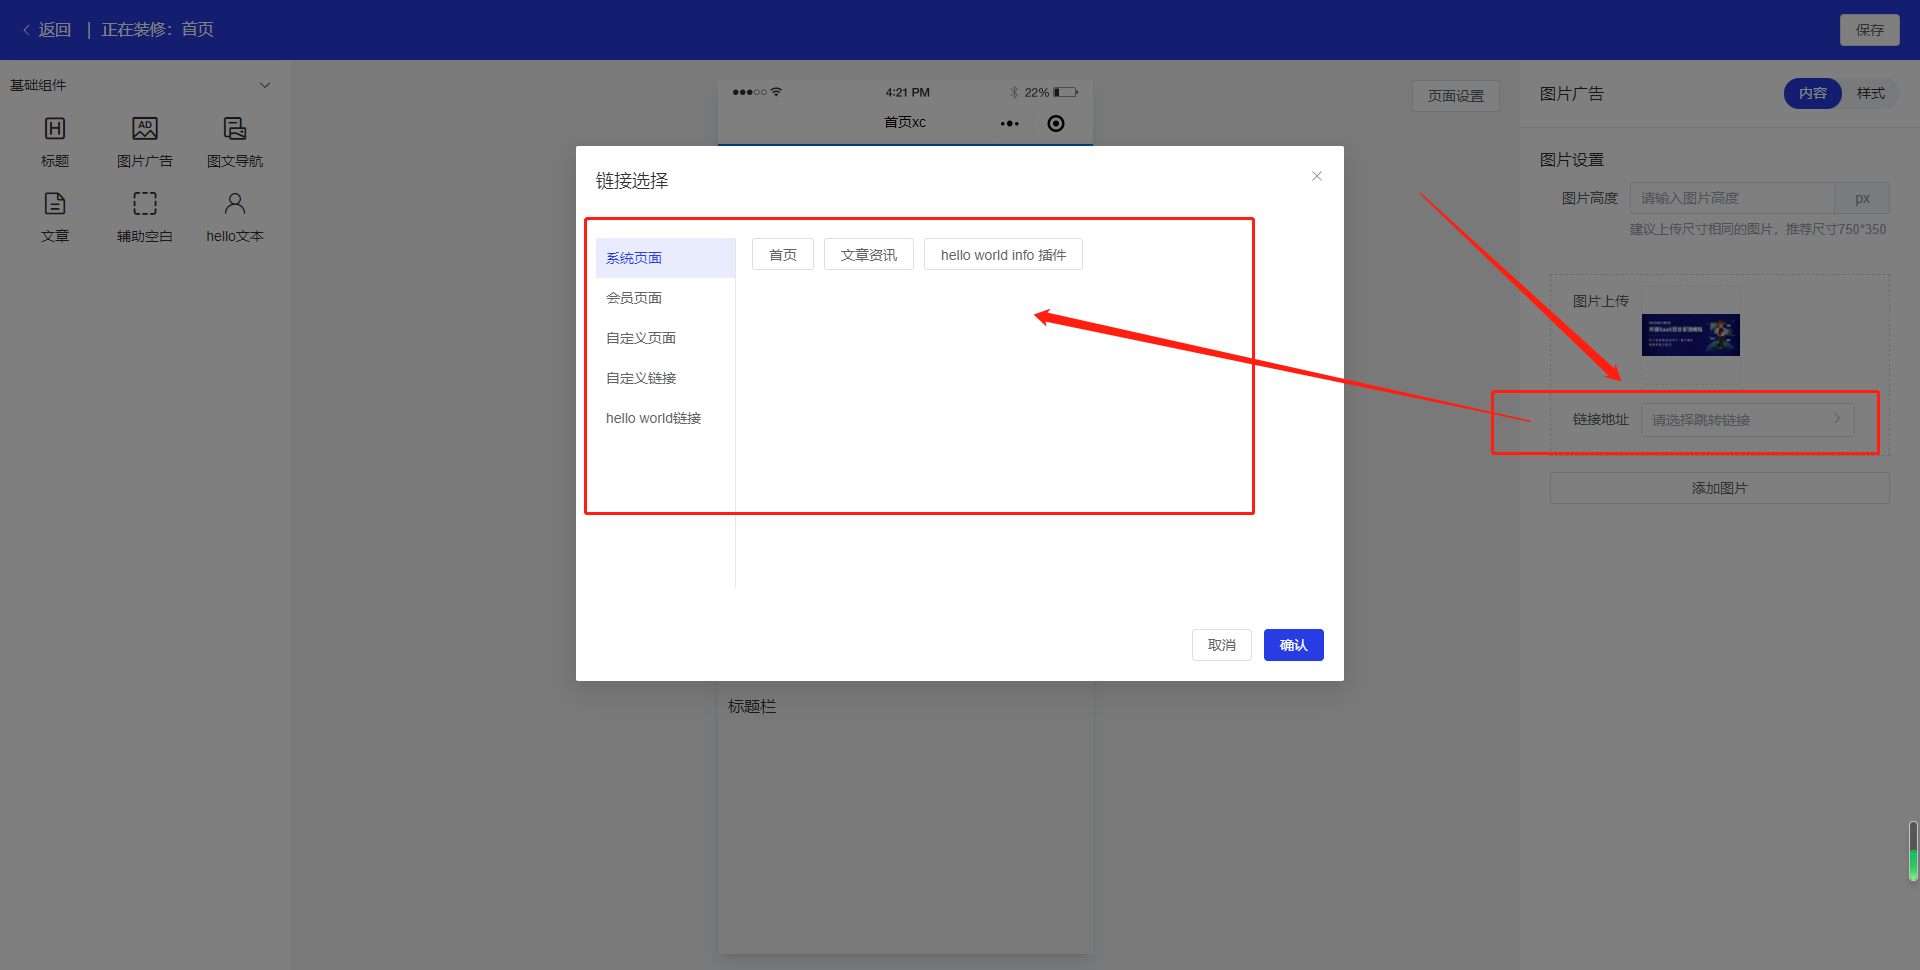
3. 您可能在組件開發時,希望添加一些超鏈接到系統中,供別的地方調用該組件的相關功能,則需要在addon\hello_world\app\dict\diy目錄下,建立links.php文件(如果以上目錄不存在,則手工創建)。如果您開發組件時,不需要這一項,則這個步驟可以省略。
編輯文件內容
```
return [
'SYSTEM_LINK' => [
'title' => get_lang('dict_diy.system_link'),
'child_list' => [
[
'name' => 'HELLO_WORLD_INFO', //頁面名稱
'title' => get_lang('dict_diy.hello_world_info'), //頁面標題
'url' => '/pages/hello_world/info', //頁面的view地址
'is_share' => 1 //是否可以分享
],
]
],
'HELLO_WORLD_LINK' => [
'title' => get_lang('dict_diy.hello_world_link'),
'child_list' => [
[
'name' => 'HELLO_WORLD_INDEX',
'title' => get_lang('dict_diy.hello_world_index'),
'url' => '/pages/hello_world/index',
'is_share' => 1
],
]
],
];
```
這樣,niucloud-admin框架安裝本插件時,會自動加載您定義好的超級鏈接。別的組件有需要引用超級鏈接的地方,會自動出現您寫入的超級鏈接。
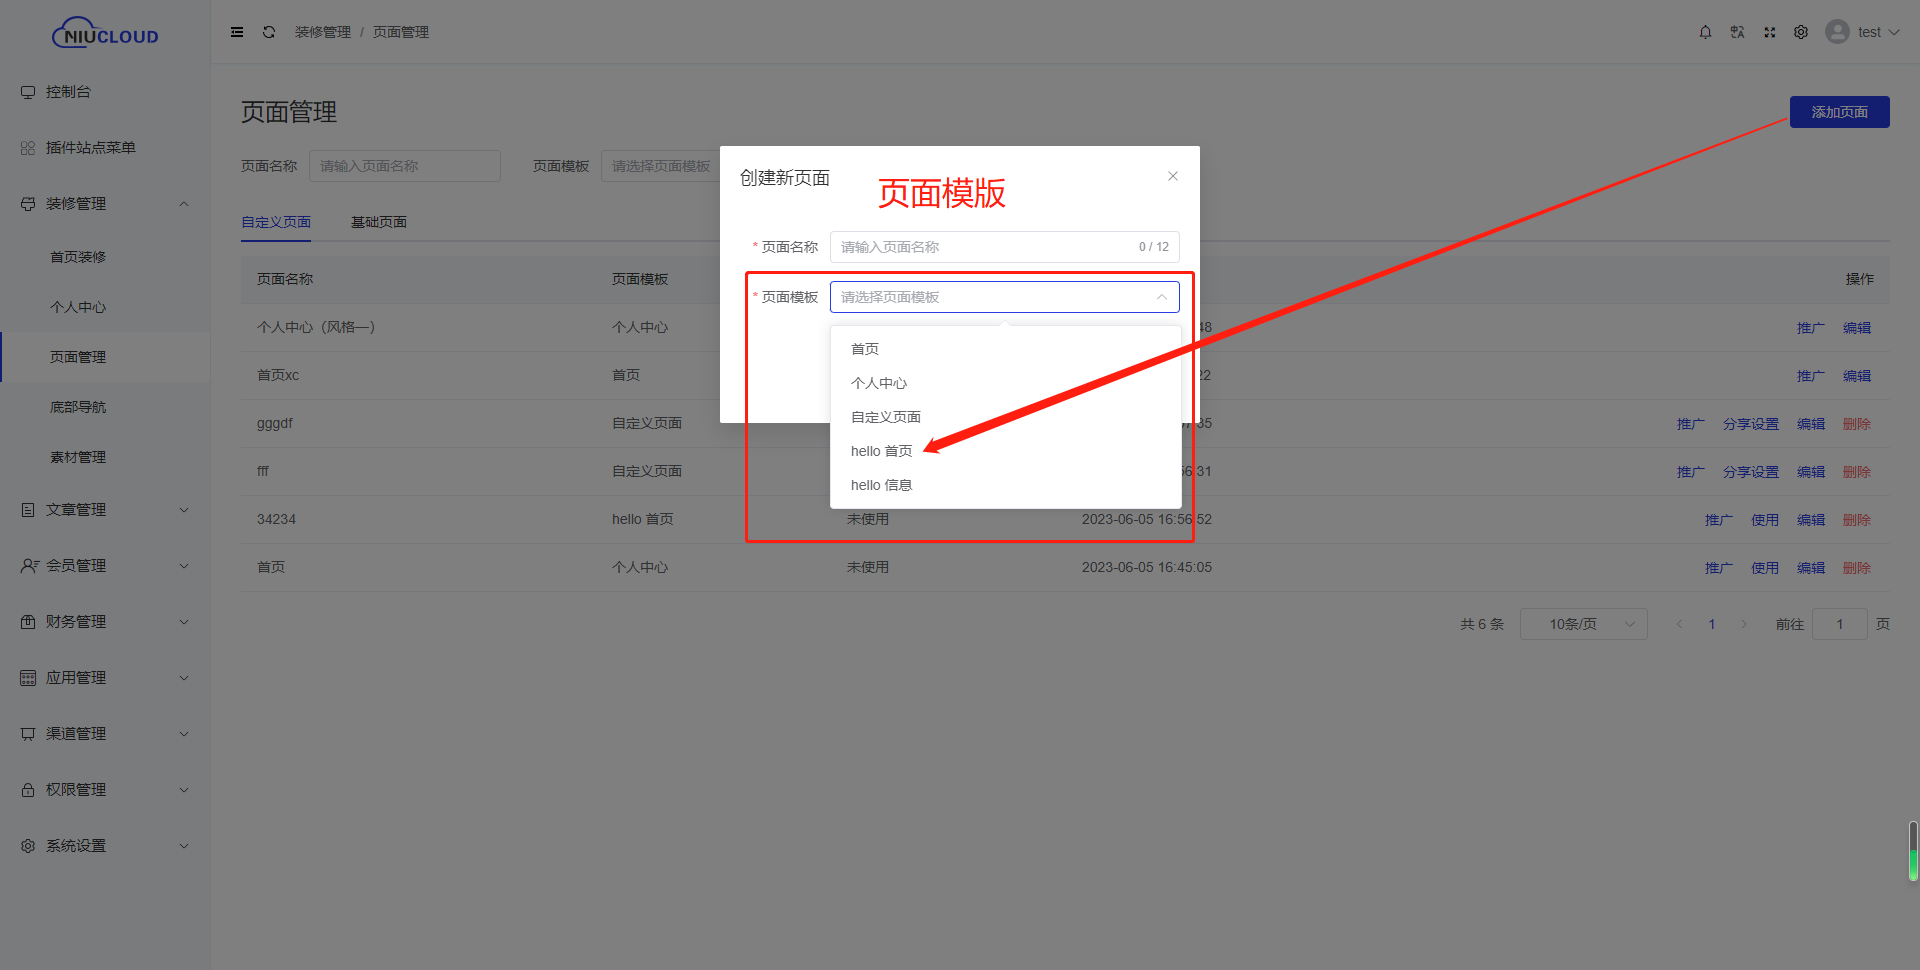
4. 您可能在組件開發時,希望添加一些自定義頁面模板到系統中,則需要在addon\hello_world\app\dict\diy目錄下,建立template.php文件(如果以上目錄不存在,則手工創建)。如果您開發組件時,不需要這一項,則這個步驟可以省略。對于實際的一個功能,正常來說,大部分頁面是固定頁面的開發,個別頁面做成自定義開放給使用者配置。也可以一個系統完全是固定頁面組成。或者同一個頁面可以同時支持自定義配置,也包括固定頁面,供使用者選擇使用。niucloud-admin框架全部支持。
編輯文件內容
```
return [
'DIY_HELLO_WORLD_INDEX' => [
'title' => get_lang('dict_diy.page_hello_world_index'),
'page' => 'pages/hello_world/index',
],
'DIY_HELLO_WORLD_INFO' => [
'title' => get_lang('dict_diy.page_hello_world_info'),
'page' => 'pages/hello_world/info',
],
];
```
這樣,niucloud-admin框架安裝本插件時,會自動加載您定義好的自定義頁面模板。
5. 您可能在組件開發時,希望添加一些自定義頁面數據到系統中,則需要在addon\myctl\app\dict\diy目錄下,建立pages.php文件(如果以上目錄不存在,則手工創建)。如果您開發組件時,不需要這一項,則這個步驟可以省略。
編輯文件內容
```
return [
'DIY_INDEX' => [
'hello_world_index' => [ // 頁面標識
"title" => "hello world 首頁", // 頁面名稱
'cover' => '', // 頁面封面圖
'preview' => '', // 頁面預覽圖
'desc' => '', // 頁面描述
'mode' => 'diy', // 頁面模式:diy:自定義,fixed:固定
// 頁面數據源
"data" => [
"global" => [
"title" => "hello world首頁頁面",
"pageBgColor" => "#F8F8F8",
'bgUrl' => '',
'imgWidth' => '',
'imgHeight' => '',
"bottomTabBarSwitch" => true,
"template" => [
'textColor' => "#303133",
"pageBgColor" => "",
"componentBgColor" => "",
"topRounded" => 0,
"bottomRounded" => 0,
"elementBgColor" => "",
"topElementRounded" => 0,
"bottomElementRounded" => 0,
"margin" => [
"top" => 0,
"bottom" => 0,
"both" => 0
]
],
'topStatusBar' => [
'bgColor' => "#ffffff",
'isTransparent' => false,
'isShow' => true,
'style' => 'style-1',
'textColor' => "#333333",
'textAlign' => 'center',
],
'popWindow' => [
'imgUrl' => "",
'imgWidth' => '',
'imgHeight' => '',
'count' => -1,
'show' => 0,
'link' => [
'name' => ""
],
]
],
"value" => [
[
"path" => "edit-image-ads",
"id" => "4640ld4k1pu0",
"componentName" => "ImageAds",
"componentTitle" => "圖片廣告",
"uses" => 0,
"list" => [
[
"link" => [
"name" => ""
],
"imageUrl" => "static/resource/images/diy/banner.png",
"imgWidth" => 750,
"imgHeight" => 320,
"id" => "2xuytp7622w0"
]
],
"ignore" => [],
"pageBgColor" => "",
"componentBgColor" => "",
"topRounded" => 0,
"bottomRounded" => 0,
"elementBgColor" => "",
"topElementRounded" => 0,
"bottomElementRounded" => 0,
"margin" => [
"top" => 0,
"bottom" => 0,
"both" => 0
]
]
]
]
]
]
];
```
這樣,niucloud-admin框架安裝本插件時,會自動加載您定義好的自定義頁面數據。
通過上面的操作,這個后端的組件開發配置就都準備好了。如果這個時候把插件安裝,就會發現在編輯頁面時,您開發的組件已經顯示在組件列表中了。只是沒有任何功能。
6.開發組件后臺設置功能
在插件的目錄addon\hello_world\admin\src\views\diy\components\,建立edit-hello-text.vue文件。
編輯該文件
```
<template>
<!-- 內容 -->
<div class="content-wrap" v-show="diyStore.editTab == 'content'">
<div class="edit-attr-item-wrap">
<h3 class="mb-[10px]">文本設置</h3>
<el-form label-width="80px" class="px-[10px]">
<el-form-item :label="t('blankHeight')">
<el-slider v-model="diyStore.editComponent.height" show-input size="small" class="ml-[10px] horz-blank-slider"/>
</el-form-item>
</el-form>
</div>
</div>
<!-- 樣式 -->
<div class="style-wrap" v-show="diyStore.editTab == 'style'">
<slot name="style"></slot>
</div>
</template>
<script lang="ts" setup>
import {t} from '@/lang'
import useDiyStore from '@/stores/modules/diy'
const diyStore = useDiyStore()
diyStore.editComponent.ignore = []; // 忽略公共屬性
defineExpose({})
</script>
<style lang="scss">
.horz-blank-slider {
.el-slider__input {
width: 100px;
}
}
</style>
<style lang="scss" scoped></style>
```
7. 接下來就是開發具體的組件的前臺功能 。組件的代碼文件放置在addon\uni-app\components\diy\
下面的代碼為具體的組件的功能代碼
```
<template>
<view :style="warpCss">
演示插件文本——自定義組件
</view>
</template>
<script setup lang="ts">
import { computed } from 'vue';
import useDiyStore from '@/stores/diy';
const props = defineProps(['component', 'index']);
const diyStore = useDiyStore();
const diyComponent = computed(() => {
if (diyStore.mode == 'decorate') {
return diyStore.value[props.index];
} else {
return props.component;
}
})
const warpCss = computed(() => {
var style = '';
style += 'background-color:' + diyComponent.value.componentBgColor + ';';
style += 'border-top-left-radius:' + diyComponent.value.topRounded * 2 + 'rpx;';
style += 'border-top-right-radius:' + diyComponent.value.topRounded * 2 + 'rpx;';
style += 'border-bottom-left-radius:' + diyComponent.value.bottomRounded * 2 + 'rpx;';
style += 'border-bottom-right-radius:' + diyComponent.value.bottomRounded * 2 + 'rpx;';
return style;
})
</script>
<style></style>
```
到此,一個自定義的組件就開發完了。
<br>
*****
<br>
接下來講解一下package目錄下面幾個文件的功能和作用
<br>
 <br>
**`admin-package.json`** 作用是插件配置的需要,在niucloud-admin框架基礎上增加的擴展,插件安裝時會合并到系統admin下面的package.json,然后系統執行npm install自動安裝
**`composer.json`** 作用是在系統框架composer基礎上增加的依賴,插件安裝時會合并到系統的服務端niucloud\composer.json,然后系統執行composer update命令自動安裝
**`uni-app-package.json`** 作用和uni-app端的 uni-app\package.json一樣。表示插件開發中前端uni-app增加的擴展,插件安裝時會合并到系統uni-app前端,然后系統執行npm install自動安裝
**`uni-app-pages.json`** 插件開發中,uni-app前端定義的所有的頁面模版。插件安裝時,會自動復制到uni-app\pages路徑下。niucloud-admin框架的設計,沒有自動掃描文件,自動復制,這樣設計的意義是,有些頁面,需要條件編譯,有些頁面,需要編譯后做一些特殊的處理,所以沒有設計為自動掃描復制的機制。切記!沒有寫入這個配置的頁面,會在安裝時導致文件缺失,一定要把頁面全部寫入這個文件中
**`web-package.json`** 作用和web端的 web\package.json一樣。表示插件開發中前端web增加的擴展,插件安裝時會合并到系統web前端,然后系統執行npm install自動安裝
- 源碼下載
- 安裝部署
- 環境要求
- 安裝視頻教程
- 寶塔部署
- 授權綁定
- 二次開發須知
- 技術棧
- 目錄結構
- 命名規范
- 二次開發指導
- 二次開發環境搭建步驟
- 二次開發注意事項
- 單站和Saas模式開發
- 插件結構描述
- MENU開發
- DIY組件/頁面開發
- 自定義手機端DIY裝修頁面
- Route 路由處理
- Services中的core文件夾
- 自定義站點管理端控制臺頁面樣式
- 調用素材資源
- Resource資源文件
- 引入圖標ICON
- SMS發送短信開發
- Job 消息隊列和計劃任務
- 消息隊列
- 計劃任務開發
- 生產環境編譯打包處理步驟
- 生產環境搭建步驟
- 插件安裝時npm,composer檢測不可用問題處理
- 上傳圖片大小限制修改
- 插件uniapp開發
- 菜單語言包
- 插件打包
- 插件內測在線升級
- 自定義端口開發
- 如何開發自定義布局后臺布局
- 二次開發應用插件視頻教程
- 二次開發安裝視頻教程
- 準備工作與創建插件
- 插件目錄整體說明
- 插件admin目錄
- 插件app目錄說明(adminapi、api、驗證器)
- 插件app目錄(dict、job)
- 插件app目錄說明(lang、listener)
- 插件app目錄說明(model、service)
- 插件uniapp目錄說明
- 插件開發之后臺功能開發(代碼生成器)
- 插件開發之uniapp功能開發(api)第一節
- 插件開發之uniapp功能開發(api)第二節
- 插件開發之uniapp功能開發(api)第三節
- 插件安裝與打包原理
- 消息隊列開發
- 計劃任務開發
- DIY組件和自定義頁面裝修開發
- 支付接口開發
- 插件升級包打包流程以及云編譯功能
- 常見問題
- 怎么添加菜單,添加了菜單不出現怎么回事
- 怎么配置跨域的問題
- 站點site端(租戶端、商家端)和saas管理端(平臺端)究竟啥意思,有啥區別
- 框架中是有訂單表order,假如開發一個商城插件,請問商城的訂單數據是不是重新搞一個訂單表shop_order
- 有些支付平臺是綁定回調唯一網址或目錄,如果有幾個開發者開發插件都有支付那這塊怎么解決?
- 站點過期,可以登錄,這樣對嗎?
- 計劃任務怎么啟動啊
- Git多分支開發,切換分支
- 安裝應用出現is_dir():報錯處理方案
- 綁定授權時出現“請求來源產品與授權產品不一致”解決方案
- “未找到admin源碼所在目錄”的解決方案
- 頁面裝修本地開發環境配置
- 接口請求錯誤處理方案
- 未獲取到授權信息問題處理方案
- 騰訊地圖配置
- 請求超時問題處理方案
- 下載應用時提示找不到zip解決方案
- 怎么關閉開發調試模式
- 獲取數據失敗問題處理方案
- 框架安裝后,訪問域名無法進入admin端(多數發生在本地)
- 底部導航失效問題
- 開放平臺小程序審核通過發布失敗問題
- 先升級插件后升級框架,導致云編譯報debounce的錯誤
- 微信公眾號自動回復不通
- 修改訪問域名默認跳轉端口
- 插件與框架的兼容問題處理
- 升級提示mkdir()處理方案
- 云編譯時node.js內存不足導致內存溢出處理方案
- 報錯Allowed memory size of ** bytes exhausted (tried to allocate ** bytes)處理方法
- 代碼生成器
- 設計數據表
- 導入數據表
- 添加字段
- 代碼生成
- 效果預覽
- niucloud (服務端)
- 服務端目錄結構
- 整體運行流程
- 入口文件
- 模塊
- 中間件
- 控制器
- 路由
- 模型類
- 服務類
- 驗證類
- 消息隊列
- 開發消息隊列
- 多語言
- 裝載器
- 短信發送
- 上傳文件
- 第三方支付
- 第三方登錄
- 數據字典裝載器
- 打印
- 事件
- 消息提醒(模版消息)
- 數據字典
- admin (后臺管理端)
- 準備工作
- 新手入門
- 目錄結構
- 系統配置
- 路由
- 接口
- 管理端編譯上傳
- uni-app(手機端前端)
- 準備工作
- 前端目錄結構
- Hbuilder開發
- 發行h5
- 運行uniapp
- 發行uniapp
- Visual Studio Code開發
- 發行 uniapp
- 運行 uniapp
- 配置項
- 路由
- 接口
- 分包建議
- 手機端編譯
- 微信小程序編譯上傳
- web端(PC前端)
- 準備工作
- 目錄結構
- 代碼運行
- 路由
- 接口
- 黑暗主題
- web端打包上線
- api接口
- 配置手冊
- 阿里云oss云存儲配置
- 三方開放平臺小程序托管
- 計劃任務配置
- 站點域名配置
- 小票打印配置
- 電子面單配置
- 微信小程序客服配置
- 微信打款配置