
`pytest-bdd`和`behave`是 Python 的兩個流行的 BDD 測試框架,兩者都可以用來編寫用戶故事和可執行的測試用例,
具體選擇哪一個則需要根據實際的項目狀況來看。
先簡單看一下兩者的功能:
**pytest-bdd**
1. 基于`pytest`測試框架,可以與`pytest`的其他功能(例如 fixtures)一起使用。
2. 提供了一種緊湊的步驟定義方式,可以通過裝飾器定義并重復使用步驟。
3. 支持參數化的測試,這樣可以用同一組步驟進行多組數據的測試。
**behave**
1. 基于 Python 的`unittest`測試框架。
2. `behave`的步驟文件更加接近純文本形式,對非編程人員更友好。
3. 支持使用`environment.py`文件來定義在整個 test suite 運行前后需要進行的操作。
## hehave
以下是`behave`的一些優點和特性:
1. **適用于非技術團隊成員**:使用 Gherkin 語言,可以撰寫更接近自然語言的測試場景描述,使得產品經理、商業分析師等非技術團隊成員也能夠理解、修改或編寫測試場景。
2. **環境控制**:`behave`提供了在測試運行前后設置和清理環境的功能,例如數據庫初始化或數據清理等,只需要在`environment.py`文件里定義相應的函數即可。
3. **可讀性強和可維護性高**:`behave`強調的是實現從用戶角度去描述系統行為的測試,這使得測試和實際用戶需求更加貼合,增加了測試的可讀性。而且將測試用例編寫為人類可讀的語言,可以提高代碼的可維護性。
4. **創造可共享的步驟**:可以為常用的操作創建可重用的步驟,這樣就能寫出更加簡潔、易于維護的測試代碼。
5. **對標/兼容 Cucumber**:`behave`的 Gherkin 語言實現與寬廣使用的 Cucumber 測試框架非常接近,這一點在遷移到或從 Cucumber 環境中遷出時會很有用。
6. **與其他 Python 測試框架相容**:`behave`可與`unittest`、`doctest`、`nose`、`py.test`等 Python 測試工具完美集成。
綜上所述,`behave`提供了一種高度可讀、可共享、適合大規模測試及非技術團隊成員的 BDD 測試工具。
## pytest-bdd 與 behave的比較
`behave`和`pytest-bdd`都是 Python 下常用的為支持 BDD(行為驅動開發)流程而設計的測試框架,它們都采用`.feature`文件來描述行為,并使用相似的 Gherkin 語言語法進行描述。它們的`.feature`文件的格式大致上是相同的,但是在實際的使用和處理上可能會有一些細微差別。
以下是`behave`和`pytest-bdd`來處理`.feature`文件的一些細節差異:
* **Scenario 參數化**:`behave`使用`Scenario Outline`語法來實現參數化場景,而`pytest-bdd`使用`Scenarios`來實現參數化場景。在`behave`中,你必須定義 Examples 表格并在其中提供參數值, 而在`pytest-bdd`中,你可以簡單地用`Scenarios`讀取一個外部`.feature`文件。
* **裝飾器參數**:在`pytest-bdd`中,步驟裝飾器(例如`@given`、`@when`和`@then`)可以接受一個可選的解析器,用于從步驟文本中捕獲值。這樣,分析器可以為已經定義的步驟參數提供多個場景。
其他大部分方面,`behave`和`pytest-bdd`都是非常相似的,例如都支持`Given`、`When`和`Then`這樣的基本步驟,都允許在`Background`段落中定義在每個場景前都要運行的步驟,仍然允許你創建可重用的步驟定義。
綜上,`behave`和`pytest-bdd`處理`.feature`文件的方式非常相似,雖然在某些特性和實現上有些許差別。選哪個更多取決于個人或團隊需求。
## pytest-bdd 與 behave的實例比較
接下來以一個具體的加法運算器為實例,初步演示兩者使用上的差異。
首先, 兩者的規格文件基本相同, 這里的文件名是 :calculator.feature,內容如下:
```
Feature: Addition
Scenario: Add two numbers
Given I have a calculator
When I enter "1" and "2"
Then the result should be "3"
```
規格很簡單, 就是驗證加法, 1+2 =3。
主要的差別是兩者在測試代碼上的差異。
使用pytest-bdd編寫的測試代碼的文件名是 test_calculator.py, 內容如下:
```
import sys
import os
import pytest
#sys.path.append('D:/devworkspace/python-ency/chp3/tests/bdd/util')
sys.path.append(os.path.join(os.path.dirname(os.path.dirname(os.path.dirname(__file__))), 'util'))
from calculator import Calculator
from pytest_bdd import scenario, given, when, then, parsers
@scenario('../features/calculator.feature','Add two numbers')
def test_add():
print(sys.path.append(os.path.dirname(os.path.dirname(__file__))+'util'))
pass
@pytest.fixture
@given("I have a calculator")
def calculator():
return Calculator()
@when(parsers.parse('I enter "{a}" and "{b}"'))
def enter_numbers(calculator, a, b):
calculator.a = int(a)
calculator.b = int(b)
@then(parsers.parse('the result should be "{result}"'))
def verify_result(calculator, result):
assert calculator.add(calculator.a, calculator.b) == int(result)
```
* pytest-bdd要求測試場景的函數和名稱需要以test_開頭, 步驟函數沒有特定的要求,關于 pytest-bdd的更多命名的規范可以參考: [ 基于pytest-bdd的項目目錄結構和命名規范](https://blog.csdn.net/oscar999/article/details/134452435)
使用behave編寫的測試代碼的文件名同樣是 test_calculator.py, 內容如下:
```
import sys
import os
sys.path.append(os.path.join(os.path.dirname(os.path.dirname(os.path.dirname(os.path.dirname(__file__)))), 'util'))
from behave import given, when, then
from calculator import Calculator
@given('I have a calculator')
def step_impl(context):
context.calc = Calculator()
@when('I enter "{num1}" and "{num2}"')
def step_impl(context, num1, num2):
context.result = context.calc.add(int(num1), int(num2))
@then('the result should be "{expected_result}"')
def step_impl(context, expected_result):
assert context.result == int(expected_result)
```
簡單對比一下兩者的測試代碼區別:
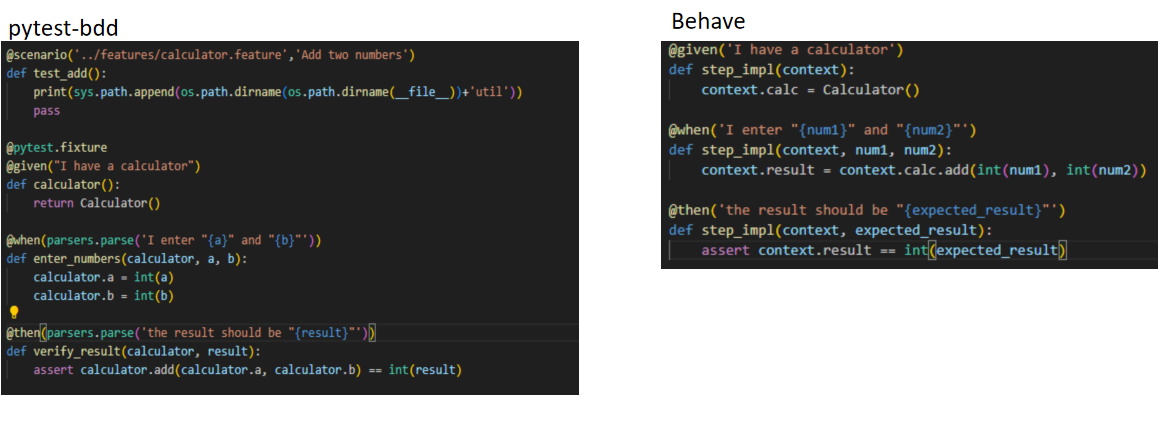
1. Beave 的寫法相比更加簡潔
2. pytest-bdd 可以手動關聯測試場景,看上去靈活度更高
## 總結
這兩個框架都有其優點和特性,選擇哪一個主要取決于特定需求。
* 如果你已經在使用`pytest`,并且希望以最少的學習曲線使用 BDD,那么`pytest-bdd`可能是更好的選擇。
* 另一方面,如果你希望編寫的測試代碼更接近自然語言,并且適合非技術團隊成員閱讀和修改,那么`behave`可能是更好的選擇。
*****
這是一個使用 pytest-bdd 編寫的簡單計算器示例。該示例包含以下功能:
- 支持加法、減法、乘法和除法操作。
- 支持連續計算。
- 支持清空操作。
## 安裝 pytest-bdd
依賴于 `pytest-bdd` 模塊,可以使用以下命令進行安裝:
```
pip install pytest-bdd
```
## 編寫特性文件
創建一個名為 `calculator.feature` 的特性文件,編寫以下內容:
```gherkin
Feature: Calculator
Scenario: Addition operation
Given I have entered 50 into the calculator
And I have entered 70 into the calculator
When I press add
Then the result should be 120 on the screen
Scenario: Subtraction operation
Given I have entered 70 into the calculator
And I have entered 50 into the calculator
When I press subtract
Then the result should be 20 on the screen
Scenario: Multiplication operation
Given I have entered 10 into the calculator
And I have entered 5 into the calculator
When I press multiply
Then the result should be 50 on the screen
Scenario: Division operation
Given I have entered 50 into the calculator
And I have entered 5 into the calculator
When I press divide
Then the result should be 10 on the screen
Scenario: Multiple operations
Given I have entered 5 into the calculator
And I have entered 10 into the calculator
When I press multiply
And I have entered 2 into the calculator
When I press add
And I have entered 5 into the calculator
When I press subtract
Then the result should be 20 on the screen
Scenario: Clear operation
Given I have entered 5 into the calculator
And I have entered 10 into the calculator
When I press clear
Then the result should be 0 on the screen
```
## 編寫步驟實現
創建一個名為 `test_calculator.py` 的文件,編寫以下內容:
```python
import pytest
from calculator import Calculator
@pytest.fixture(scope="function")
def calculator():
return Calculator()
@given("I have entered <x> into the calculator")
def step_impl(calculator, x):
calculator.enter(int(x))
@when("I press add")
def step_impl(calculator):
calculator.add()
@when("I press subtract")
def step_impl(calculator):
calculator.subtract()
@when("I press multiply")
def step_impl(calculator):
calculator.multiply()
@when("I press divide")
def step_impl(calculator):
calculator.divide()
@when("I press clear")
def step_impl(calculator):
calculator.clear()
@then("the result should be <y> on the screen")
def step_impl(calculator, y):
assert calculator.result == int(y)
```
## 編寫計算器類
創建一個名為 `calculator.py` 的文件,編寫以下內容:
```python
class Calculator:
def __init__(self):
self.result = 0
def enter(self, num):
self.result = num
def add(self):
num = int(input())
self.result += num
def subtract(self):
num = int(input())
self.result -= num
def multiply(self):
num = int(input())
self.result *= num
def divide(self):
num = int(input())
self.result /= num
def clear(self):
self.result = 0
```
## 運行測試
最后,使用以下命令運行測試:
```
pytest
```
測試結果:
```bash
collected 6 items
calculator.feature ...... [100%]
======================================================= 6 passed in 0.02s =======================================================
```
這意味著所有測試成功通過。
可以注意到,每個特性都經過了測試,且是使用自然語言編寫的。這使得測試更易于閱讀和理解。
## 目錄結構
在使用`pytest-bdd`進行 BDD 測試時,測試文件的組織和目錄結構通常如下:
~~~
Copy code/myproject
/features
/steps
__init__.py
test_steps.py
__init__.py
test.feature
/myproject
__init__.py
app.py
test_app.py
pytest.ini
~~~
這是一個基礎的目錄結構,每部分的說明如下:
1. `/myproject/features`目錄:這是所有的`.feature`文件所在地。`.feature`文件采用 Gherkin 語法來描述需求和場景。通常,你可能會按照項目的不同模塊或者功能來分別創建對應的`.feature`文件。
2. `/myproject/features/steps`目錄:這是用 Python 所編寫的步驟定義文件所在地。這些步驟定義將描述`.feature`文件中所給出的各個步驟應該如何執行。
3. `/myproject/myproject`目錄:這里是項目的代碼部分。
4. `test_app.py`文件:你的其他`pytest`測試可能會寫在這里。
5. `pytest.ini`文件:這是`pytest`的配置文件。
可以根據實際情況調整上述目錄結構,例如你可能需要創建更多的子目錄或者文件,來適應你的項目結構。
##
## aa
* https://www.yii666.com/blog/621694.html
* http://www.cuketest.com/zh-cn/cucumber/pytest_bdd
* https://github.com/pytest-dev/pytest-bdd
* https://pytest-bdd.readthedocs.io/en/stable/
- 前言
- 1.入門篇
- Python介紹
- 安裝與使用
- Python開發利器之VS Code
- 模塊安裝
- 命令行
- 一次Python無法安裝模塊的問題探索與解決之旅
- 命令運行
- Conda
- 下載地址
- 2.基礎篇
- 基礎語法
- 輸入與輸出
- with as的用法
- 注釋
- Python命令行參數
- 編碼
- 變量類型
- 列表遍歷
- 運算符
- 表達式語句
- 條件
- 循環
- 日期和時間
- 函數
- 高級語法
- @符號-裝飾器
- 模塊和包
- name
- init.py
- 錯誤和異常
- 面向對象
- 3.專題篇
- 常用功能
- Python 字符串連接
- python web
- Python CGI編程
- Python OAuth2
- 認證 Flask-HTTPAuth
- 常用命令
- 內置函數
- dir()
- print(f)
- 標準模塊
- sys
- pickle-數據序列化
- os
- IO(輸入輸出)
- 鍵盤輸入
- 文件讀寫
- 測試
- Python測試框架之pytest快速入門
- pytest-bdd快速示例和問題解決
- 基于pytest-bdd的項目目錄結構和命名規范
- python BDD 的相關概念
- Behave介紹和快速示例
- Python BDD之Behave測試報告
- Python BDD 框架比較之 pytest-bdd vs behave
- pytest進階
- Flask + pytest測試
- 參考網址
- pytest-bdd進階
- hehave進階
- 測試路徑
- python + selunium
- HTML 根據多層CSS 查找元素
- 等待執行
- 使用text 查找 span
- pytest如何在控制臺輸出
- 4.問題篇
- pip pip3 及區別
- TypeError: can only concatenate str (not "NoneType") to str
- 5.實戰篇
- matplotlib-繪圖包
- 導入類
- 命名規范
- 模塊查找
- 6.進階篇
- Flask
- Flask介紹
- Flask擴展模塊
- Flask-Login
- 問題
- Jinja2
- Flask-RESTful
- Flask-JWT-Extended
- WSGI
- Flask-SQLAlchemy
- 部署
- Flask VS Django
- Flask Web
- Flask + Vue
- Flask實戰
- Flask 標準目錄結構
- Blueprints
- 參考
- FastAPI 測試
- https 證書 Caused by SSLError(SSLCertVerificationError(1, '[SSL: CERTIFICATE_VERIFY_FAILED] certificate verify failed: unable to get local issuer certificate