
**`MQTT`** 全稱為 Message Queuing Telemetry Transport(消息隊列遙測傳輸)是一種基于**發布/訂閱**范式的“輕量級”消息協議,由 IBM 發布。
----
[TOC]
----
## 概述
* MQTT 可以被解釋為一種低開銷,低帶寬占用的即時通訊協議,可以用極少的代碼和帶寬的為連接遠程設備提供實時可靠的消息服務,它適用于硬件性能低下的遠程設備以及網絡狀況糟糕的環境下,因此 MQTT 協議在 IoT(Internet of things,物聯網),小型設備應用,移動應用等方面有較廣泛的應用。
* IoT 設備要運作,就必須連接到互聯網,設備才能相互協作,以及與后端服務協同工作。而互聯網的基礎網絡協議是 TCP/IP,MQTT 協議是基于 TCP/IP 協議棧而構建的,因此它已經慢慢的已經成為了 IoT 通訊的標準。
MQTT 簡單特點介紹
遙測傳輸 (MQTT) 是輕量級基于代理的發布/訂閱的消息傳輸協議,設計思想是開放、簡單、輕量、易于實現。這些特點使它適用于受限環境。該協議的特點有:
* 使用發布/訂閱消息模式,提供一對多的消息發布,解除應用程序耦合。
* 對負載內容屏蔽的消息傳輸。
* 使用 TCP/IP 提供網絡連接。
* 小型傳輸,開銷很小(固定長度的頭部是 2 字節),協議交換最小化,以降低網絡流量。
* 使用 Last Will 和 Testament 特性通知有關各方客戶端異常中斷的機制。
有三種消息發布服務質量:
* “至多一次”,消息發布完全依賴底層 TCP/IP 網絡。會發生消息丟失或重復。這一級別可用于如下情況,環境傳感器數據,丟失一次讀記錄無所謂,因為不久后還會有第二次發送。
* “至少一次”,確保消息到達,但消息重復可能會發生。
* “只有一次”,確保消息到達一次。這一級別可用于如下情況,在計費系統中,消息重復或丟失會導致不正確的結果。
[[官方網站]](http://mqtt.org/)
[[github-wiki]](https://github.com/mqtt/mqtt.github.io/wiki)
[[github-Brokers/servers]](https://github.com/mqtt/mqtt.github.io/wiki/servers)
[[github-Client libraries]](https://github.com/mqtt/mqtt.github.io/wiki/libraries)
connect/publish/subscribe
## 結構
:-: 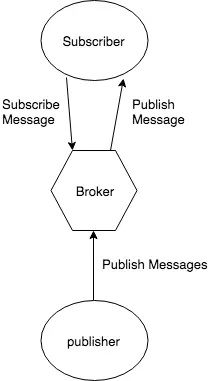
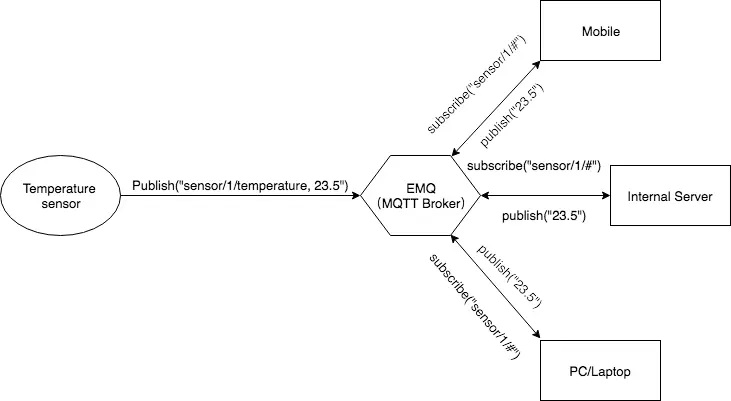
`MQTT`協議中有三種身份:`發布者(Publish)`、`代理(Broker)`(服務器)、`訂閱者(Subscribe)`。
消息的`發布者`和`訂閱者`都是客戶端,消息`代理`是服務器,消息`發布者`可以同時是`訂閱者`。
## broker
### ActiveMQ /Appollo
[[官方網站]](https://activemq.apache.org/)
[[Github-activemq]](https://github.com/apache/activemq)
[[下載地址]](http://activemq.apache.org/apollo/download.html)
Apache ActiveMQ is a high performance Apache 2.0 licensed Message Broker and JMS 1.1 implementation.
### Mosquitto
[[官方網站-mosquitto]](http://mosquitto.org/)
Eclipse Mosquitto is an open source (EPL/EDL licensed) message broker that implements the MQTT protocol versions 5.0, 3.1.1 and 3.1.
The Mosquitto project also provides a C library for implementing MQTT clients, and the very popular mosquitto\_pub and mosquitto\_sub command line MQTT clients.
Mosquitto is part of the [Eclipse Foundation](https://eclipse.org/), is an [iot.eclipse.org](https://iot.eclipse.org/) project and is sponsored by [cedalo.com](https://cedalo.com/).
如果需要連接的設備沒有超過 10 萬臺,使用 8GB 內存的云主機跑 Mosquitto 就可以;
如果設備量是幾十萬臺,可以考慮 Mosquitto 做集群負載均衡;
如果設備量是大幾十萬臺乃至百萬臺以上,那你需要專業的團隊或專門的投入來維護這件事情,
**libmosquitto** — MQTT version 5.0/3.1.1 client library
[[官方文檔-api]](https://mosquitto.org/api/)
Author: Roger Light`<[roger@atchoo.org](mailto:roger@atchoo.org)>`
### EMQ X
[[官方網站-emqx.io]](https://emqx.io)
[[官方文檔-docs]](https://docs.emqx.io/)
[[官方指南-tutorial]](https://docs.emqx.io/tutorial/v4/en/)
[[Github-emqx]](https://github.com/emqx/emqx)
Scalable and Reliable Real-time MQTT 5.0 Message Broker for IoT in 5G Era.
* [EMQ X Broker download](https://www.emqx.io/downloads#broker)
* [EMQ X Enterprise download](https://www.emqx.io/downloads#enterprise)
* [EMQ X Edge download](https://www.emqx.io/downloads#edge)
* [EMQ X Kuiper download](https://www.emqx.io/downloads#kuiper)
| | Broke | Enterprise | Edge | Kuiper |
| --- | --- | --- | --- | --- |
| Feature Overview | <li>Fully Open Source</li><li> MQTT v5.0 Support</li><li> Distributed Architecture</li><li> High Concurrency</li><li>Low Latency</li><li>Highly Extensible</li><li> Running Anywhere</li> | <li>Million-level Device Connections</li><li> Multiple IoT Protocols Support</li><li> Powerful SQL-based Rule Engine</li><li> Bridging Messages to Kafka</li><li>Various Databases Persistence</li><li> Management&Monitoring Center</li><li> 7x24 Global Support Team</li> | <li>Fully Open Source</li><li> x86 and ARM support</li><li> Bridge to Multi-Cloud</li><li> Offline Data Storage</li><li> SQL-based Rule Engine</li><li> Web-based Management </li>| <li> Fully Open Source</li><li> Lightweight and across operating system</li><li> Real-time streaming processing</li><li> Rich time windows support</li><li> Rich SQL functions support</li><li> CLI and Restful API tools</li> |
#### Installation
[[官方文檔]](https://docs.emqx.io/broker/latest/en/getting-started/installation.html)
- Package manager installation (Linux)
**Centos**
1. Install the required dependencies
~~~
$ sudo yum install -y yum-utils device-mapper-persistent-data lvm2
~~~
2. Set up a stable repository, taking the CentOS7 as an example.
~~~
$ sudo yum-config-manager --add-repo https://repos.emqx.io/emqx-ce/redhat/centos/7/emqx-ce.repo
~~~
3. Install the latest version of EMQ X
~~~
$ sudo yum install emqx
~~~
If prompted to accept the GPG key, confirm that the key complies with fc84 1ba6 3775 5ca8 487b 1e3c c0b4 0946 3e64 0d53 and accept the fingerprint.
4. Install a specific version of EMQ X
i. Query available version
~~~
$ yum list emqx --showduplicates | sort -r
emqx.x86_64 4.0.0-1.el7 emqx-stable
emqx.x86_64 3.0.1-1.el7 emqx-stable
emqx.x86_64 3.0.0-1.el7 emqx-stable
~~~
ii. Install a specific version based on the version string in the second column, such as 4.0.0
~~~
$ sudo yum install emqx-4.0.0
~~~
5. Start EMQ X
* Directly start
~~~
$ emqx start
emqx 4.0.0 is started successfully!
$ emqx_ctl status
Node 'emqx@127.0.0.1' is started
emqx v4.0.0 is running
~~~
* systemctl start
~~~
$ sudo systemctl start emqx
~~~
* service start
~~~
$ sudo service emqx start
~~~
6. Stop EMQ X Broker
~~~
$ emqx stop
ok
~~~
7. Remove EMQ X Broker
~~~
$ sudo yum remove emqx
~~~
#### ZIP (Linux、MaxOS、Windows)
1. Download the zip package of the EMQ X Broker version to be installed from [emqx.io](https://www.emqx.io/downloads/broker?osType=Linux) or [Github](https://github.com/emqx/emqx/releases).
2. Unzip the installation file:
~~~
$ unzip emqx-ubuntu18.04-v4.0.0.zip
~~~
3. Start EMQ X Broker
~~~
$ ./bin/emqx start
emqx 4.0.0 is started successfully!
$ ./bin/emqx_ctl status
Node 'emqx@127.0.0.1' is started
emqx v4.0.0 is running
~~~
4. Stop EMQ X Broker
~~~
$ ./bin/emqx stop
ok
~~~
5. Remove EMQ X Broker
Simply delete the EMQ X Broker directory
#### Download and Start EMQ X in Five Minutes
Once the package is downloaded and installed (or unzipped), the EQM X is ready to start. Taking the zip package for Mac as an example:
~~~
unzip emqx-macosx-v3.2.0.zip && cd emqx
//start emqx
./bin/emqx start
// Check the running status
./bin/emqx_ctl status
// stop emqx
./bin/emqx stop
~~~
After EMQ X is started, the MQTT client can connect to it through port `1883`. By default, the running log is in the directory of `log/`.
EMQ X loads the Dashboard plugin and launches the web management console by default. Users can check the broker running status, statistics, connections, sessions, topics, subscriptions, and plugins through the web console.
Console address: `http://127.0.0.1:18083/`,
default username: admin,
password:public
**Listener** is mainly used to configure listening ports and related parameters of different protocols. EMQ X Broker supports configuring multiple Listeners to listen to multiple protocols or ports at the same time. The following are the supported Listeners:
| Listener | Description |
| --- | --- |
| TCP Listener | A listener for MQTT which uses TCP |
| SSL Listener | A secure listener for MQTT which uses TLS |
| Websocket Listener | A listener for MQTT over WebSockets |
| Secure Websocket Listener | A secure listener for MQTT over secure WebSockets (TLS) |
:-: **The default TCP ports used by the EMQ X message server**
| Port | Description |
| --- | --- |
| 1883 | MQTT protocol port |
| 8883 | MQTT/SSL port |
| 8083 | MQTT/WebSocket port |
| 8081 | HTTP API port |
| 18083 | Dashboard Management Console Port |
For each version EMQ X will be released as installation packages or zip packages for diverse OSes and platforms, including CentOS, Ubuntu, Debian, FreeBSD, macOS, Windows and etc. It is also available as Docker image.
EMQ X
配置文件: /etc/emqx/emqx.conf
插件配置文件: /etc/emqx/plugins/*.conf
環境配置文件:/bin/emqx_env
~~~
#!/bin/sh
[ "x" = "x$EMQX_NODE_NAME" ] && EMQX_NODE_NAME=emqx@127.0.0.1
[ "x" = "x$EMQX_NODE_COOKIE" ] && EMQX_NODE_COOKIE=emqxsecretcookie
[ "x" = "x$EMQX_MAX_PACKET_SIZE" ] && EMQX_MAX_PACKET_SIZE=64KB
[ "x" = "x$EMQX_MAX_PORTS" ] && EMQX_MAX_PORTS=65536
[ "x" = "x$EMQX_TCP_PORT" ] && EMQX_TCP_PORT=1883
[ "x" = "x$EMQX_SSL_PORT" ] && EMQX_SSL_PORT=8883
[ "x" = "x$EMQX_WS_PORT" ] && EMQX_WS_PORT=8083
[ "x" = "x$EMQX_WSS_PORT" ] && EMQX_WSS_PORT=8084
~~~
日志文件目錄: /var/log/emqx
數據文件目錄:/var/lib/emqx/
啟動停止
`systemctl start|stop|restart emqx.service`
安裝完自動支持`ws`,想支持`wss`的小伙伴,去下載一個證書放到你的服務器 然后去`emqx.conf`,更改配置信息即可
`listener.wss.external.keyfile = 你自己的key文件`
`listener.wss.external.certfile = 你自己的pem文件`
重啟就可以了
用微信小程序連接的朋友,必須支持wss喲!
~~~bash
$ emqx_ctl listeners
listener on mqtt:ssl:8883
acceptors : 16
max_conns : 102400
current_conn : 0
shutdown_count : []
listener on mqtt:tcp:0.0.0.0:1883
acceptors : 8
max_conns : 1024000
current_conn : 0
shutdown_count : [{function_clause,36}]
listener on mqtt:tcp:127.0.0.1:11883
acceptors : 4
max_conns : 1024000
current_conn : 0
shutdown_count : []
listener on http:dashboard:18083
acceptors : 4
max_conns : 512
current_conn : 0
shutdown_count : []
listener on http:management:8081
acceptors : 2
max_conns : 512
current_conn : 0
shutdown_count : []
listener on mqtt:ws:8083:8083
acceptors : 4
max_conns : 102400
current_conn : 1
shutdown_count : []
listener on mqtt:wss:8084:8084
acceptors : 4
max_conns : 16
current_conn : 0
shutdown_count : []
~~~
#### Quick Start
EMQ X uses `8083` ports for `WebSocket` connections, and `8084` for `WebSocket with SSL`.
Local connect url is:`ws://localhost:8083/mqtt`
The connect url can be split like:`ws:`//`localhost`:`8083` `/mqtt`
`protocol`//`domain`:`port`/`path`
Connection code:
#### Open Source MQTT Client Project
GitHub: [https://github.com/emqtt](https://github.com/emqtt)
| Name | Description |
| --- | --- |
| emqttc | Erlang MQTT client library |
| CocoaMQTT | Swift Language MQTT Client Library |
| QMQTT | QT framework MQTT client library |
| emqtt_benchmark | MQTT benchmark tool |
#### EMQX\_AUTH\_HTTP 插件使用指南
[[出處]](https://www.cnblogs.com/emqx/p/11400545.html)
#### 如何開機啟動EMQX?
**window 10**
1. 以管理員身份啟動`powershell`
2. 到`emqx`解壓后的`emqx/bin`目錄
3. 運行命令`emqx install`安裝windows服務
利用`bat`文件運行多條cmd命令(EMQ服務器注冊和啟動)
~~~
//關閉之前打開的cmd窗口
@echo off
//注冊emq服務
start D:\softwareDev\tools\EMQX\emqx-windows-v4.0.3\emqx\bin\emqx install
//啟動emq服務
D:\softwareDev\tools\EMQX\emqx-windows-v4.0.3\emqx\bin\emqx start
//查詢emq服務狀態
D:\softwareDev\tools\EMQX\emqx-windows-v4.0.3\emqx\bin\emqx_ctl status
//關閉cmd窗口
close
~~~
#### Rule Engine
[[官方文檔]](https://docs.emqx.io/tutorial/latest/en/rule_engine/rule_engine.html)

#### HTTP Publish
[[官方文檔1]](https://docs.emqx.io/broker/v3/en/guide.html#http-publish-api)
The EMQ X message server provides an HTTP publish interface through which an application server or web server can publish MQTT messages:
~~~
HTTP POST http://host:8080/api/v3/mqtt/publish
~~~
Web servers such as PHP/Java/Python/NodeJS or Ruby on Rails can publish MQTT messages via HTTP POST requests:
~~~
curl -v --basic -u user:passwd -H "Content-Type: application/json" -d \
'{"qos":1, "retain": false, "topic":"world", "payload":"test" , "client_id": "C_1492145414740"}' \-k http://localhost:8080/api/v3/mqtt/publish
~~~
HTTP interface parameters:
| parameter | description |
| --- | --- |
| client\_id | MQTT client ID |
| qos | QoS: 0 | 1 | 2 |
| retain | Retain: true | false |
| topic | Topic |
| payload | message payload |
Note
>[info] HTTP publishing interface uses authentication of [Basic](https://en.wikipedia.org/wiki/basic_access_authentication). The user and password in the above example are from the AppId and password in the Applications of Dashboard.
[[官方文檔2]](https://docs.emqx.io/broker/latest/en/advanced/http-api.html#endpoint-publish)
`POST /api/v4/mqtt/publish` Publish MQTT message。
**Parameters (json):**
| Name | Type | Required | Default | Description |
| --- | --- | --- | --- | --- |
| topic | String | Optional | | For topic and topics, with at least one of them specified |
| topics | String | Optional | | Multiple topics separated by`,`. This field is used to publish messages to multiple topics at the same time |
| clientid | String | Required | | Client identifier |
| payload | String | Required | | Message body |
| encoding | String | Optional | plain | The encoding used in the message body. Currently only plain and base64 are supported. |
| qos | Integer | Optional | 0 | QoS level |
| retain | Boolean | Optional | false | Whether it is a retained message |
**Success Response Body (JSON):**
| Name | Type | Description |
| --- | --- | --- |
| code | Integer | 0 |
**Examples:**
~~~
$ curl -i --basic -u admin:public -X POST "http://localhost:8081/api/v4/mqtt/publish" -d '{"topic":"a/b/c","payload":"Hello World","qos":1,"retain":false,"clientid":"example"}'
{"code":0}
~~~
#### MQTT WebSocket Connection
EMQ X also supports WebSocket connections, web browsers or applications can connect directly to the broker via WebSocket:
| | |
| --- | --- |
| WebSocket URI: | ws(s)://host:8083/mqtt |
| Sec-WebSocket-Protocol: | ‘mqttv3.1’ or ‘mqttv3.1.1’ |
The Dashboard plugin provides a test tool for an MQTT WebSocket connection:
~~~
http://127.0.0.1:18083/#/websocket
~~~
#### HTTP API
[[官方文檔]](https://docs.emqx.io/broker/latest/en/advanced/http-api.html#endpoint-brokers)
EMQ X Broker provides HTTP APIs for integration with external systems, such as querying client information, publishing messages, and creating rules.
EMQ X Broker's HTTP API service listens on port 8081 by default. You can modify the listening port through the configuration file of `etc/plugins/emqx_management.conf`, or enable HTTPS listening. All API calls start with `api/v4` after EMQ X Broker 4.0.0.
EMQ X Broker's HTTP API uses the method of [Basic Authentication](https://en.wikipedia.org/wiki/Basic_access_authentication). The `id` and `password` must be filled with `AppID` and `AppSecret` respectively. The default AppID and AppSecret are:`amdin/public`. You can modify and add AppID / AppSecret in the left menu bar of `Dashboard` by selecting "Manage"-> "Apps".
#### Hooks
[[官方文檔]](https://docs.emqx.io/broker/latest/en/advanced/hooks.html)
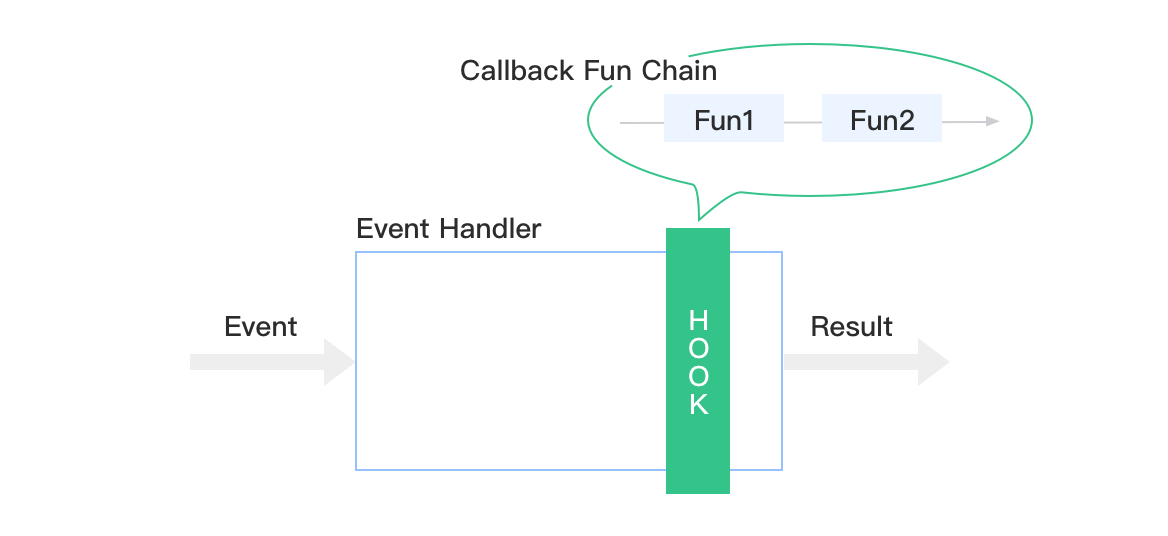
**Hooks**are a mechanism provided by EMQ X Broker, which modifies or extends system functions by intercepting function calls, message passing, and event passing between modules.
In simple terms, the purpose of this mechanism is to enhance the scalability of the software system, facilitate integration with the three-party systems, or change the original default behavior of its system. Such as:
- **HookPoint**
EMQ X Broker is based on a client's key activities during its life cycle, and presets a large number of **HookPoints**. The preset mount points in the system are:
| Name | Description | Execution Timing |
| --- | --- | --- |
| client.connect | Process connection packet | When the server receives the connection packet from the client |
| client.connack | Issue connection response | When the server is ready to issue a connection response message |
| client.connected | Connection succeed | After client authentication is completed and successfully connected to the system |
| client.disconnected | Disconnect | Connection layer of client is ready to close |
| client.authenticate | Connection authentication | After`client.connect`is executed |
| client.check\_acl | ACL authentication | Before publish/subscribe` operation is executed |
| client.subscribe | Subscribe to topic | After receiving the subscription message, and before executing`client.check_acl` |
| client.unsubscribe | Unsubscribe | After receiving the unsubscribe packet |
| session.created | Session creation | When a`client.connected`is completed and a new session is created |
| session.subscribed | Session subscription topics | After the subscription operation is completed |
| session.unsubscribed | Session unsubscription | After the unsubscription operation is completed |
| session.resumed | Session resume | when`client.connected`is executed and the old session information is successfully resumed |
| session.discarded | Session discarded | After the session was terminated due to discarding |
| session.takeovered | Session takeovered | After the session was terminated due to takeovering |
| session.terminated | Session terminated | After the session was terminated due to other reason |
| message.publish | Message published | Before the server publishes (routes) the message |
| message.delivered | Message delivered | Before the message is ready to be delivered to the client |
| message.acked | Message acked | After the message ACK is received from the client |
| message.dropped | Message dropped | After the published messages are discarded |
>[info] * **The session is discarded:** When the client logs in with the method of`clean session`, if the client's session already exists on the server, the old session will be discarded.
> * **The Session is taken over:** When the client logs in with the method of`Reserved Session`, if the client's session already exists on the server, the old session will be taken over by the new connection
- **Callback function**
The input parameters and returned value of the callback function are shown in the following table:
(For parameter data structure, see:[emqx\_types.erl](https://github.com/emqx/emqx/blob/master/src/emqx_types.erl))
| Name | input parameter | Returned value |
| --- | --- | --- |
| client.connect | `ConnInfo`:Client connection layer parameters <br> `Props`:Properties of MQTT v5.0 connection packets | New`Props` |
| client.connack | `ConnInfo`:Client connection layer parameters <br> `Rc`:returned code <br>`Props`: Properties of MQTT v5.0 connection response packets | New`Props` |
| client.connected | `ClientInfo`: Client information parameters <br> `ConnInfo`: Client connection layer parameters | \- |
| client.disconnected | `ClientInfo`:Client information parameters <br> `ConnInfo`:Client connection layer parameters
`ReasonCode`:Reason code | \- |
| client.authenticate | `ClientInfo`:Client information parameters <br> `AuthResult`:Authentication results | New`AuthResult` |
| client.check\_acl | `ClientInfo`:Client information parameters <br> `Topic`:Publish/subscribe topic <br> `PubSub`: Publish/subscribe <br> `ACLResult`:Authentication result | New`ACLResult` |
| client.subscribe | `ClientInfo`:Client information parameters <br> `Props`:Properties parameters of MQTT v5.0 subscription messages <br> `TopicFilters`:List of topics of subscription | New`TopicFilters` |
| client.unsubscribe | `ClientInfo`:Client information parameters <br> `Props`:Properties parameters of MQTT v5.0 unsubscription messages <br> `TopicFilters`:List of topics of unsubscription | New`TopicFilters` |
| session.created | `ClientInfo`:Client information parameters <br> `SessInfo`:Session information | \- |
| session.subscribed | `ClientInfo`:Client information parameters <br> `Topic`:subscribed topic <br> `SubOpts`:Configuration options for subscribe operations | \- |
| session.unsubscribed | `ClientInfo`:Client information parameters <br> `Topic`:unsubscribed topic <br> `SubOpts`:Configuration options for unsubscribe operations | \- |
| session.resumed | `ClientInfo`:Client information parameters <br> `SessInfo`:Session information | \- |
| session.discarded | `ClientInfo`:Client information parameters <br> `SessInfo`:Session information | \- |
| session.takeovered | `ClientInfo`:Client information parameters <br> `SessInfo`:Session information | |
| session.terminated | `ClientInfo`:Client information parameters <br> `Reason`:Termination reason <br> `SessInfo`:Session information | \- |
| message.publish | `Message`:Message object | New`Message` |
| message.delivered | `ClientInfo`:Client information parameters <br> `Message`:Message object | New`Message` |
| message.acked | `ClientInfo`:Client information parameters <br> `Message`:Message object | \- |
| message.dropped | `Message`:Message object <br> `By`:Dropped by <br> `Reason`:Drop reason | \- |
For the application of these hooks, see: [emqx\_plugin\_template](https://github.com/emqx/emqx-plugin-template)
#### WebHooks
[[官方文檔]](https://docs.emqx.io/broker/latest/en/advanced/webhooks.html)
WebHook is a plugin provided by the [emqx\_web\_hook](https://github.com/emqx/emqx-web-hook) plugin with the function of notifying a web service of hook events in EMQ X Broker.
The internal implementation of WebHook is based on `hooks`, but it is closer to the top level. It obtains various events in EMQ X Broker through the callback function mounted on the hook, and forwards them to the web server configured in `emqx_web_hook`.
Taking the client.connected event as an example, the event delivery process is as follows:
~~~
Client | EMQ X | emqx_web_hook | HTTP +------------+
=============>| - - - - - - -> - - - - - - - ->===========> | Web Server |
| Broker | | Request +------------+
~~~
>[info] **WebHook** processes events in one-way pattern. It only supports pushing events in EMQ X Broker to Web services, and does not care about the return of Web services. With the help of Webhooks, many services such as device going online, online and offline recording, subscription and message storage, and message delivery confirmation can be completed.
- **Trigger rule**
Trigger rules can be configured in`etc/plugins/emqx_web_hooks.conf`. The configuration format is as follows:
~~~
## Format example
web.hook.rule.<Event>.<Number> = <Rule>
## Example
web.hook.rule.message.publish.1 = {"action": "on_message_publish", "topic": "a/b/c"}
web.hook.rule.message.publish.2 = {"action": "on_message_publish", "topic": "foo/#"}
~~~
- **Trigger event**
The following events are currently supported:
| Name | Description | Execution timing |
| --- | --- | --- |
| client.connect | Processing connection packets | When the server receives the client's connection packet |
| client.connack | Issue connection acknowledge | When the server is ready to send connack packet |
| client.connected | connected | After the client authentication is completed and successfully connected to the system |
| client.disconnected | disconnected | When the client connection layer is about to close |
| client.subscribe | subscribe | After receiving the subscription message,and before executing`client.check_acl`authentication |
| client.unsubscribe | unsubscribe | After receiving the unsubscription message |
| session.subscribed | Session subscribed | After completing the subscription operation |
| session.unsubscribed | session unsubscribed | After completing the unsubscription operation |
| message.publish | message published | Before the server rpublishes (routes) the message |
| message.delivered | message deliveried | Before the message is ready to be delivered to the client |
| message.acked | message acknowledged | After the server received the message ACK from the client |
| message.dropped | message dropped | After the published message is dropped |
#### CLI
[[官方文檔]](https://docs.emqx.io/broker/latest/en/advanced/cli.html)
EMQ X Broker provides the management command line of `./bin/emqx_ctl` for users to manage, configure and query EMQ X Broker.
Example:
~~~
$ ./bin/emqx_ctl status
Node 'emqx@127.0.0.1' is started
emqx v4.0.0 is running
~~~
| Type | Command | Description |
| --- | --- | --- |
| `mgmt` command can query the application | `mgmt list` | List application |
| | `mgmt insert<AppId><Name>` | Add an application that can access to the HTTP API |
| | `mgmt update<AppId><status>` | Update applications that can access to the HTTP API |
| | `mgmt lookup<AppId>` | Get application details that can access to the HTTP API |
| | `mgmt delete<AppId>` | Remove applications that can access to the HTTP API |
#### 集群搭建
[[來源]](https://zhuanlan.zhihu.com/p/47649383)
### mosca
[[官方網站-mosca]](http://www.mosca.io/)
Mosca is a node.js mqtt broker, which can be used:
* Standalone
* Embedded in another Node.js application
**Features**
* MQTT 3.1 and 3.1.1 compliant.
* QoS 0 and QoS 1.
* Various storage options for QoS 1 offline packets, and subscriptions.
* Usable inside ANY other Node.js app.
* version 2.0.0+ targets node v6, v4 and v0.12
* version 1.0.0+ targets node v6, v5, v4 and v0.12, with partial support for node v0.10.
## client
### MQTT Client life cycle
[[參考文檔]](https://docs.emqx.io/broker/latest/en/development/client.html)
The behavior of the MQTT client throughout the life cycle can be summarized as establishing a connection, subscribing to a topic, receiving and processing messages, publishing messages to a specified topic, unsubscribing, and disconnecting.
Taking a client to connect, publish, and process messages as an example, the steps generally required for each link are:
* **Create a connection:**
* Specify MQTT Broker basic information access address and port
* Specify whether the transmission type is TCP or MQTT over WebSocket
* If TLS is enabled, you need to select the protocol version and carry the corresponding certificate
* If Broker enables authentication, the client needs to carry the corresponding MQTT Username Password information
* Configure client parameters such as keepalive duration, clean session callback retain flag, MQTT protocol version, will message (LWT), etc.
* **Subscribe to a topic**: You can subscribe to the topic after the connection is established successfully, and you need to specify the topic information
* Specify topic filter, support topic wildcards`+`and`#`when subscribing
* Specify QoS, and the option of Qos 0 1 2 can be selected according to the client library and broker implementation. Please note that some brokers and cloud service providers do not support some QoS levels. For example, AWS IoT, Alibaba Cloud IoT Suite, and Azure IoT Hub do not support QoS 2 level
* Topic subscription may fail due to network problems, Broker side ACL rules restrictions
* **Receive messages and process:**
* Generally, the processing function is specified at the time of connection. This processing method is slightly different according to the network programming model of the client library and the platform.
* **Publish a message:** Publish a message to a specified topic
* Specify the target topic. Note that the topic cannot contain wildcards`+`or`#`. If the topic contains wildcards, it may result in failure of message publishing and client disconnection (depending on the implementation of Broker and client library)
* Specify the message QoS level. There are also different QoS levels supported by the Broker and the platform. For example, if the Azure IoT Hub releases a QoS 2 message, the client connection will be disconnected.
* Specify the message payload, which cannot exceed the maximum message size set by Broker
* Specify the retained message flag
* **Unsubscribe**
* Just specify the target topic
* **Disconnect:**
* The client actively disconnects, and the server publishes a will message (LWT)
### MQTT.js
[[Github-MQTT.js]](https://github.com/mqttjs/MQTT.js)
A client library for the `MQTT` protocol, written in JavaScript for node.js and the browser.
As a **breaking change**, the`encoding`option in the old client is removed, and now everything is UTF-8 with the exception of the`password`in the CONNECT message and`payload`in the PUBLISH message, which are`Buffer`.
Another **breaking change** is that MQTT.js now defaults to MQTT v3.1.1, so to support old brokers, please read the [client options doc](https://github.com/mqttjs/MQTT.js#client).
#### Installation
~~~shell
npm install mqtt --save
~~~
MQTT.js supports `WebSocket` protocol connections in `browser` environments and `TCP (SSL/TLS)` protocol in `Node.js` environments. Choose the appropriate connection mode according to your usage scenario:
* Use the connect() function to connect and return a client instance
* Uses callback functions to handle related logic in client events:
* connect:Connection success event
* reconnect:Connection error, abnormal disconnection and reconnection events
* error:Connection error and termination of connection events
* message:Receive subscription message event
* client has several basic functions:
* subscribe(): Subscribe to a topic or topics
* publish(): Publish a message to a topic
* end(): Close the client
#### API
[[Github-API]](https://github.com/mqttjs/MQTT.js)
- `mqtt.`
- **`connect([url], options)`**
- **`Client(streamBuilder, options)`**
- `on('eventName',callbackFn)`
- `publish(topic, message, [options], [callback])`
- `subscribe( topic/topic array/topic object, [options], [callback])`
- `unsubscribe(topic/topic array, [options], [callback])`
- `end([force], [options], [cb])`
- `removeOutgoingMessage( mid)`
- `reconnect()`
- `handleMessage(packet, callback)`
- `getLastMessageId()`
- `connected`
- `reconnecting`
- **`store(streamBuilder, options)`**
- `put(packet, callback)`
- `del(packet, callback)`
- `createStream()`
- `close(callback)`
:-: `eventName` vs `callbackFn`
| envent-name | callback-function | Emitted | note |
| --- | --- | --- | --- |
| `connect` | function (connack) {} | on successful (re)connection (i.e. connack rc=0) | `connack` received connack packet. When `clean` connection option is `false` and server has a previous session for `clientId` connection option, then `connack.sessionPresent` flag is `true`. When that is the case, you may rely on stored session and prefer not to send subscribe commands for the client. |
| `reconnect` | function () {} | when a reconnect starts. | - |
| `close` | function () {} | after a disconnection | - |
| `disconnect` | function (packet) {} | after receiving disconnect packet from broker. MQTT 5.0 feature. | - |
| `offline` | function () {} | when the client goes offline. | - |
| `error` | function (error) {} | when the client cannot connect (i.e. connack rc != 0) or when a parsing error occurs. | - |
| `end` | function () {} | when `mqtt.Client#end()` is called. If a callback was passed to`mqtt.Client#end()`, this event is emitted once the callback returns. | - |
| `message` | function (topic, message, packet) {} | when the client receives a publish packet | <li>`topic` topic of the received packet</li> <li> `message` payload of the received packet</li> <li> `packet` received packet, as defined in `mqtt-packet`</li> |
| `packetsend` | function (packet) {} | when the client sends any packet. This includes .published() packets as well as packets used by MQTT for managing subscriptions and connections | `packet` received packet, as defined in `mqtt-packet` |
| `packedreceive` | function (packet) {} | when the client receives any packet. This includes packets from subscribed topics as well as packets used by MQTT for managing subscriptions and connections | `packet` received packet, as defined in `mqtt-packet` |
#### About QoS
Here is how QoS works:
* QoS 0 : received **at most once**: The packet is sent, and that's it. There is no validation about whether it has been received.
* QoS 1 : received **at least once**: The packet is sent and stored as long as the client has not received a confirmation from the server. MQTT ensures that it *will* be received, but there can be duplicates.
* QoS 2 : received **exactly once**: Same as QoS 1 but there is no duplicates.
About data consumption, obviously, QoS 2 > QoS 1 > QoS 0, if that's a concern to you.
----
### phpMQTT
[[github, phpMQTT]](https://github.com/bluerhinos/phpMQTT)
a simple php class to connect/publish/subscribe to a MQTT broker
### Mosquitto-PHP
[[github, Mosquitto-PHP]](https://github.com/mgdm/Mosquitto-PHP)
[[官方文檔]](https://mosquitto-php.readthedocs.io/en/latest/overview.html)
A wrapper for the Eclipse Mosquitto? MQTT client library for PHP.
## 參考
### 淺談,實例mqtt
[[來源]](https://www.jianshu.com/p/abc6f5a8face)
### 物聯網通信協議——比較-MQTT、 DDS、 AMQP、XMPP、 JMS、 REST、 CoAP
[[來源]](https://www.cnblogs.com/saryli/p/9742709.html)
- WebAPP
- Linux Command
- 入門
- 處理文件
- 查找文件單詞
- 環境
- 聯網
- Linux
- Linux目錄配置標準:FHS
- Linux文件與目錄管理
- Linux賬號管理與ACL權限設置
- Linux系統資源查看
- 軟件包管理
- Bash
- Daemon/Systemd
- ftp
- Apache
- MySQL
- Command
- Replication
- mysqld
- remote access
- remark
- 限制
- PHP
- String
- Array
- Function
- Class
- File
- JAVA
- Protocals
- http
- mqtt
- IDE
- phpDesigner
- eclipse
- vscode
- Notepad++
- WebAPI
- Javasript
- DOM
- BOM
- Event
- Class
- Module
- Ajax
- Fetch
- Promise
- async/await
- Statements and declarations
- Function
- Framwork
- jQurey
- Types
- Promise
- BootStrap
- v4
- ThinkPHP5
- install
- 定時任務
- CodeIgniter
- React.js
- node.js
- npm
- npm-commands
- npm-folder
- package.json
- Docker and private modules
- module
- webpack.js
- install
- configuration
- package.json
- entry
- modules
- plugins
- Code Splitting
- loaders
- libs
- API
- webpack-cli
- Vue.js
- install
- Compile
- VueAPI
- vuex
- vue-router
- vue-devtools
- vue-cli
- vue-loader
- VDOM
- vue-instance
- components
- template
- Single-File Components
- props
- data
- methods
- computed
- watch
- Event-handling
- Render Func
- remark
- 案例學習
- bootstrap-vue
- modal
- fontAwesome
- Hosting Font Awesome Yourself
- using with jquery
- using with Vue.js
- HTML
- CSS
- plugins
- Chart.js
- D3.js
- phpSpreadSheet
- Guzzle
- Cmder
- Git
- git命令
- git流程
- Postman
- Markdown
- Regular Expressions
- PowerDesigner
- 附錄1-學習資源