
# 實驗知識點
* 圖片水印以及縮略圖的基本原理
* PHP 代碼對圖片水印以及縮略圖具體實現
* 對水印以及縮略功能進行封裝
#### 實驗環境
* Ubuntu 14.04.5
* Nginx 1.4.6
* PHP 7.2
* `sublime text`文本編輯器。
#### 適合人群
本課程難度為一般,屬于初級級別課程,適合具有 PHP 基礎的用戶,熟悉 PHP 基礎知識加深鞏固。
# 原理
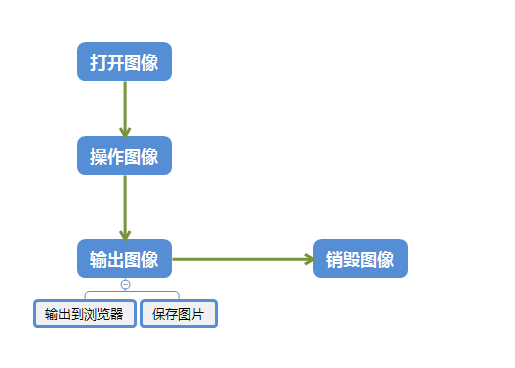
通過 PHP 的 GD 圖形拓展庫進行以下操作生成圖片水印以及縮略圖:
1. 打開圖像
2. 操作圖像
3. 輸出圖像
4. 銷毀圖像
# 開發準備
因為環境里已經安裝了 php-gd 庫,所以不用再安裝,如果沒有安裝需要執行`sudo apt install php-gd`命令安裝。
首先我們修改 Nginx 配置文件`/etc/nginx/sites-available/default`,執行命令:
~~~bash
sudo vim /etc/nginx/sites-available/default
~~~
注釋掉`root /home/shiyanlou/Code/myweb/public`,同時取消`root /usr/share/nginx/html`的注釋。
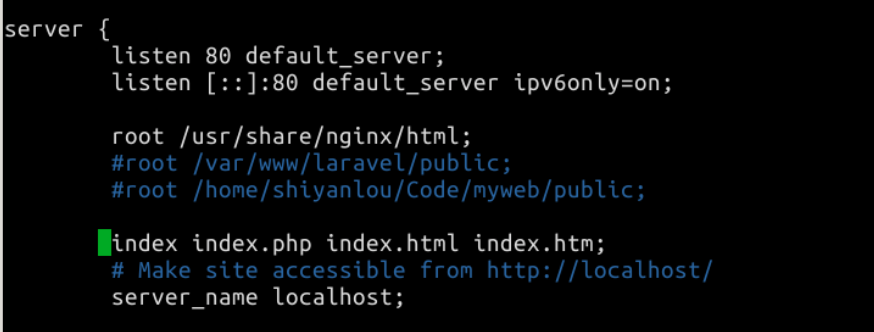
修改配置文件之后,我們重新加載 nginx 配置:
~~~bash
sudo service nginx reload
~~~
打開`Xfce終端`,依次啟動 Nginx 和 PHP 服務:
~~~bash
sudo service nginx start
sudo service php7.2-fpm start
~~~
因為我們要在 Nginx 服務器根目錄下寫入文件,所以首先我們需要修改`/usr/share/nginx/html`目錄的權限:
~~~bash
sudo chmod 777 -R /usr/share/nginx/html
~~~
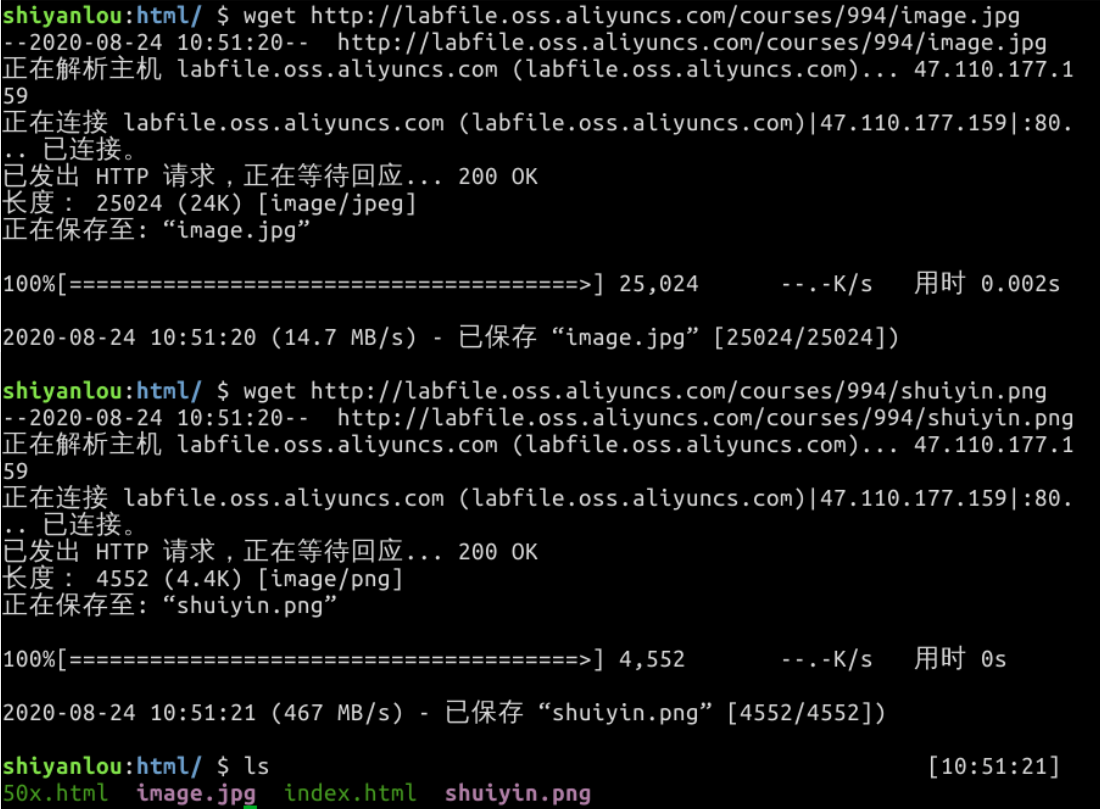
在目錄`/usr/share/nginx/html`下,需要下載 2 張圖片。首先進入`/usr/share/nginx/html`目錄:
~~~bash
cd /usr/share/nginx/html
~~~
然后再下載圖片:
~~~bash
wget http://labfile.oss.aliyuncs.com/courses/994/image.jpg
wget http://labfile.oss.aliyuncs.com/courses/994/shuiyin.png
~~~
# 水印實現
打開`sublime`編輯器
通過`sublime`編輯器打開文件夾`/var/www/html`并創建文件`watermark.php`。
編輯文件`watermark.php`:
~~~php
<?php
//打開圖像
$image_path = 'image.jpg';
$image_info = getimagesize($image_path);
echo "<pre>";
print_r($image_info);
echo "</pre>";
?>
~~~
然后打開火狐瀏覽器輸入地址`localhost/watermark.php`,可以看到瀏覽器打印出了變量`image_info`:
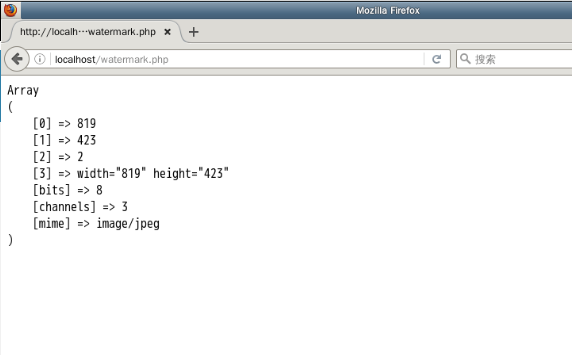
| 索引 | 意義 |
| :-- | :-- |
| 0 | 圖像寬度的像素值 |
| 1 | 圖像高度的像素值 |
| 2 | 圖像的類型,返回的是數字**1 = GIF,2 = JPG,3 = PNG,4 = SWF,5 = PSD,6 = BMP,7 = TIFF(intel byte order),8 = TIFF(motorola byte order),9 = JPC,10 = JP2,11 = JPX,12 = JB2,13 = SWC,14 = IFF,15 = WBMP,16 = XBM** |
| 3 | 寬度和高度的字符串,可以直接用于 HTML 的`<image>`標簽 |
| bits | 圖像的每種顏色的位數,二進制格式 |
| channels | 圖像的通道值,RGB 圖像默認是 3 |
| mime | 圖像的 MIME 信息 |
然后接下來刪除如下打印相關的代碼:
~~~php
echo "<pre>";
print_r($image_info);
echo "</pre>";
~~~
修改文件內容,補充代碼為如下所示:
**復制過去的代碼中,中文會以`???`的形式顯示,如果有影響到程序,可以直接刪除。**
~~~php
<?php
//打開圖像
$image_path = 'image.jpg';
$image_info = getimagesize($image_path);
//取得圖像類型的文件后綴
$image_type = image_type_to_extension($image_info[2], false);
//在內存中,創建動態圖像
$image_fun = "imagecreatefrom$image_type";
$image = $image_fun($image_path);
$image2_path = 'shuiyin.png';
$image2_info = getimagesize($image2_path);
//取得圖像類型的文件后綴
$image2_type = image_type_to_extension($image2_info[2], false);
//在內存中,創建動態圖像
$image2_fun = "imagecreatefrom$image2_type";
$image2 = $image2_fun($image2_path);
//操作圖像
//獲取image和shuiyin的寬高
$image_x = imagesx($image);
$image_y = imagesy($image);
$image2_x = imagesx($image2);
$image2_y = imagesy($image2);
//水印定位到右下角
$x = $image_x - $image2_x;
$y = $image_y - $image2_y;
imagecopy($image, $image2, $x, $y, 0, 0, $image2_info[0], $image2_info[1]);
//銷毀水印圖像
imagedestroy($image2);
// 輸出圖像
header('Content-type:',$image_info['mime']);
$funs = "image$image_type";
$funs($image, null, 100);
?>
~~~
水印可以是透明的圖片或者是帶有背景顏色的圖片。
GIF 格式的圖片可以保存透明信息,但 GIF 格式的圖片最多只能有 256 種顏色,因而只能使用在對圖片要求不高的場合。
另一種格式:PNG 格式,PNG 格式的圖片支持無損壓縮,而且可以很好地保存透明信息。
然后 PNG 的透明背景的水印在函數`imagecopymerge()`里顯示背景為白色。所以在這里暫時假定都用 PNG 格式的背景透明圖片做水印,所以暫時就用函數`imagecopy()`,這樣才能使得背景透明的圖片正常顯示。(在后面小節的類封裝會有一個封裝新的方法來解決這個問題)
~~~php
bool imagecopy ( resource $dst_im , resource $src_im , int $dst_x , int $dst_y , int $src_x , int $src_y , int $src_w , int $src_h )
~~~
| `imagecopy()`參數 | 意義 |
| :-- | :-- |
| `dst_im` | 目標圖像 |
| `src_im` | 被拷貝的源圖像 |
| `dst_x` | 目標圖像開始 x 坐標 |
| `dst_y` | 目標圖像開始 y 坐標,x,y 同為 0 則從左上角開始 |
| `src_x` | 拷貝圖像開始 x 坐標 |
| `src_y` | 拷貝圖像開始 y 坐標,x,y 同為 0 則從左上角開始拷貝 |
| `src_w` | 從`src_x`開始,拷貝的寬度 |
| `src_h` | 從`src_y`開始,拷貝的高度 |
~~~php
bool imagecopymerge ( resource $dst_im , resource $src_im , int $dst_x , int $dst_y , int $src_x , int $src_y , int $src_w , int $src_h , int $pct )
~~~
前 8 個參數和函數`imagecopy()`一樣,只多出了一個`pct`參數。
| `imagecopymerge()`參數 | 意義 |
| :-- | :-- |
| `pct` | 圖像合并程度,取值 0-100 |
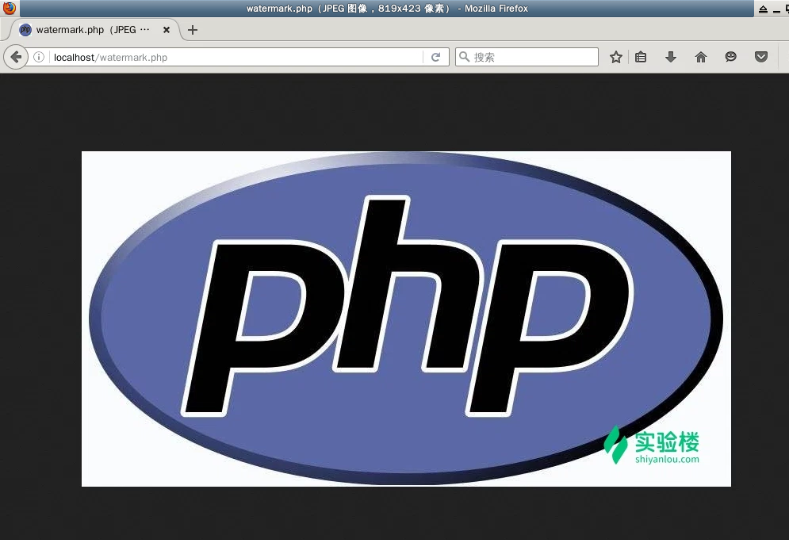
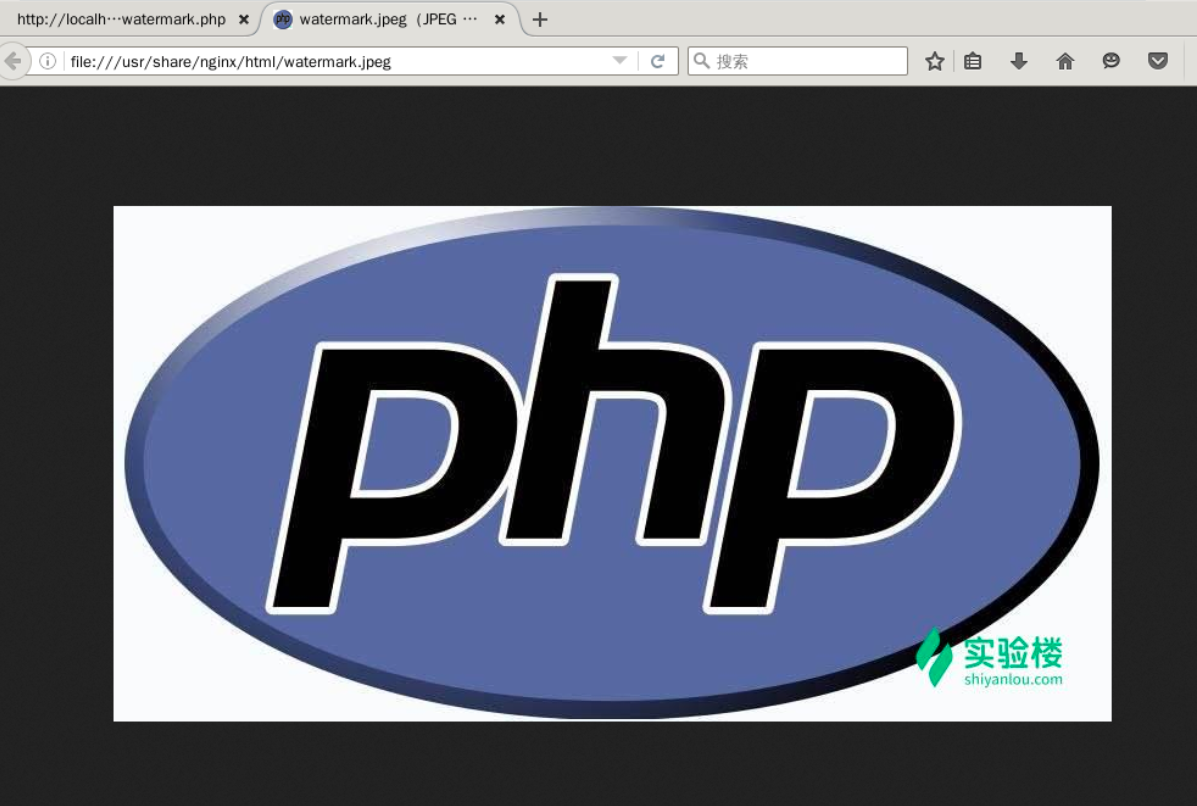
然后打開火狐瀏覽器輸入地址`localhost/watermark.php`就可以看到效果圖了:
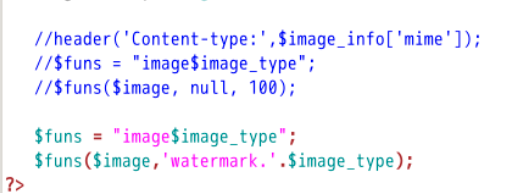
輸出圖片也可以是保存圖片,編輯`watermark.php`注釋掉瀏覽器輸出圖像的代碼,添加保存到本地的代碼:
~~~php
//輸出圖像
// header('Content-type:',$image_info['mime']);
// $funs = "image$image_type";
// $funs($image, null, 100);
//保存在本地
$funs = "image$image_type";
$funs($image,'watermark.'.$image_type);
~~~
在終端輸入`ls -alh`可以顯示當前目錄下的文件情況:
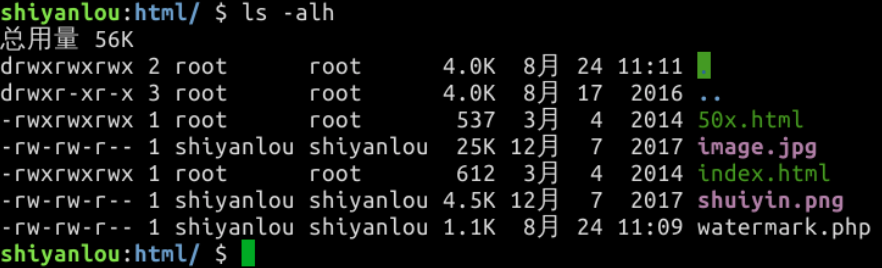
然后再瀏覽器刷新`localhost/watermark.php`頁面,此時不會有任何輸出。
我們再在終端執行`ls -alh`可以看出生成了圖片`watermark.jpeg`
可以用瀏覽器打開查看輸出效果,在終端輸入`firefox watermark.jpeg`:
# 縮略圖實現
接下來我們開始縮略圖的實現。在目錄下創建文件`thumbnail.php`,輸入如下內容:
~~~php
<?php
// 獲取圖片路徑、以及設置縮略的寬高
$filename = "image.jpg";
$xmax = 500;
$ymax = 400;
// 開打圖像
$image_info = getimagesize($filename);
// 獲取圖像類型
$type = image_type_to_extension($image_info[2], false);
// 在內存中,創建一個圖像對應的圖像類型創建一個新圖像
$imagecreate = "imagecreatefrom$type";
// 把圖像復制到內存中
$image = $imagecreate($filename);
//操作圖像
//獲取原圖的高度和寬度
$x = imagesx($image);
$y = imagesy($image);
//按比例縮放
if($x >= $y) {
$newx = $xmax;
$newy = $newx * $y / $x;
}
else {
$newy = $ymax;
$newx = $x / $y * $newy;
}
//創建新圖像
$image2 = imagecreatetruecolor($newx, $newy);
// 復制圖像進行縮略
imagecopyresized($image2, $image, 0, 0, 0, 0, floor($newx), floor($newy), $x, $y);
// 銷毀圖像
imagedestroy($image);
// 輸出圖像
header("Content-type: image/png");
header('Content-type:',$image_info['mime']);
$funs = "image$type";
$funs($image2);
// 銷毀圖像
imagedestroy($image2);
?>
~~~
* `imagecreatetruecolor()`新建一個真彩色圖像。
* `imagecopyresized()`拷貝圖像或圖像的一部分并調整大小。
~~~php
bool imagecopyresized( resource dst_im, resource src_im, int dst_x, int dst_y, int src_x, int src_y,int dst_w, int dst_h, int src_w, int src_h )
~~~
前八項也和上面的函數`imagecopy()`一樣,為了方便查看還是全部列出來:
| `imagecopyresized()`參數 | 意義 |
| :-- | :-- |
| `dst_im` | 目標圖像 |
| `src_im` | 被拷貝的源圖像 |
| `dst_x` | 目標圖像開始 x 坐標 |
| `dst_y` | 目標圖像開始 y 坐標,`x,y`同為 0 則從左上角開始 |
| `src_x` | 拷貝圖像開始 x 坐標 |
| `src_y` | 拷貝圖像開始 y 坐標,`x,y`同為 0 則從左上角開始拷貝 |
| `src_w` | 從`src_x`開始,拷貝的寬度 |
| `src_h` | 從`src_y`開始,拷貝的高度 |
| `dst_w` | 目標圖像的寬度 |
| `dst_h` | 目標圖像的高度 |
然后打開火狐瀏覽器輸入地址`localhost/thumbnail.php`就可以看到效果圖了
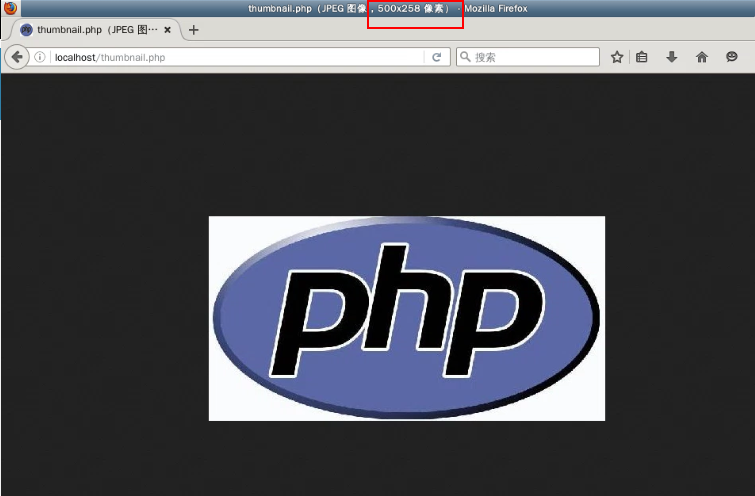
有上面的打印出的`image_info()`可知,圖片`image.jpg`原始長寬是:819 \* 423 然后由于圖像`image.jpg`的長像素比寬的大,所以就是以你所設置的變量`xmax`(長)為界定,然后根據原始圖片的寬長比來進行縮放(反之就是長寬比)再乘以變量`xmax`就是縮放后圖的寬了,因為要等比例縮放。
保存圖片代碼邏輯和實現圖片水印的一致。這里就不在添加到文件`thumbnail.php`中了。
# 封裝
對圖片水印與縮略圖代碼進行封裝。
可以自己先封裝,要實在是封裝不好的話,再看看代碼。然后多進行幾遍。爭取能自己熟練書寫出來。提高自己編寫代碼的能力。
創建文件`image.class.php`,輸入下面的代碼:
~~~php
<?php
class Image{
private $image; //內存中的圖片
private $info; //圖片的基本信息
//打開圖片
public function __construct($filepath){
$info = getimagesize($filepath);
$this->info=array(
'width'=>$info[0],
'height'=>$info[1],
'type'=>image_type_to_extension($info['2'],false),
'mime'=>$info['mime']
);
$fun = "imagecreatefrom{$this->info['type']}";
$this->image=$fun($filepath);
}
//操作圖片
/**
* thumbnail 縮略圖
* @param $xmax 設置縮放的寬
* @param $ymax 設置縮放的高
*/
public function thumbnail($xmax,$ymax){
//獲取原圖的高度和寬度
$x = imagesx($this->image);
$y = imagesy($this->image);
//限制只能縮小
if($x <= $xmax && $y <= $ymax){
return $this->image;
}
//按比例縮小
if($x >= $y) {
$newx = $xmax;
$newy = $newx * $y / $x;
}else {
$newy = $ymax;
$newx = $x / $y * $newy;
}
//創建新圖像
$newimage = imagecreatetruecolor($newx, $newy);
imagecopyresized($newimage, $this->image, 0, 0, 0, 0, floor($newx), floor($newy), $x, $y);
$this->image = $newimage;
}
/**
* waterMark 添加圖片水印
* @param $waterMark 水印圖片路徑
* @param $alpha 透明度
*/
public function waterMark($waterMark, $alpha = 0){
$info = getimagesize($waterMark);
$type = image_type_to_extension($info[2],false);
$funMark = "imagecreatefrom{$type}";
$water = $funMark($waterMark);
//獲取 image 和 water 的寬高
$image_x = imagesx($this->image);
$image_y = imagesy($this->image);
$water_x = imagesx($water);
$water_y = imagesy($water);
//水印定位到右下角
$x = $image_x - $water_x;
$y = $image_y - $water_y;
$this->imagecopymerge_alpha($this->image, $water, $x, $y, 0, 0, $info[0], $info[1], $alpha);
imagedestroy($water);
}
// 輸出圖片
/**
* show 在瀏覽器中輸出圖片
*/
public function show(){
header("Content-type:".$this->info['mime']);
$funs = "image{$this->info['type']}";
$funs($this->image);
}
/**
* save 把圖片保存在硬盤里
* @param $newname 圖片命名
*/
public function save($newname){
$funs = "image{$this->info['type']}";
$funs($this->image,$newname.'.'.$this->info['type']);
}
public function imagecopymerge_alpha($dst_im, $src_im, $dst_x, $dst_y, $src_x, $src_y, $src_w, $src_h, $pct){
$opacity=$pct;
// getting the watermark width
$w = imagesx($src_im);
// getting the watermark height
$h = imagesy($src_im);
// creating a cut resource
$cut = imagecreatetruecolor($src_w, $src_h);
// copying that section of the background to the cut
imagecopy($cut, $dst_im, 0, 0, $dst_x, $dst_y, $src_w, $src_h);
// inverting the opacity
$opacity = 100 - $opacity;
// placing the watermark now
imagecopy($cut, $src_im, 0, 0, $src_x, $src_y, $src_w, $src_h);
imagecopymerge($dst_im, $cut, $dst_x, $dst_y, $src_x, $src_y, $src_w, $src_h, $opacity);
}
//銷毀圖片
public function __destruct(){
imagedestroy($this->image);
}
}
?>
~~~
然后創建文件`demo.php`,輸入下面的代碼實現圖片水印:
~~~php
<?php
//引入Iamge類文件
include 'image.class.php';
$filepath = 'image.jpg';
$image = new Image($filepath);
//60是透明度參數默認設置為0
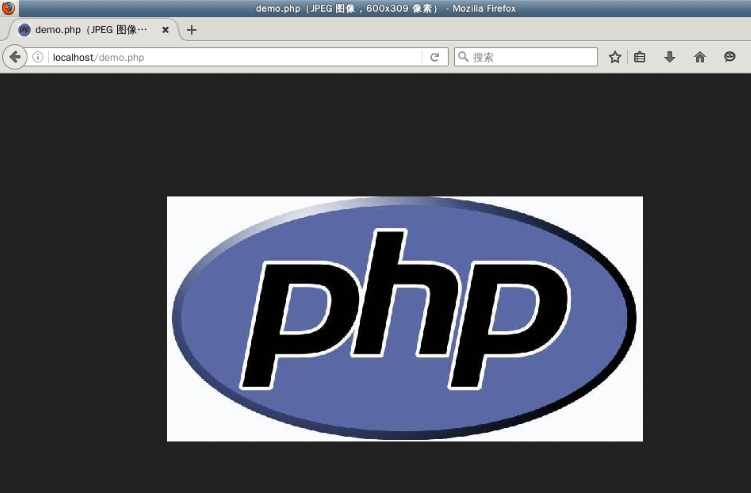
$image->waterMark('shuiyin.png', 60);
$image->show();
$image->save('sc_shuiyintu');
?>
~~~
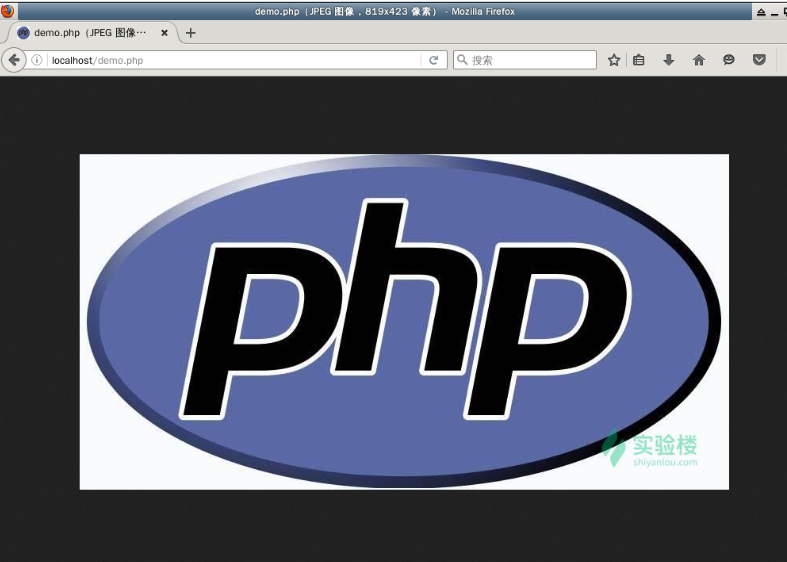
在瀏覽器輸入`localhost/demo.php`:
然后在終端輸入`ls -alh`查看輸出的水印圖片文件:
注釋掉`demo.php`里的生成水印的代碼,添加實現縮略圖的代碼:
~~~php
<?php
//引入 Iamge 類文件
include 'image.class.php';
//圖片水印
// $filepath = 'image.jpg';
// $image = new Image($filepath);
// $image->waterMark('shuiyin.png', 60);
// $image->show();
// $image->save('sc_shuiyintu');
//縮略圖
$filepath = 'image.jpg';
$image = new Image($filepath);
$image->thumbnail(600, 300);
$image->show();
$image->save('sc_suoluetu');
?>
~~~
在瀏覽器輸入`localhost/demo.php`:
然后在終端輸入`ls -alh`查看輸出的水印圖片文件:
[](javascript:;)
完成學習
- 服務器購買到搭建寶塔
- 結構規范
- php基礎
- php簡介
- php是什么
- PHP 能做什么
- PHP 如何運行
- 如何了解弱語言
- 安裝環境
- 安裝LNMP
- 寶塔
- phpstudy
- PHP基本語法
- PHP 標記
- 從 HTML 中分離
- 指令分隔符
- 注釋
- php 數據類型
- 類型檢測
- 四種標量類型
- boolean(布爾型)
- Integer 整型
- Float 浮點型
- String 字符串類型
- 兩種復合類型
- array(數組)
- object(對象)
- 兩種特殊類型
- resource(資源)
- NULL(無類型)
- 類型轉換
- 變量
- 變量定義和命名規范
- 傳值和引用
- 預定義變量
- php預定義變量
- $_SERVER詳解
- 變量范圍
- 全局變量
- 靜態變量
- 可變變量
- 常量
- 常量簡介
- 常量定義
- 相比變量
- 魔術常量
- 運算符
- 運算符簡介
- 算術運算符
- 賦值運算符
- 位運算符
- 比較運算符
- 錯誤控制運算符
- 執行運算符
- 遞增(減)運算符
- 邏輯運算符
- 字符串運算符
- 數組運算符
- 新增操作符
- 控制結構
- 控制簡介
- if 語句
- while 語句
- for 語句
- foreach 語句
- break 語句
- continue 語句
- switch 語句
- declare 語句
- return 語句
- include 語句
- PHP 函數
- 函數簡介
- 用戶自定義函數
- 函數的參數
- 返回值
- 可變函數
- 內部函數
- 匿名函數
- PHP 的類和對象
- PHP 的類和對象簡介
- 基本概念
- 對象繼承
- 屬性
- 類常量
- 自動加載對象
- 構造和析構函數
- 訪問控制
- 范圍解析操作符(::)
- 靜態static
- Static 關鍵字
- 抽象類
- 接口
- 匿名類
- 面向對象其他特性
- const關鍵字
- final關鍵字
- abstract用于定義抽象方法和抽象類。
- self、$this、parent::關鍵字
- 接口(interface)
- trait關鍵字
- instanceof關鍵字
- 魔術方法
- 構造函數和析構函數
- 私有屬性的設置獲取
- __toString()方法
- __clone()方法
- __call()方法
- 類的自動加載
- 會話控制
- cookie
- PHP 操作 cookie
- 項目實戰
- SESSION
- Session 的初步介紹與實驗準備
- PHP 操作 session
- 項目實戰2
- http
- 特點
- 工作過程
- request
- response
- HTTP狀態碼
- URL
- GET和POST的區別
- HTTPS
- 常用函數
- 常用的字符串函數
- 常用的數組函數
- 常用文件函數
- 常用時間函數
- 常用日歷函數
- 常用url函數
- 面試題常見
- 時間戳
- 技術類文檔
- 技術開發文檔
- 開發環境
- 開發規范
- 注釋規范
- 開發目錄結構
- 數據庫字典
- 路由
- 定時任務
- 獲取系統配置
- 系統常用函數
- 后臺表單
- 消息隊列
- 第三方類庫標注
- 需求文檔
- 數據庫
- MYSQL
- 事務(重點)
- 索引
- 存儲過程
- 觸發器
- 視圖
- 導入導出數據庫
- 優化mysql數據庫的方法
- MyISAM與InnoDB區別
- 外連接、內連接的區別
- 物理文件結構
- MongoDB
- Redis
- 運用場景和實例
- pgsql
- 服務器
- Nginx
- 正向代理和反向代理
- 負載均衡
- Linux常用命令
- 基本目錄和命令
- php開發工具
- phpStorm編輯器
- 安裝和漢化
- 鏈接ftp
- 常用操作
- 常用快捷鍵
- 自定義快捷鍵
- 使用快捷鍵新建目錄和文件
- 使用快捷鍵快速查找文件、類、方法
- 多文件切換
- 快速搜索設置項
- 多點編輯
- 方法重構
- 自定義文件模板和代碼片段
- 自定義文件模板
- 自定義代碼片段
- Xdebug 調試插件
- 安裝Xdebug 調試插件
- 在PHPStorm 中使用 Xdebug 插件調試代碼
- Vi Box虛擬機
- Vi Box 虛擬機 Oracle VM VirtualBox
- 虛擬機輔助工具一-Vagrant
- 華碩主板BIOS設置中VT虛擬化技術選項怎么開啟 Oracle VM VirtualBox
- 溝通工具
- 文檔分享
- 流程圖
- 任務分配
- 代碼托管
- 缺陷管理
- 設計圖
- gitLab
- 安裝
- 漢化
- Gitlab 用戶和項目管理
- Gitlab 持續集成與自動構建實踐
- PHP進階
- 大流量解決方案
- PSR規范
- RESTFUL規范
- 設計模式
- 單例模式
- 策略模式
- 工廠模式
- 簡單工廠模式
- 工廠方法模式
- 抽象工廠模式
- 外觀模式
- 享元模式
- 代理模式
- 命令模式
- 中介者模式
- 觀察者模式
- 狀態模式
- 建筑者模式
- 適配器模式
- 橋接模式
- 裝飾器模式
- 排序算法
- 冒泡排序算法
- 二分查找算法
- 直接插入排序算法
- 希爾排序算法
- 選擇排序算法
- 快速排序算法
- 常見網絡攻擊類型
- CSRF攻擊
- XSS攻擊
- SQL注入
- Cookie攻擊
- thinkphp
- thinkphp5命令行
- git
- Git 常用命令操作和基礎學習
- 傻瓜與白癡的筆記本
- 學習
- 一、Git 與 GitHub 的來歷
- 二、在 GitHub 上創建倉庫
- 三、安裝
- Windows 上安裝 Git
- 安裝2
- 四、克隆 GitHub 上的倉庫到本地
- 五、GIT基本操作哦
- 六、Git 分支操作
- 一、添加SSH關聯授權
- 二、為 Git 命令設置別名
- 三、Git 分支管理
- 七、多人協作 GitHub 部分
- 八、多人協作 Git 部分
- 九、Git tag 和 GitHub releases
- composer
- Composer 基礎使用
- 安裝和使用
- 在項目中集成PHPmailer
- 認識composer.json和composer.lock文件
- composer的其他命令操作
- 本地創建composer包
- 提交自己的依賴包到composer Packagist
- crontab計劃任務
- Linux任務計劃crontab
- php 的 計劃任務——Crontab
- bootstrap前端框架
- 入門
- 實戰技巧
- 后臺模板樣式——admin
- 第三方接口對接
- 微信
- 敏感詞過濾
- 微信圖片檢測
- 短信類型
- 阿里云短信
- 容聯云短信
- 飛鴿短信
- 媒體
- 新聞接口測試
- 免費新聞
- 免費視頻
- nba賽事,未測試
- 豆瓣電影接口
- 音樂接口
- 網易短視頻接口
- 知乎微信接口
- 百度ai
- 百度語音
- 圖片識別
- 騰訊
- 騰訊im
- 騰訊云直播
- 騰訊滑動驗證
- 物流快遞
- 快遞鳥、快遞100
- 推送
- 極光推送
- 地圖&天氣
- 獲取城市和天氣預報
- 地址獲取和定位
- 地址轉換經緯度
- 圖片類型
- 360新聞圖片
- 多平臺翻譯
- 實名認證
- 七牛云
- 云合同
- 多站點收錄查詢接口
- 打印機
- 第三方登錄
- 微信登錄
- 支付
- 支付寶app支付
- 微信提現+退款
- 微信app支付
- 微信支付公式
- 類庫
- 圖片類
- phpqrcode實戰:生成二維碼
- 圖片處理類
- 驗證碼類
- 消息類
- PHPMailer
- 分詞類
- ik
- PHPAnalysis
- 自己封裝的方法
- GD庫
- 自動獲取圖片主題顏色
- 圖片轉素描
- 生成海報
- 圖片轉字符
- 驗證碼
- 圖片轉黑白灰
- GD庫實現圖片水印與縮略圖
- Imagick擴展
- 將一張image圖片轉化為字符串的形式
- 基本方法
- 圖片路徑轉base64
- 生成文件后綴圖片
- url路徑判斷拼接
- 防篡改入口文件
- php中文姓名判斷
- 可控抽獎
- 特殊截取
- 銀行卡位(特殊卡號不支持)
- 微信紅包計算
- 數組和對象互轉
- php批量更新修改數據庫
- base64_img上傳
- 刪庫刪目錄————跑路
- 字符串特殊符號過濾
- 首字母轉成默認頭像
- 生成隨機字符串
- 根據id轉 邀請碼
- 日志寫入
- 字符串截取,超出顯示省略號
- 清除html標簽+清除html標簽,字符串截取
- 計算時間差的函數和演示
- php判斷路徑是否是絕對路徑,如果不是拼接至絕對路徑
- sql 參數過濾
- php敏感詞過濾
- 省市區分別截取
- 生成csv
- 無限極分類
- api接口返回封裝的方法函數
- xml和數組互轉
- 獲取thinkph5下控制器和方法名
- 過濾
- 獲取服務器信息
- php隨機顏色
- 創建多級目錄
- 推廣碼
- 跨域檢測
- 二維碼
- 文檔類
- word
- PHPWord
- tcPdf
- MPDF
- dompdf
- FPDF、Fpdi類庫
- excel
- PhpSpreadsheet導入
- phpExcel
- 時間
- PHP-農歷+節氣+節日等類庫
- 時間類庫
- 最好用的是人性化時間差
- 文件管理類
- 文件操作類
- 文件夾操作
- php操作ftp的類庫
- curl
- 數據庫操作類
- Db擴展函數
- 數據庫備份
- 仿tp5的Db庫
- 不常用mysql
- 自動生成數據庫字典
- 字符串
- 字符串操作helper/Str
- 隨機生成姓名
- 隨機生成類
- php字符串類
- 中文轉拼音的類庫
- 分類
- 緩存
- 數據驗證
- 身份證相關操作
- 安全類
- 表單生成類
- 自動生成表單,未完待續中