## 來源
[「React進階」 React全部api解讀+基礎實踐大全(夯實基礎2萬字總結)](https://juejin.cn/post/6950063294270930980)
## 內容
很多同學用`react`開發的時候,真正用到的`React`的`api`少之又少,基本停留在`Component`,`React.memo`等層面,實際`react`源碼中,暴露出來的方法并不少,只是我們平時很少用。但是`React`暴露出這么多`api`并非沒有用,想要玩轉`react`,就要明白這些`API`究竟是干什么的,應用場景是什么,今天就讓我們從`react` 到 `react-dom`,一次性把`react`生產環境的暴露`api`復習個遍(涵蓋90%+)。
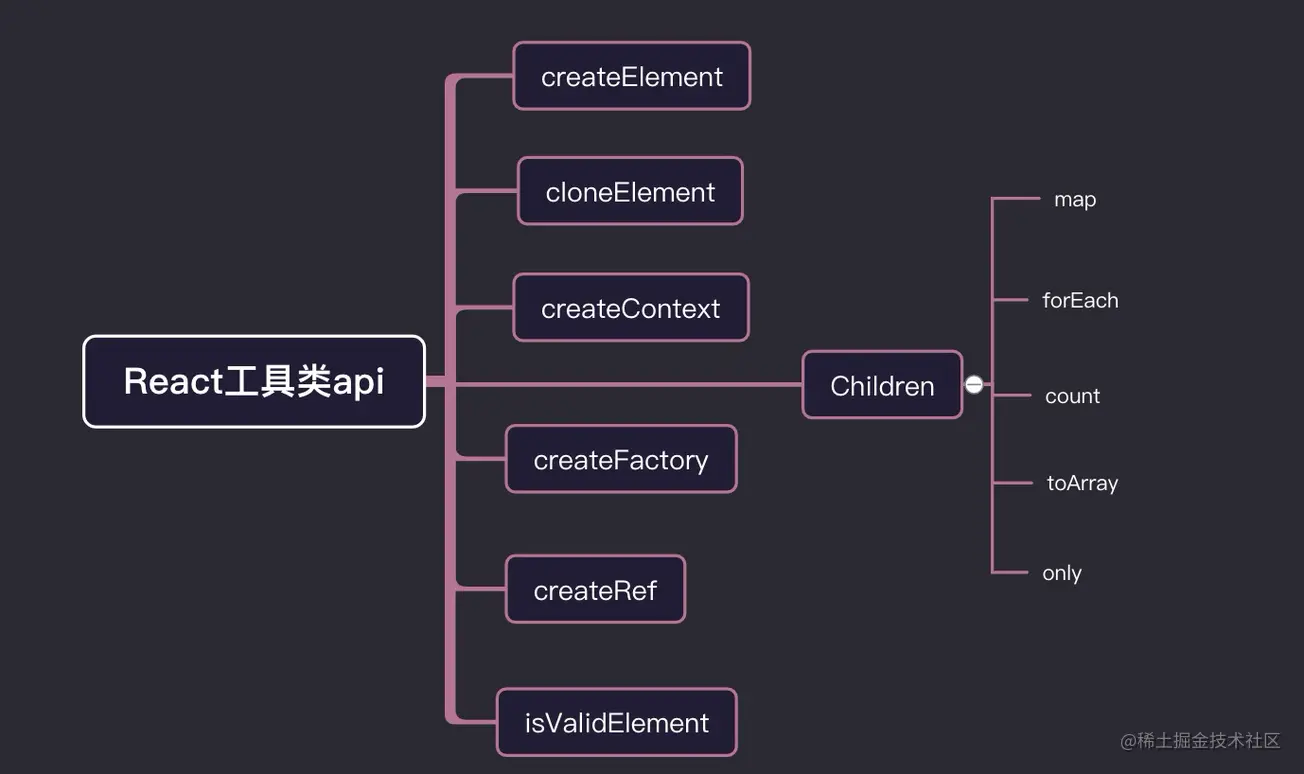
我們把`react`,`API`,分為**組件類**,**工具類**,**`hooks`**,再加上 **`react-dom`** ,一共四大方向,分別加以探討。
為了能讓屏幕前的你,更理解`api`,我是絞盡腦汁,本文的每一個`api`基本都會出一個`demo`演示效果,彌補一下天書般的`react`文檔??????,還有就是我對`api`基本概念的理解。創作不易,希望屏幕前的你能給筆者賞個**贊**,以此鼓勵我繼續創作前端硬文。
老規矩,我們帶著疑問開始今天的閱讀(**自測掌握程度**)?
* 1 `react`暴露的`api`有哪些,該如何使用?
* 2 `react`提供了哪些自測性能的手段?
* 3 `ref`既然不能用在函數組件中,那么父組件如何控制函數子組件內的`state`和方法?
* 4 `createElement`和`cloneElement`有什么區別,應用場景是什么?
* 5 `react`內置的`children`遍歷方法,和數組方法,有什么區別?
* 6 `react`怎么將子元素渲染到父元素之外的指定容器中?
* ...
我相信讀完這篇文章,這些問題全都會迎刃而解?
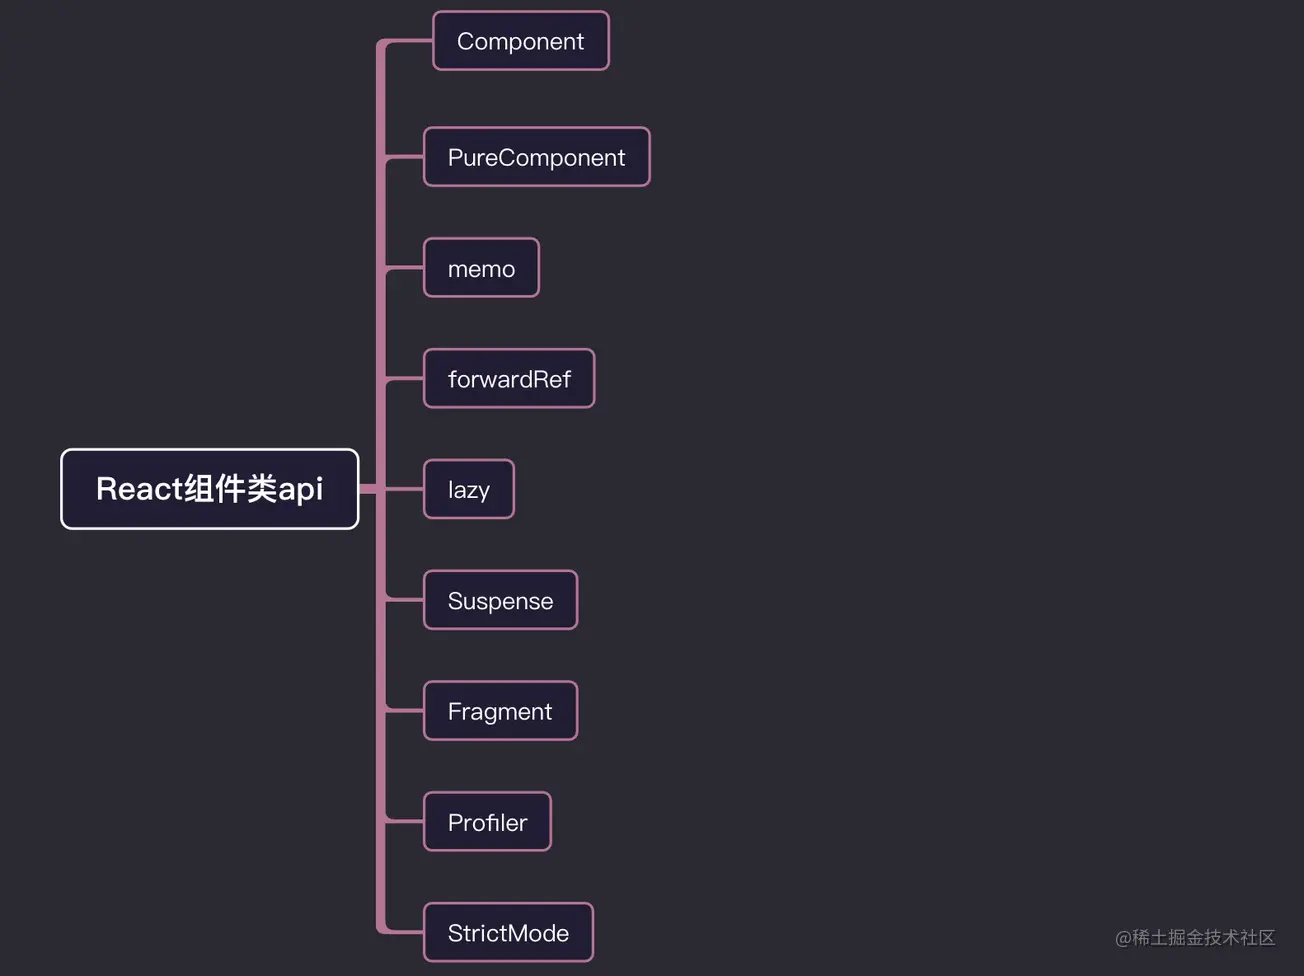
# 組件類
組件類,詳細分的話有三種類,第一類說白了就是我平時用于繼承的基類組件`Component`,`PureComponent`,還有就是`react`提供的內置的組件,比如`Fragment`,`StrictMode`,另一部分就是高階組件`forwardRef`,`memo`等。
## Component
`Component`是`class`組件的根基。類組件一切始于`Component`。對于`React.Component`使用,我們沒有什么好講的。我們這里重點研究一下`react`對`Component`做了些什么。
`react/src/ReactBaseClasses.js`
~~~js
function Component(props, context, updater) {
this.props = props;
this.context = context;
this.refs = emptyObject;
this.updater = updater || ReactNoopUpdateQueue;
}
復制代碼
~~~
這就是`Component`函數,其中`updater`對象上保存著更新組件的方法。
**我們聲明的類組件是什么時候以何種形式被實例化的呢?**
`react-reconciler/src/ReactFiberClassComponent.js`
**constructClassInstance**
~~~js
function constructClassInstance(
workInProgress,
ctor,
props
){
const instance = new ctor(props, context);
instance.updater = {
isMounted,
enqueueSetState(){
/* setState 觸發這里面的邏輯 */
},
enqueueReplaceState(){},
enqueueForceUpdate(){
/* forceUpdate 觸發這里的邏輯 */
}
}
}
復制代碼
~~~
對于`Component`, `react` 處理邏輯還是很簡單的,實例化我們類組件,然后賦值`updater`對象,負責組件的更新。然后在組件各個階段,執行類組件的`render`函數,和對應的生命周期函數就可以了。
## PureComponent
`PureComponent`和 `Component`用法,差不多一樣,唯一不同的是,純組件`PureComponent`會淺比較,`props`和`state`是否相同,來決定是否重新渲染組件。所以一般用于**性能調優**,減少**render**次數。
什么叫做**淺比較**,我這里舉個列子:
~~~js
class Index extends React.PureComponent{
constructor(props){
super(props)
this.state={
data:{
name:'alien',
age:28
}
}
}
handerClick= () =>{
const { data } = this.state
data.age++
this.setState({ data })
}
render(){
const { data } = this.state
return <div className="box" >
<div className="show" >
<div> 你的姓名是: { data.name } </div>
<div> 年齡: { data.age }</div>
<button onClick={ this.handerClick } >age++</button>
</div>
</div>
}
}
復制代碼
~~~
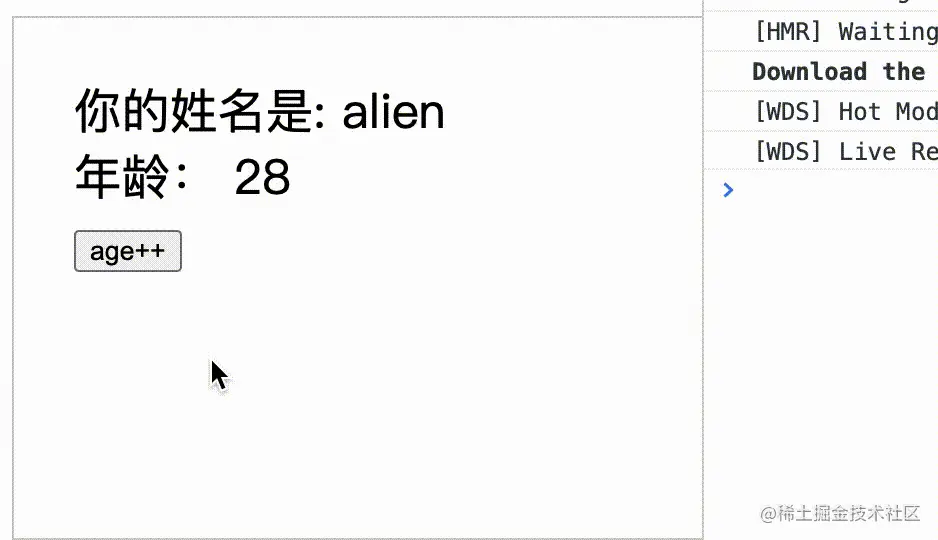 **點擊按鈕,沒有任何反應**,因為`PureComponent`會比較兩次`data`對象,都指向同一個`data`,沒有發生改變,所以不更新視圖。
解決這個問題很簡單,只需要在`handerClick`事件中這么寫:
~~~js
this.setState({ data:{...data} })
復制代碼
~~~
**淺拷貝**就能根本解決問題。
## memo
`React.memo`和`PureComponent`作用類似,可以用作性能優化,`React.memo` 是高階組件,函數組件和類組件都可以使用, 和區別`PureComponent`是 `React.memo`只能對`props`的情況確定是否渲染,而`PureComponent`是針對`props`和`state`。
`React.memo` 接受兩個參數,第一個參數原始組件本身,第二個參數,可以根據一次更新中`props`是否相同決定原始組件是否重新渲染。是一個返回布爾值,`true` 證明組件無須重新渲染,`false`證明組件需要重新渲染,這個和類組件中的`shouldComponentUpdate()`正好相反 。
**React.memo: 第二個參數 返回 `true` 組件不渲染 , 返回 `false` 組件重新渲染。** **shouldComponentUpdate: 返回 `true` 組件渲染 , 返回 `false` 組件不渲染。**
接下來我們做一個場景,控制組件在僅此一個`props`數字變量,一定范圍渲染。
例子??:
控制 `props` 中的 `number` :
* 1 只有 `number` 更改,組件渲染。
* 2 只有 `number` 小于 5 ,組件渲染。
~~~js
function TextMemo(props){
console.log('子組件渲染')
if(props)
return <div>hello,world</div>
}
const controlIsRender = (pre,next)=>{
if(pre.number === next.number ){ // number 不改變 ,不渲染組件
return true
}else if(pre.number !== next.number && next.number > 5 ) { // number 改變 ,但值大于5 , 不渲染組件
return true
}else { // 否則渲染組件
return false
}
}
const NewTexMemo = memo(TextMemo,controlIsRender)
class Index extends React.Component{
constructor(props){
super(props)
this.state={
number:1,
num:1
}
}
render(){
const { num , number } = this.state
return <div>
<div>
改變num:當前值 { num }
<button onClick={ ()=>this.setState({ num:num + 1 }) } >num++</button>
<button onClick={ ()=>this.setState({ num:num - 1 }) } >num--</button>
</div>
<div>
改變number: 當前值 { number }
<button onClick={ ()=>this.setState({ number:number + 1 }) } > number ++</button>
<button onClick={ ()=>this.setState({ number:number - 1 }) } > number -- </button>
</div>
<NewTexMemo num={ num } number={number} />
</div>
}
}
復制代碼
~~~
**效果:**

完美達到了效果,`React.memo`一定程度上,可以等價于組件外部使用`shouldComponentUpdate` ,用于攔截新老`props`,確定組件是否更新。
## forwardRef
官網對`forwardRef`的概念和用法很籠統,也沒有給定一個具體的案例。很多同學不知道 `forwardRef`具體怎么用,下面我結合具體例子給大家講解`forwardRef`應用場景。
**1 轉發引入Ref**
這個場景實際很簡單,比如父組件想獲取孫組件,某一個`dom`元素。這種隔代`ref`獲取引用,就需要`forwardRef`來助力。
~~~js
function Son (props){
const { grandRef } = props
return <div>
<div> i am alien </div>
<span ref={grandRef} >這個是想要獲取元素</span>
</div>
}
class Father extends React.Component{
constructor(props){
super(props)
}
render(){
return <div>
<Son grandRef={this.props.grandRef} />
</div>
}
}
const NewFather = React.forwardRef((props,ref)=><Father grandRef={ref} {...props} /> )
class GrandFather extends React.Component{
constructor(props){
super(props)
}
node = null
componentDidMount(){
console.log(this.node)
}
render(){
return <div>
<NewFather ref={(node)=> this.node = node } />
</div>
}
}
復制代碼
~~~
**效果**

`react`不允許`ref`通過`props`傳遞,因為組件上已經有 `ref` 這個屬性,在組件調和過程中,已經被特殊處理,`forwardRef`出現就是解決這個問題,把`ref`轉發到自定義的`forwardRef`定義的屬性上,讓`ref`,可以通過`props`傳遞。
**2 高階組件轉發Ref**
一文吃透`hoc`文章中講到,由于屬性代理的`hoc`,被包裹一層,所以如果是類組件,是通過`ref`拿不到原始組件的實例的,不過我們可以通過`forWardRef`轉發`ref`。
~~~js
function HOC(Component){
class Wrap extends React.Component{
render(){
const { forwardedRef ,...otherprops } = this.props
return <Component ref={forwardedRef} {...otherprops} />
}
}
return React.forwardRef((props,ref)=> <Wrap forwardedRef={ref} {...props} /> )
}
class Index extends React.Component{
componentDidMount(){
console.log(666)
}
render(){
return <div>hello,world</div>
}
}
const HocIndex = HOC(Index,true)
export default ()=>{
const node = useRef(null)
useEffect(()=>{
/* 就可以跨層級,捕獲到 Index 組件的實例了 */
console.log(node.current.componentDidMount)
},[])
return <div><HocIndex ref={node} /></div>
}
復制代碼
~~~
如上,解決了高階組件引入`Ref`的問題。
## lazy
> React.lazy 和 Suspense 技術還不支持服務端渲染。如果你想要在使用服務端渲染的應用中使用,我們推薦 Loadable Components 這個庫
`React.lazy`和`Suspense`配合一起用,能夠有動態加載組件的效果。`React.lazy` 接受一個函數,這個函數需要動態調用 `import()`。它必須返回一個 `Promise` ,該 `Promise` 需要 `resolve` 一個 `default export` 的 `React` 組件。
我們模擬一個動態加載的場景。
**父組件**
~~~js
import Test from './comTest'
const LazyComponent = React.lazy(()=> new Promise((resolve)=>{
setTimeout(()=>{
resolve({
default: ()=> <Test />
})
},2000)
}))
class index extends React.Component{
render(){
return <div className="context_box" style={ { marginTop :'50px' } } >
<React.Suspense fallback={ <div className="icon" ><SyncOutlined spin /></div> } >
<LazyComponent />
</React.Suspense>
</div>
}
}
復制代碼
~~~
我們用`setTimeout`來模擬`import`異步引入效果。
**Test**
~~~js
class Test extends React.Component{
constructor(props){
super(props)
}
componentDidMount(){
console.log('--componentDidMount--')
}
render(){
return <div>
<img src={alien} className="alien" />
</div>
}
}
復制代碼
~~~
**效果**
## Suspense
何為`Suspense`, `Suspense` 讓組件“等待”某個異步操作,直到該異步操作結束即可渲染。
用于數據獲取的 `Suspense` 是一個新特性,你可以使用 `<Suspense>` 以聲明的方式來“等待”任何內容,包括數據。本文重點介紹它在數據獲取的用例,它也可以用于等待圖像、腳本或其他異步的操作。
上面講到高階組件`lazy`時候,已經用 `lazy` + `Suspense`模式,構建了異步渲染組件。我們看一下官網文檔中的案例:
~~~js
const ProfilePage = React.lazy(() => import('./ProfilePage')); // 懶加載
<Suspense fallback={<Spinner />}>
<ProfilePage />
</Suspense>
復制代碼
~~~
## Fragment
`react`不允許一個組件返回多個節點元素,比如說如下情況
~~~js
render(){
return <li> ?????? </li>
<li> ?????? </li>
<li> ?????? </li>
}
復制代碼
~~~
如果我們想解決這個情況,很簡單,只需要在外層套一個容器元素。
~~~js
render(){
return <div>
<li> ?????? </li>
<li> ?????? </li>
<li> ?????? </li>
</div>
}
復制代碼
~~~
但是我們不期望,增加額外的`dom`節點,所以`react`提供`Fragment`碎片概念,能夠讓一個組件返回多個元素。 所以我們可以這么寫
~~~js
<React.Fragment>
<li> ?????? </li>
<li> ?????? </li>
<li> ?????? </li>
</React.Fragment>
復制代碼
~~~
還可以簡寫成:
~~~js
<>
<li> ?????? </li>
<li> ?????? </li>
<li> ?????? </li>
</>
復制代碼
~~~
和`Fragment`區別是,`Fragment`可以支持`key`屬性。`<></>`不支持`key`屬性。
**溫馨提示**。我們通過`map`遍歷后的元素,`react`底層會處理,默認在外部嵌套一個`<Fragment>`。
比如:
~~~js
{
[1,2,3].map(item=><span key={item.id} >{ item.name }</span>)
}
復制代碼
~~~
`react`底層處理之后,等價于:
~~~html
<Fragment>
<span></span>
<span></span>
<span></span>
</Fragment>
復制代碼
~~~
## Profiler
`Profiler`這個`api`一般用于開發階段,性能檢測,檢測一次`react`組件渲染用時,性能開銷。
`Profiler` 需要兩個參數:
第一個參數:是 `id`,用于表識唯一性的`Profiler`。
第二個參數:`onRender`回調函數,用于渲染完成,接受渲染參數。
**實踐:**
~~~js
const index = () => {
const callback = (...arg) => console.log(arg)
return <div >
<div >
<Profiler id="root" onRender={ callback } >
<Router >
<Meuns/>
<KeepaliveRouterSwitch withoutRoute >
{ renderRoutes(menusList) }
</KeepaliveRouterSwitch>
</Router>
</Profiler>
</div>
</div>
}
復制代碼
~~~
**結果**
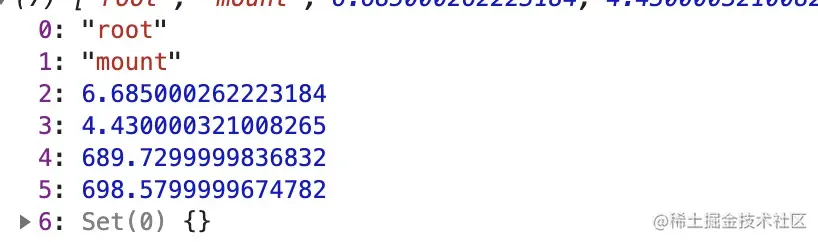
onRender
* 0 -id: `root` -> `Profiler` 樹的 `id` 。
* 1 -phase: `mount` -> `mount` 掛載 , `update` 渲染了。
* 2 -actualDuration: `6.685000262223184` -> 更新 `committed` 花費的渲染時間。
* 3 -baseDuration: `4.430000321008265` -> 渲染整顆子樹需要的時間
* 4 -startTime : `689.7299999836832` -> 本次更新開始渲染的時間
* 5 -commitTime : `698.5799999674782` -> 本次更新committed 的時間
* 6 -interactions: `set{}` -> 本次更新的 `interactions` 的集合
> 盡管 Profiler 是一個輕量級組件,我們依然應該在需要時才去使用它。對一個應用來說,每添加一些都會給 CPU 和內存帶來一些負擔。
## StrictMode
`StrictMode`見名知意,嚴格模式,用于檢測`react`項目中的潛在的問題,。與 `Fragment` 一樣, `StrictMode` 不會渲染任何可見的 `UI` 。它為其后代元素觸發額外的檢查和警告。
> 嚴格模式檢查僅在開發模式下運行;它們不會影響生產構建。
`StrictMode`目前有助于:
* ①識別不安全的生命周期。
* ②關于使用過時字符串 `ref API` 的警告
* ③關于使用廢棄的 `findDOMNode` 方法的警告
* ④檢測意外的副作用
* ⑤檢測過時的 `context API`
**實踐:識別不安全的生命周期**
對于不安全的生命周期,指的是`UNSAFE_componentWillMount`,`UNSAFE_componentWillReceiveProps` , `UNSAFE_componentWillUpdate`
`外層開啟嚴格模式:`
~~~js
<React.StrictMode>
<Router >
<Meuns/>
<KeepaliveRouterSwitch withoutRoute >
{ renderRoutes(menusList) }
</KeepaliveRouterSwitch>
</Router>
</React.StrictMode>
復制代碼
~~~
`我們在內層組件中,使用不安全的生命周期:`
~~~js
class Index extends React.Component{
UNSAFE_componentWillReceiveProps(){
}
render(){
return <div className="box" />
}
}
復制代碼
~~~
`效果:`

# 工具類
接下來我們一起來探究一下`react`工具類函數的用法。
## createElement
一提到`createElement`,就不由得和`JSX`聯系一起。我們寫的`jsx`,最終會被 `babel`,用`createElement`編譯成`react`元素形式。我寫一個組件,我們看一下會被編譯成什么樣子,
如果我們在`render`里面這么寫:
~~~js
render(){
return <div className="box" >
<div className="item" >生命周期</div>
<Text mes="hello,world" />
<React.Fragment> Flagment </React.Fragment>
{ /* */ }
text文本
</div>
}
復制代碼
~~~
會被編譯成這樣:
~~~js
render() {
return React.createElement("div", { className: "box" },
React.createElement("div", { className: "item" }, "\u751F\u547D\u5468\u671F"),
React.createElement(Text, { mes: "hello,world" }),
React.createElement(React.Fragment, null, " Flagment "),
"text\u6587\u672C");
}
復制代碼
~~~
當然我們可以不用`jsx`模式,而是直接通過`createElement`進行開發。
**`createElement`模型:**
~~~js
React.createElement(
type,
[props],
[...children]
)
復制代碼
~~~
`createElement`參數:
\*\*第一個參數:\*\*如果是組件類型,會傳入組件,如果是`dom`元素類型,傳入`div`或者`span`之類的字符串。
**第二個參數:**:第二個參數為一個對象,在`dom`類型中為**屬性**,在`組件`類型中為**props**。
**其他參數:**,依次為`children`,根據順序排列。
**createElement做了些什么?**
經過`createElement`處理,最終會形成 `$$typeof = Symbol(react.element)`對象。對象上保存了該`react.element`的信息。
## cloneElement
可能有的同學還傻傻的分不清楚`cloneElement`和`createElement`區別和作用。
`createElement`把我們寫的`jsx`,變成`element`對象; 而`cloneElement`的作用是以 `element` 元素為樣板克隆并返回新的 `React` 元素。返回元素的 `props` 是將新的 `props` 與原始元素的 `props` 淺層合并后的結果。
那么`cloneElement`感覺在我們實際業務組件中,可能沒什么用,但是在**一些開源項目,或者是公共插槽組件中**用處還是蠻大的,比如說,我們可以在組件中,劫持`children element`,然后通過`cloneElement`克隆`element`,混入`props`。經典的案例就是 `react-router`中的`Swtich`組件,通過這種方式,來匹配唯一的 `Route`并加以渲染。
我們設置一個場景,在組件中,去劫持`children`,然后給`children`賦能一些額外的`props`:
~~~js
function FatherComponent({ children }){
const newChildren = React.cloneElement(children, { age: 18})
return <div> { newChildren } </div>
}
function SonComponent(props){
console.log(props)
return <div>hello,world</div>
}
class Index extends React.Component{
render(){
return <div className="box" >
<FatherComponent>
<SonComponent name="alien" />
</FatherComponent>
</div>
}
}
復制代碼
~~~
**打印:**

完美達到了效果!
## createContext
`createContext`用于創建一個`Context`對象,`createContext`對象中,包括用于傳遞 `Context` 對象值 `value`的`Provider`,和接受`value`變化訂閱的`Consumer`。
~~~js
const MyContext = React.createContext(defaultValue)
復制代碼
~~~
`createContext`接受一個參數`defaultValue`,如果`Consumer`上一級一直沒有`Provider`,則會應用`defaultValue`作為`value`。**只有**當組件所處的樹中沒有匹配到 `Provider` 時,其 `defaultValue` 參數才會生效。
我們來模擬一個 `Context.Provider`和`Context.Consumer`的例子:
~~~js
function ComponentB(){
/* 用 Consumer 訂閱, 來自 Provider 中 value 的改變 */
return <MyContext.Consumer>
{ (value) => <ComponentA {...value} /> }
</MyContext.Consumer>
}
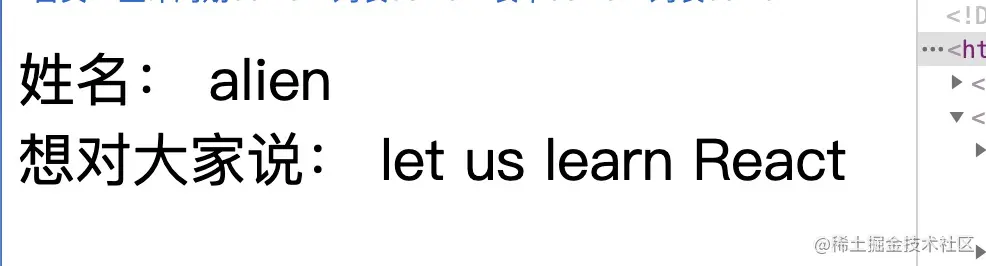
function ComponentA(props){
const { name , mes } = props
return <div>
<div> 姓名: { name } </div>
<div> 想對大家說: { mes } </div>
</div>
}
function index(){
const [ value , ] = React.useState({
name:'alien',
mes:'let us learn React '
})
return <div style={{ marginTop:'50px' }} >
<MyContext.Provider value={value} >
<ComponentB />
</MyContext.Provider>
</div>
}
復制代碼
~~~
**打印結果:**
`Provider`和`Consumer`的良好的特性,可以做數據的**存**和**取**,`Consumer`一方面傳遞`value`,另一方面可以訂閱`value`的改變。
`Provider`還有一個特性可以層層傳遞`value`,這種特性在`react-redux`中表現的淋漓盡致。
## createFactory
~~~js
React.createFactory(type)
復制代碼
~~~
返回用于生成指定類型 React 元素的函數。類型參數既可以是標簽名字符串(像是 '`div`' 或 '`span`'),也可以是 React 組件 類型 ( `class` 組件或函數組件),或是 `React fragment` 類型。
使用:
~~~js
const Text = React.createFactory(()=><div>hello,world</div>)
function Index(){
return <div style={{ marginTop:'50px' }} >
<Text/>
</div>
}
復制代碼
~~~
**效果**
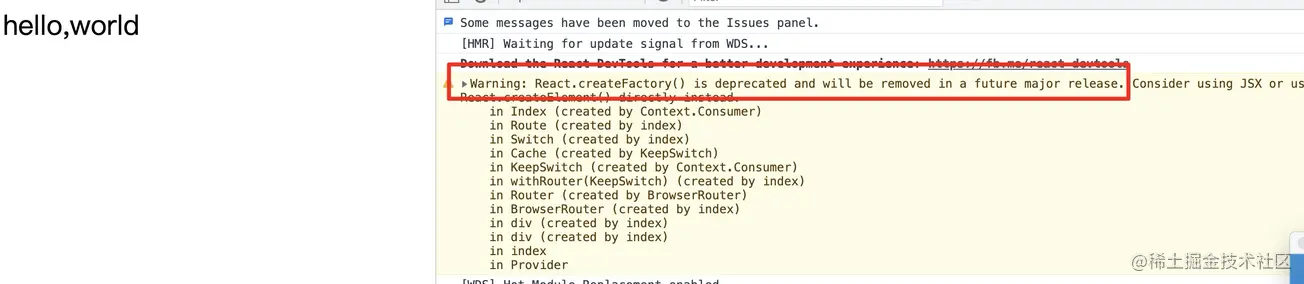
報出警告,這個`api`將要被廢棄,我們這里就不多講了,如果想要達到同樣的效果,請用`React.createElement`
## createRef
`createRef`可以創建一個 `ref` 元素,附加在`react`元素上。
**用法:**
~~~js
class Index extends React.Component{
constructor(props){
super(props)
this.node = React.createRef()
}
componentDidMount(){
console.log(this.node)
}
render(){
return <div ref={this.node} > my name is alien </div>
}
}
復制代碼
~~~
個人覺得`createRef`這個方法,很雞肋,我們完全可以`class`類組件中這么寫,來捕獲`ref`。
~~~js
class Index extends React.Component{
node = null
componentDidMount(){
console.log(this.node)
}
render(){
return <div ref={(node)=> this.node } > my name is alien </div>
}
}
復制代碼
~~~
或者在`function`組件中這么寫:
~~~js
function Index(){
const node = React.useRef(null)
useEffect(()=>{
console.log(node.current)
},[])
return <div ref={node} > my name is alien </div>
}
復制代碼
~~~
## isValidElement
這個方法可以用來檢測是否為`react element`元素,接受待驗證對象,返回`true`或者`false`。這個api可能對于業務組件的開發,作用不大,因為對于組件內部狀態,都是已知的,我們根本就不需要去驗證,是否是`react element` 元素。 但是,對于一起公共組件或是開源庫,`isValidElement`就很有作用了。
**實踐**
我們做一個場景,驗證容器組件的所有子組件,過濾到非`react element`類型。
沒有用`isValidElement`驗證之前:
~~~js
const Text = () => <div>hello,world</div>
class WarpComponent extends React.Component{
constructor(props){
super(props)
}
render(){
return this.props.children
}
}
function Index(){
return <div style={{ marginTop:'50px' }} >
<WarpComponent>
<Text/>
<div> my name is alien </div>
Let's learn react together!
</WarpComponent>
</div>
}
復制代碼
~~~
**過濾之前的效果**

**我們用`isValidElement`進行`react element`驗證:**
~~~js
class WarpComponent extends React.Component{
constructor(props){
super(props)
this.newChidren = this.props.children.filter(item => React.isValidElement(item) )
}
render(){
return this.newChidren
}
}
復制代碼
~~~
**過濾之后效果**

過濾掉了非`react element` 的 `Let's learn react together!`。
## Children.map
接下來的五個`api`都是和`react.Chidren`相關的,我們來分別介紹一下,我們先來看看官網的描述,`React.Children` 提供了用于處理 `this.props.children` 不透明數據結構的實用方法。
有的同學會問遍歷 `children`用數組方法,`map` ,`forEach` 不就可以了嗎? 請我們注意一下`不透明數據結構`,什么叫做不透明結構?
**我們先看一下透明的結構:**
~~~js
class Text extends React.Component{
render(){
return <div>hello,world</div>
}
}
function WarpComponent(props){
console.log(props.children)
return props.children
}
function Index(){
return <div style={{ marginTop:'50px' }} >
<WarpComponent>
<Text/>
<Text/>
<Text/>
<span>hello,world</span>
</WarpComponent>
</div>
}
復制代碼
~~~
**打印**

但是我們把`Index`結構改變一下:
~~~js
function Index(){
return <div style={{ marginTop:'50px' }} >
<WarpComponent>
{ new Array(3).fill(0).map(()=><Text/>) }
<span>hello,world</span>
</WarpComponent>
</div>
}
復制代碼
~~~
**打印**

這個數據結構,我們不能正常的遍歷了,即使遍歷也不能遍歷,每一個子元素。此時就需要 `react.Chidren` 來幫忙了。
但是我們把`WarpComponent`組件用`react.Chidren`處理`children`:
~~~js
function WarpComponent(props){
const newChildren = React.Children.map(props.children,(item)=>item)
console.log(newChildren)
return newChildren
}
復制代碼
~~~
此時就能正常遍歷了,達到了預期效果。

**注意** 如果 `children` 是一個 `Fragment` 對象,它將被視為單一子節點的情況處理,而不會被遍歷。
## Children.forEach
`Children.forEach`和`Children.map` 用法類似,`Children.map`可以返回新的數組,`Children.forEach`僅停留在遍歷階段。
我們將上面的`WarpComponent`方法,用`Children.forEach`改一下。
~~~js
function WarpComponent(props){
React.Children.forEach(props.children,(item)=>console.log(item))
return props.children
}
復制代碼
~~~
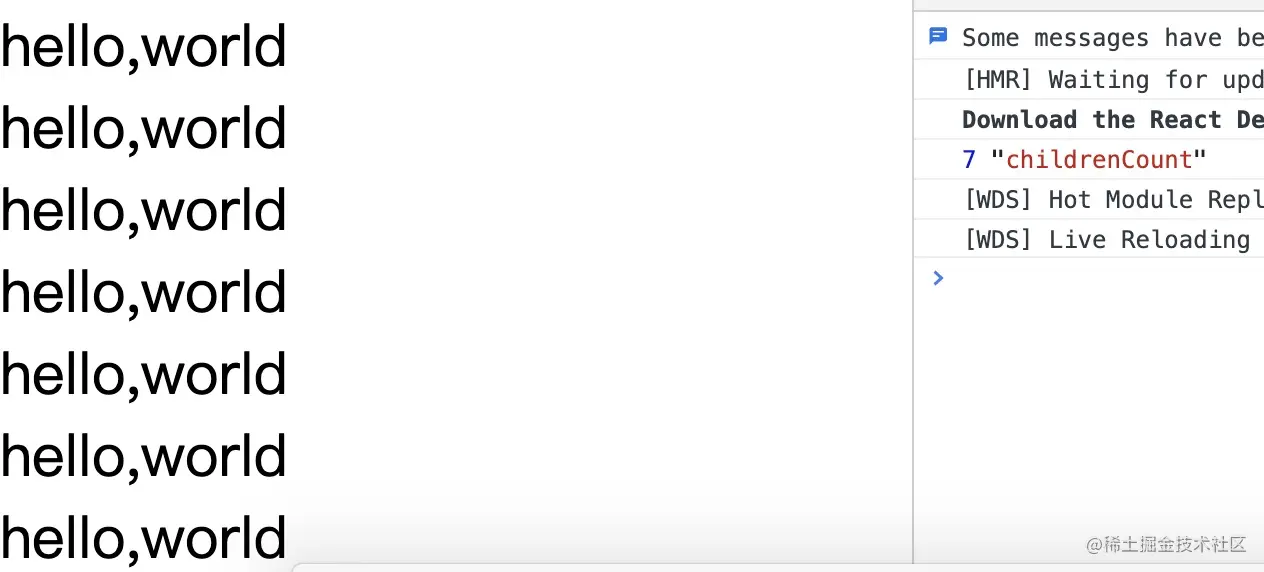
## Children.count
`children` 中的組件總數量,等同于通過 `map` 或 `forEach` 調用回調函數的次數。對于更復雜的結果,`Children.count`可以返回同一級別子組件的數量。
我們還是把上述例子進行改造:
~~~js
function WarpComponent(props){
const childrenCount = React.Children.count(props.children)
console.log(childrenCount,'childrenCount')
return props.children
}
function Index(){
return <div style={{ marginTop:'50px' }} >
<WarpComponent>
{ new Array(3).fill(0).map((item,index) => new Array(2).fill(1).map((item,index1)=><Text key={index+index1} />)) }
<span>hello,world</span>
</WarpComponent>
</div>
}
復制代碼
~~~
**效果:**
## Children.toArray
`Children.toArray`返回,`props.children`扁平化后結果。
~~~js
function WarpComponent(props){
const newChidrenArray = React.Children.toArray(props.children)
console.log(newChidrenArray,'newChidrenArray')
return newChidrenArray
}
function Index(){
return <div style={{ marginTop:'50px' }} >
<WarpComponent>
{ new Array(3).fill(0).map((item,index)=>new Array(2).fill(1).map((item,index1)=><Text key={index+index1} />)) }
<span>hello,world</span>
</WarpComponent>
</div>
}
復制代碼
~~~
**效果:**

**newChidrenArray** ,就是扁平化的數組結構。`React.Children.toArray()` 在拉平展開子節點列表時,更改 `key` 值以保留嵌套數組的語義。也就是說, `toArray` 會為返回數組中的每個 `key` 添加前綴,以使得每個元素 `key` 的范圍都限定在此函數入參數組的對象內。
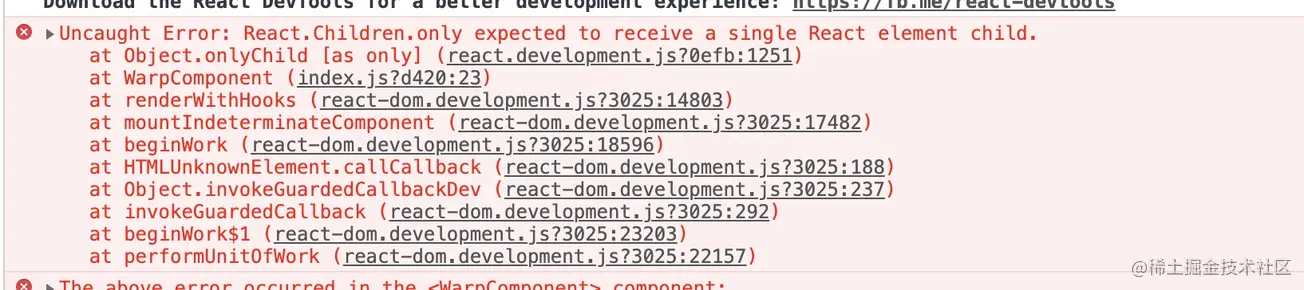
## Children.only
驗證 `children` 是否只有一個子節點(一個 `React` 元素),如果有則返回它,否則此方法會拋出錯誤。
**不唯一**
~~~js
function WarpComponent(props){
console.log(React.Children.only(props.children))
return props.children
}
function Index(){
return <div style={{ marginTop:'50px' }} >
<WarpComponent>
{ new Array(3).fill(0).map((item,index)=><Text key={index} />) }
<span>hello,world</span>
</WarpComponent>
</div>
}
復制代碼
~~~
**效果**
**唯一**
~~~js
function WarpComponent(props){
console.log(React.Children.only(props.children))
return props.children
}
function Index(){
return <div style={{ marginTop:'50px' }} >
<WarpComponent>
<Text/>
</WarpComponent>
</div>
}
復制代碼
~~~
**效果**

`React.Children.only()` 不接受 `React.Children.map()` 的返回值,因為它是一個數組而并不是 `React` 元素。
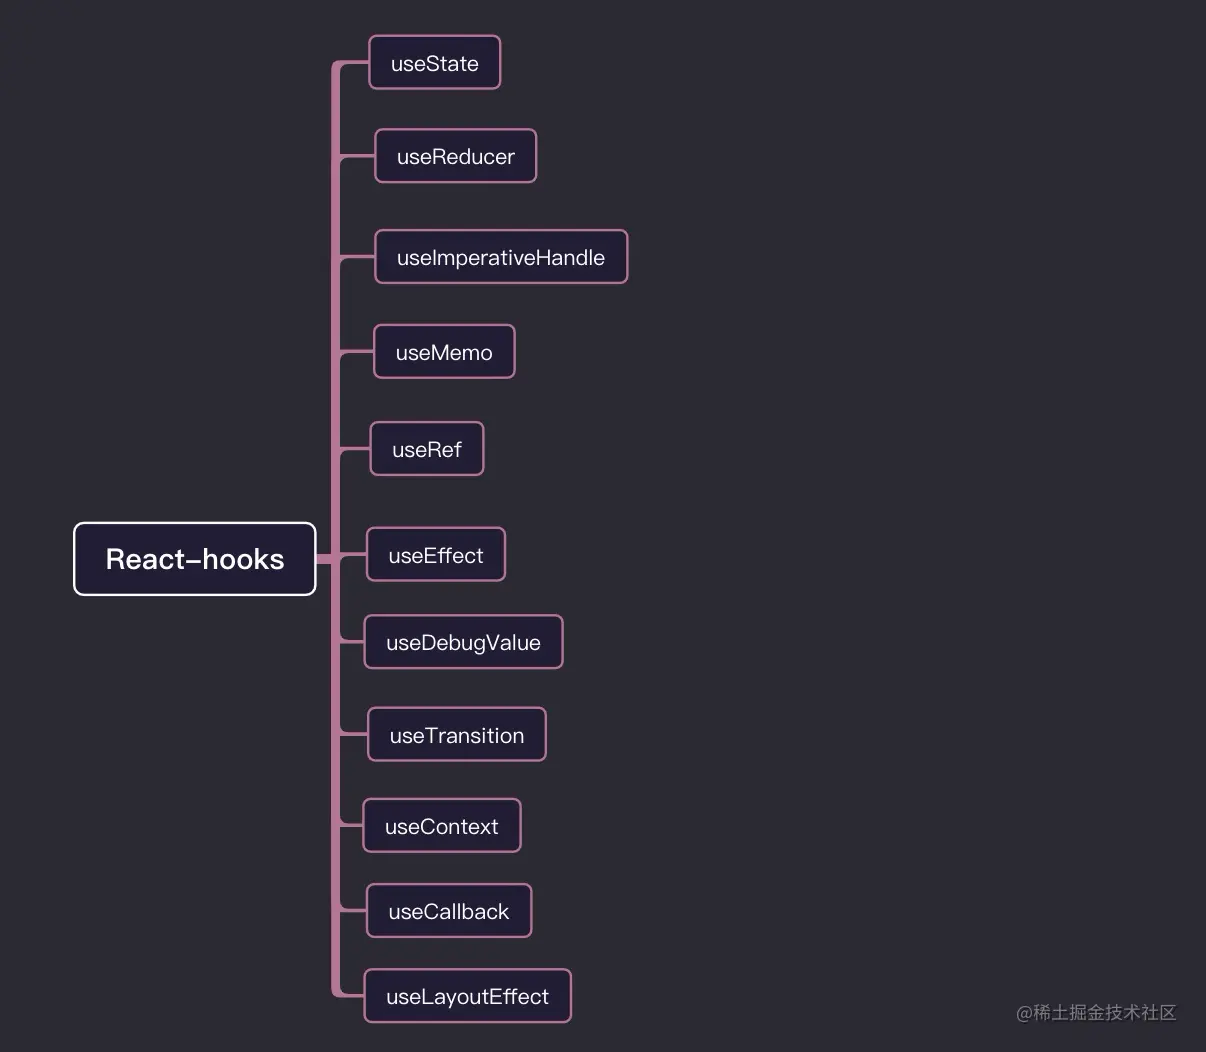
# react-hooks
對于`react-hooks`,我已經寫了三部曲,介紹了`react-hooks`使用,自定義`hooks`,以及`react-hooks`原理,感興趣的同學可以去看看,文章末尾有鏈接,對于常用的`api`,我這里參考了`react-hooks`如何使用那篇文章。并做了相應精簡化和一些內容的補充。
## useState
`useState`可以彌補函數組件沒有`state`的缺陷。`useState`可以接受一個初識值,也可以是一個函數`action`,`action`返回值作為新的`state`。返回一個數組,第一個值為`state`讀取值,第二個值為改變`state`的`dispatchAction`函數。
我們看一個例子:
~~~jsx
const DemoState = (props) => {
/* number為此時state讀取值 ,setNumber為派發更新的函數 */
let [number, setNumber] = useState(0) /* 0為初始值 */
return (<div>
<span>{ number }</span>
<button onClick={ ()=> {
setNumber(number+1) /* 寫法一 */
setNumber(number=>number + 1 ) /* 寫法二 */
console.log(number) /* 這里的number是不能夠即時改變的 */
} } >num++</button>
</div>)
}
復制代碼
~~~
## useEffect
`useEffect`可以彌補函數組件沒有生命周期的缺點。我們可以在`useEffect`第一個參數回調函數中,做一些請求數據,事件監聽等操作,第二個參數作為`dep`依賴項,當依賴項發生變化,重新執行第一個函數。
**useEffect可以用作數據交互。**
~~~jsx
/* 模擬數據交互 */
function getUserInfo(a){
return new Promise((resolve)=>{
setTimeout(()=>{
resolve({
name:a,
age:16,
})
},500)
})
}
const DemoEffect = ({ a }) => {
const [ userMessage , setUserMessage ] :any= useState({})
const div= useRef()
const [number, setNumber] = useState(0)
/* 模擬事件監聽處理函數 */
const handleResize =()=>{}
/* useEffect使用 ,這里如果不加限制 ,會是函數重復執行,陷入死循環*/
useEffect(()=>{
/* 請求數據 */
getUserInfo(a).then(res=>{
setUserMessage(res)
})
/* 操作dom */
console.log(div.current) /* div */
/* 事件監聽等 */
window.addEventListener('resize', handleResize)
/* 只有當props->a和state->number改變的時候 ,useEffect副作用函數重新執行 ,如果此時數組為空[],證明函數只有在初始化的時候執行一次相當于componentDidMount */
},[ a ,number ])
return (<div ref={div} >
<span>{ userMessage.name }</span>
<span>{ userMessage.age }</span>
<div onClick={ ()=> setNumber(1) } >{ number }</div>
</div>)
}
復制代碼
~~~
**useEffect可以用作事件監聽,還有一些基于`dom`的操作。**,別忘了在`useEffect`第一個參數回調函數,返一個函數用于清除事件監聽等操作。
~~~jsx
const DemoEffect = ({ a }) => {
/* 模擬事件監聽處理函數 */
const handleResize =()=>{}
useEffect(()=>{
/* 定時器 延時器等 */
const timer = setInterval(()=>console.log(666),1000)
/* 事件監聽 */
window.addEventListener('resize', handleResize)
/* 此函數用于清除副作用 */
return function(){
clearInterval(timer)
window.removeEventListener('resize', handleResize)
}
},[ a ])
return (<div >
</div>)
}
復制代碼
~~~
## useMemo
`useMemo`接受兩個參數,第一個參數是一個函數,返回值用于產生**保存值**。 第二個參數是一個數組,作為`dep`依賴項,數組里面的依賴項發生變化,重新執行第一個函數,產生**新的值**。
應用場景: **1 緩存一些值,避免重新執行上下文**
~~~js
const number = useMemo(()=>{
/** ....大量的邏輯運算 **/
return number
},[ props.number ]) // 只有 props.number 改變的時候,重新計算number的值。
復制代碼
~~~
**2 減少不必要的`dom`循環**
~~~js
/* 用 useMemo包裹的list可以限定當且僅當list改變的時候才更新此list,這樣就可以避免selectList重新循環 */
{useMemo(() => (
<div>{
selectList.map((i, v) => (
<span
className={style.listSpan}
key={v} >
{i.patentName}
</span>
))}
</div>
), [selectList])}
復制代碼
~~~
**3 減少子組件渲染**
~~~js
/* 只有當props中,list列表改變的時候,子組件才渲染 */
const goodListChild = useMemo(()=> <GoodList list={ props.list } /> ,[ props.list ])
復制代碼
~~~
## useCallback
`useMemo` 和 `useCallback` 接收的參數都是一樣,都是在其依賴項發生變化后才執行,都是返回緩存的值,區別在于 `useMemo` 返回的是函數運行的結果, `useCallback` 返回的是函數。 返回的`callback`可以作為`props`回調函數傳遞給子組件。
~~~js
/* 用react.memo */
const DemoChildren = React.memo((props)=>{
/* 只有初始化的時候打印了 子組件更新 */
console.log('子組件更新')
useEffect(()=>{
props.getInfo('子組件')
},[])
return <div>子組件</div>
})
const DemoUseCallback=({ id })=>{
const [number, setNumber] = useState(1)
/* 此時usecallback的第一參數 (sonName)=>{ console.log(sonName) }
經過處理賦值給 getInfo */
const getInfo = useCallback((sonName)=>{
console.log(sonName)
},[id])
return <div>
{/* 點擊按鈕觸發父組件更新 ,但是子組件沒有更新 */}
<button onClick={ ()=>setNumber(number+1) } >增加</button>
<DemoChildren getInfo={getInfo} />
</div>
}
復制代碼
~~~
## useRef
`useRef`的作用:
* 一 是可以用來獲取`dom`元素,或者`class`組件實例 。
* 二 `react-hooks原理`文章中講過,創建`useRef`時候,會創建一個原始對象,只要函數組件不被銷毀,原始對象就會一直存在,那么我們可以利用這個特性,來通過`useRef`保存一些數據。
~~~jsx
const DemoUseRef = ()=>{
const dom= useRef(null)
const handerSubmit = ()=>{
/* <div >表單組件</div> dom 節點 */
console.log(dom.current)
}
return <div>
{/* ref 標記當前dom節點 */}
<div ref={dom} >表單組件</div>
<button onClick={()=>handerSubmit()} >提交</button>
</div>
}
復制代碼
~~~
## useLayoutEffect
**`useEffect`執行順序:** 組件更新掛載完成 -> 瀏覽器 `dom` 繪制完成 -> 執行 `useEffect` 回調。 **`useLayoutEffect` 執行順序:** 組件更新掛載完成 -> 執行 `useLayoutEffect` 回調-> 瀏覽器`dom`繪制完成。
所以說 `useLayoutEffect` 代碼可能會阻塞瀏覽器的繪制 。我們寫的 `effect`和 `useLayoutEffect`,`react`在底層會被分別打上`PassiveEffect`,`HookLayout`,在`commit`階段區分出,在什么時機執行。
~~~jsx
const DemoUseLayoutEffect = () => {
const target = useRef()
useLayoutEffect(() => {
/*我們需要在dom繪制之前,移動dom到制定位置*/
const { x ,y } = getPositon() /* 獲取要移動的 x,y坐標 */
animate(target.current,{ x,y })
}, []);
return (
<div >
<span ref={ target } className="animate"></span>
</div>
)
}
復制代碼
~~~
## useReducer
在`react-hooks`原理那篇文章中講解到,`useState`底層就是一個簡單版的`useReducer`
`useReducer` 接受的第一個參數是一個函數,我們可以認為它就是一個 `reducer` , `reducer` 的參數就是常規 `reducer` 里面的 `state` 和 `action` ,返回改變后的 `state` , `useReducer` 第二個參數為 `state` 的初始值 返回一個數組,數組的第一項就是更新之后 `state` 的值 ,第二個參數是派發更新的 `dispatch` 函數。
我們來看一下`useReducer`如何使用:
~~~js
const DemoUseReducer = ()=>{
/* number為更新后的state值, dispatchNumbner 為當前的派發函數 */
const [ number , dispatchNumbner ] = useReducer((state,action)=>{
const { payload , name } = action
/* return的值為新的state */
switch(name){
case 'add':
return state + 1
case 'sub':
return state - 1
case 'reset':
return payload
}
return state
},0)
return <div>
當前值:{ number }
{ /* 派發更新 */ }
<button onClick={()=>dispatchNumbner({ name:'add' })} >增加</button>
<button onClick={()=>dispatchNumbner({ name:'sub' })} >減少</button>
<button onClick={()=>dispatchNumbner({ name:'reset' ,payload:666 })} >賦值</button>
{ /* 把dispatch 和 state 傳遞給子組件 */ }
<MyChildren dispatch={ dispatchNumbner } State={{ number }} />
</div>
}
復制代碼
~~~
## useContext
我們可以使用 `useContext` ,來獲取父級組件傳遞過來的 `context` 值,這個當前值就是最近的父級組件 `Provider` 設置的 `value` `值,useContext` 參數一般是由 `createContext` 方式引入 ,也可以父級上下文 `context` 傳遞 ( 參數為 `context` )。`useContext` 可以代替 `context.Consumer` 來獲取 `Provider` 中保存的 `value` 值
~~~jsx
/* 用useContext方式 */
const DemoContext = ()=> {
const value:any = useContext(Context)
/* my name is alien */
return <div> my name is { value.name }</div>
}
/* 用Context.Consumer 方式 */
const DemoContext1 = ()=>{
return <Context.Consumer>
{/* my name is alien */}
{ (value)=> <div> my name is { value.name }</div> }
</Context.Consumer>
}
export default ()=>{
return <div>
<Context.Provider value={{ name:'alien' , age:18 }} >
<DemoContext />
<DemoContext1 />
</Context.Provider>
</div>
}
復制代碼
~~~
## useImperativeHandle
`useImperativeHandle` 可以配合 `forwardRef` 自定義暴露給父組件的實例值。這個很有用,我們知道,對于子組件,如果是`class`類組件,我們可以通過`ref`獲取類組件的實例,但是在子組件是函數組件的情況,如果我們不能直接通過`ref`的,那么此時`useImperativeHandle`和 `forwardRef`配合就能達到效果。
`useImperativeHandle`接受三個參數:
* 第一個參數ref: 接受 `forWardRef` 傳遞過來的 `ref`。
* 第二個參數 `createHandle` :處理函數,返回值作為暴露給父組件的`ref`對象。
* 第三個參數 `deps`:依賴項 `deps`,依賴項更改形成新的`ref`對象。
**我們來模擬給場景,用`useImperativeHandle`,使得父組件能讓子組件中的`input`自動賦值并聚焦。**
~~~js
function Son (props,ref) {
console.log(props)
const inputRef = useRef(null)
const [ inputValue , setInputValue ] = useState('')
useImperativeHandle(ref,()=>{
const handleRefs = {
/* 聲明方法用于聚焦input框 */
onFocus(){
inputRef.current.focus()
},
/* 聲明方法用于改變input的值 */
onChangeValue(value){
setInputValue(value)
}
}
return handleRefs
},[])
return <div>
<input
placeholder="請輸入內容"
ref={inputRef}
value={inputValue}
/>
</div>
}
const ForwarSon = forwardRef(Son)
class Index extends React.Component{
inputRef = null
handerClick(){
const { onFocus , onChangeValue } =this.cur
onFocus()
onChangeValue('let us learn React!')
}
render(){
return <div style={{ marginTop:'50px' }} >
<ForwarSon ref={node => (this.inputRef = node)} />
<button onClick={this.handerClick.bind(this)} >操控子組件</button>
</div>
}
}
復制代碼
~~~
**效果:**

## useDebugValue
`useDebugValue` 可用于在 `React` 開發者工具中顯示自定義 `hook` 的標簽。這個`hooks`目的就是檢查自定義`hooks`
~~~js
function useFriendStatus(friendID) {
const [isOnline, setIsOnline] = useState(null);
// ...
// 在開發者工具中的這個 Hook 旁邊顯示標簽
// e.g. "FriendStatus: Online"
useDebugValue(isOnline ? 'Online' : 'Offline');
return isOnline;
}
復制代碼
~~~
> 我們不推薦你向每個自定義 Hook 添加 debug 值。當它作為共享庫的一部分時才最有價值。在某些情況下,格式化值的顯示可能是一項開銷很大的操作。除非需要檢查 Hook,否則沒有必要這么做。因此,useDebugValue 接受一個格式化函數作為可選的第二個參數。該函數只有在 Hook 被檢查時才會被調用。它接受 debug 值作為參數,并且會返回一個格式化的顯示值。
## useTransition
`useTransition`允許延時由`state`改變而帶來的視圖渲染。避免不必要的渲染。它還允許組件將速度較慢的數據獲取更新推遲到隨后渲染,以便能夠立即渲染更重要的更新。
~~~js
const TIMEOUT_MS = { timeoutMs: 2000 }
const [startTransition, isPending] = useTransition(TIMEOUT_MS)
復制代碼
~~~
* `useTransition` 接受一個對象, `timeoutMs`代碼需要延時的時間。
* 返回一個數組。**第一個參數:** 是一個接受回調的函數。我們用它來告訴 `React` 需要推遲的 `state` 。 **第二個參數:** 一個布爾值。表示是否正在等待,過度狀態的完成(延時`state`的更新)。
下面我們引入官網的列子,來了解`useTransition`的使用。
~~~js
const SUSPENSE_CONFIG = { timeoutMs: 2000 };
function App() {
const [resource, setResource] = useState(initialResource);
const [startTransition, isPending] = useTransition(SUSPENSE_CONFIG);
return (
<>
<button
disabled={isPending}
onClick={() => {
startTransition(() => {
const nextUserId = getNextId(resource.userId);
setResource(fetchProfileData(nextUserId));
});
}}
>
Next
</button>
{isPending ? " 加載中..." : null}
<Suspense fallback={<Spinner />}>
<ProfilePage resource={resource} />
</Suspense>
</>
);
}
復制代碼
~~~
在這段代碼中,我們使用 `startTransition` 包裝了我們的數據獲取。這使我們可以立即開始獲取用戶資料的數據,同時推遲下一個用戶資料頁面以及其關聯的 `Spinner` 的渲染 2 秒鐘( `timeoutMs` 中顯示的時間)。
這個`api`目前處于實驗階段,沒有被完全開放出來。
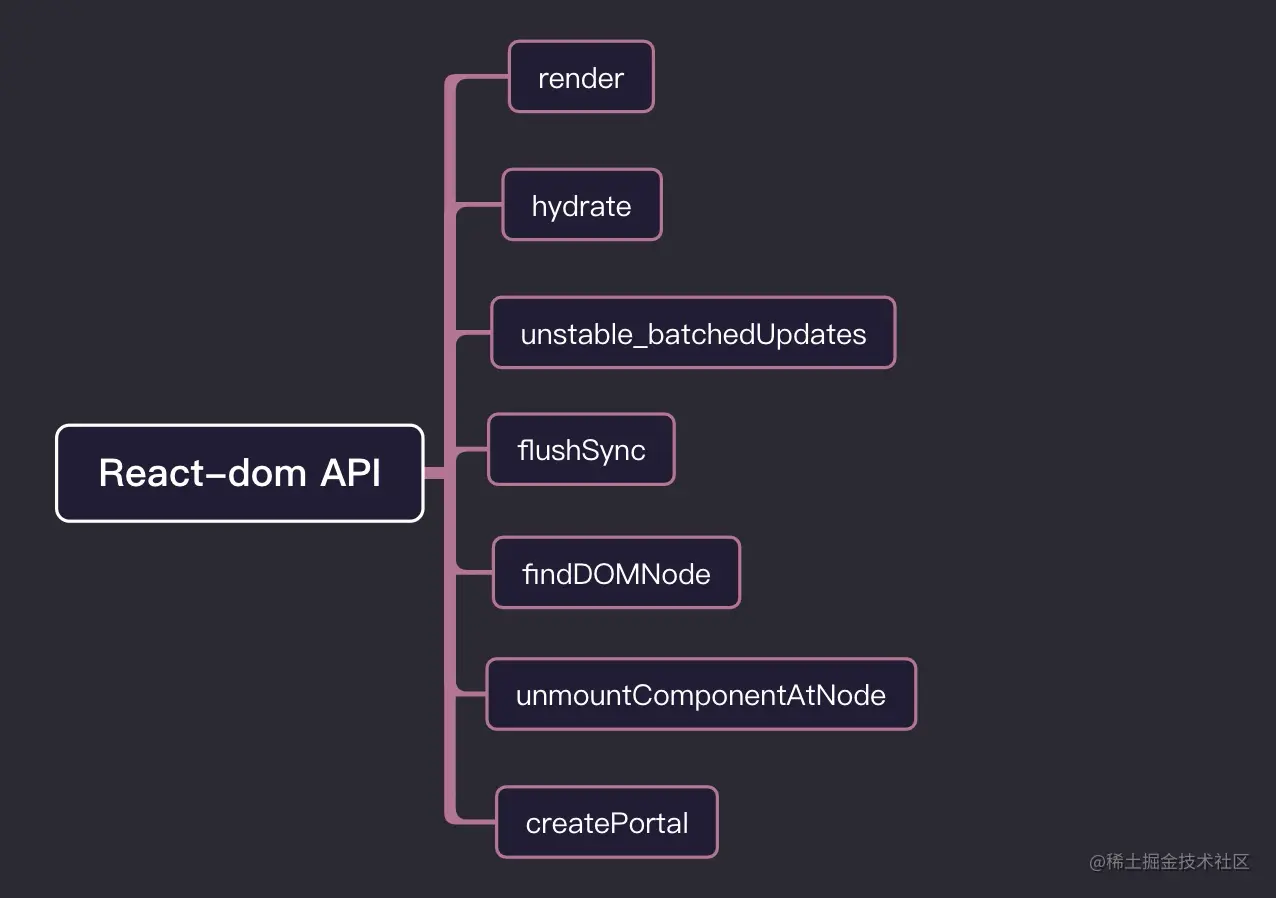
# react-dom
接下來,我們來一起研究`react-dom`中比較重要的`api`。
## render
`render` 是我們最常用的`react-dom`的 `api`,用于渲染一個`react`元素,一般`react`項目我們都用它,渲染根部容器`app`。
~~~js
ReactDOM.render(element, container[, callback])
復制代碼
~~~
**使用**
~~~jsx
ReactDOM.render(
< App / >,
document.getElementById('app')
)
復制代碼
~~~
`ReactDOM.render`會控制`container`容器節點里的內容,但是不會修改容器節點本身。
## hydrate
服務端渲染用`hydrate`。用法與 `render()` 相同,但它用于在 `ReactDOMServer` 渲染的容器中對 `HTML` 的內容進行 `hydrate` 操作。
~~~js
ReactDOM.hydrate(element, container[, callback])
復制代碼
~~~
## createPortal
`Portal` 提供了一種將子節點渲染到存在于父組件以外的 `DOM` 節點的優秀的方案。`createPortal` 可以把當前組件或 `element` 元素的子節點,渲染到組件之外的其他地方。
那么具體應用到什么場景呢?
比如一些全局的彈窗組件`model`,`<Model/>`組件一般都寫在我們的組件內部,倒是真正掛載的`dom`,都是在外層容器,比如`body`上。此時就很適合`createPortal`API。
`createPortal`接受兩個參數:
~~~js
ReactDOM.createPortal(child, container)
復制代碼
~~~
第一個: `child` 是任何可渲染的 `React` 子元素 第二個: `container`是一個 `DOM` 元素。
接下來我們實踐一下:
~~~js
function WrapComponent({ children }){
const domRef = useRef(null)
const [ PortalComponent, setPortalComponent ] = useState(null)
React.useEffect(()=>{
setPortalComponent( ReactDOM.createPortal(children,domRef.current) )
},[])
return <div>
<div className="container" ref={ domRef } ></div>
{ PortalComponent }
</div>
}
class Index extends React.Component{
render(){
return <div style={{ marginTop:'50px' }} >
<WrapComponent>
<div >hello,world</div>
</WrapComponent>
</div>
}
}
復制代碼
~~~
**效果**
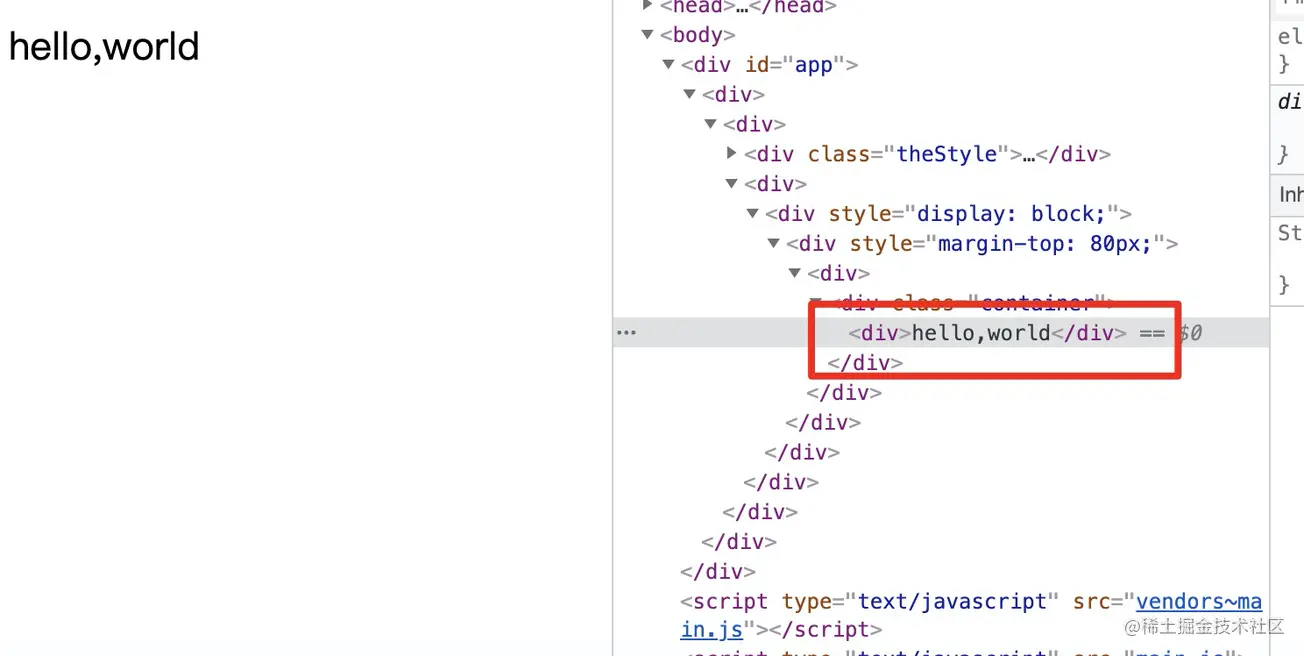
我們可以看到,我們`children`實際在`container` 之外掛載的,但是已經被`createPortal`渲染到`container`中。
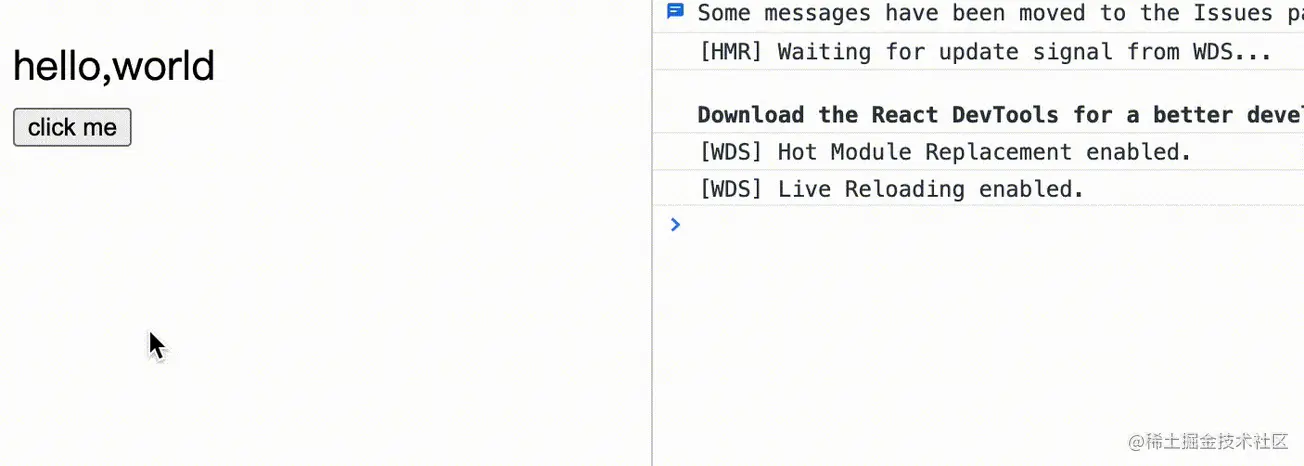
## unstable\_batchedUpdates
在`react-legacy`模式下,對于事件,`react`事件有批量更新來處理功能,但是這一些非常規的事件中,批量更新功能會被打破。所以我們可以用`react-dom`中提供的`unstable_batchedUpdates` 來進行批量更新。
**一次點擊實現的批量更新**
~~~js
class Index extends React.Component{
constructor(props){
super(props)
this.state={
numer:1,
}
}
handerClick=()=>{
this.setState({ numer : this.state.numer + 1 })
console.log(this.state.numer)
this.setState({ numer : this.state.numer + 1 })
console.log(this.state.numer)
this.setState({ numer : this.state.numer + 1 })
console.log(this.state.numer)
}
render(){
return <div style={{ marginTop:'50px' }} >
<button onClick={ this.handerClick } >click me</button>
</div>
}
}
復制代碼
~~~
**效果**
渲染次數一次。
**批量更新條件被打破**
~~~js
handerClick=()=>{
Promise.resolve().then(()=>{
this.setState({ numer : this.state.numer + 1 })
console.log(this.state.numer)
this.setState({ numer : this.state.numer + 1 })
console.log(this.state.numer)
this.setState({ numer : this.state.numer + 1 })
console.log(this.state.numer)
})
}
復制代碼
~~~
**效果**

渲染次數三次。
**unstable\_batchedUpdate助力**
~~~js
handerClick=()=>{
Promise.resolve().then(()=>{
ReactDOM.unstable_batchedUpdates(()=>{
this.setState({ numer : this.state.numer + 1 })
console.log(this.state.numer)
this.setState({ numer : this.state.numer + 1 })
console.log(this.state.numer)
this.setState({ numer : this.state.numer + 1 })
console.log(this.state.numer)
})
})
}
復制代碼
~~~
渲染次數一次,完美解決批量更新問題。
## flushSync
`flushSync` 可以將回調函數中的更新任務,放在一個較高的優先級中。我們知道`react`設定了很多不同優先級的更新任務。如果一次更新任務在`flushSync`回調函數內部,那么將獲得一個較高優先級的更新。比如
~~~js
ReactDOM.flushSync(()=>{
/* 此次更新將設置一個較高優先級的更新 */
this.setState({ name: 'alien' })
})
復制代碼
~~~
為了讓大家理解`flushSync`,我這里做一個`demo`奉上,
~~~js
/* flushSync */
import ReactDOM from 'react-dom'
class Index extends React.Component{
state={ number:0 }
handerClick=()=>{
setTimeout(()=>{
this.setState({ number: 1 })
})
this.setState({ number: 2 })
ReactDOM.flushSync(()=>{
this.setState({ number: 3 })
})
this.setState({ number: 4 })
}
render(){
const { number } = this.state
console.log(number) // 打印什么??
return <div>
<div>{ number }</div>
<button onClick={this.handerClick} >測試flushSync</button>
</div>
}
}
復制代碼
~~~
先不看答案,點擊一下按鈕,打印什么呢?
**我們來點擊一下看看**
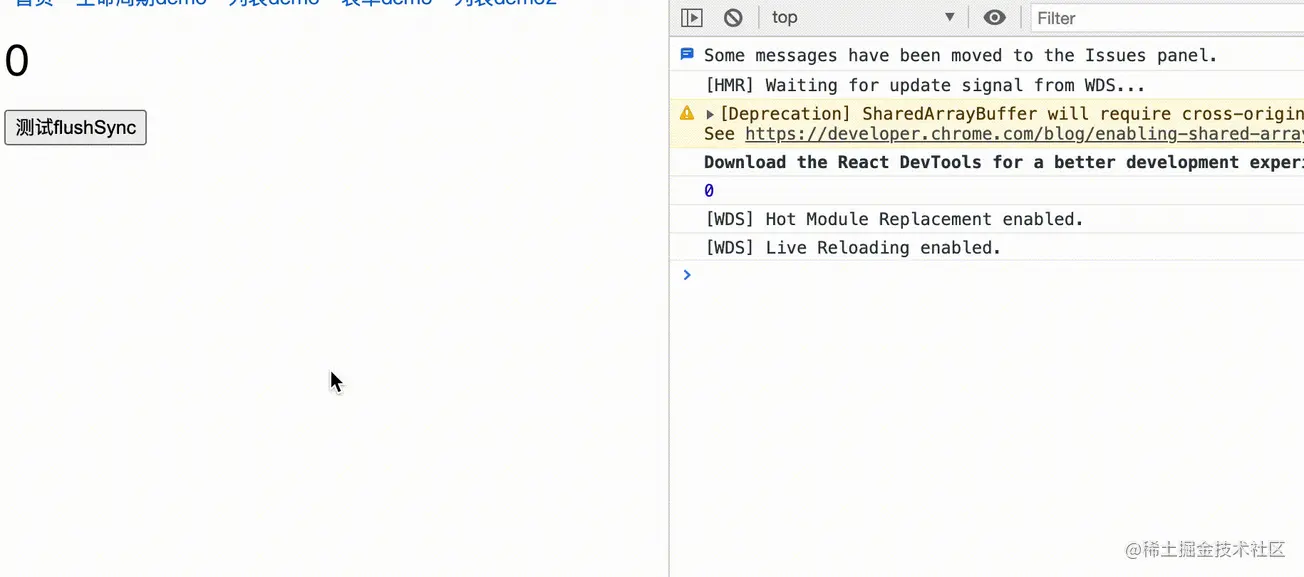
打印 0 3 4 1 ,相信不難理解為什么這么打印了。
* 首先 `flushSync` `this.setState({ number: 3 })`設定了一個高優先級的更新,所以3 先被打印
* 2 4 被批量更新為 4
相信這個`demo`讓我們更深入了解了`flushSync`。
## findDOMNode
`findDOMNode`用于訪問組件`DOM`元素節點,`react`推薦使用`ref`模式,不期望使用`findDOMNode`。
~~~js
ReactDOM.findDOMNode(component)
復制代碼
~~~
注意的是:
* 1 `findDOMNode`只能用在已經掛載的組件上。
* 2 如果組件渲染內容為 `null` 或者是 `false`,那么 `findDOMNode`返回值也是 `null`。
* 3 `findDOMNode` 不能用于函數組件。
接下來讓我們看一下,`findDOMNode`具體怎么使用的:
~~~js
class Index extends React.Component{
handerFindDom=()=>{
console.log(ReactDOM.findDOMNode(this))
}
render(){
return <div style={{ marginTop:'100px' }} >
<div>hello,world</div>
<button onClick={ this.handerFindDom } >獲取容器dom</button>
</div>
}
}
復制代碼
~~~
**效果:**
我們完全可以將外層容器用`ref`來標記,獲取捕獲原生的`dom`節點。
## unmountComponentAtNode
從 `DOM` 中卸載組件,會將其事件處理器和 `state` 一并清除。 如果指定容器上沒有對應已掛載的組件,這個函數什么也不會做。如果組件被移除將會返回 `true` ,如果沒有組件可被移除將會返回 `false` 。
我們來簡單舉例看看`unmountComponentAtNode`如何使用?
~~~js
function Text(){
return <div>hello,world</div>
}
class Index extends React.Component{
node = null
constructor(props){
super(props)
this.state={
numer:1,
}
}
componentDidMount(){
/* 組件初始化的時候,創建一個 container 容器 */
ReactDOM.render(<Text/> , this.node )
}
handerClick=()=>{
/* 點擊卸載容器 */
const state = ReactDOM.unmountComponentAtNode(this.node)
console.log(state)
}
render(){
return <div style={{ marginTop:'50px' }} >
<div ref={ ( node ) => this.node = node } ></div>
<button onClick={ this.handerClick } >click me</button>
</div>
}
}
復制代碼
~~~
**效果**
# 總結
本文通過`react`組件層面,工具層面,`hooks`層面,`react-dom`了解了`api`的用法,希望看完的同學,能夠對著文章中的`demo`自己敲一遍,到頭來會發現自己成長不少。
最后, 送人玫瑰,手留余香,覺得有收獲的朋友可以給筆者**點贊,關注**一波 ,陸續更新前端超硬核文章。
提前透漏:接下來會出一部揭秘`react`事件系統的文章。
**感興趣的同學請關注公眾號 `前端Sharing` 持續推送優質好文**
## 往期react文章
文章中,對于其他沒有講到的`react-hooks`,建議大家看`react-hooks`三部曲。
**react-hooks三部曲**
* [第一部: react-hooks如何使用](https://juejin.cn/post/6864438643727433741 "https://juejin.cn/post/6864438643727433741") `150+` 贊??
* [第二部:玩轉react-hooks,自定義hooks設計模式及其實戰](https://juejin.cn/post/6890738145671938062 "https://juejin.cn/post/6890738145671938062") `240+` ??贊
* [第三部:「react進階」一文吃透react-hooks原理](https://juejin.cn/post/6944863057000529933 "https://juejin.cn/post/6944863057000529933") `820`
**react進階系列**
* [「react進階」年終送給react開發者的八條優化建議](https://juejin.cn/post/6908895801116721160 "https://juejin.cn/post/6908895801116721160") `918+` 贊??
* [「react進階」一文吃透React高階組件(HOC)](https://juejin.cn/post/6940422320427106335 "https://juejin.cn/post/6940422320427106335") `330+` 贊??
**react源碼系列**
* [「源碼解析 」這一次徹底弄懂react-router路由原理](https://juejin.cn/post/6886290490640039943 "https://juejin.cn/post/6886290490640039943") `132+` 贊??
* [「源碼解析」一文吃透react-redux源碼(useMemo經典源碼級案例)](https://juejin.cn/post/6937491452838559781 "https://juejin.cn/post/6937491452838559781") `143+` 贊??
**開源項目系列**
* [「react緩存頁面」從需求到開源(我是怎么樣讓產品小姐姐刮目相看的)](https://juejin.cn/post/6922340460136513549 "https://juejin.cn/post/6922340460136513549") `300+` 贊??
* [「前端工程化」從0-1搭建react,ts腳手架(1.2w字超詳細教程)](https://juejin.cn/post/6919308174151385096 "https://juejin.cn/post/6919308174151385096") `330+` 贊??
## 參考文檔
[react中文文檔](https://link.juejin.cn?target=https%3A%2F%2Freactjs.org%2F "https://reactjs.org/")
作者:我不是外星人
鏈接:https://juejin.cn/post/6950063294270930980
來源:稀土掘金
著作權歸作者所有。商業轉載請聯系作者獲得授權,非商業轉載請注明出處。
