[TOC]
## 鍵盤事件
在 Canvas 中,常用的鍵盤事件有兩種
(1)鍵盤按下:keydown
(2)鍵盤松開:keyup
鍵盤事件中一般都是根據按鍵的 keyCode 來判斷用戶按下的是鍵盤中的哪個鍵,常見的按鍵及其對應的 keyCode 如下表:
| 按鍵 | keyCode |
| --- | --- |
| W | 87 |
| S | 83 |
| A | 65 |
| D | 68 |
| ↑ | 38 |
| ↓ | 40 |
| ← | 37 |
| → | 39 |
我們先寫一個 tool.js 做一些封裝
```js
// 獲取鍵盤控制方向
window.tools.getKey = function () {
var key = {}
window.addEventListener('keydown', function (e) {
if (e.keyCode === 38 || e.keyCode === 87) {
key.direction = 'up'
} else if (e.keyCode === 39 || e.keyCode === 68) {
key.direction = 'right'
} else if (e.keyCode === 40 || e.keyCode === 83) {
key.direction = 'down'
} else if (e.keyCode === 37 || e.keyCode === 65) {
key.direction = 'left'
} else {
key.direction = ''
}
}, false)
return key
}
```
getKey() 方法返回一個對象 key,這個對象有一個 direction 屬性,表示用戶控制物體移動的方向。使用時只需要判斷 direction 屬性值是什么即可。
```html
<!DOCTYPE html>
<html lang="en">
<head>
<meta charset="UTF-8">
<meta name="viewport" content="width=device-width, initial-scale=1.0">
<meta http-equiv="X-UA-Compatible" content="ie=edge">
<title>鍵盤控制小球移動</title>
<script src="./tool.js"></script>
</head>
<body>
<canvas id="canvas" width="480" height="300" style="border: 1px solid gray; display: block; margin: 0 auto;"></canvas>
<script>
window.onload = function () {
let cnv = document.getElementById('canvas')
let cxt = cnv.getContext('2d')
// 初始化一個圓形
drawBall(cnv.width / 2, cnv.height / 2)
// 初始化變量
let x = 100
let y = 75
// 獲取按鍵方向
let key = tools.getKey()
// 添加鼠標按下事件
window.addEventListener('keydown', function (e) {
// 清除整個 Canvas,以重繪圖形
cxt.clearRect(0, 0, cnv.width, cnv.height)
// 根據 key.direction 的值,判斷小球移動方向
switch (key.direction) {
case 'up':
y -= 2
drawBall(x, y)
break
case 'down':
y += 2
drawBall(x, y)
break
case 'left':
x -= 2
drawBall(x, y)
break
case 'right':
x += 2
drawBall(x, y)
break
default: // 如果不加 default 按下其他按鍵小球就會消失了!
drawBall(x, y)
}
}, false)
// 定義繪制小球的函數
function drawBall (x, y) {
cxt.beginPath()
cxt.arc(x, y, 20, 0, 360 * Math.PI / 180, true)
cxt.closePath()
cxt.fillStyle = '#6699FF'
cxt.fill()
}
}
</script>
</body>
</html>
```
這里先引入了 tool.js 文件,以便使用 getKey() 方法來獲取用戶控制小球的方向,然后使用 window.addEventListener() 來監聽鍵盤事件,根據 key.direction 的值來判斷小球移動的方向以實現控制小球的移動。
## requestAnimationFrame() 的使用
Canvas 中一般都使用 requestAnimationFrame() 來實現循環,從而達到動畫效果,常見的語法如下,詳細解釋見 [MDN](https://developer.mozilla.org/zh-CN/docs/Web/API/Window/requestAnimationFrame)
```js
(function frame () {
window.requestAnimationFrame(frame)
context.clearRect(0, 0, canvas.width, canvas.height)
// ...
})()
```
這里定義了一個自執行函數 frame(),然后在函數內部使用 window.requestAnimationFrame() 不斷調用 frame()。對于 Canvas 動畫效果,每次必須清空畫布然后重繪才行,所以需要使用 clearRect() 方法清空畫布。
requestAnimationFrame() 方法的兼容代碼如下:
```js
window.requestAnimationFrame = (
window.webkitRequestAnimationFrame ||
window.mozRequestAnimationFrame ||
window.msRequestAnimationFrame ||
window.oRequestAnimationFrame ||
function (callback) {
return window.setTimeout(callback, 1000 / 60)
}
)
```
```html
<!DOCTYPE html>
<html lang="en">
<head>
<meta charset="UTF-8">
<meta name="viewport" content="width=device-width, initial-scale=1.0">
<meta http-equiv="X-UA-Compatible" content="ie=edge">
<title>循環動畫</title>
</head>
<body>
<canvas id="canvas" width="480" height="300" style="border: 1px solid gray; display: block; margin: 0 auto;"></canvas>
<script>
window.onload = function () {
let cnv = document.getElementById('canvas')
let cxt = cnv.getContext('2d')
// 初始化圓的 x 軸坐標為 0
let x = 0;
// 動畫循環
(function frame () {
window.requestAnimationFrame(frame)
cxt.clearRect(0, 0, cnv.width, cnv.height)
// 繪制圓
cxt.beginPath()
cxt.arc(x, 70, 20, 0, 360 * Math.PI / 180, true)
cxt.closePath()
cxt.fillStyle = 'skyblue'
cxt.fill()
// 變量遞增
x += 2
})()
}
</script>
</body>
</html>
```
## 物理動畫
物理動畫,簡單來說,就是模擬現實世界的一種動畫效果。在物理動畫中,物體會遵循牛頓運動定律。
### 三角函數

對應 JavaScript 中的函數如下:
- sin(θ):Math.sin(θ * Math.PI / 180)
- cos(θ):Math.cos(θ * Math.PI / 180)
- tan(θ):Math.tan(θ * Math.PI / 180)
- arcsin(x / R):Math.asin(x / R) * (180 / Math.PI)
- arccos(x / R): Math.acos(x / R) * (180 / Math.PI)
- arctan(x / R): Math.atan(x / R) * (180 / Math.PI)
在 Canvas 中,凡是涉及角度都是用 “弧度制” 表示,例如 180° 寫成 Math.PI,360° 寫成 Math.PI * 2,所以角度都推薦下面這種寫法
```js
度數 * Math.PI / 180
```
<span style="font-size: 15px; font-weight: 600; color: #409EFF;">Math.atan() 與 Math.atan2()</span>
使用 Math.atan() 函數可能會出現有一個度數對應兩個夾角的情況,如圖(注意 canvas 中的坐標系):

對于上圖中的四個內角,將有以下正切值:
tan(A) = tan(C) = -0.5
tan(B) = tan(D) = 0.5
為了解決這個問題,可以使用反正切函數 Math.atan2() 來求出兩條邊之間夾角的度數,并且能夠準確判斷度數對應哪一個夾角。

`Math.atan2(y, x)`接收兩個參數,y 表示對邊的變長,x 表示鄰邊的邊長
Math.atan(1 / 2) 和 Math.atan((-1) / (-2)) 的結果是一樣的,但是對于 Math.atan2() 函數而言,其結果是不同的。
```js
console.log(Math.atan2(1, 2), Math.atan2(-1, -2))
// 0.4636476090008061 -2.677945044588987
console.log(`Math.atan2(1, 2) 對應的角度為: ${Math.atan2(1, 2) * 180 / Math.PI}
Math.atan2(-1, -2) 對應的角度為: ${Math.atan2(-1, -2) * 180 / Math.PI}
`)
// Math.atan2(1, 2) 對應的角度為: 26.56505117707799
// Math.atan2(-1, -2) 對應的角度為: -153.43494882292202
```

可以看到 Math.atan2(1, 2) 對應的是角 B,而 Math.atan2(-1, -2) 對應的是角 D,-153。43° 這個角度是從 x 軸正方向開始以逆時針方向計算的,這樣就把兩個角區分開來了。

下面的示例是 Math.atan2() 的一個經典效果:追隨鼠標旋轉
首先寫一個箭頭類 arrow.js 用于繪制箭頭
```js
Arrow.prototype = {
stroke: function (cxt) {
cxt.save()
cxt.translate(this.x, this.y)
cxt.rotate(this.angle)
cxt.strokeStyle = this.color
cxt.beginPath()
cxt.moveTo(-20, -10)
cxt.lineTo(0, -10)
cxt.lineTo(0, -20)
cxt.lineTo(20, 0)
cxt.lineTo(0, 20)
cxt.lineTo(0, 10)
cxt.lineTo(-20, 10)
cxt.closePath()
cxt.stroke()
cxt.restore()
},
fill: function (cxt) {
cxt.save()
cxt.translate(this.x, this.y)
cxt.rotate(this.angle)
cxt.fillStyle = this.color
cxt.beginPath()
cxt.moveTo(-20, -10)
cxt.lineTo(0, -10)
cxt.lineTo(0, -20)
cxt.lineTo(20, 0)
cxt.lineTo(0, 20)
cxt.lineTo(0, 10)
cxt.lineTo(-20, 10)
cxt.closePath()
cxt.fill()
cxt.restore()
}
}
```
```html
<!DOCTYPE html>
<html lang="en">
<head>
<meta charset="UTF-8">
<meta name="viewport" content="width=device-width, initial-scale=1.0">
<meta http-equiv="X-UA-Compatible" content="ie=edge">
<title>追隨鼠標旋轉</title>
<script src="./arrow.js"></script>
<script src="./tool.js"></script>
</head>
<body>
<canvas id="canvas" width="480" height="300" style="border: 1px solid gray; display: block; margin: 0 auto;"></canvas>
<script>
window.onload = function () {
let cnv = document.getElementById('canvas')
let cxt = cnv.getContext('2d')
// 實例化一個箭頭,中心坐標為畫布中心坐標
let arrow = new Arrow(cnv.width / 2, cnv.height / 2)
// 獲取鼠標坐標
let mouse = tools.getMouse(cnv); // 這里記得加分號,封裝見 tools.js
(function drawFrame () {
window.requestAnimationFrame(drawFrame, cnv)
cxt.clearRect(0, 0, cnv.width, cnv.height)
let dx = mouse.x - cnv.width / 2
let dy = mouse.y - cnv.height / 2
// 使用 Math.atan2() 方法計算出鼠標與建投中心的夾角
arrow.angle = Math.atan2(dy, dx)
arrow.fill(cxt)
})()
}
</script>
</body>
</html>
```

效果:當鼠標在畫布上移動時,箭頭會跟著鼠標移動的方向進行旋轉。其原理很簡單,在動畫循環過程中,每次鼠標移動的時候,都會計算鼠標當前位置與箭頭中心的夾角,然后把這個夾角作為箭頭旋轉的角度,重繪箭頭即可。

<span style="font-size: 15px; font-weight: 600; color: #409EFF;">圓周運動</span>
Canvas 中的圓周運動一般有兩種,即正圓運動和橢圓運動。
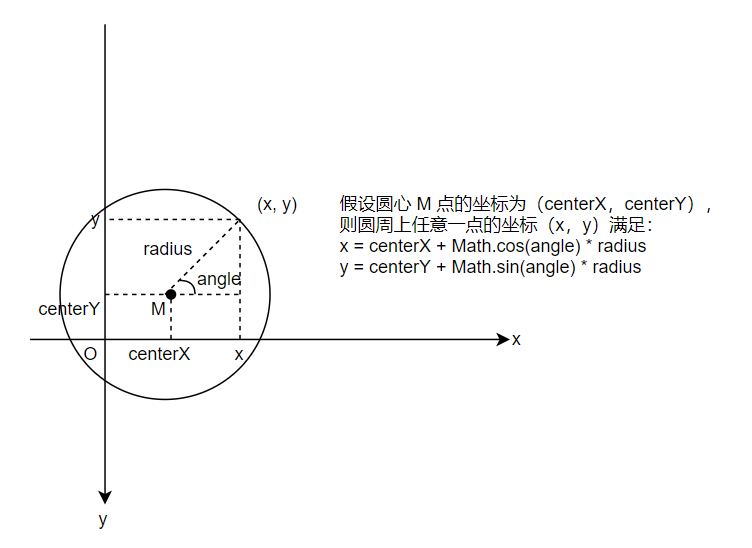
正圓運動就是利用上圖中的數學公式,下面做一個小球做正圓運動的例子:
首先建立一個 ball.js 文件用于存放小球類:
```js
function Ball (x, y, radius, color) {
this.x = x || 0
this.y = y || 0
this.radius = radius || 12
this.color = color || '#6699FF'
this.scaleX = 1
this.scaleY = 1
}
Ball.prototype = {
// 繪制 "描邊" 小球
stroke: function (cxt) {
cxt.save()
cxt.scale(this.scaleX, this.scaleY)
cxt.strokeStyle = this.color
cxt.beginPath()
cxt.arc(this.x, this.y, this.radius, 0, 360 * Math.PI / 180, false)
cxt.closePath()
cxt.stroke()
cxt.restore()
},
// 繪制 "填充" 小球
fill: function (cxt) {
cxt.save()
cxt.translate(this.x, this.y)
cxt.rotate(this.rotation)
cxt.scale(this.scaleX, this.scaleY)
cxt.fillStyle = this.color
cxt.beginPath()
cxt.arc(0, 0, this.radius, 0, 360 * Math.PI / 180, false)
cxt.closePath()
cxt.fill()
cxt.restore()
}
}
```
把圓的坐標公式套進去就能完成動畫了。
```html
<!DOCTYPE html>
<html lang="en">
<head>
<meta charset="UTF-8">
<meta name="viewport" content="width=device-width, initial-scale=1.0">
<meta http-equiv="X-UA-Compatible" content="ie=edge">
<title>正圓運動</title>
<script src="./ball.js"></script>
<script src="./tool.js"></script>
</head>
<body>
<canvas id="canvas" width="480" height="300" style="border: 1px solid gray; display: block; margin: 0 auto;"></canvas>
<script>
window.onload = function () {
let cnv = document.getElementById('canvas')
let cxt = cnv.getContext('2d')
// 實例化一個小球,中心坐標為 (100, 25),半徑、顏色都取默認值
let ball = new Ball(100, 25)
let centerX = cnv.width / 2
let centerY = cnv.height / 2
let radius = 50
let angle = 0;
(function frame () {
window.requestAnimationFrame(frame)
cxt.clearRect(0, 0, cnv.width, cnv.height)
// 繪制圓形
cxt.beginPath()
cxt.arc(centerX, centerY, 50, 0, 360 * Math.PI / 180, false)
cxt.closePath()
cxt.stroke()
// 計算小球坐標
ball.x = centerX + Math.cos(angle) * radius
ball.y = centerY + Math.sin(angle) * radius
ball.fill(cxt)
// 角度遞增
angle += 0.05
})()
}
</script>
</body>
</html>
```

<span style="font-size: 15px; font-weight: 600; color: #409EFF;">橢圓運動</span>
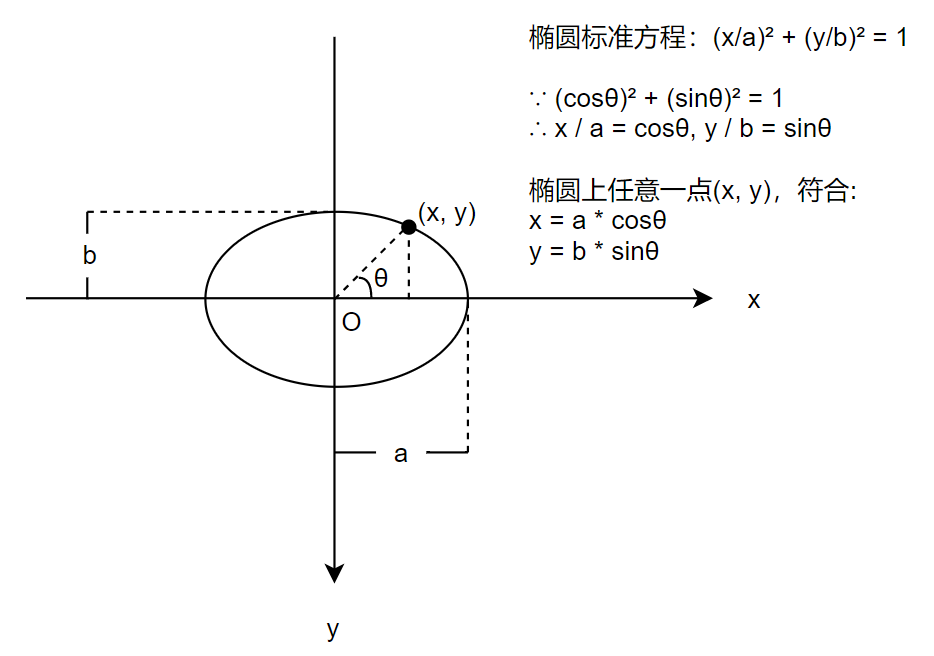
總之就是把上面的公式套進去即可,代碼略作修改:
```js
ball.x = centerX + Math.cos(angle) * radiusX
ball.y = centerY + Math.sin(angle) * radiusY
```

<span style="font-size: 15px; font-weight: 600; color: #409EFF;">波形運動</span>
正弦函數 sin 和余弦函數 cos 都有屬于它們自身的波形,由于它倆是相似的,這里僅以 sin 函數為例介紹。
在 Canvas 中,根據 sin 函數作用對象的不同,常見的波形運動可以分為三種
(1)作用于 x 軸坐標
(2)作用于 y 軸坐標
(3)作用于縮放屬性(scaleX 或 scaleY)
1、作用于 x 軸坐標
當正弦函數作用于物體中心的 x 軸坐標時,物體會進行左右搖擺,類似于水草在水流中左右搖擺
語法:
```js
x = centerX + Math.sin(angle) * range
angel += speed
```
其中,(centerX,centerY)表示物體中心坐標,angle 表示角度(弧度制),range 表示振幅,speed 表示角度改變的大小。
```html
<!DOCTYPE html>
<html lang="en">
<head>
<meta charset="UTF-8">
<meta name="viewport" content="width=device-width, initial-scale=1.0">
<meta http-equiv="X-UA-Compatible" content="ie=edge">
<title>正圓運動</title>
<script src="./ball.js"></script>
<script src="./tool.js"></script>
</head>
<body>
<canvas id="canvas" width="480" height="300" style="border: 1px solid gray; display: block; margin: 0 auto;"></canvas>
<script>
window.onload = function () {
let cnv = document.getElementById('canvas')
let cxt = cnv.getContext('2d')
let ball = new Ball(cnv.width / 2, cnv.height / 2)
let angle = 0
let range = 80;
(function frame () {
window.requestAnimationFrame(frame)
cxt.clearRect(0, 0, cnv.width, cnv.height)
// 計算小球坐標
ball.x = cnv.width / 2 + Math.sin(angle) * range
ball.fill(cxt)
// 角度遞增
angle += 0.05
})()
}
</script>
</body>
</html>
```

當正弦函數 sin 只作用于物體的 x 軸坐標時,就可以實現類似水草擺動的平滑運動效果。如果想使擺動的幅度看起來更明顯一些,可以乘以一個較大的值(振幅)。
2、作用于 y 軸坐標
當正弦函數 sin 作用于物體中心的 y 軸坐標時,物體運動的軌跡剛好就是 sin 函數的波形
語法:
```js
y = centerY + Math.sin(angle) * rangel
angle += speed
```
```js
ball.x += 1
ball.y = cnv.height / 2 + Math.sin(angle) * range
ball.fill(cxt)
```

3、作用于縮放屬性(scaleX 或 scaleY)
當正弦函數 sin 作用于物體的縮放屬性時,物體會不斷地放大然后縮小,從而產生一種脈沖動畫的效果。
語法:
```js
scaleX = 1 + Math.sin(angle) * range
scaleY = 1 + Math.sin(angle) * range
angle += speed
```
```html
<!DOCTYPE html>
<html lang="en">
<head>
<meta charset="UTF-8">
<meta name="viewport" content="width=device-width, initial-scale=1.0">
<meta http-equiv="X-UA-Compatible" content="ie=edge">
<title>sin 函數作用于縮放屬性</title>
<script src="./ball.js"></script>
<script src="./tool.js"></script>
</head>
<body>
<canvas id="canvas" width="480" height="300" style="border: 1px solid gray; display: block; margin: 0 auto;"></canvas>
<script>
window.onload = function () {
let cnv = document.getElementById('canvas')
let cxt = cnv.getContext('2d')
let ball = new Ball(cnv.width / 2, cnv.height / 2, 25)
let range = 0.5
let angle = 0;
(function frame () {
window.requestAnimationFrame(frame)
cxt.clearRect(0, 0, cnv.width, cnv.height)
ball.scaleX = 1 + Math.sin(angle) * range
ball.scaleY = 1 + Math.sin(angle) * range
ball.fill(cxt)
// 角度遞增
angle += 0.05
})()
}
</script>
</body>
</html>
```

### 勻速運動
勻速運動是一種加速度為 0 的運動,比較簡單,語法如下:
```js
object.x += vx
object.y += vy
```
其中,object.x 表示物體 x 軸坐標,object.y 表示物體 y 軸坐標。vx 表示 x 軸方向的速度大小,vy 表示 y 軸方向的速度大小。
如果我們想在任意方向上做勻速運動該怎么做呢?這就需要用到速度的合成與分解。

語法:
```js
vx = speed * Math.cos(angle * Math.PI / 180)
vy = speed * Math.sin(angle * Math.PI / 180)
object.x += vx
object.y += vy
```
下面是一個箭頭追隨鼠標勻速移動的例子:
```html
<!DOCTYPE html>
<html lang="en">
<head>
<meta charset="UTF-8">
<meta name="viewport" content="width=device-width, initial-scale=1.0">
<meta http-equiv="X-UA-Compatible" content="ie=edge">
<title>箭頭追隨鼠標移動</title>
<script src="./arrow.js"></script>
<script src="./tool.js"></script>
</head>
<body>
<canvas id="canvas" width="480" height="300" style="border: 1px solid gray; display: block; margin: 0 auto;"></canvas>
<script>
window.onload = function () {
let cnv = document.getElementById('canvas')
let cxt = cnv.getContext('2d')
// 實例化一個箭頭,中心坐標為畫布中心坐標
let arrow = new Arrow(cnv.width / 2, cnv.height / 2)
// 獲取鼠標坐標
let mouse = tools.getMouse(cnv)
let speed = 1.5
let angle = 0;
(function drawFrame () {
window.requestAnimationFrame(drawFrame, cnv)
cxt.clearRect(0, 0, cnv.width, cnv.height)
let dx = mouse.x - cnv.width / 2
let dy = mouse.y - cnv.height / 2
// 使用 Math.atan2() 方法計算出鼠標與箭頭中心的夾角
angle = Math.atan2(dy, dx)
let vx = Math.cos(angle) * speed
let vy = Math.sin(angle) * speed
arrow.x += vx
arrow.y += vy
arrow.angle = angle
arrow.fill(cxt)
})()
}
</script>
</body>
</html>
```

### 加速運動
勻速運動的速度大小是一直保持不變的,而加速運動的速度大小是會隨著時間變化而變化的。語法:
```js
vx += ax // ax 表示 x 軸方向加速度
vy += ay
object.x += vx
object.y += vy
```
同樣的,想做任意方向上的加速度就需要用到加速度的合成與分解。

語法:
```js
ax = a * Math.cos(angle * Math.PI / 180)
ay = a * Math.sin(angle * Math.PI / 180)
vx += ax
vy += ay
object.x += vx
object.y += vy
```
### 重力
語法:
```js
vy += gravity
object.y += vy
```
對于重力引起的運動,可以看成是沿著 y 軸正方向的加速運動。
利用重力的一個常見的效果就是自由落體反彈的效果,例子如下:
```html
<!DOCTYPE html>
<html lang="en">
<head>
<meta charset="UTF-8">
<meta name="viewport" content="width=device-width, initial-scale=1.0">
<meta http-equiv="X-UA-Compatible" content="ie=edge">
<title>重力應用</title>
<script src="./ball.js"></script>
<script src="./tool.js"></script>
</head>
<body>
<canvas id="canvas" width="480" height="300" style="border: 1px solid gray; display: block; margin: 0 auto;"></canvas>
<script>
window.onload = function () {
let cnv = document.getElementById('canvas')
let cxt = cnv.getContext('2d')
let ball = new Ball(cnv.width / 2, 0)
// y 軸初始速度為 0,重力加速度為 0.2,反彈系數為 -0.8
let vy = 0
const gravity = 0.2
const bounce = -0.8;
(function drawFrame () {
window.requestAnimationFrame(drawFrame)
cxt.clearRect(0, 0, cnv.width, cnv.height)
ball.y += vy
// 邊界檢測
if (ball.y > cnv.height - ball.radius) {
ball.y = cnv.height - ball.radius
// 速度反向并且減小
vy = vy * bounce
}
ball.fill(cxt)
// 變量遞增,注意放在圖形繪制之后
vy += gravity
})()
}
</script>
</body>
</html>
```

小球碰到地面一般都會反彈,由于反彈會有速度損耗,并且小球 y 軸速度方向會變為反方向,因此需要乘以一個反彈系數 bounce,其取值一般為 -1.0 ~ 0 之間的任意數。
### 摩擦力
摩擦力指的是阻礙物體相對運動的力,其方向與物體運動的方向相反。摩擦力只會改變速度的大小而不會改變它的方向,即摩擦力只能將物體的速度降為 0,但它無法讓物體掉頭往相反的方向移動。
語法:
```js
vx *= friction // 摩擦系數
vy *= friction
object.x += vx
object.y += vy
```
需要注意的是,當物體沿任意方向運動時,如果加入摩擦力因素,那么每次都應該先把該方向的速度分解為 x 軸和 y 軸兩個方向的分速度,然后再用分速度乘以摩擦系數,而不是分解摩擦力。
