[toc]
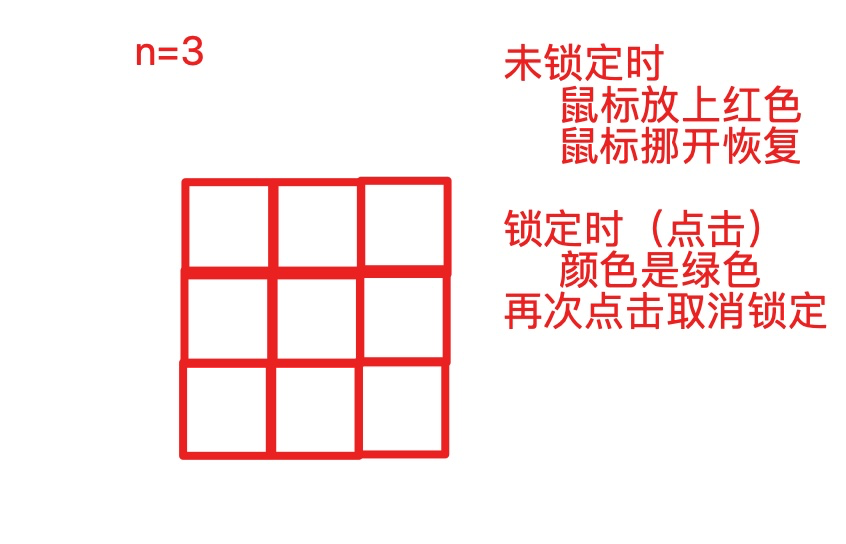
# 題1、使用原生 JS 的 DOM 實現:1. 彈出一個框,可以輸入一個數字 n 。 2. 然后在頁面中制作 n*n 個的格子 3.每個格子鼠標放上時背景色變為紅色,鼠標挪開時顏色恢復 4. 當點擊一個格子時,顏色變成綠色并鎖定這個顏色(鼠標放上、挪開不改變顏色) 5.點擊一個已經被鎖定的元素時,取消鎖定顏色恢復,繼承可以鼠標放上、挪開時改變顏色。(格子大小可以使用 CSS 控制,背景色的改變通過 JS 控制)
## 實現01-先根據 N 生成 table
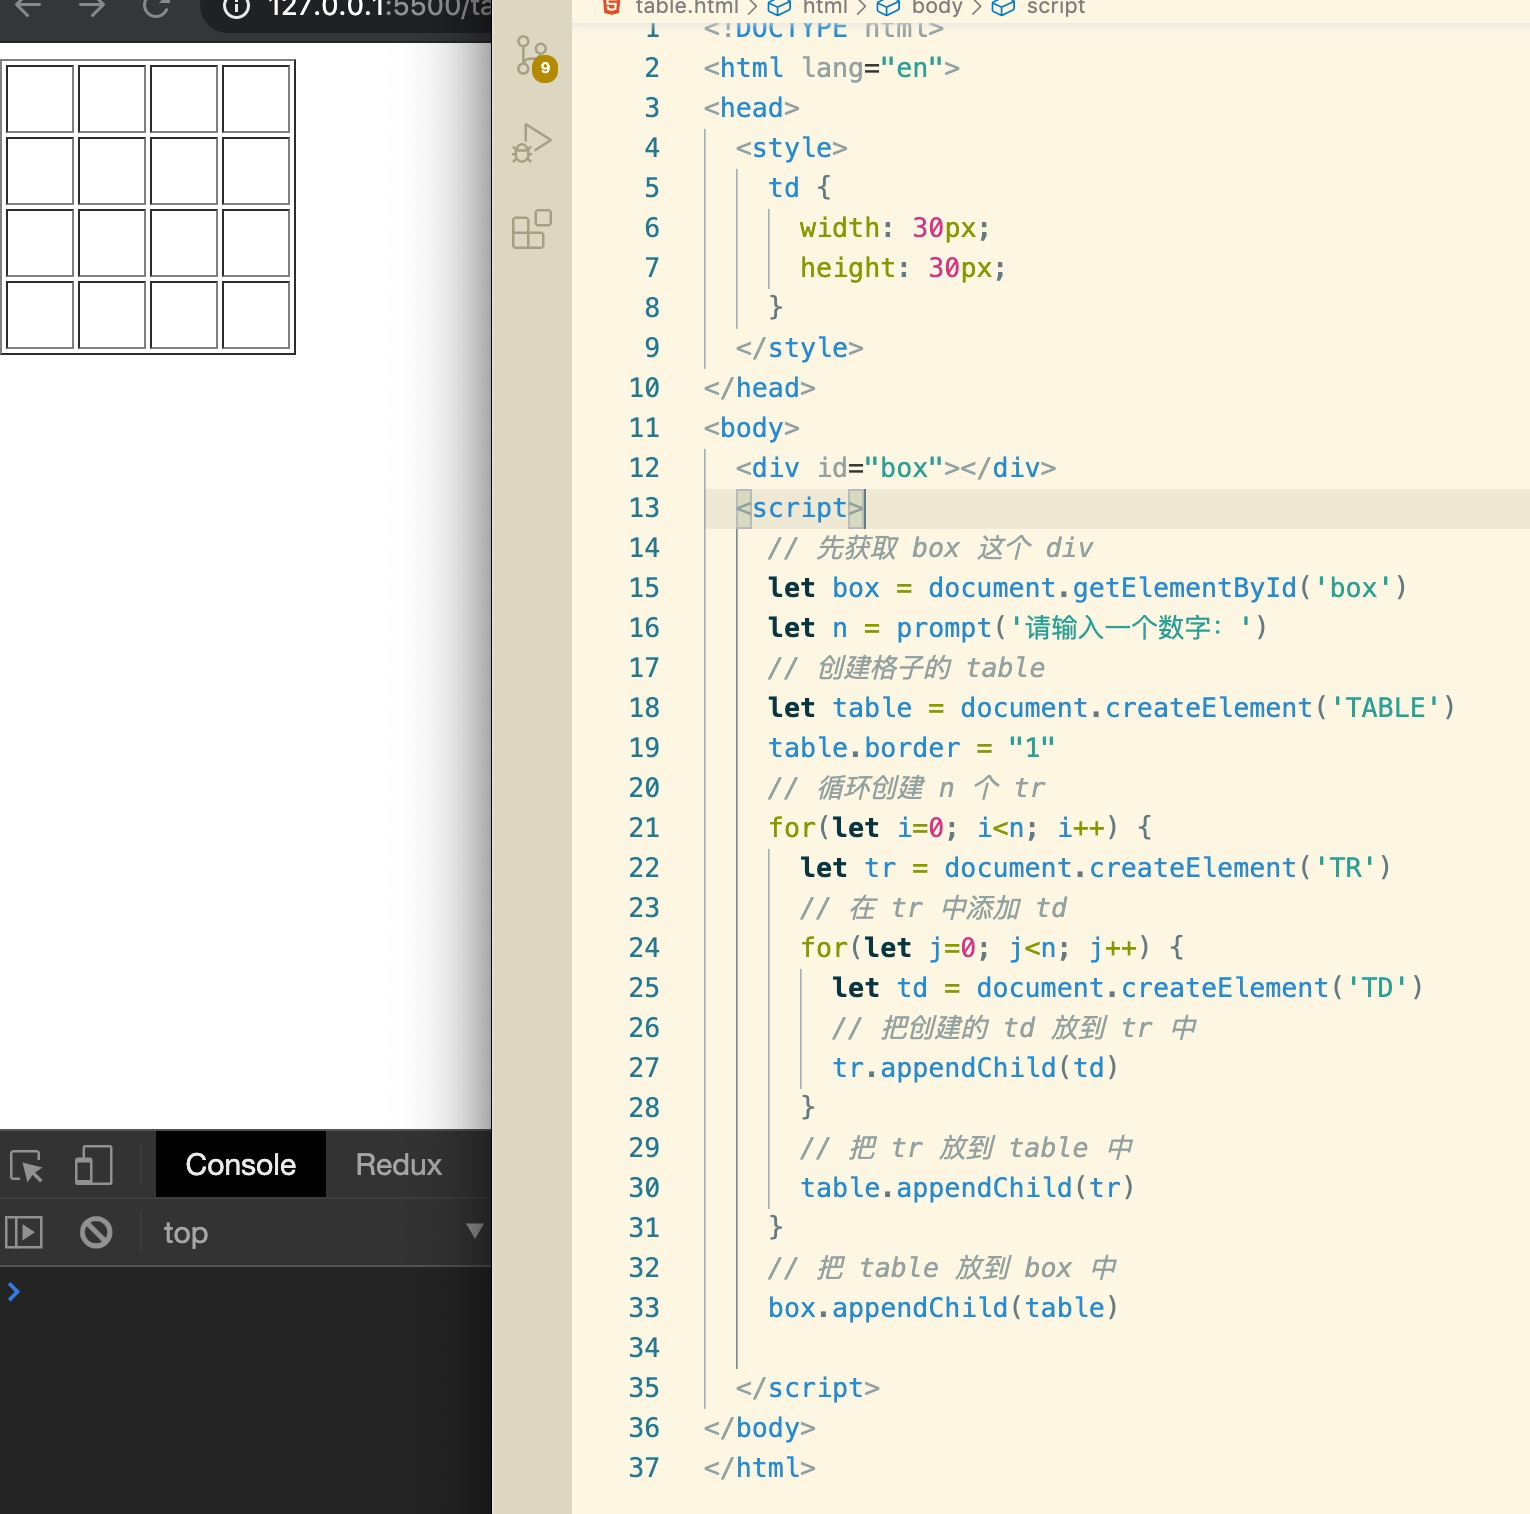
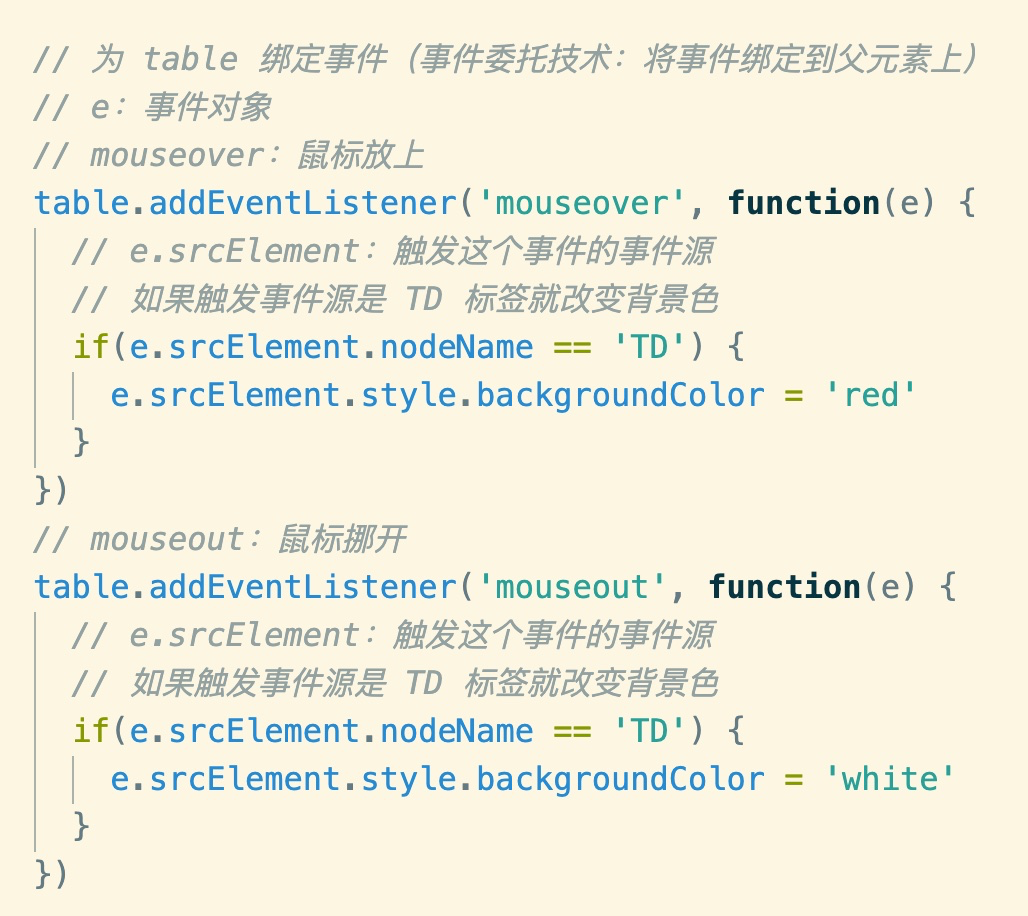
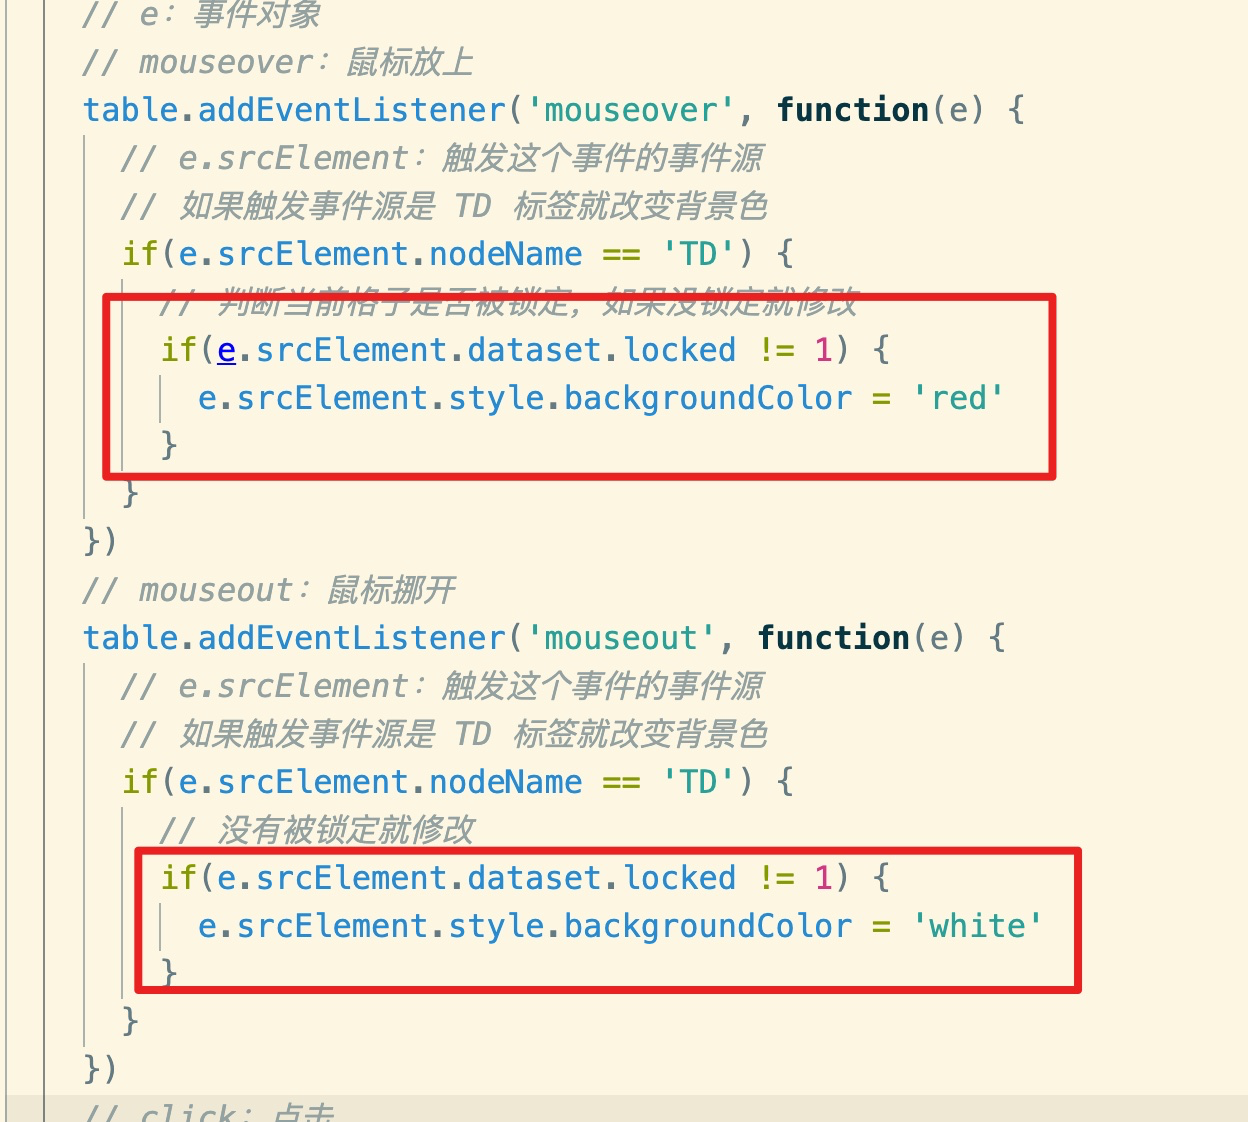
## 實現02-鼠標放上、挪開時改變背景色
說明:因為為每個 td 綁定事件,比較浪費資源(td太多),所以我們可以使用 `事件委托` 技術只在 table 上綁定一個事件即可:
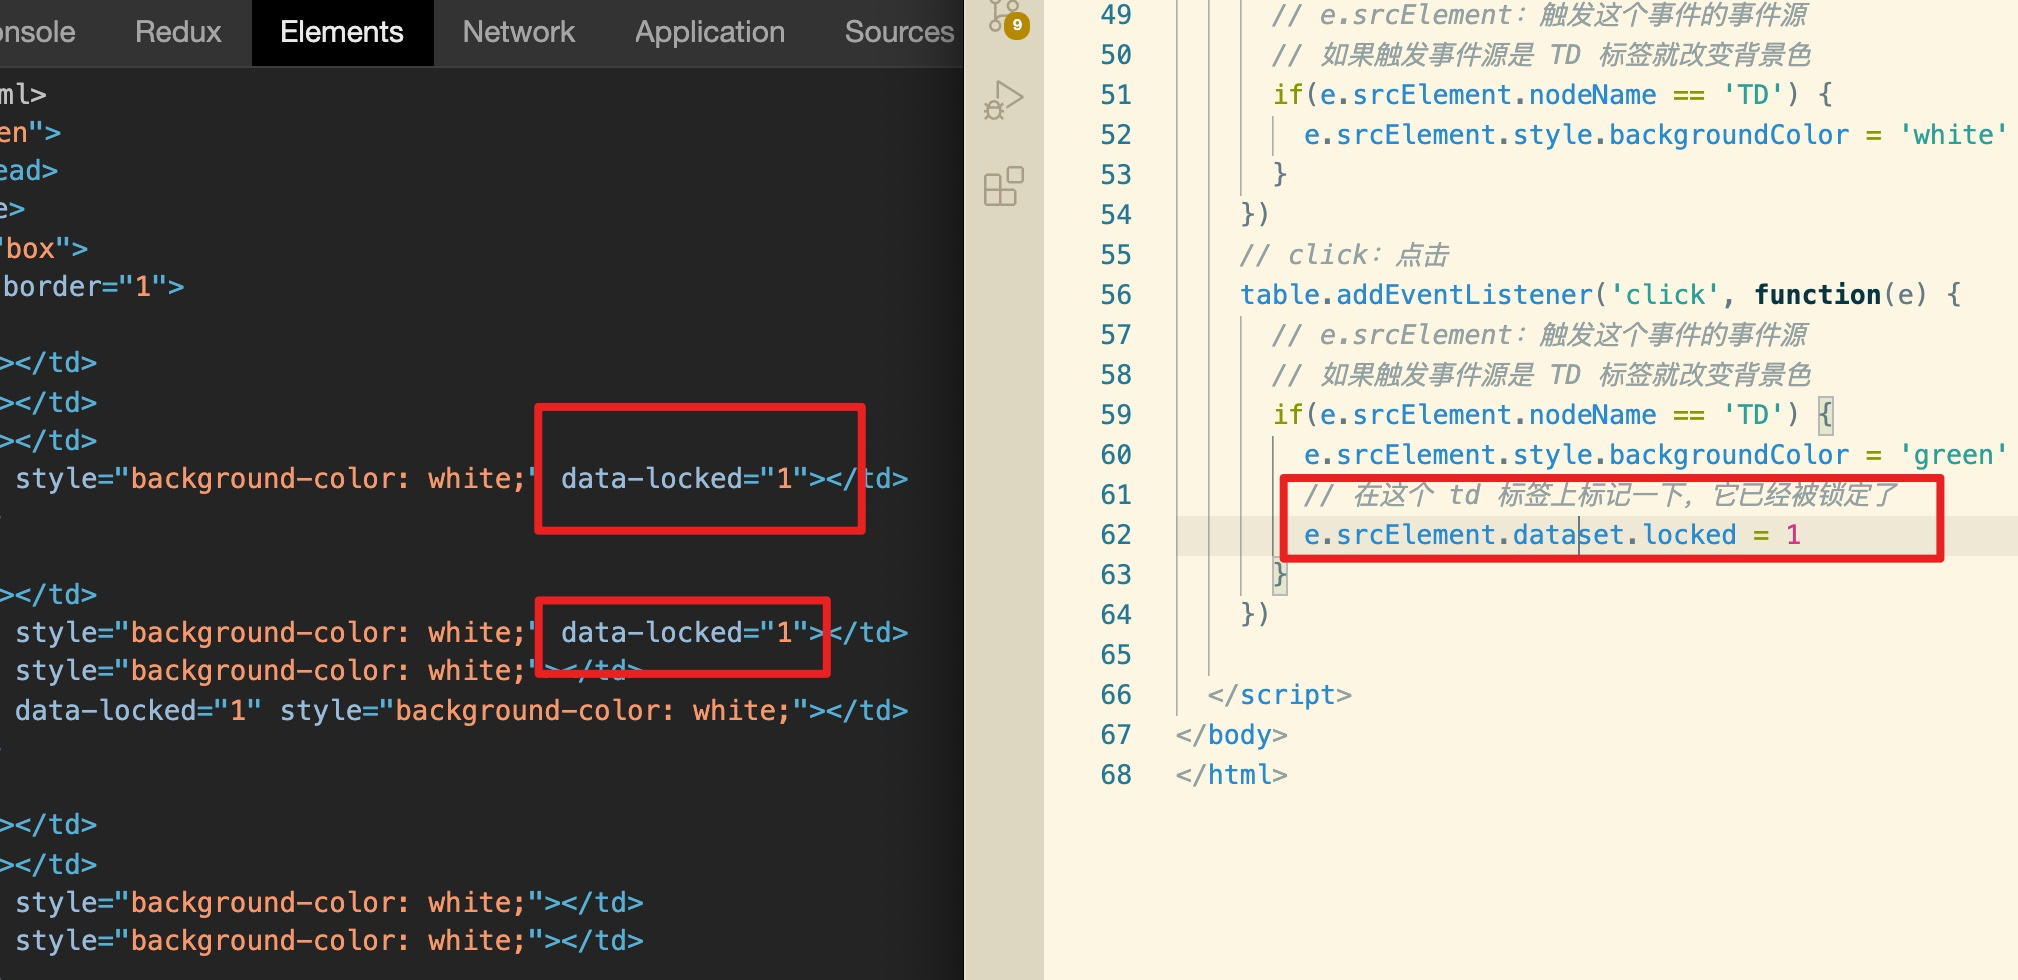
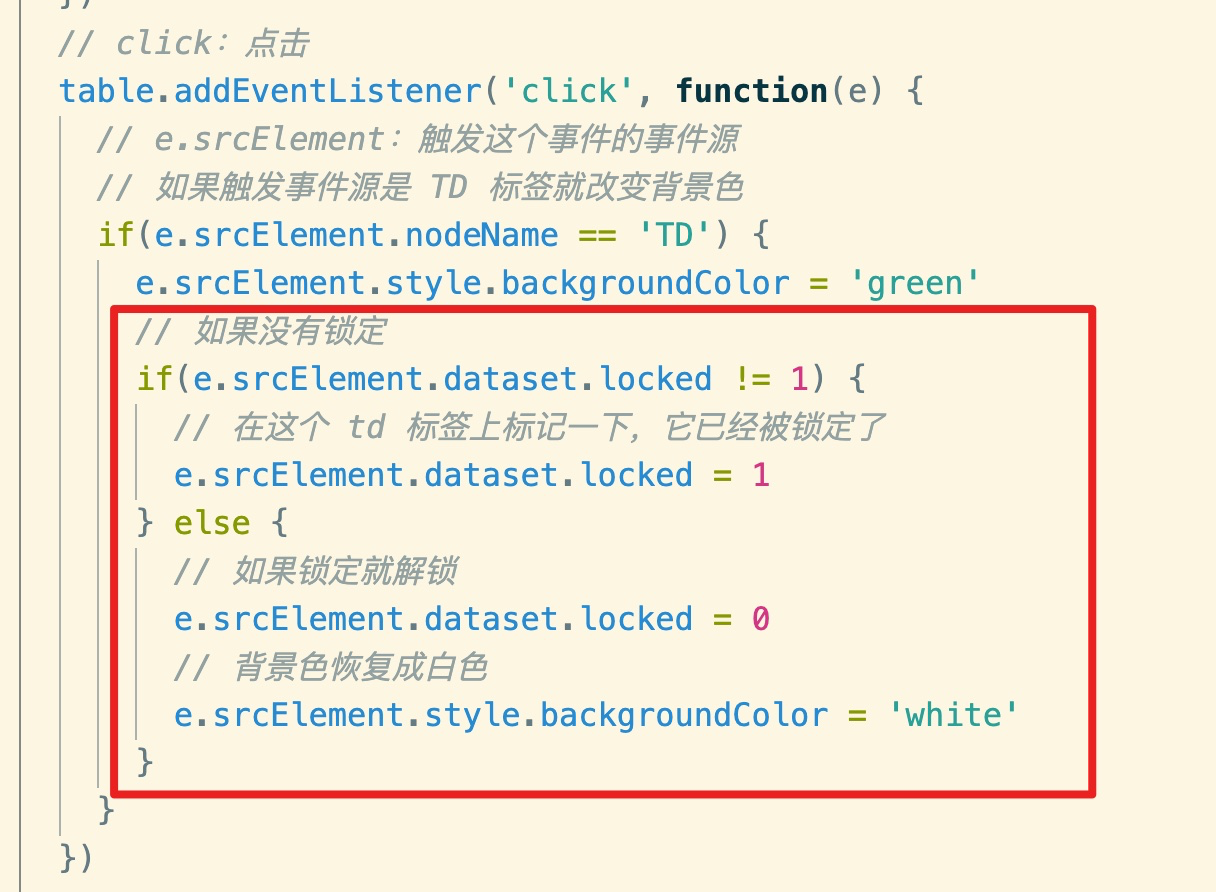
## 實現03-標記一個格子被鎖定了
為了標記至少有兩種實現思路:
思路一、創建一個 Map 數據類型,保存每個格子是否被鎖定的狀態。
let locked = new Map()
// 當點擊一個格子時
locked.set(格子對象, true) // 被鎖定了
思路二、直接在鼠標上自定義一個屬性來標記它的狀態
<td data-locked="1"></td>
<td data-locked="0"></td>
使用時直接 對象.dataSet 即可
以下采用第二種 dataset 的方案
## 實現04-如果鎖定就不允許修改
在鼠標放上和挪開時判斷是否被鎖定:
## 實現05-再次點擊時解鎖
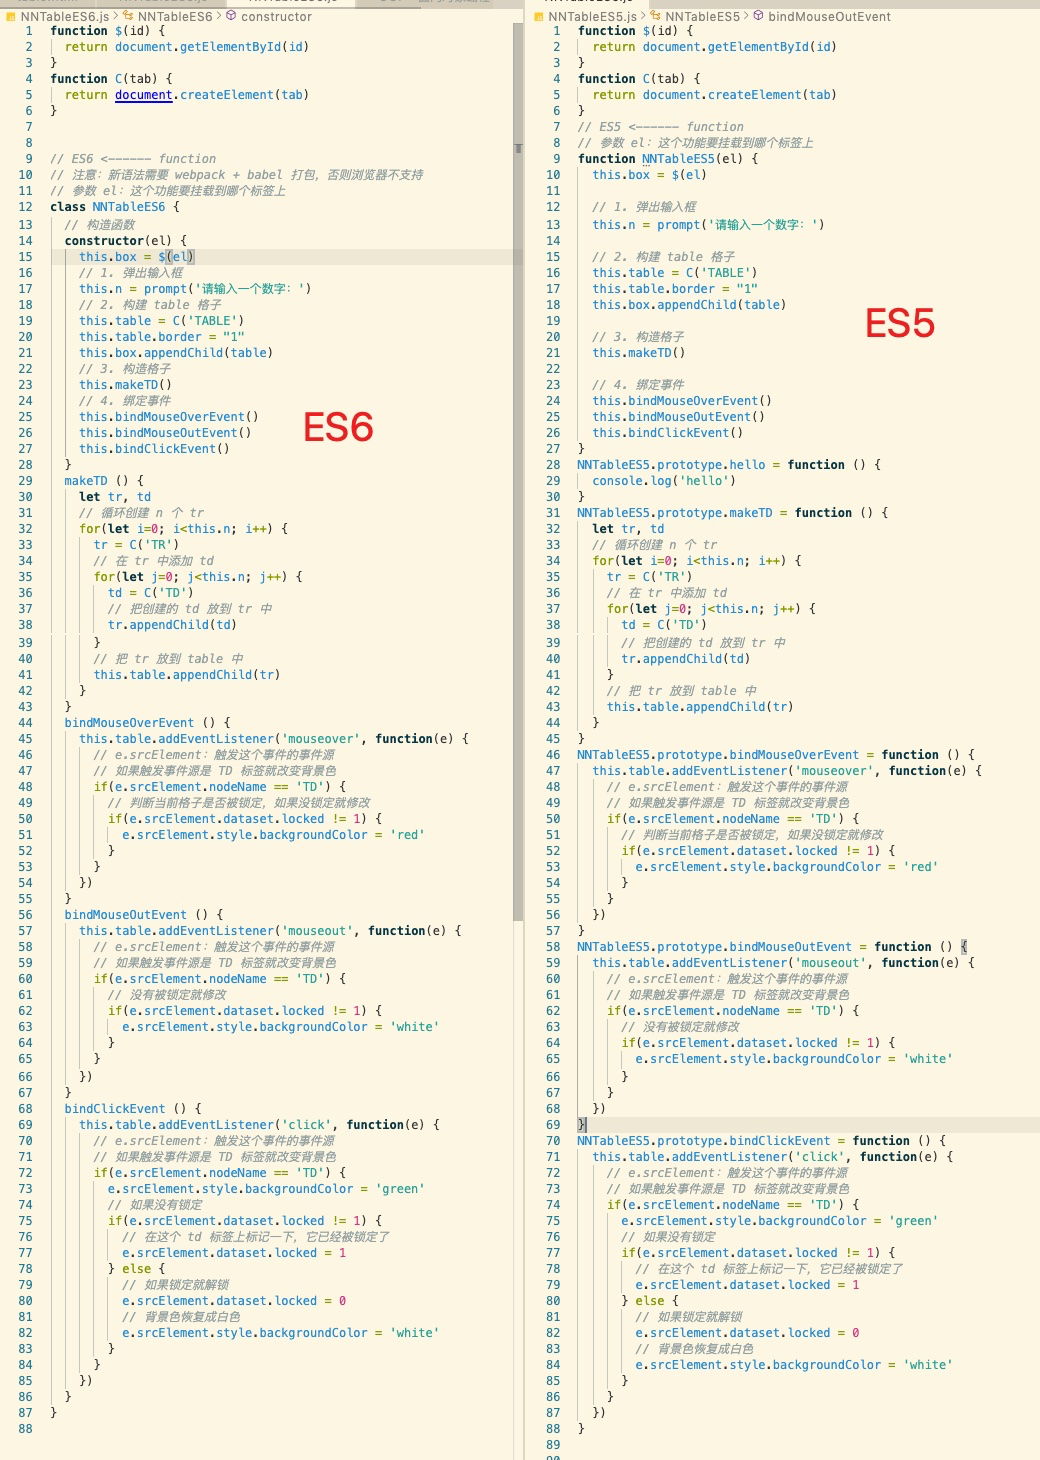
## 擴展:面向對象的寫法
# 題2、彈出兩個框,一個框輸入一個擁有總金額數量(整數),另一個框可以輸入多個商品的價格(多個數字之間用空格隔開),計算得出,這些總金額最多能購買多少件商品(每件商品只能購物一次)。
比如:輸入
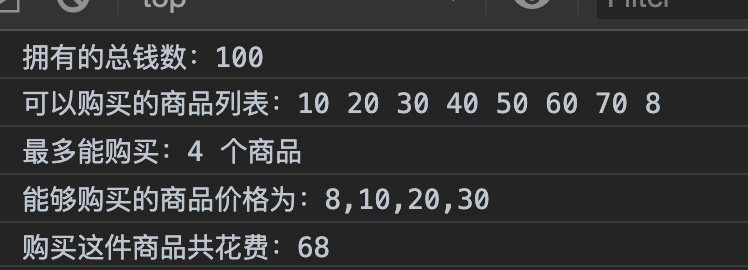
總金額:100
多個商品價格:10 40 49 60 70 80 100 300
得出的結果:
最多能買:3 個
哪些價格的商品:10 40 49
花費多少錢:99
實際思路:
1. 先把價格的字符串轉成數組(split 通過空格轉)
2. 對數組排序(sort((a,b)=>a-b))
3. 循環數組從第1個(最便宜的)開始循環累加商品金額,直到累加的金額大于,總金額為止
~~~
// 總金額
let totalPrice = prompt("請輸入總金額:")
// 商品價格列表
let goodsPrice = prompt("請輸入商品價格(多個用空格隔開):")
// 商品價格列表轉數組
let goodsArr = goodsPrice.split(/\s+/) // 根據至少一個連續的空格轉數組
// 讓數組升序排列
goodsArr.sort((a,b)=>a-b)
// 從數組的第一個商品開始購買
let sum = 0 // 已購買的商品的總價
let buy = [] // 已購買的商品的單價
let price
for(let i=0; i<goodsArr.length; i++) {
// 價格轉成數字(+、Number、parseInt、parseFloat)
price = Number(goodsArr[i])
// 如果沒有超出就繼續
if( (price + sum) <= totalPrice) {
sum += price
buy.push(price)
} else {
// 超出了就退出
break
}
}
// 結果輸出
console.log("擁有的總錢數:"+totalPrice)
console.log("可以購買的商品列表:"+goodsPrice)
console.log("最多能購買:"+buy.length+" 個商品")
console.log("能夠購買的商品價格為:"+buy.toString())
console.log("購買這件商品共花費:"+sum)
~~~
運行結果:
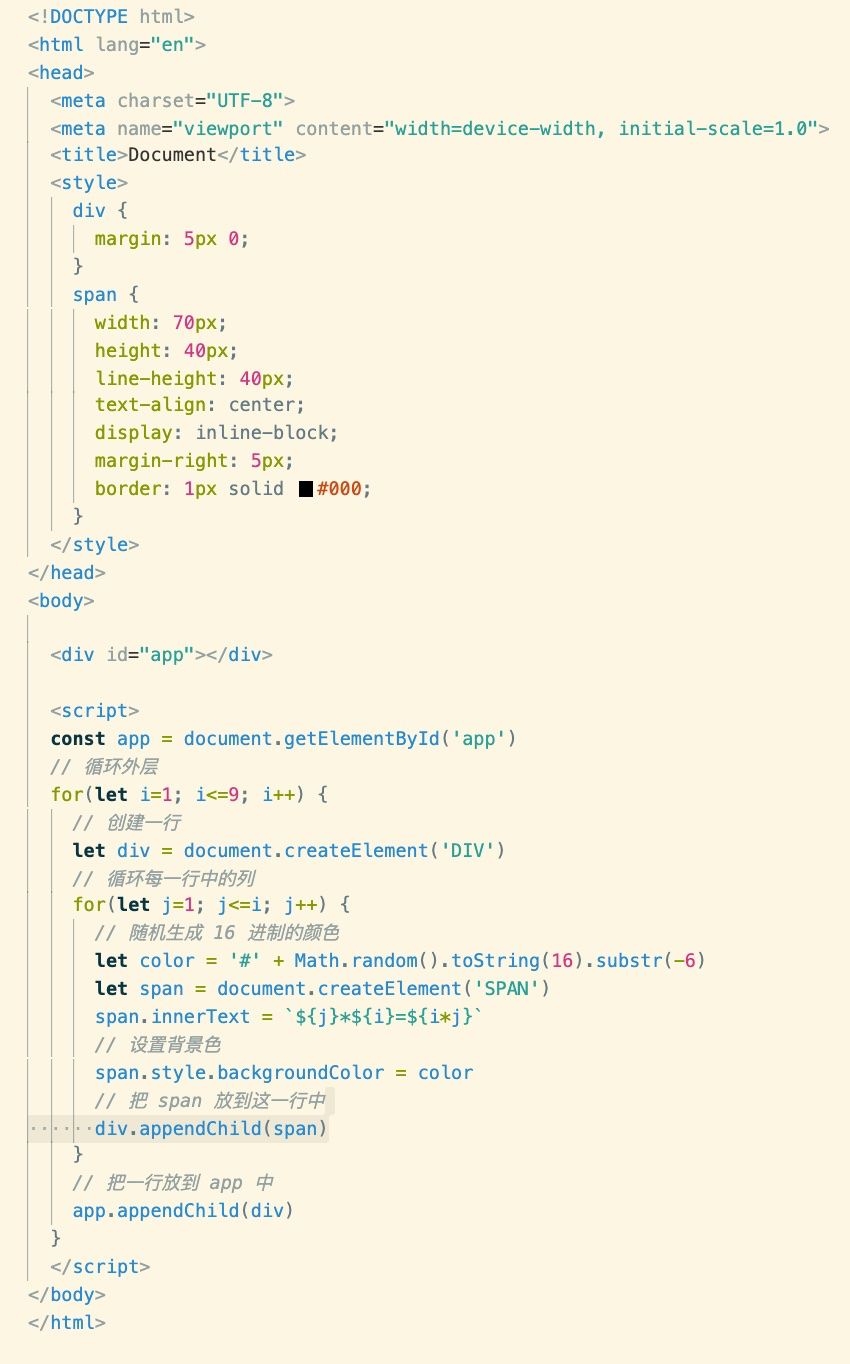
# 題3、隨機顏色的 99 乘法表
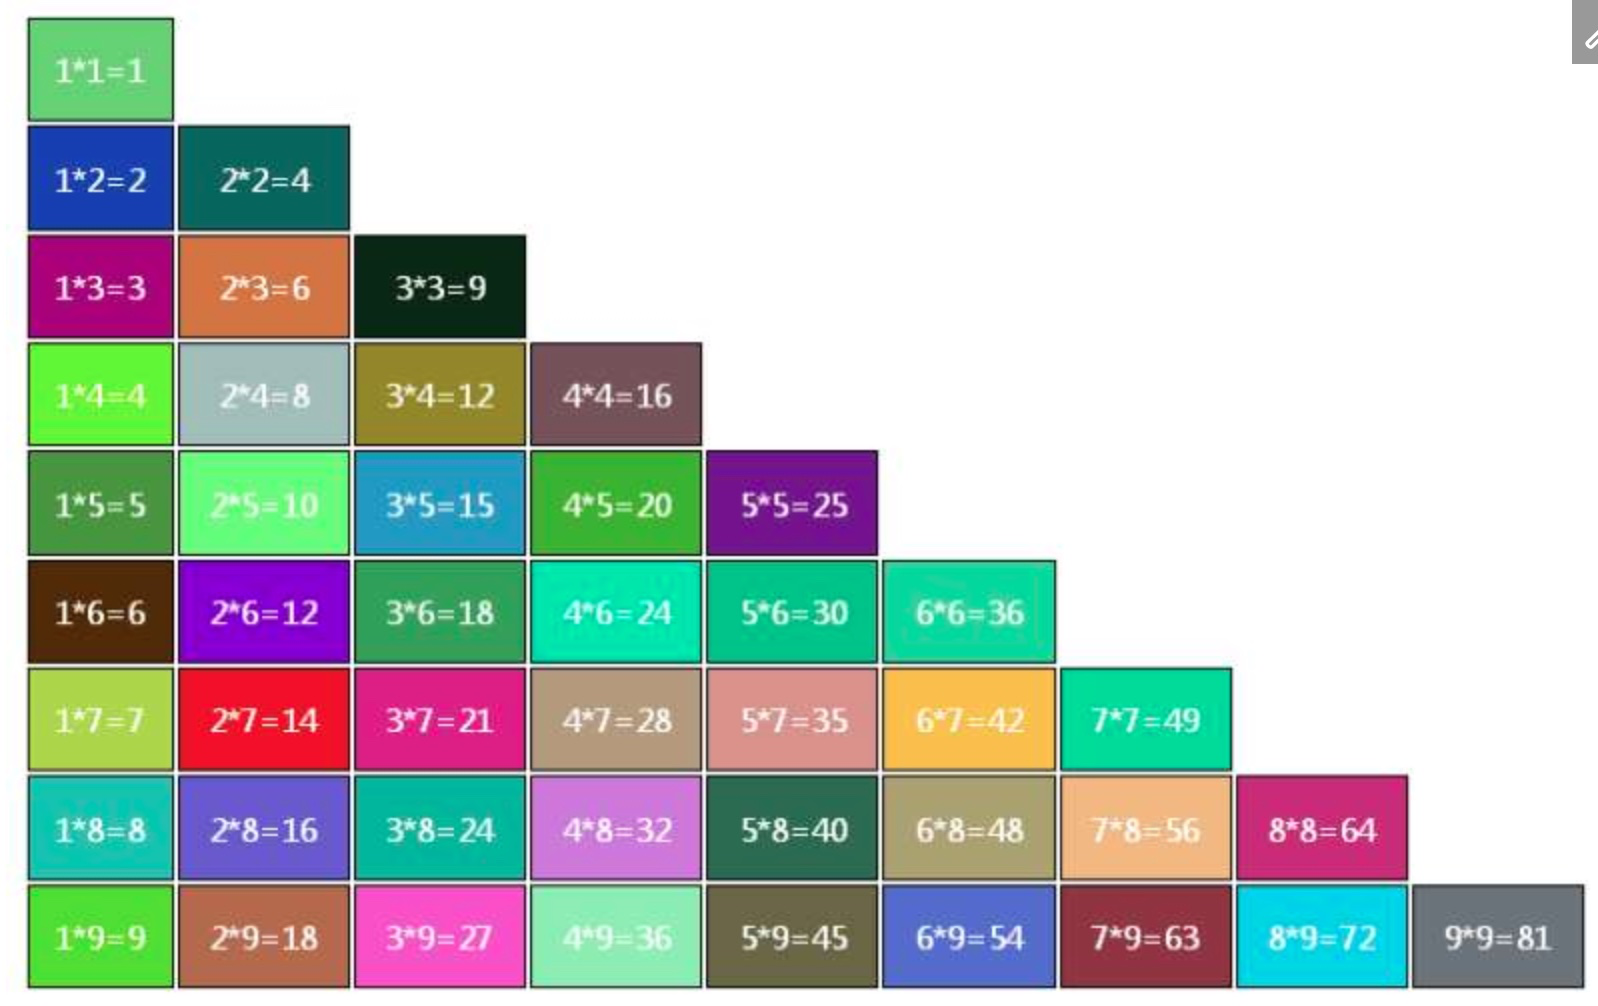
代碼實現:
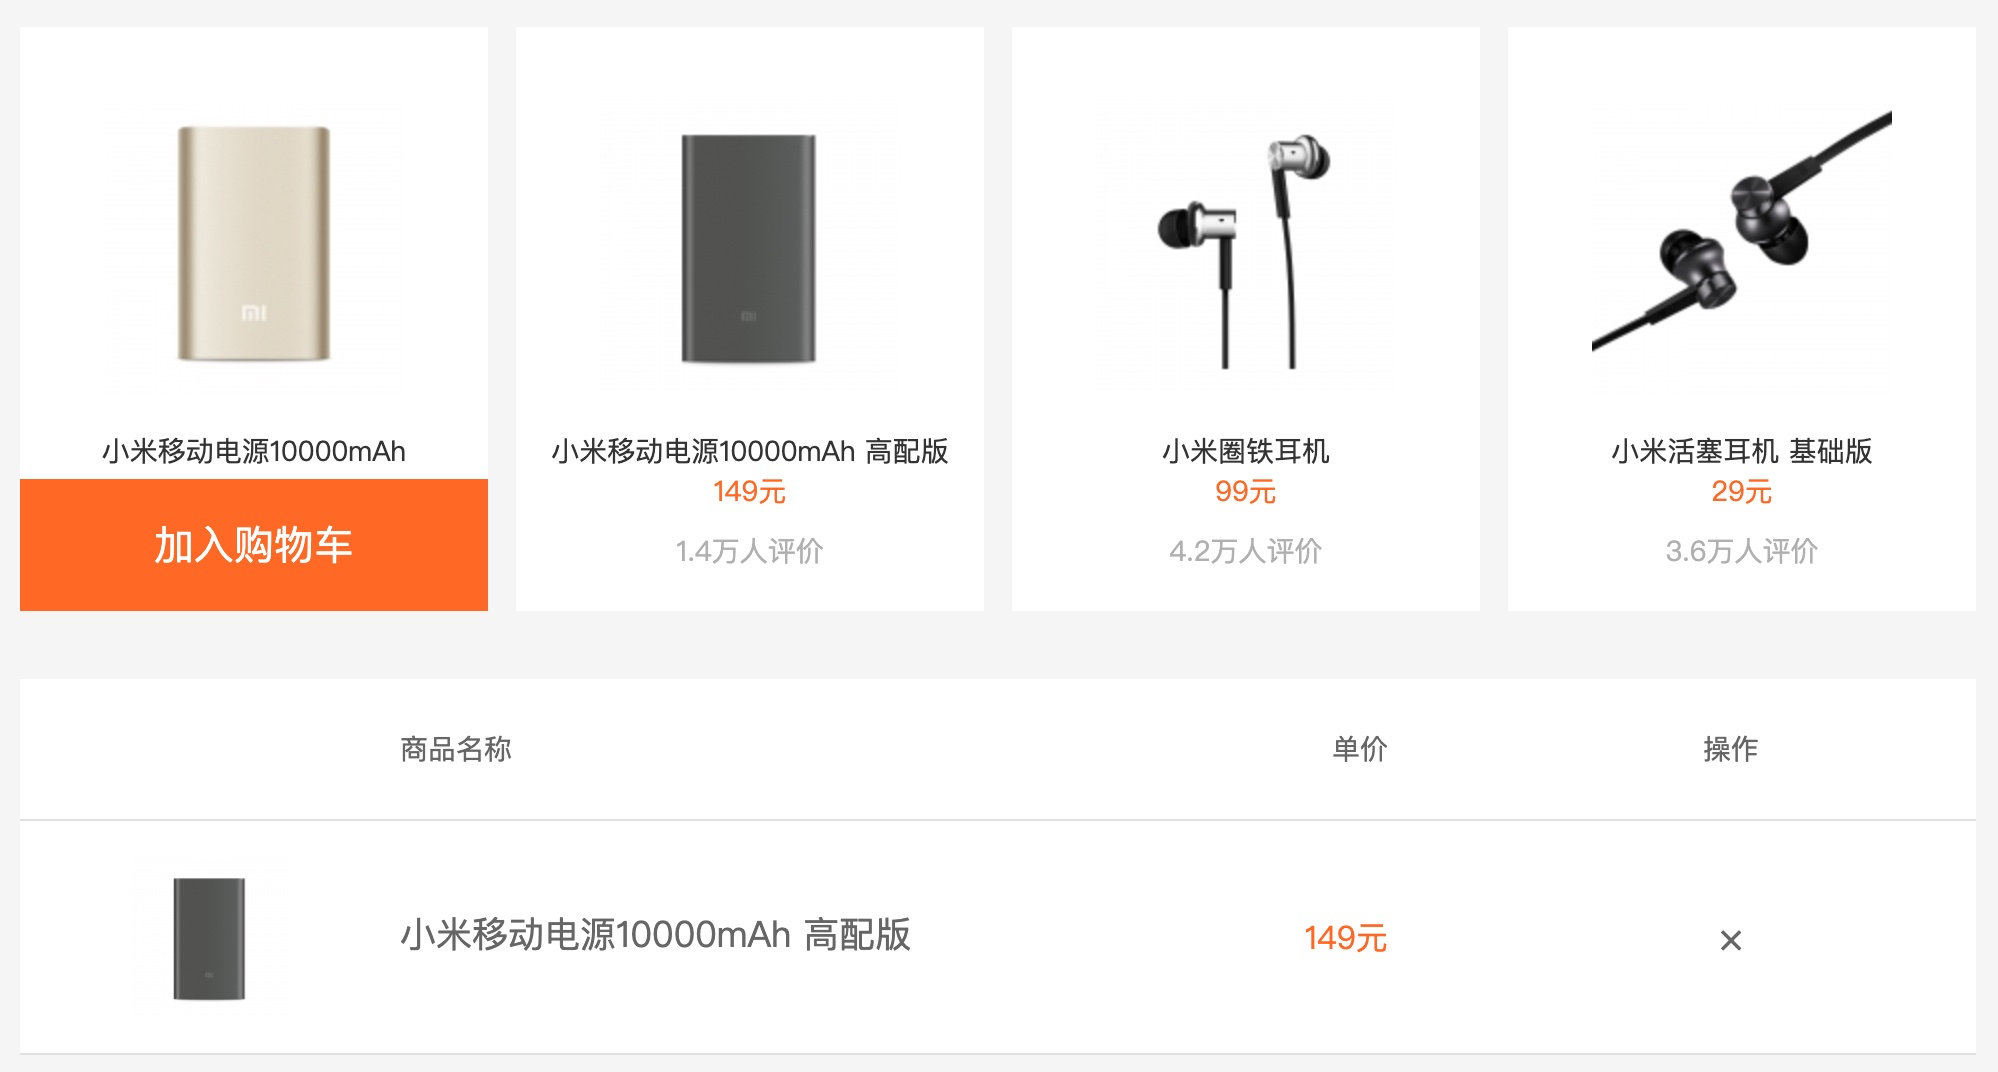
# 題4、JS 原生購物車
數據:
~~~
const data = [
{
"image": "https://img13.360buyimg.com/babel/s1180x940_jfs/t1/112612/27/8633/100927/5ed0ffe3Ee5006a06/142195ec551409e6.jpg.webp",
"goods_name": "小米移動電源10000mAh",
"price": "135",
"comment": "1.4萬"
},
{
"image": "https://img10.360buyimg.com/pop/s1180x940_jfs/t1/133282/15/506/78667/5ece44afEd0d8193e/89395514aa661a69.jpg.webp",
"goods_name": "小米電源 高配版",
"price": "135",
"comment": "1.4萬"
},
{
"https://img10.360buyimg.com/da/s1180x940_jfs/t1/120568/26/3467/101836/5ed0fda0E49973841/e1801a3d7e067ce7.jpg.webp",
"goods_name": "小米活塞耳機",
"price": "135",
"comment": "1.4萬"
},
{
"https://imgcps.jd.com/ling/100008348542/5omL5py66LSt5a6e5oOg/5aSH6LSn6LaF5YC8/p-5bd8253082acdd181d02fa33/28403921/590x470.jpg",
"goods_name": "小米耳機",
"price": "135",
"comment": "1.4萬"
}
]
~~~
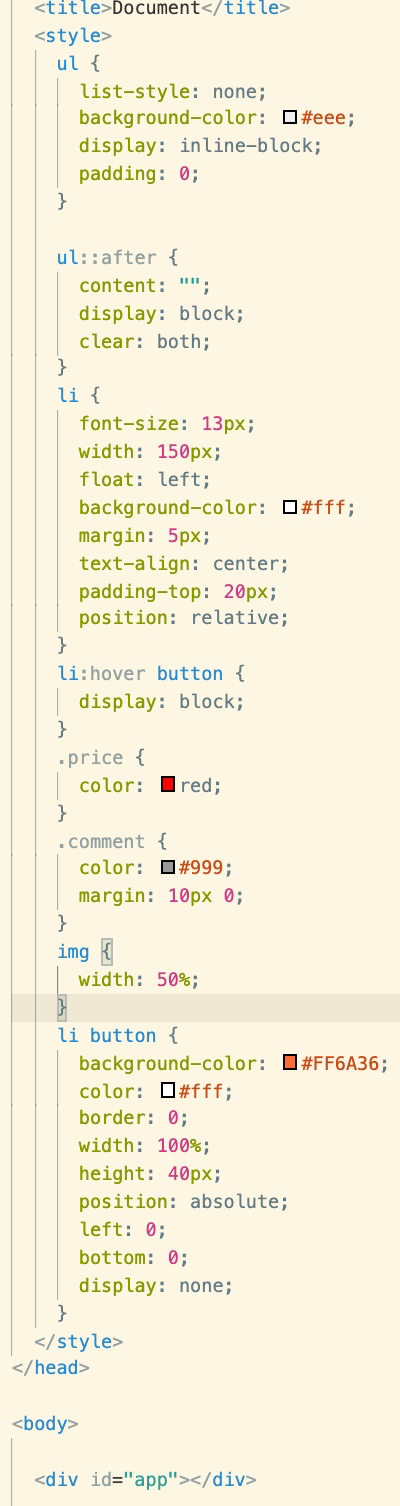
OOP代碼實現:
1. html 和 CSS
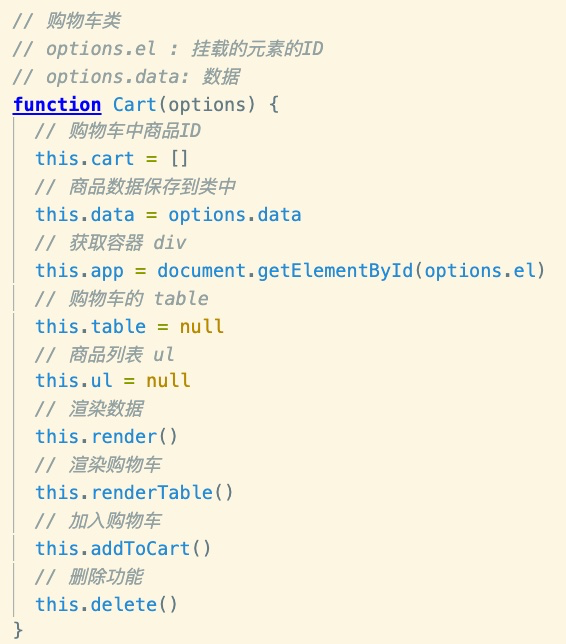
2. 購物車類
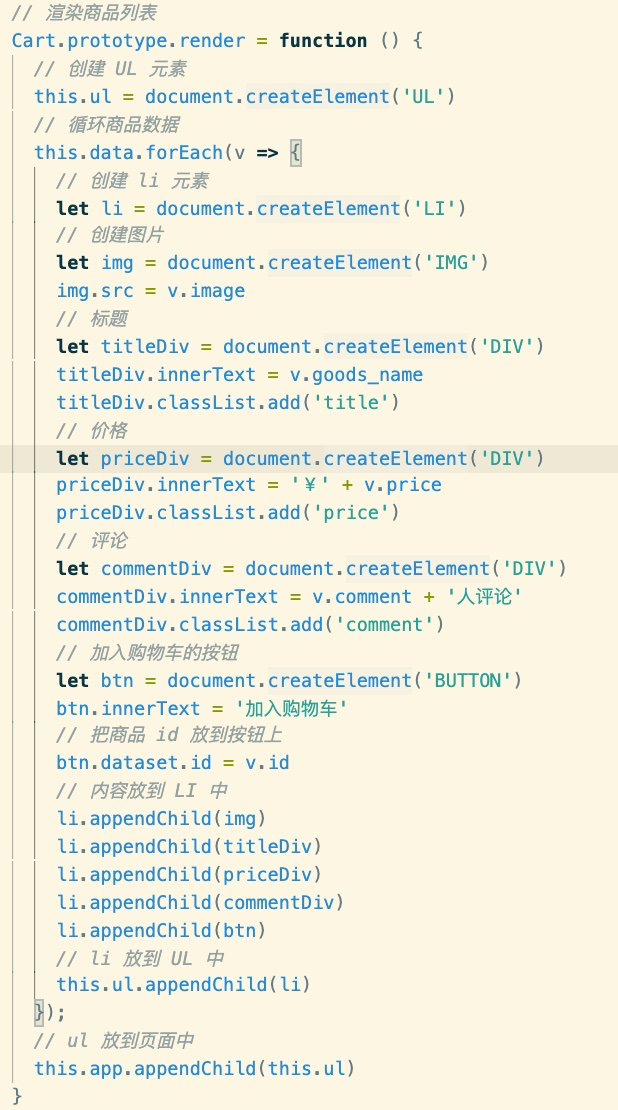
3. 為類添加渲染數據的方法
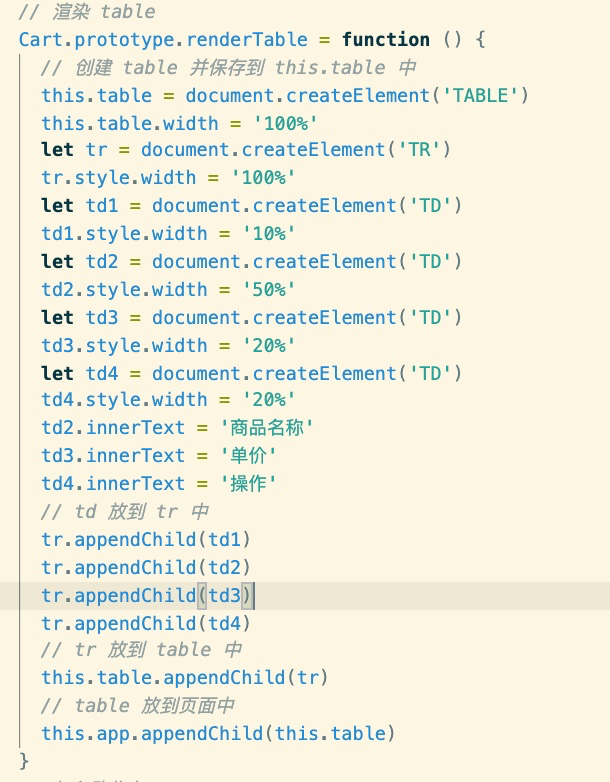
4. 渲染購物車表格
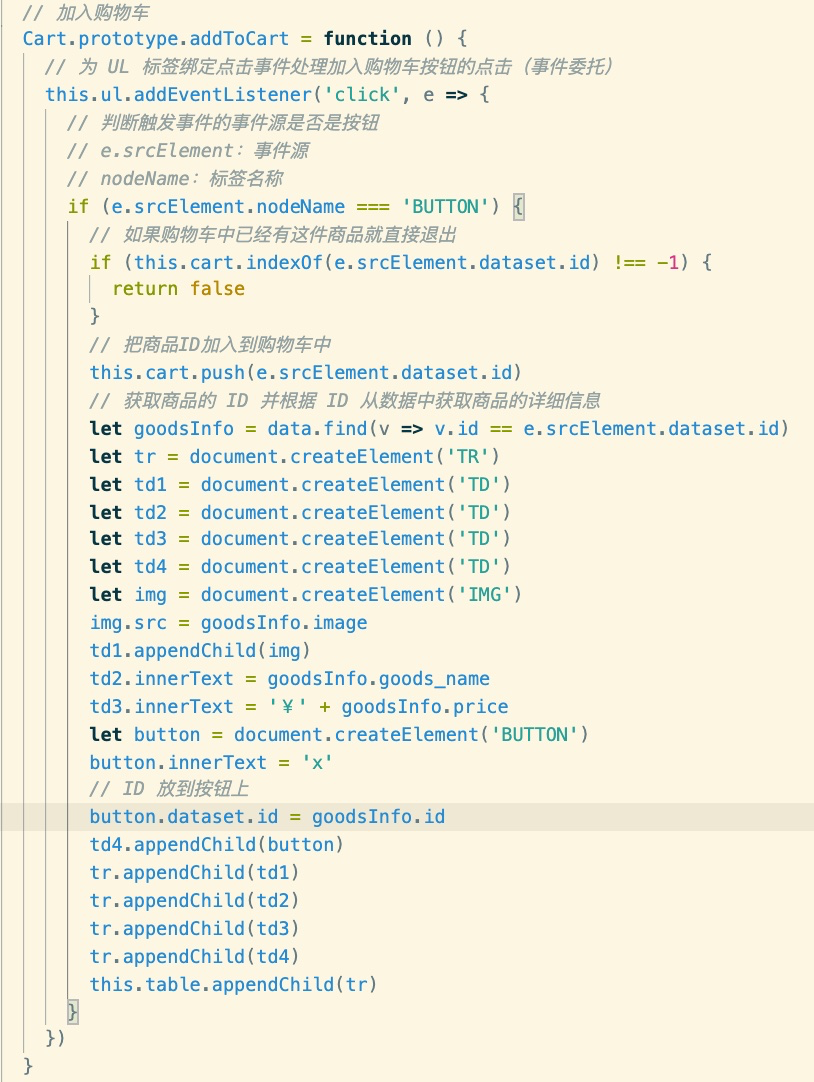
5. 加入購物車
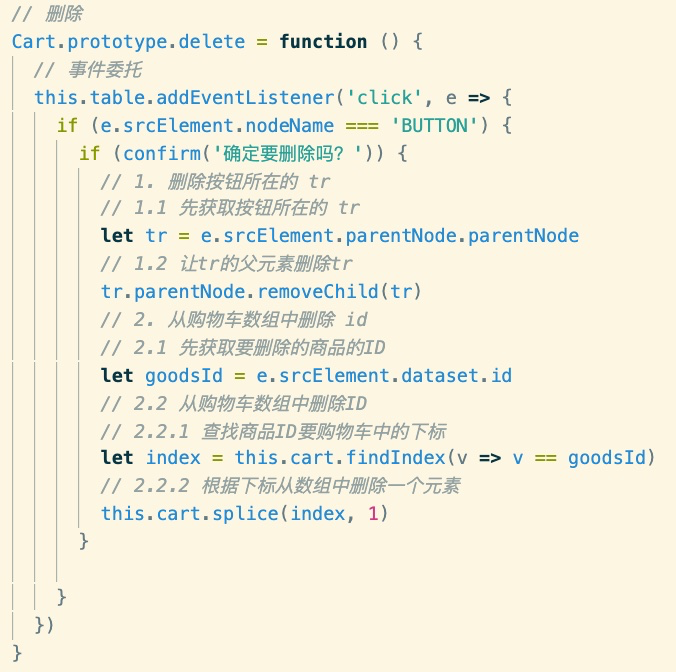
6. 刪除
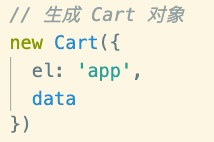
7. 使用
# 題5、表單驗證
# 題6、有一個數組,數組中有10件商品,每件商品的是一對象類型的數據,在頁面中每次顯示三條記錄,并可以上下按鈕翻頁?
~~~
<div id="app"></div>
<button onclick="prev()">上一頁</button>
<button onclick="next()">下一頁</button>
/********** 1. 構建 10 件商品的數據 *******/
let data = []
// 循環生成 10 件商品
for(let i=0; i<10; i++) {
data.push({
id: i+1,
goods_name: '手機-' + i,
price: (Math.random()*100).toFixed(2)
})
}
/*********** 2. 在頁面中渲染三件商品
如何截取數組?
slice:不會修改原數組
splice:從原數組中把截取的數據刪除
翻頁?
使用 slice 從數組中截取出三件商品,截取時的下標:
第1頁 --》 0 ~ 3
第2頁 --> 3 ~ 6
第3頁 --> 6 ~ 9
第4頁 --> 9 ~ 12
.......
第n頁 --> (n-1)*3 ~ (n-1)*3+3
******/
const app = document.getElementById('app')
// 當前頁
let page = 1
// 顯示第 i 頁的數據
function showData(page) {
// 計算截取的下標
let start = (page-1)*3
let end = start + 3
// 截取出第1頁的數據
let goods = data.slice(start, end)
// 先把原數據清空
app.innerHTML = ''
goods.forEach(v=>{
let div = document.createElement('DIV')
div.innerHTML = "商品名稱:"+v.goods_name + ",價格:¥"+v.price
app.appendChild(div)
})
}
showData( page )
// 下一頁
function next() {
// 如果不是最后一頁
if(page < 4) {
page++
showData(page)
}
}
// 上一頁
function prev() {
// 如果不是第1頁
if(page > 1) {
page--
showData(page)
}
}
~~~
擴展練習:有一個數組,數組中有10件商品,一次在頁面中顯示三件商品,有一個“換一換”,每點擊一次換三件。要求:頁面中始終顯示三件商品,不夠三件時從前面取,比如:最后只剩一件不夠三件了,那么就從最前面拿2件湊夠三件顯示。
實現思路:1. 每次從數組中截取出前三件商品并從數組中把這三件商品刪除(splice(0,3))
2. 把截取出的三件商品再合并到數組的最后(concat)
~~~
<button onclick="change()">換一換</button>
function change() {
// 取出前3件商品,并從數組中刪除這三件
let goods = data.splice(0,3)
// 把這3件商品再放回數組的最后
data = data.concat(goods)
// 渲染這三件商品
app.innerHTML = ''
goods.forEach(v=>{
let div = document.createElement('DIV')
div.innerHTML = "商品名稱:"+v.goods_name + ",價格:¥"+v.price
app.appendChild(div)
})
}
~~~
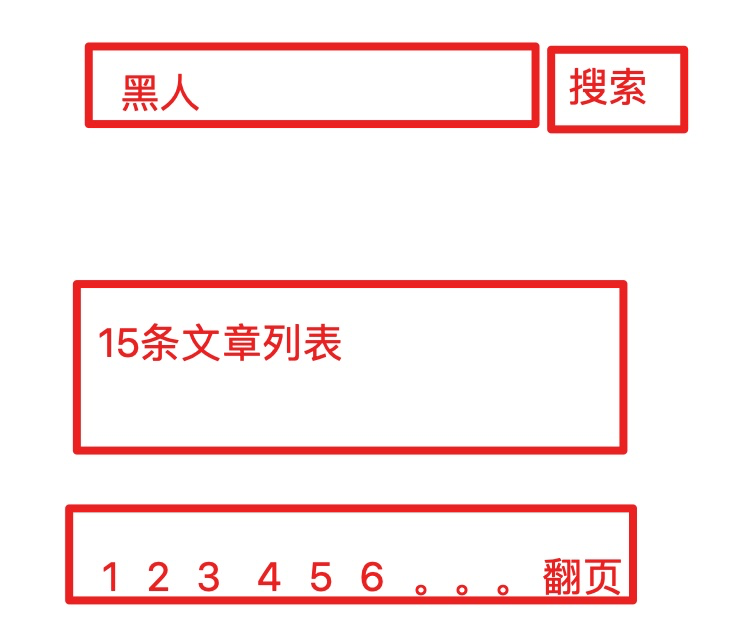
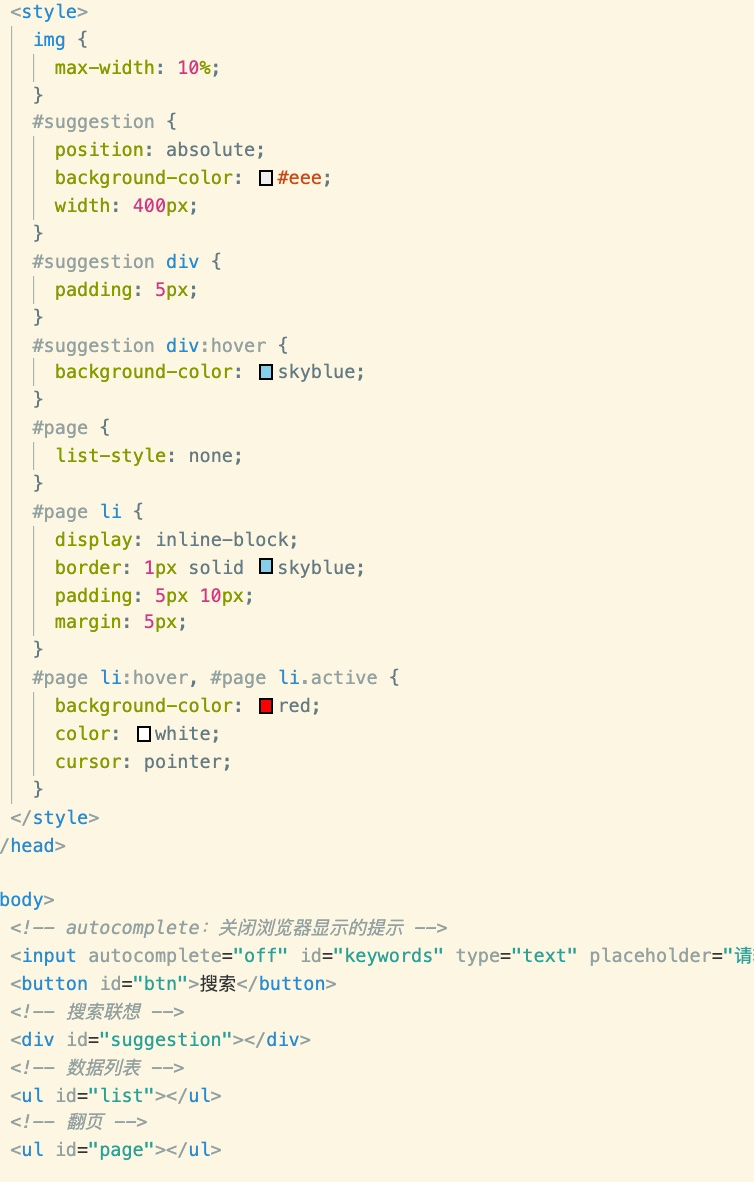
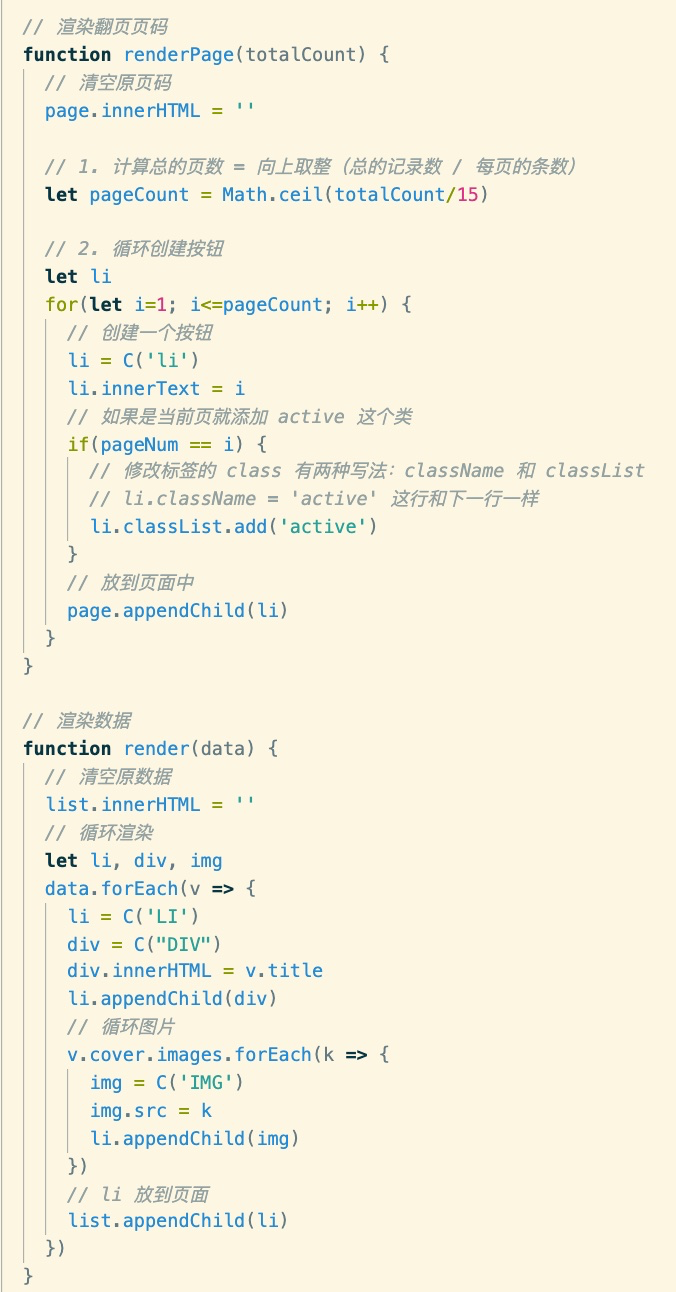
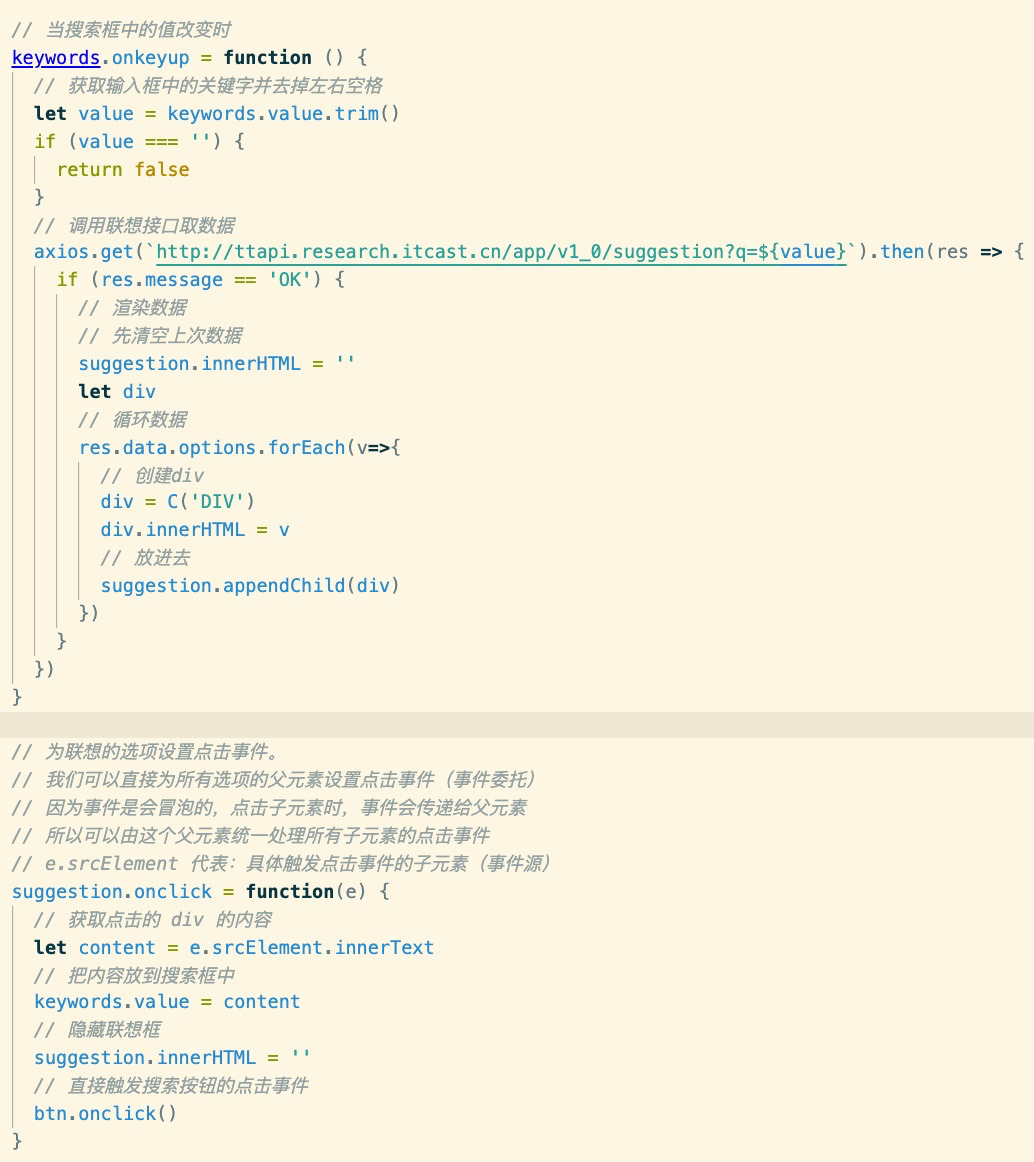
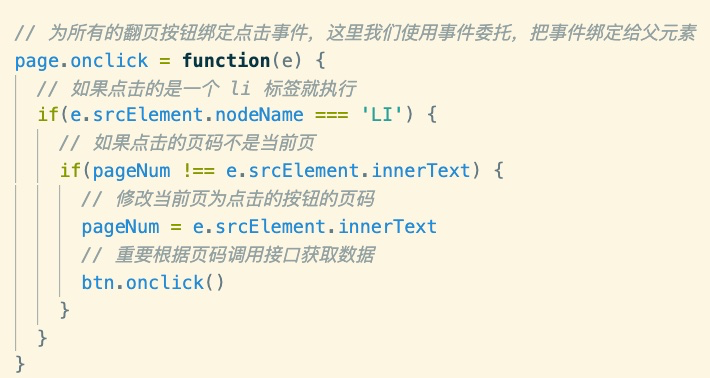
# 題7、實現一個文章搜索功能:制作一個搜索框和一個搜索按鈕,當點擊搜索按鈕時就調用接口搜索相關文章,每頁顯示15條,并實現翻頁功能?
接口文檔地址:[http://ttapi.research.itcast.cn/app/v1\_0/search](http://ttapi.research.itcast.cn/app/v1_0/search)
請求方式:GET
參數:q(搜索關鍵字) page(當前頁碼) per_page (每頁條數)
使用技術:原生 JS
制作完之后的效果:
代碼實現:
HTML 和 CSS
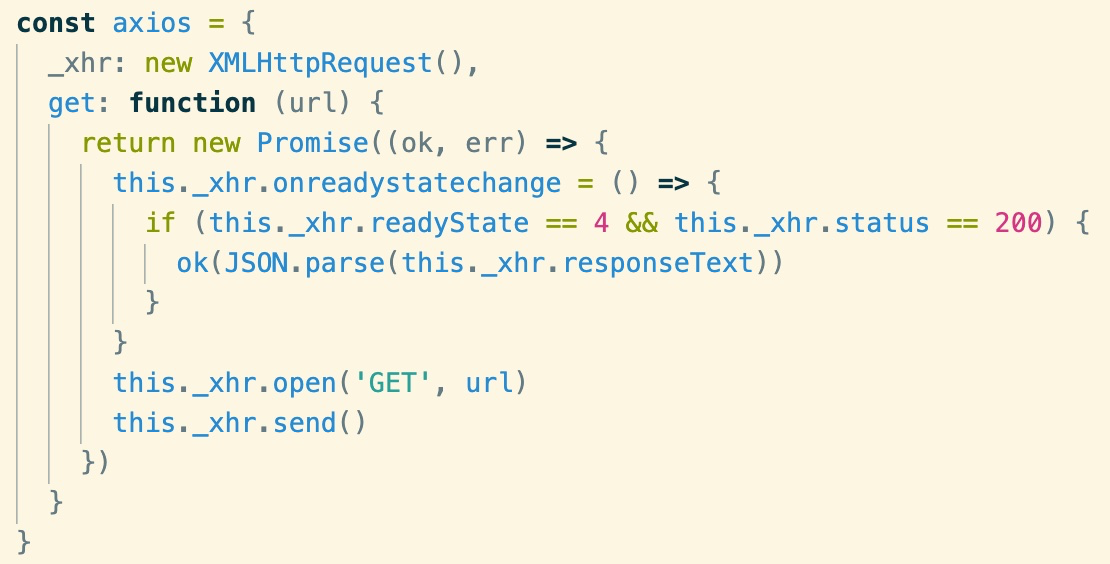
封裝原生 AJAX 為Promise 對象
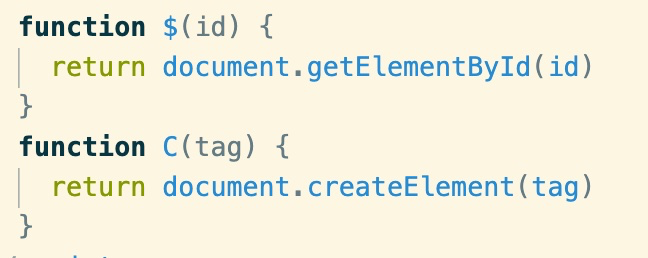
兩個輔導函數
點擊搜索時調用接口獲取某一頁的數據
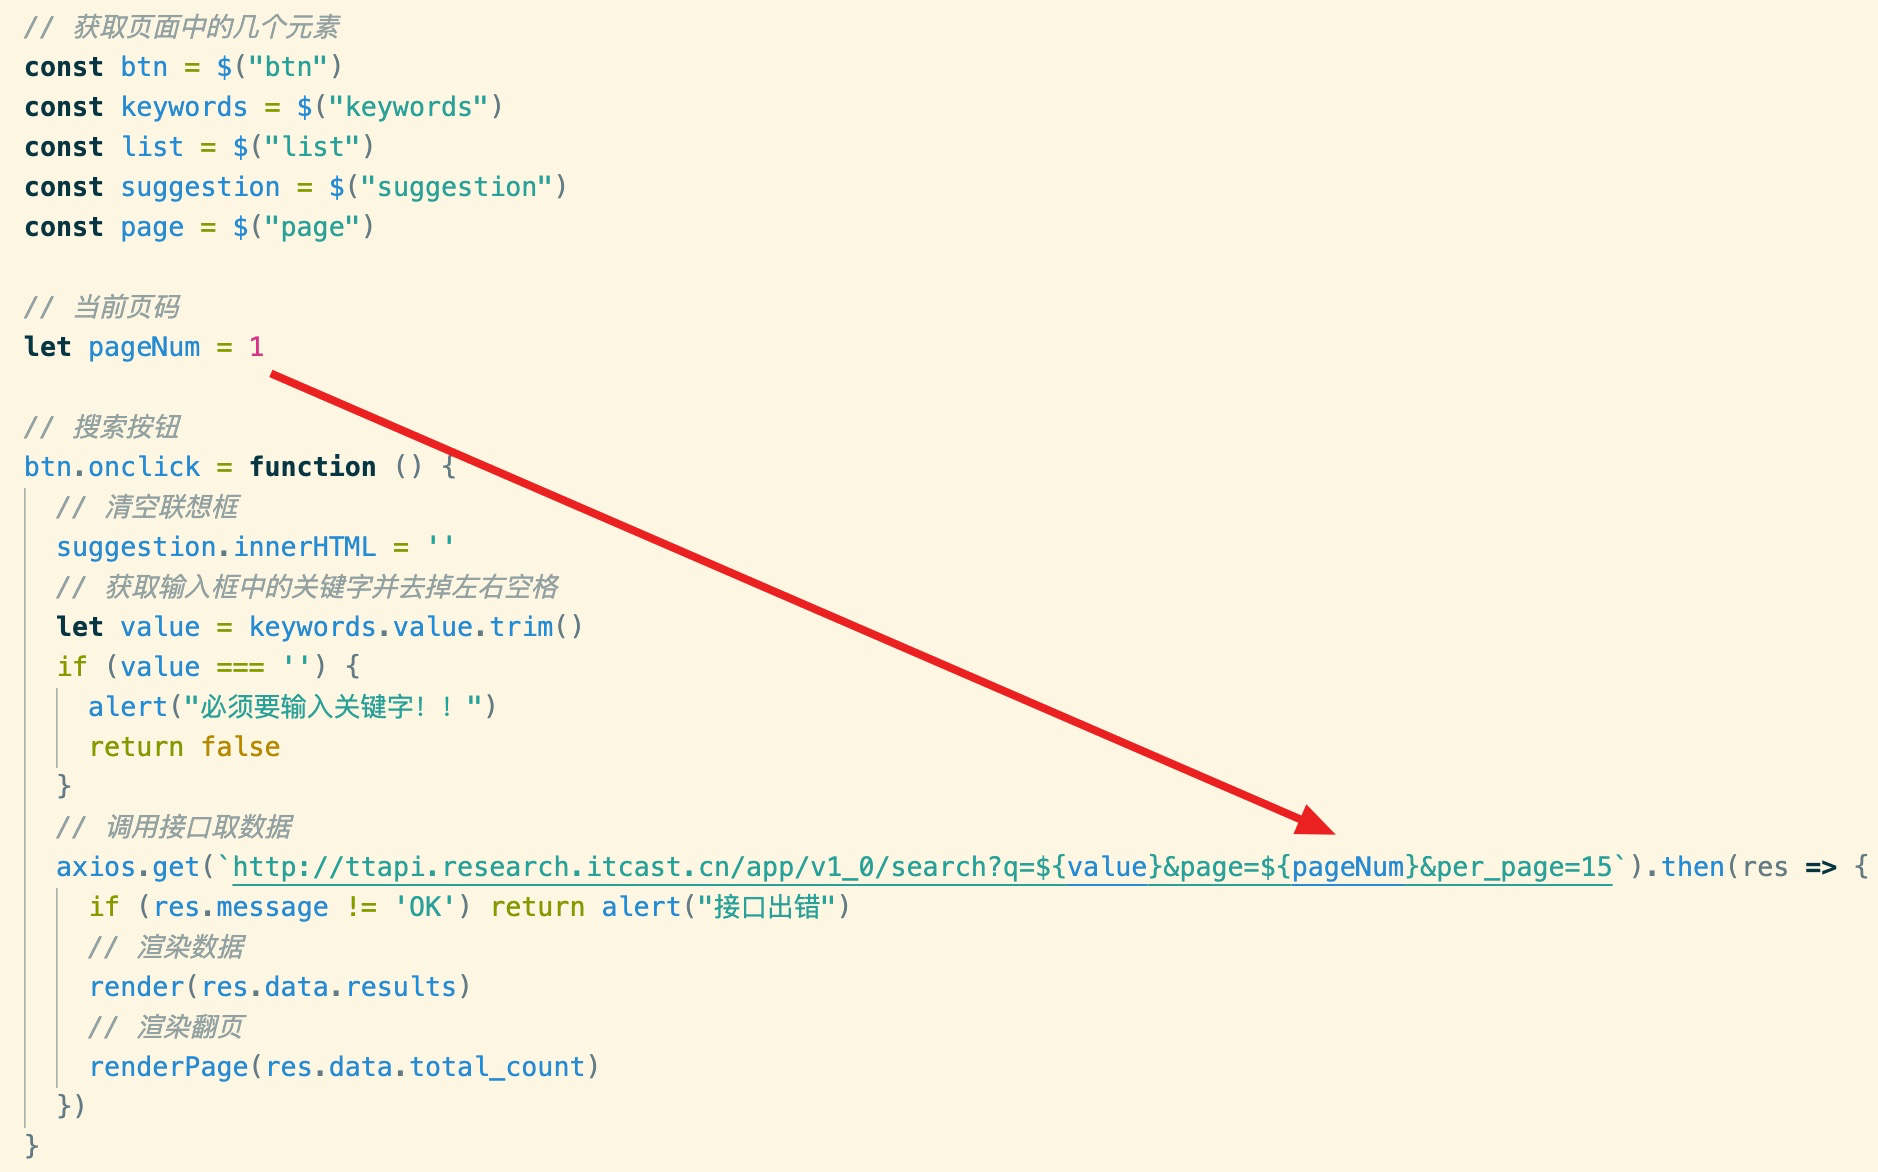
根據返回的數據渲染翻頁按鈕和數據列表
搜索聯想功能
點擊翻頁按鈕時重新調用接口
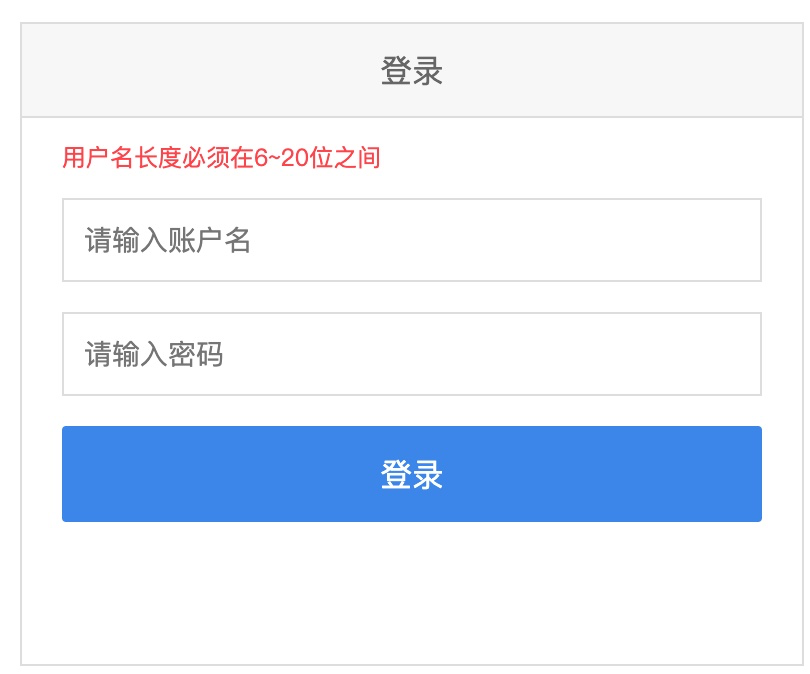
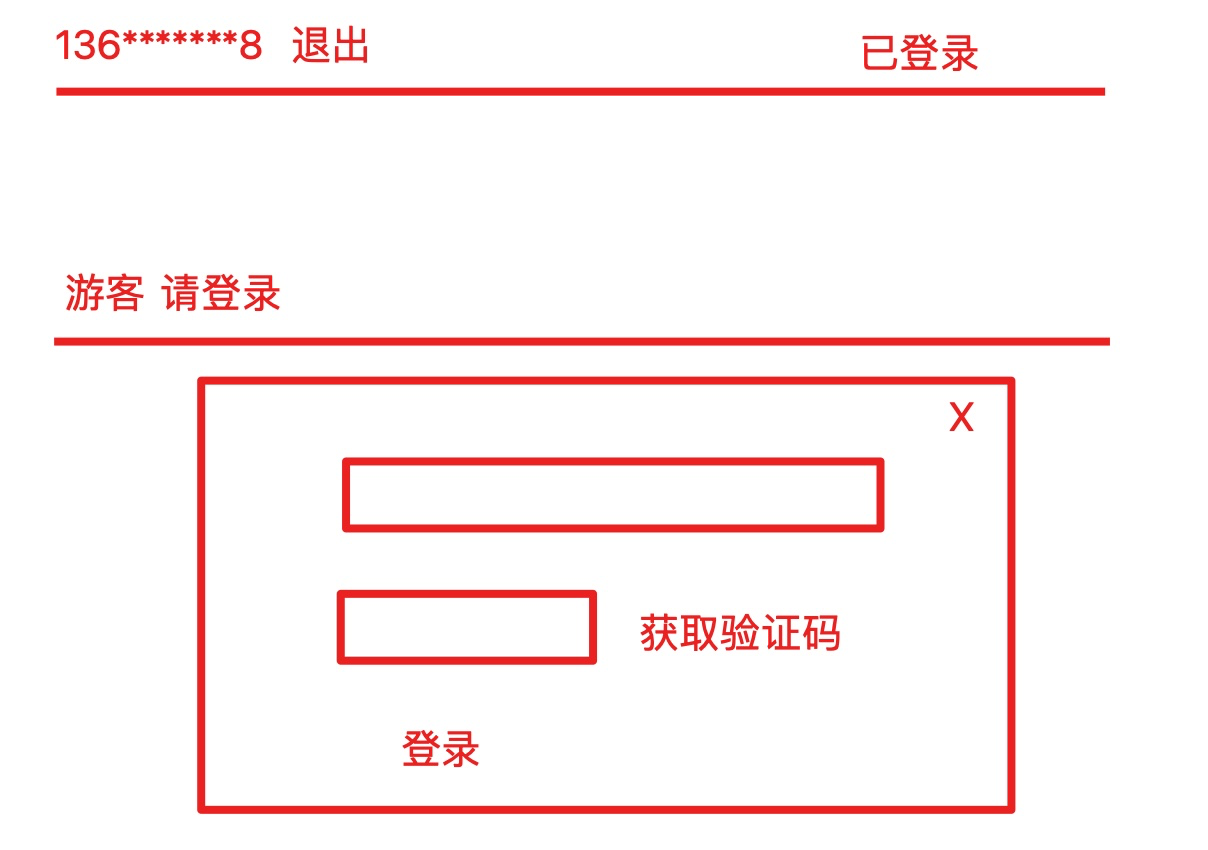
# 題8、現有三個接口:登錄-注冊 、獲取短驗證碼、令牌過期刷新,請使用前端技術實現登錄功能?
功能描述:
代碼實現(使用 OOP 的語法)
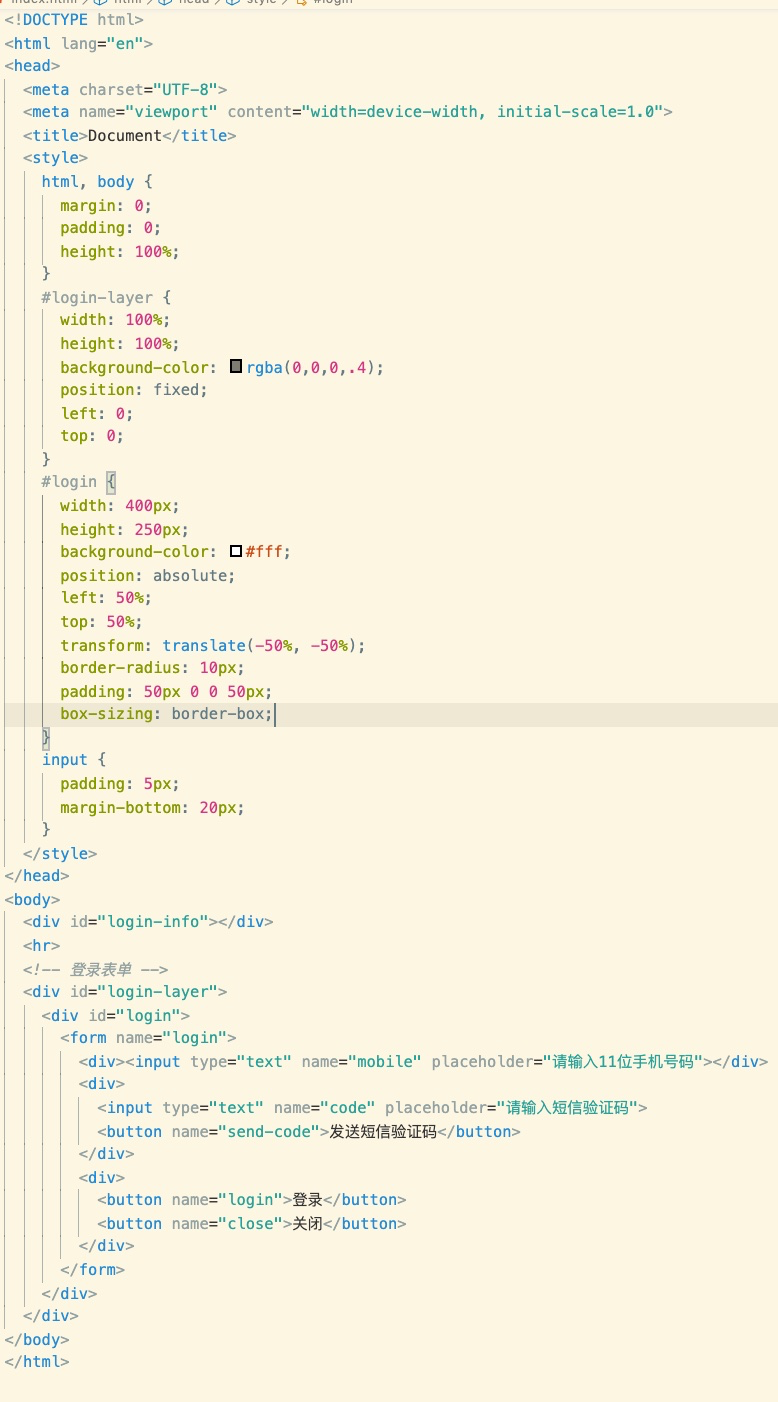
1. 靜態頁面
2. 封裝 AJAX 對象
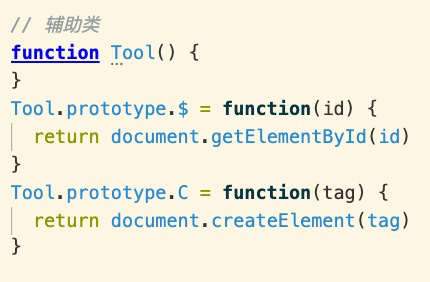
3. 創建一個輔助類
4. 創建實現業務邏輯的類
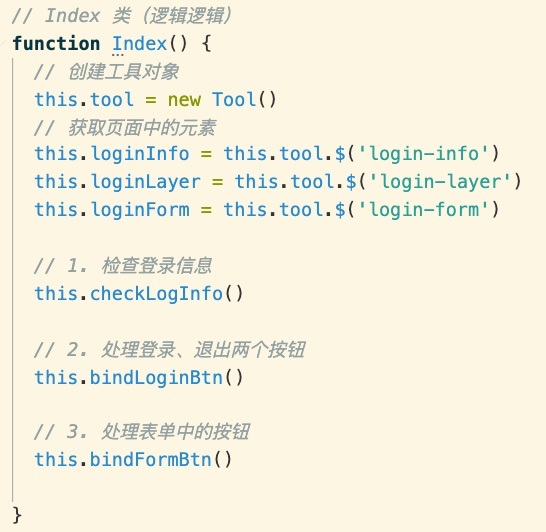
類中有三個方法
5. 在頁面中使用這個類實現功能
# 題9、以第題8的基礎上,能夠獲取并修改頭像?
接口一、獲取用戶信息的接口
地址:http://ttapi.research.itcast.cn/app/v1_0/user/profile
方式:GET
請求參數:

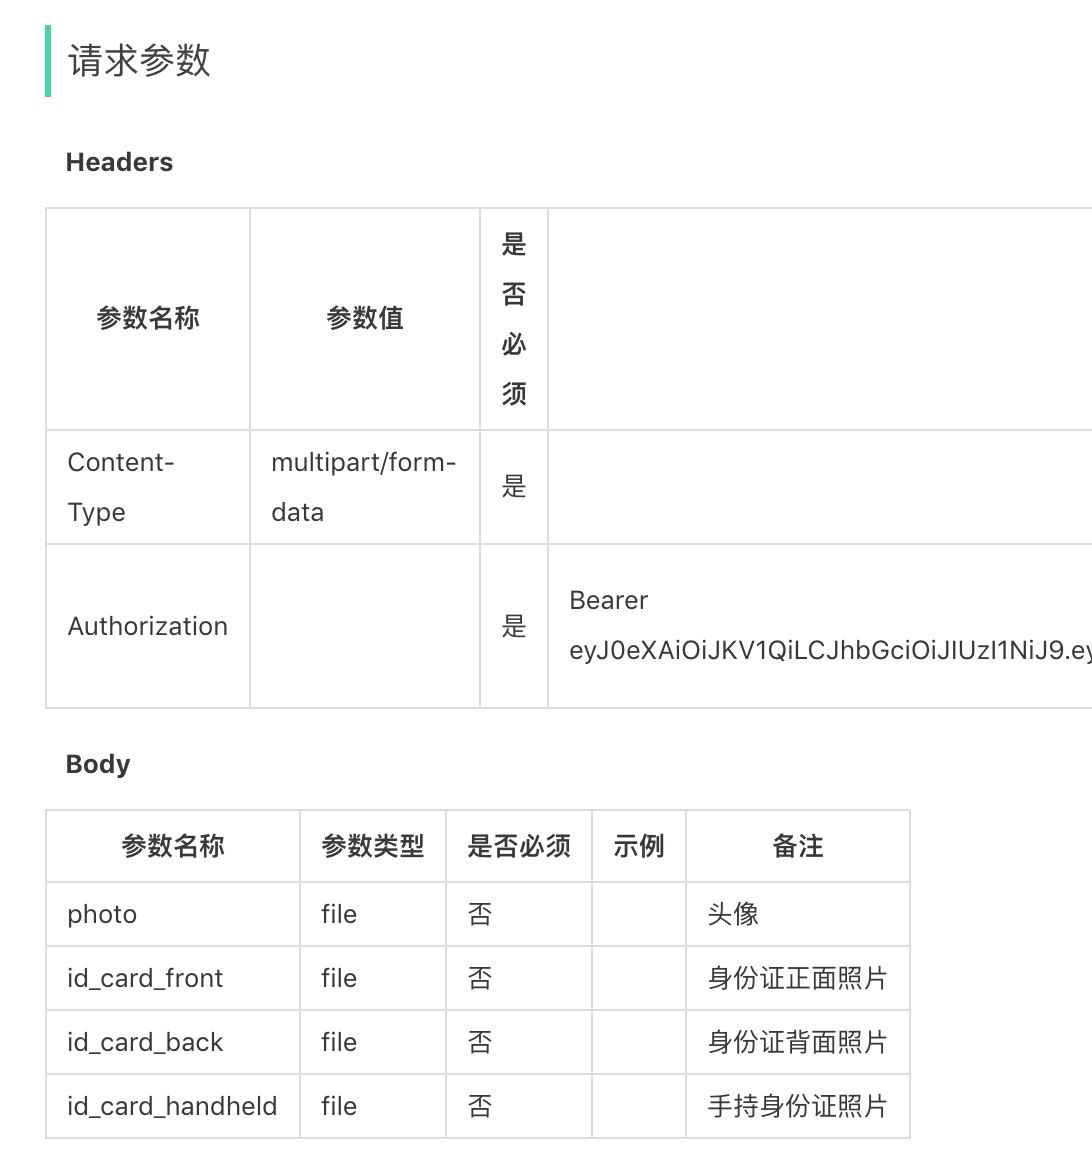
接口二、修改頭像
地址:http://ttapi.research.itcast.cn/app/v1_0/user/photo
方式:PATCH
請求參數:
HTML 代碼
~~~
<!DOCTYPE html>
<html lang="en">
<head>
<meta charset="UTF-8">
<meta name="viewport" content="width=device-width, initial-scale=1.0">
<title>Document</title>
<style>
html, body {
margin: 0;
padding: 0;
height: 100%;
}
#login-layer {
width: 100%;
height: 100%;
background-color: rgba(0,0,0,.4);
position: fixed;
left: 0;
top: 0;
display: none;
}
#login {
width: 400px;
height: 250px;
background-color: #fff;
position: absolute;
left: 50%;
top: 50%;
transform: translate(-50%, -50%);
border-radius: 10px;
padding: 50px 0 0 50px;
box-sizing: border-box;
}
input {
padding: 5px;
margin-bottom: 20px;
}
#avatar {
max-width: 350px;
}
</style>
</head>
<body>
<div id="login-info"></div>
<hr>
<div><img id="avatar"></div>
<button id="btn-info">獲取頭像</button>
<div>
<input type="file" id="upload-file" />
<br>
<button id="upload-btn">更新頭像</button>
</div>
<!-- 登錄表單 -->
<div id="login-layer">
<div id="login">
<form id="login-form">
<div><input type="text" name="mobile" placeholder="請輸入11位手機號碼"></div>
<div>
<input type="text" name="code" placeholder="請輸入短信驗證碼">
<button name="send-code">發送短信驗證碼</button>
</div>
<div>
<button name="login">登錄</button>
<button name="close">關閉</button>
</div>
</form>
</div>
</div>
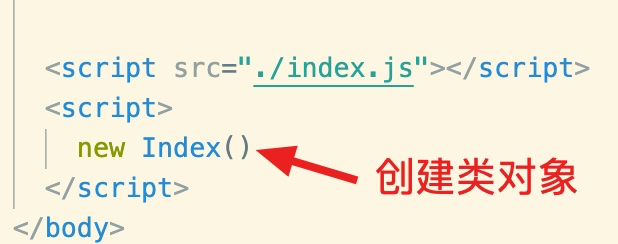
<script src="./index.js"></script>
<script>
new Index()
</script>
</body>
</html>
~~~
JS 代碼
~~~
// Index 類(邏輯邏輯)
function Index() {
// 創建工具對象
this.tool = new Tool()
// 獲取頁面中的元素
this.loginInfo = this.tool.$('login-info')
this.loginLayer = this.tool.$('login-layer')
this.loginForm = this.tool.$('login-form')
this.infoBtn = this.tool.$('btn-info')
this.avatar = this.tool.$('avatar')
this.uploadFile = this.tool.$('upload-file')
this.uploadBtn = this.tool.$('upload-btn')
// 1. 檢查登錄信息
this.checkLogInfo()
// 2. 處理登錄、退出兩個按鈕
this.bindLoginBtn()
// 3. 處理表單中的按鈕
this.bindFormBtn()
// 4. 顯示個人信息
this.getUserInfo()
// 5. 上傳圖片
this.bindUpload()
}
// 判斷登錄信息
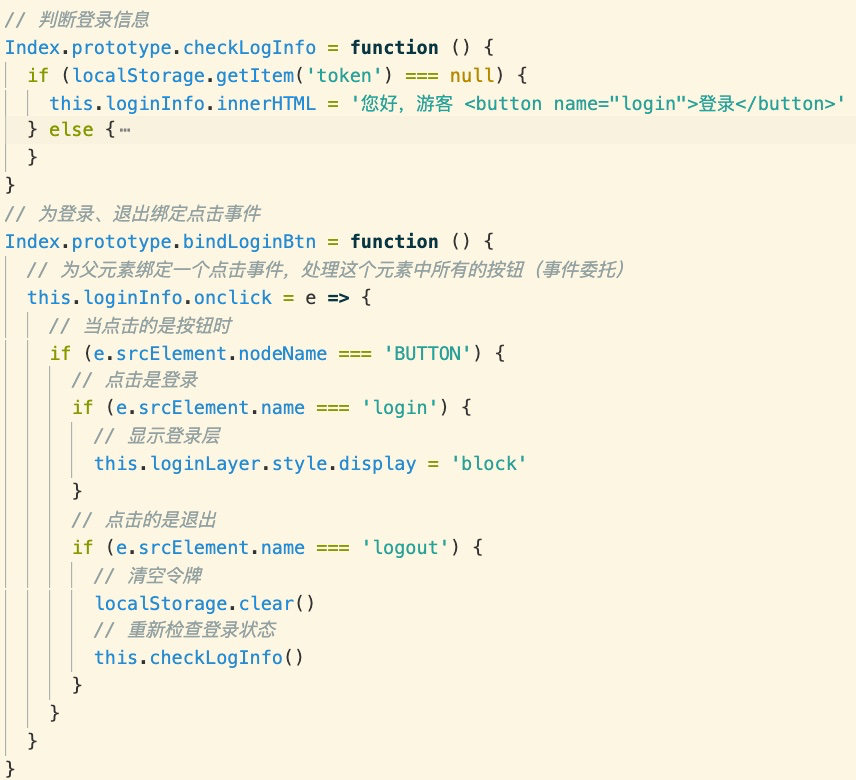
Index.prototype.checkLogInfo = function () {
if (localStorage.getItem('token') === null) {
this.loginInfo.innerHTML = '您好,游客 <button name="login">登錄</button>'
} else {
let mobile = localStorage.getItem('mobile')
this.loginInfo.innerHTML = `${mobile} <button name="logout">退出</button>`
}
}
// 為登錄、退出綁定點擊事件
Index.prototype.bindLoginBtn = function () {
// 為父元素綁定一個點擊事件,處理這個元素中所有的按鈕(事件委托)
this.loginInfo.onclick = e => {
// 當點擊的是按鈕時
if (e.srcElement.nodeName === 'BUTTON') {
// 點擊是登錄
if (e.srcElement.name === 'login') {
// 顯示登錄層
this.loginLayer.style.display = 'block'
}
// 點擊的是退出
if (e.srcElement.name === 'logout') {
// 清空令牌
localStorage.clear()
// 重新檢查登錄狀態
this.checkLogInfo()
}
}
}
}
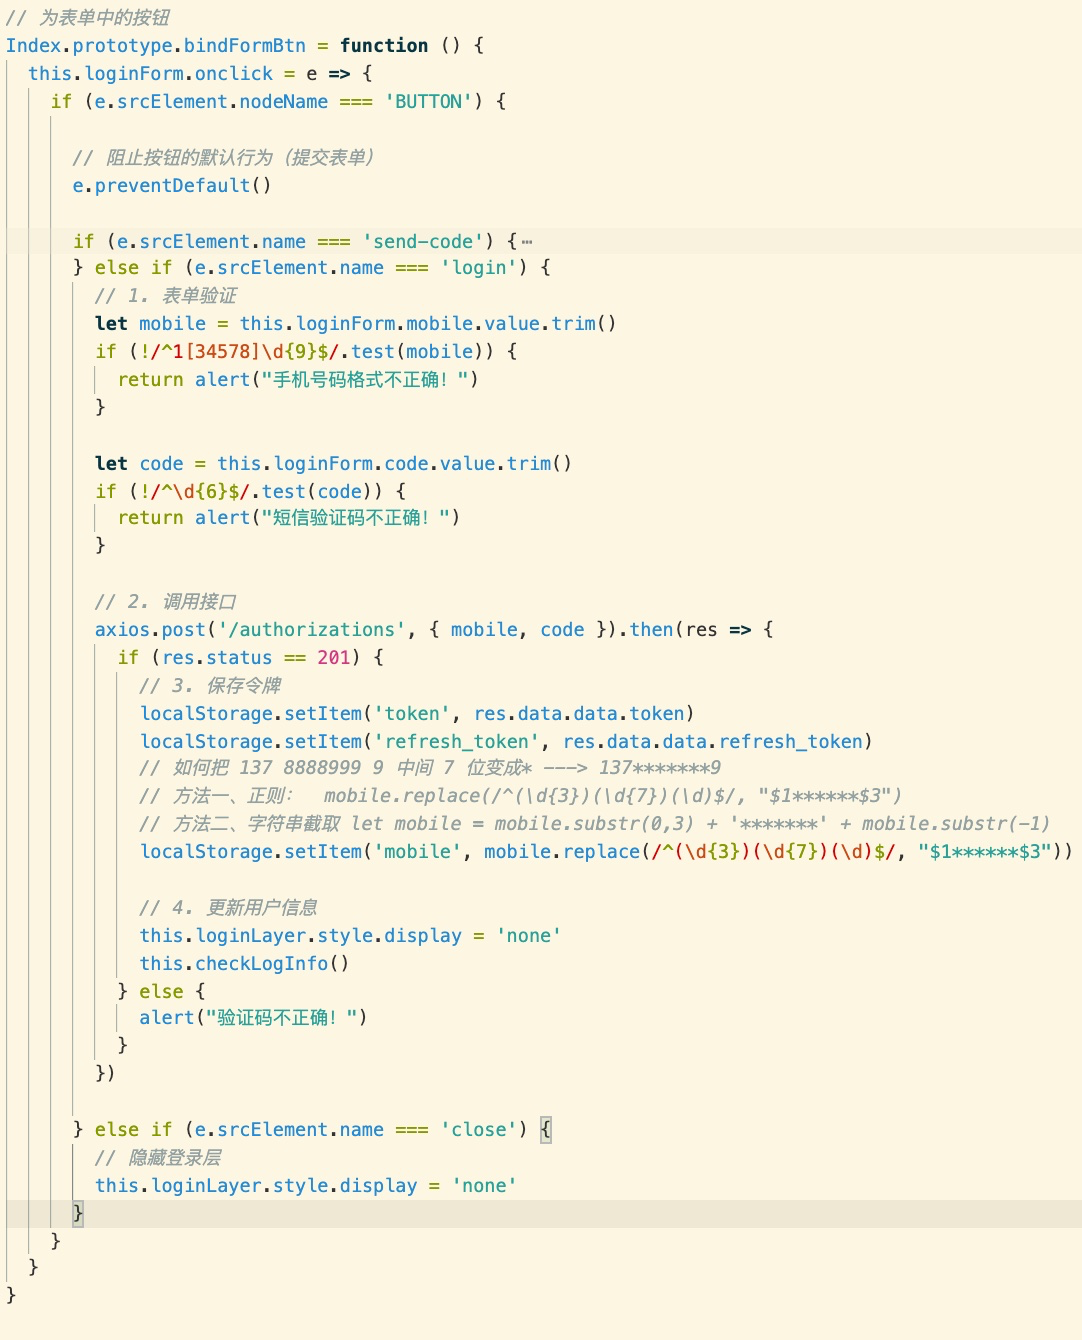
// 為表單中的按鈕
Index.prototype.bindFormBtn = function () {
this.loginForm.onclick = e => {
if (e.srcElement.nodeName === 'BUTTON') {
// 阻止按鈕的默認行為(提交表單)
e.preventDefault()
if (e.srcElement.name === 'send-code') {
// 1. 驗證手機號碼并去掉左右空格
let mobile = this.loginForm.mobile.value.trim()
let RE = /^1[34578]\d{9}$/
if (!RE.test(mobile)) {
return alert("手機號碼格式不正確!")
}
// 2. 發送短信(調用接口)
axios.get('/sms/codes/' + mobile).then(res => {
if (res.message === 'OK') {
// 3. 按鈕 60s 倒計時
let sec = 60
// 按鈕狀態為禁用
e.srcElement.disabled = true
e.srcElement.innerText = '60s'
// 啟動定時器
let si = setInterval(() => {
sec--
if (sec < 0) {
// 停止定時器
clearInterval(si)
e.srcElement.disabled = false
e.srcElement.innerText = '發送短信驗證碼'
} else {
e.srcElement.innerText = sec + 's'
}
}, 1000)
} else {
alert('發短信失敗!')
}
})
} else if (e.srcElement.name === 'login') {
// 1. 表單驗證
let mobile = this.loginForm.mobile.value.trim()
if (!/^1[34578]\d{9}$/.test(mobile)) {
return alert("手機號碼格式不正確!")
}
let code = this.loginForm.code.value.trim()
if (!/^\d{6}$/.test(code)) {
return alert("短信驗證碼不正確!")
}
// 2. 調用接口
axios.post('/authorizations', { mobile, code }).then(res => {
if (res.status == 201) {
// 3. 保存令牌
localStorage.setItem('token', res.data.data.token)
localStorage.setItem('refresh_token', res.data.data.refresh_token)
// 如何把 137 8888999 9 中間 7 位變成* ---> 137*******9
// 方法一、正則: mobile.replace(/^(\d{3})(\d{7})(\d)$/, "$1******$3")
// 方法二、字符串截取 let mobile = mobile.substr(0,3) + '*******' + mobile.substr(-1)
localStorage.setItem('mobile', mobile.replace(/^(\d{3})(\d{7})(\d)$/, "$1******$3"))
// 4. 更新用戶信息
this.loginLayer.style.display = 'none'
this.checkLogInfo()
} else {
alert("驗證碼不正確!")
}
})
} else if (e.srcElement.name === 'close') {
// 隱藏登錄層
this.loginLayer.style.display = 'none'
}
}
}
}
// 獲取用戶信息
Index.prototype.getUserInfo = function () {
this.infoBtn.onclick = () => {
axios.get('/user/profile').then(res => {
// 設置頭像到圖片上
this.avatar.src = res.data.photo
})
}
}
// 上傳圖片
Index.prototype.bindUpload = function () {
// 將要上傳的圖片對象
let image
// 獲取上傳的圖片
this.uploadFile.onchange = e => {
// 把選擇的圖片保存到外層的變量中
image = e.srcElement.files[0]
// 預覽圖片
const fr = new FileReader()
fr.readAsDataURL(e.srcElement.files[0])
// 設置讀取完之后的回調函數
fr.onload = e1 => {
// 把讀取的圖片路徑設置到頭像
this.avatar.src = e1.srcElement.result
}
}
// 更新頭像按鈕
this.uploadBtn.onclick = e => {
// 在上傳文件時一般需要使用 FormData 這個對象
let fd = new FormData()
fd.append('photo', image)
// 調用接口更新頭像
axios.patch('/user/photo', fd).then(res => {
console.log(res)
})
}
}
// 封裝 AJAX 的對象
const axios = {
baseURL: 'http://ttapi.research.itcast.cn/app/v1_0',
_xhr: new XMLHttpRequest(),
_addToken: function (isjson = true) {
// 獲取令牌
let token = localStorage.getItem('token')
if (token !== null) {
// 把令牌添加到請求協議頭上
this._xhr.setRequestHeader('Authorization', 'Bearer ' + token)
}
if (isjson) {
this._xhr.setRequestHeader('Content-Type', 'application/json')
}
},
get: function (url) {
return new Promise((ok, err) => {
this._xhr.onreadystatechange = () => {
if (this._xhr.readyState == 4 && this._xhr.status == 200) {
ok(JSON.parse(this._xhr.responseText))
}
}
this._xhr.open('GET', this.baseURL + url)
// 設置協議頭
this._addToken()
this._xhr.send(null)
})
},
post: function (url, data) {
return new Promise((ok, err) => {
this._xhr.onreadystatechange = () => {
// 只要連接成功就返回數據
if (this._xhr.readyState == 4) {
// 返回狀態碼和數據
ok({
"status": this._xhr.status,
"data": JSON.parse(this._xhr.responseText)
})
}
}
this._xhr.open('POST', this.baseURL + url)
// 設置協議頭
this._addToken()
// 發送
this._xhr.send(JSON.stringify(data))
})
},
patch: function (url, data) {
return new Promise((ok, err) => {
this._xhr.onreadystatechange = () => {
// 只要連接成功就返回數據
if (this._xhr.readyState == 4) {
// 返回狀態碼和數據
ok({
"status": this._xhr.status,
"data": JSON.parse(this._xhr.responseText)
})
}
}
this._xhr.open('PATCH', this.baseURL + url)
// 設置協議頭(提交的不是 json)
this._addToken(false)
// 發送
this._xhr.send(data)
})
}
}
// 輔助類
function Tool() {
}
Tool.prototype.$ = function(id) {
return document.getElementById(id)
}
Tool.prototype.C = function(tag) {
return document.createElement(tag)
}
~~~
