
我覺得Delphi最強大的的功能之一就是開發數據庫三層應用的DataSnap,在Android上的實現,首先是完成服務器的設計:
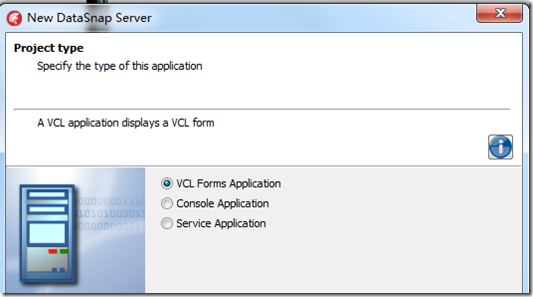
(1)利用向導完成DataSnap服務器的框架,如下圖:
[](https://yq.aliyun.com/go/articleRenderRedirect?url=http%3A%2F%2Fimages.cnitblog.com%2Fblog%2F124433%2F201310%2F17091156-8ee69d30df2d4f25b742dca7c161153d.png)
由于是實驗,所以選擇VCL程序,如果是實際應用,建議Service程序
[](https://yq.aliyun.com/go/articleRenderRedirect?url=http%3A%2F%2Fimages.cnitblog.com%2Fblog%2F124433%2F201310%2F17091213-97481d6ebbaf42d3914e3bc5fd1d36dd.png)
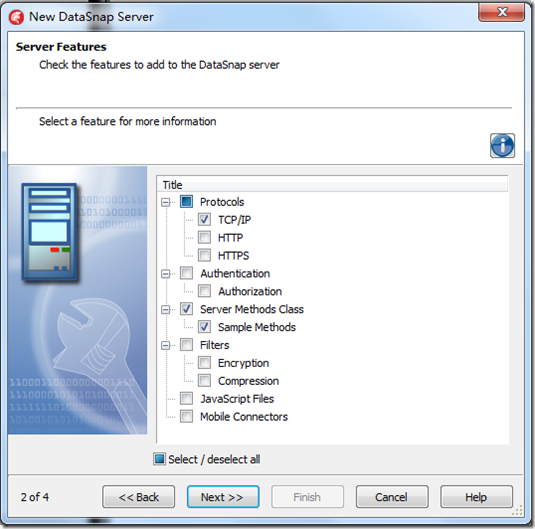
我習慣使用TCP/IP作為通訊協議,簡單且速度快,Sample Methods是演示和測試用
[](https://yq.aliyun.com/go/articleRenderRedirect?url=http%3A%2F%2Fimages.cnitblog.com%2Fblog%2F124433%2F201310%2F17091227-681e8837fa0b4051bb3377528ed6f28c.png)
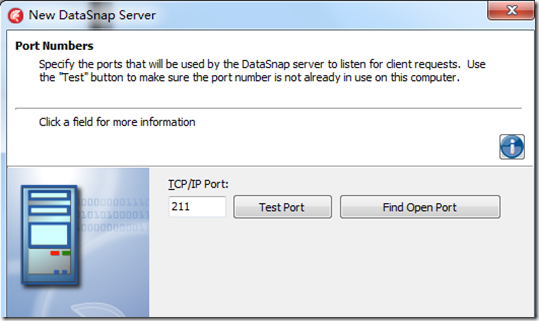
缺省211端口
[](https://yq.aliyun.com/go/articleRenderRedirect?url=http%3A%2F%2Fimages.cnitblog.com%2Fblog%2F124433%2F201310%2F17091256-bd5e1870cd084a26ba8c216e8fe52ef6.png)
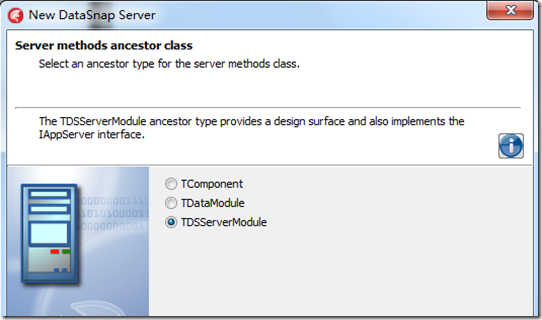
使用TDSServerModule作為數據服務提供主體,非常方便變更為Service應用服務
[](https://yq.aliyun.com/go/articleRenderRedirect?url=http%3A%2F%2Fimages.cnitblog.com%2Fblog%2F124433%2F201310%2F17091323-98e930031f2644c08e58758d9f5ca529.png)
(2)設置服務器數據
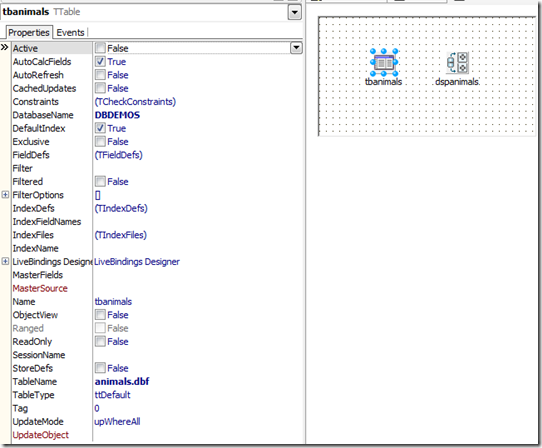
在TDSServerModule中設置數據,為簡便起見,采用BDE引擎的DBDEMOS下animals.dbf數據庫,有文字也有圖片,如下圖:
[](https://yq.aliyun.com/go/articleRenderRedirect?url=http%3A%2F%2Fimages.cnitblog.com%2Fblog%2F124433%2F201310%2F17091347-50092be9ed77408a8b8e7012180be194.png)
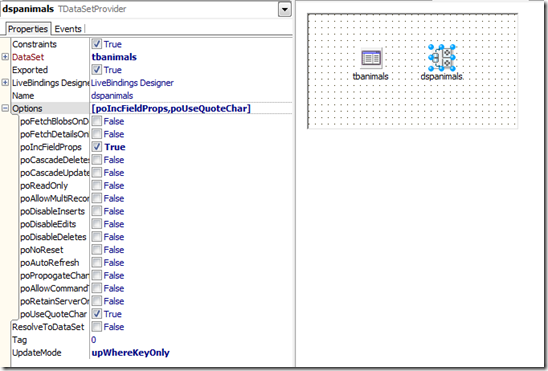
放置一個TDataSetProvider連接該數據源,如下圖:
[](https://yq.aliyun.com/go/articleRenderRedirect?url=http%3A%2F%2Fimages.cnitblog.com%2Fblog%2F124433%2F201310%2F17091410-8b943c80cc6c4127904551292d7af5b6.png)
服務器至此設計完成,沒有編寫一行代碼,只是調整了部分控件和窗體的名稱。手動啟動該應用服務程序。
(3)新建Android客戶端程序
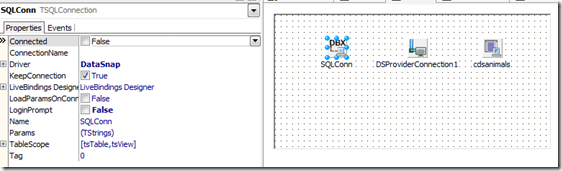
新建一個android客戶端程序,在工程中增加一個TDataModule模塊,用于放置與應用服務器的連接和數據,在模塊窗體上放置TSQLConnection、TDSPProviderConnection、TClientDataSet三個控件,如下圖:
[](https://yq.aliyun.com/go/articleRenderRedirect?url=http%3A%2F%2Fimages.cnitblog.com%2Fblog%2F124433%2F201310%2F17091425-90b280f0d0314ccb8cf48dc165034d85.png)
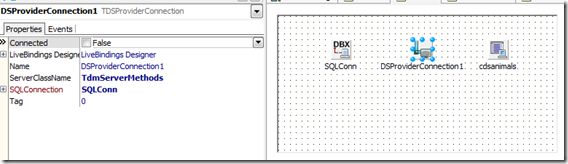
其中TSQLConnection的屬性設置中LoginPrompt要設為False,TDSPProviderConnection的屬性設置如下:
[](https://yq.aliyun.com/go/articleRenderRedirect?url=http%3A%2F%2Fimages.cnitblog.com%2Fblog%2F124433%2F201310%2F17091433-cd55918928d24fa29e157660acf6e8e5.png)
其中ServerClassName是指應用服務器上作為數據服務提供主體的TDSServerModule的實例類名稱,在這里我習慣性地重新命名了,缺省一般是TServerMethods1。TClientDataSet的設置如下圖:
[](https://yq.aliyun.com/go/articleRenderRedirect?url=http%3A%2F%2Fimages.cnitblog.com%2Fblog%2F124433%2F201310%2F17091439-1507353250b04e15a51f3cb4315ca4bf.png)
為實現應用服務器上Sample Methods在客戶端的調用,需要創建服務類在客戶端的實現類,右鍵點擊TSQLConnection選擇生成,如下圖:
[](https://yq.aliyun.com/go/articleRenderRedirect?url=http%3A%2F%2Fimages.cnitblog.com%2Fblog%2F124433%2F201310%2F17091447-954e94e6d60a472691fe9ec89ff58ec4.png)
新生成的類定義如下:
[](https://yq.aliyun.com/go/articleRenderRedirect?url=http%3A%2F%2Fimages.cnitblog.com%2Fblog%2F124433%2F201310%2F17091453-1a69541be686451e91fa5e6f4c246660.png)
以上過程完全同Windows下的DataSnap客戶端開發。
(4)Android界面顯示數據
Android下對數據的顯示,與Windows下開發最大的區別是,無法使用TDBEdit一類的數據感應控件,取而代之的是標準控件,通過LiveBindings技術實現數據感應。要實現該過程,首先是在窗體上放置用于數據展示的標準控件,這里采用了TListBox和TGrid,通過TTabControl分開,如下圖:
[](https://yq.aliyun.com/go/articleRenderRedirect?url=http%3A%2F%2Fimages.cnitblog.com%2Fblog%2F124433%2F201310%2F17091506-d6c3017e75c44696b4dcae043a5e15ff.png)
IP和Port輸入框是為了更靈活地連接服務器,下面的按鈕OnClick事件代碼如下:
procedure TfrmMain.Button1Click(Sender: TObject);?
var?
? dm : TdmServerMethodsClient;?
begin?
? try
??? //連接指定IP和Port的應用服務器?
??? dmMain.SQLConn.Close;?
??? dmMain.SQLConn.Params.Values\['HostName'\] := edtIP.Text;?
??? dmMain.SQLConn.Params.Values\['Port'\] := edtPort.Text;?
??? try?
????? dmMain.SQLConn.Open;?
????? try
?????? //創建應用服務器上的Sample Methods在客戶端的實現類?
??????? dm := TdmServerMethodsClient.Create(dmMain.SQLConn.DBXConnection);
????? //執行服務器上的方法?
??????? ShowMessage(dm.ReverseString(edtIP.Text));?
????? finally?
??????? dm.Free;?
????? end;
????? //開啟客戶端數據集?
????? dmMain.cdsanimals.Close;?
????? dmMain.cdsanimals.Open;?
??? except?
????? on E: Exception do?
??????? ShowMessage(E.Message);?
??? end;?
? finally?
??? dmMain.SQLConn.Close;?
? end;?
end;?
客戶端界面與數據集之間采用LiveBindings方式,最好是打開LiveBindings設計頁面,如下圖:
[](https://yq.aliyun.com/go/articleRenderRedirect?url=http%3A%2F%2Fimages.cnitblog.com%2Fblog%2F124433%2F201310%2F17091515-17e8c8f7e841452f9a558ece3d806da0.png)
[](https://yq.aliyun.com/go/articleRenderRedirect?url=http%3A%2F%2Fimages.cnitblog.com%2Fblog%2F124433%2F201310%2F17091518-d3e3cf21139e412cafa0f0bf41d1a490.png)
由于TListBox只能顯示一個字段數據,所以用另外一個窗體單獨顯示某條記錄的詳細信息,如下圖:
[](https://yq.aliyun.com/go/articleRenderRedirect?url=http%3A%2F%2Fimages.cnitblog.com%2Fblog%2F124433%2F201310%2F17091524-51972918aac74acc9baf5fada657bc9a.png)
啟動并運行,點擊按鈕執行服務器函數后界面如下圖:
[](https://yq.aliyun.com/go/articleRenderRedirect?url=http%3A%2F%2Fimages.cnitblog.com%2Fblog%2F124433%2F201310%2F17091540-7d82b1e818c64885a8d09feaad65274f.png)
TGrid展示數據如下圖:
[](https://yq.aliyun.com/go/articleRenderRedirect?url=http%3A%2F%2Fimages.cnitblog.com%2Fblog%2F124433%2F201310%2F17091552-c98eb813d0a840f99b52282a00962182.png)
TlistBox展示數據如下圖:
[](https://yq.aliyun.com/go/articleRenderRedirect?url=http%3A%2F%2Fimages.cnitblog.com%2Fblog%2F124433%2F201310%2F17091605-c5f35d214e20476c8b9f36f7e2672559.png)
點擊某條記錄后,顯示明細窗體,如下圖:
[](https://yq.aliyun.com/go/articleRenderRedirect?url=http%3A%2F%2Fimages.cnitblog.com%2Fblog%2F124433%2F201310%2F17091611-ab9bcc02116e4a119374ed36fa8457b6.png)
結論:
(1)Android下開發DataSnap客戶端,對數據的處理和服務函數調用與Windows下一致;
(2)Android客戶端展示不能使用數據感應控件,只能使用標準控件,通過LiveBindings技術來實現數據關聯;
(3)Windows下使用TClientDataSet需要用到Midas.dll,在Android下這個問題不存在了,也不需要單獨部署Midas支持的相關文件,但是看材料iOS下好像還要部署,沒試過
- 1.制作Android Splash啟動界面
- 2.delphi之完美Splash方案
- 3. Android實例-解決虛擬鍵盤遮擋問題
- 0.Android開發小技巧
- 設 置 您 的 開 發 環 境 Windows PC(Android)
- Delphi XE控件
- 手機屏幕自適應程序問題
- 手勢操作
- delphi xeandroid對硬件操作
- Datasnap
- Delphi XE 10 跨平臺三層數據庫應用教程
- 開發數據庫三層應用的DataSnap
- ListView
- delphi xe10之控件 listview 的強大功能
- FMX.TListView的基本用法
- 初探ListView 的使用方法
- Delphi 常用控件之TlistView總結
- ListView基本用法大全
- android實現透明度可以調整的對話框
- android 獲取網絡狀態
- FMXUI
- FMXUI - ListView用法簡介