
# :-: **微服務網關聚合Swagger文檔**
:-: \*\*\*\*
>[success] 微服務項目中,沒有做API文檔聚合,訪問每個服務的API文檔都需要訪問單獨的\`swagger-ui.html\`頁面,既然我們使用了微服務,就應該有統一的API文檔入口,\`knife4j\`有這方面的支持,本文將詳細介紹其實現,希望對大家有所幫助!
> 采用Nacos作為注冊中心,Gateway作為網關,使用`knife4j`來生成API文檔。
相關服務劃分:
* hjmall-gateway:網關服務,作為微服務API文檔的訪問入口,聚合所有API文檔,需要引入文檔前端UI包;
* hjmall-accout:用戶服務,普通API服務,不需要引入文檔前端UI包;
* hjmall-market:營銷服務,普通API服務,不需要引入文檔前端UI包。
## 具體實現
>[danger] 下面詳細介紹下Spring Cloud Gateway + knife4j 聚合API文檔的具體實現,依次搭建用戶服務、營銷服務和網關服務
每個服務引入如下jar包
~~~
<!--swagger2:API 文檔生成工具 -->
<dependency>
<groupId>io.springfox</groupId>
<artifactId>springfox-swagger2</artifactId>
<version>2.9.2</version>
</dependency>
~~~
* hjmall-accout
>[danger] 我們首先來搭建用戶服務,一個普通的API服務,很簡單,僅需三步即可集成knife4j。
* 在`pom.xml`中添加相關依賴,一個SpringBoot的web功能依賴,knife4j的微服務依賴(不包含API文檔的前端UI包);
~~~
<dependency>
<groupId>com.github.xiaoymin</groupId>
<artifactId>knife4j-micro-spring-boot-starter</artifactId>
</dependency>
~~~
>[danger] 添加Swagger相關配置,非常常規的配置,添加`@EnableKnife4j`注解開啟knife4j的增強功能。
~~~
Swagger2Config 配置如下
~~~
~~~
package com.hjf.market.core;
import com.github.xiaoymin.knife4j.spring.annotations.EnableKnife4j;
import org.springframework.context.annotation.Bean;
import org.springframework.context.annotation.Configuration;
import springfox.documentation.builders.ApiInfoBuilder;
import springfox.documentation.builders.PathSelectors;
import springfox.documentation.builders.RequestHandlerSelectors;
import springfox.documentation.service.ApiInfo;
import springfox.documentation.spi.DocumentationType;
import springfox.documentation.spring.web.plugins.Docket;
import springfox.documentation.swagger2.annotations.EnableSwagger2;
@Configuration
@EnableSwagger2
@EnableKnife4j
public class Swagger2Config {
@Bean
public Docket createRestApi() {
return new Docket(DocumentationType.SWAGGER_2)
.apiInfo(apiInfo())
.select()
.apis(RequestHandlerSelectors.basePackage("com.hjf.market.controller"))
.paths(PathSelectors.any())
.build();
}
private ApiInfo apiInfo() {
return new ApiInfoBuilder()
.title("營銷系統接口Api")
.description("營銷系統接口Api")
.termsOfServiceUrl("")
.contact("devteam")
.version("1.0")
.build();
}
}
~~~
>[danger] 我們接下來搭建營銷服務,一個普通的API服務,直接參考上面用戶服務的搭建即可。
>[danger] 最后我們搭建網關服務,作為微服務API文檔的的統一入口,
> 聚合所有微服務的API文檔。在`pom.xml`中添加相關依賴,
> Gateway相關依賴和knife4j的Starter(包含API文檔的前端UI包);
~~~
<dependency>
<groupId>com.github.xiaoymin</groupId>
<artifactId>knife4j-spring-boot-starter</artifactId>
</dependency>
~~~
>[danger] 在網關上添加Swagger資源配置,用于聚合其他微服務中Swagger的`api-docs`訪問路徑;
> SwaggerResourceConfig 配置如下
~~~
package com.hjf.gateway.swagger;
import lombok.AllArgsConstructor;
import lombok.extern.slf4j.Slf4j;
import org.springframework.cloud.gateway.config.GatewayProperties;
import org.springframework.cloud.gateway.route.RouteLocator;
import org.springframework.cloud.gateway.support.NameUtils;
import org.springframework.context.annotation.Primary;
import org.springframework.stereotype.Component;
import springfox.documentation.swagger.web.SwaggerResource;
import springfox.documentation.swagger.web.SwaggerResourcesProvider;
import java.util.ArrayList;
import java.util.List;
/**
* Swagger資源配置
*/
@Slf4j
@Component
@Primary
@AllArgsConstructor
public class SwaggerResourceConfig implements SwaggerResourcesProvider {
private final RouteLocator routeLocator;
private final GatewayProperties gatewayProperties;
@Override
public List<SwaggerResource> get() {
List<SwaggerResource> resources = new ArrayList<>();
List<String> routes = new ArrayList<>();
routeLocator.getRoutes().subscribe(route -> routes.add(route.getId()));
gatewayProperties.getRoutes().stream().filter(routeDefinition -> routes.contains(routeDefinition.getId())).forEach(route -> {
route.getPredicates().stream()
.filter(predicateDefinition -> ("Path").equalsIgnoreCase(predicateDefinition.getName()))
.forEach(predicateDefinition -> resources.add(swaggerResource(route.getId(),
predicateDefinition.getArgs().get(NameUtils.GENERATED_NAME_PREFIX + "0")
.replace("**", "v2/api-docs"))));
});
return resources;
}
private SwaggerResource swaggerResource(String name, String location) {
log.info("name:{},location:{}",name,location);
SwaggerResource swaggerResource = new SwaggerResource();
swaggerResource.setName(name);
swaggerResource.setLocation(location);
swaggerResource.setSwaggerVersion("2.0");
return swaggerResource;
}
}
~~~
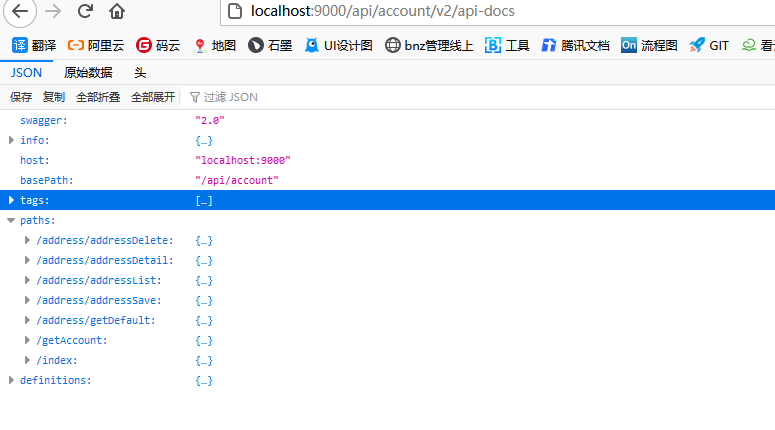
什么是Swagger的`api-docs`訪問路徑?該路徑會返回JSON格式數據,Swagger渲染API文檔頁面的所有數據就是來源于此,比如我們的用戶服務會返回如下信息,訪問地址:[http://localhost:9000/api/account/v2/api-docs](http://localhost:9000/api/account/v2/api-docs)
>[danger] 接下來我們需要自定義Swagger各個配置的節點,簡單來說就是自定義Swagger內部的各個獲取數據的接口;
> SwaggerHandler配置
~~~
package com.hjf.gateway.swagger;
import org.springframework.beans.factory.annotation.Autowired;
import org.springframework.http.HttpStatus;
import org.springframework.http.ResponseEntity;
import org.springframework.web.bind.annotation.GetMapping;
import org.springframework.web.bind.annotation.RestController;
import reactor.core.publisher.Mono;
import springfox.documentation.swagger.web.SecurityConfigurationBuilder;
import springfox.documentation.swagger.web.SwaggerResourcesProvider;
import springfox.documentation.swagger.web.UiConfiguration;
import springfox.documentation.swagger.web.UiConfigurationBuilder;
import springfox.documentation.swagger.web.*;
import java.util.Optional;
@RestController
public class SwaggerHandler {
@Autowired(required = false)
private SecurityConfiguration securityConfiguration;
@Autowired(required = false)
private UiConfiguration uiConfiguration;
private final SwaggerResourcesProvider swaggerResources;
@Autowired
public SwaggerHandler(SwaggerResourcesProvider swaggerResources) {
this.swaggerResources = swaggerResources;
}
@GetMapping("/swagger-resources/configuration/security")
public Mono<ResponseEntity<SecurityConfiguration>> securityConfiguration() {
return Mono.just(new ResponseEntity<>(
Optional.ofNullable(securityConfiguration).orElse(SecurityConfigurationBuilder.builder().build()), HttpStatus.OK));
}
@GetMapping("/swagger-resources/configuration/ui")
public Mono<ResponseEntity<UiConfiguration>> uiConfiguration() {
return Mono.just(new ResponseEntity<>(
Optional.ofNullable(uiConfiguration).orElse(UiConfigurationBuilder.builder().build()), HttpStatus.OK));
}
@GetMapping("/swagger-resources")
public Mono<ResponseEntity> swaggerResources() {
return Mono.just((new ResponseEntity<>(swaggerResources.get(), HttpStatus.OK)));
}
}
~~~
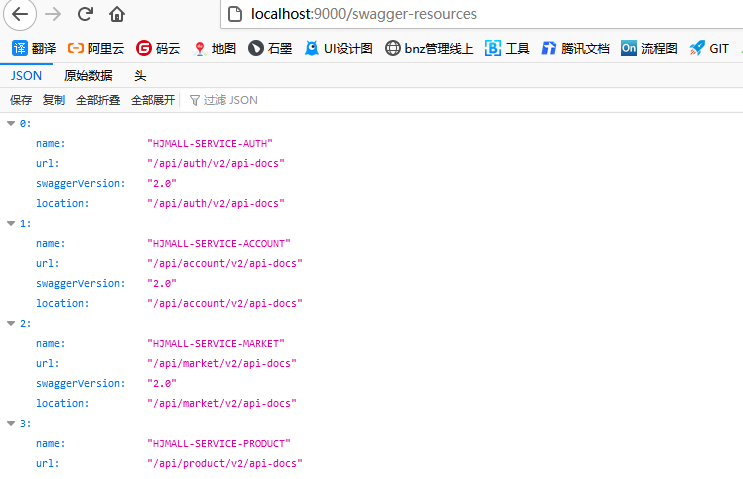
比如說`swagger-resources`這個接口,可用于獲取所有微服務的`api-docs`訪問路徑,獲取信息如下,訪問地址:[http://localhost:9000](http://localhost:9000)[/swagger-resources](http://localhost:9201/swagger-resources)
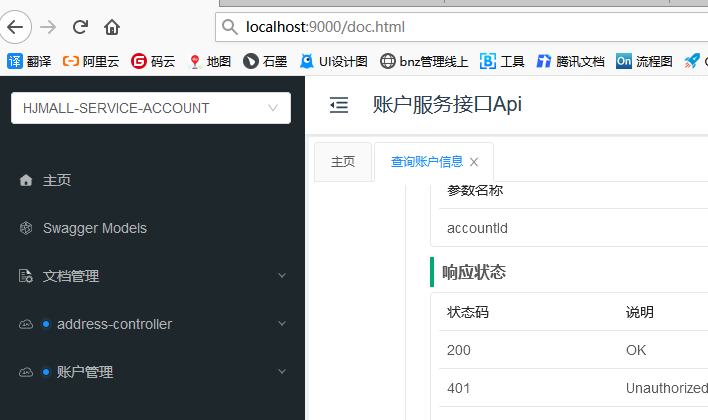
## 功能演示
>[danger] 接下來我們來演示下微服務API文檔聚合的功能,僅需要訪問網關的API文檔頁面即可,可自行切換到相關服務的API文檔。
> 在此之前先啟動我們的Nacos注冊中心,然后依次啟動`hjmall-gateway、hjmall-accout、hjmall-market`服務;
> 訪問 localhost:9000/doc.html
## 總結
>[danger] 對比knife4j和原生Swagger的微服務使用,再次證明knife4j是springfox-swagger的增強UI實現,完全遵循了springfox-swagger中的使用方式。
> 官方文檔:[https://doc.xiaominfo.com/guide/ui-front-gateway.html](https://doc.xiaominfo.com/guide/ui-front-gateway.html)
API詳細說明
| 作用范圍 | API | 使用位置 |
| --- | --- | --- |
| 協議集描述 | @Api | 用于controller類上 |
| 對象屬性 | @ApiModelProperty | 用在出入參數對象的字段上 |
| 協議描述 | @ApiOperation | 用在controller的方法上 |
| Response集 | @ApiResponses | 用在controller的方法上 |
| Response | @ApiResponse | 用在 @ApiResponses里邊 |
| 非對象參數集 | @ApiImplicitParams | 用在controller的方法上 |
| 非對象參數描述 | @ApiImplicitParam | 用在@ApiImplicitParams的方法里邊 |
| 描述返回對象的意義 | @ApiModel | 用在返回對象類上 |
`api`標記,用在類上,說明該類的作用。可以標記一個`Controller`類做為`Swagger`文檔資源,使用方式:
~~~
@Api(value = "/user", description = "用戶管理")
~~~
與`Controller`注解并列使用。 屬性配置:
| 屬性名稱 | 備注 |
| --- | --- |
| value | url的路徑值 |
| tags | 如果設置這個值、value的值會被覆蓋 |
| description | 對api資源的描述 |
| basePath | 基本路徑可以不配置 |
| position | 如果配置多個Api 想改變顯示的順序位置 |
| produces | For example, "application/json, application/xml" |
| consumes | For example, "application/json, application/xml" |
| protocols | Possible values: http, https, ws, wss. |
| authorizations | 高級特性認證時配置 |
| hidden | 配置為true 將在文檔中隱藏 |
`ApiOperation`標記,用在方法上,說明方法的作用,每一個`url`資源的定義,使用方式:
~~~
@ApiOperation("獲取用戶信息")
~~~
與`Controller`中的方法并列使用,屬性配置:
| 屬性名稱 | 備注 |
| --- | --- |
| value | url的路徑值 |
| tags | 如果設置這個值、value的值會被覆蓋 |
| description | 對api資源的描述 |
| basePath | 基本路徑可以不配置 |
| position | 如果配置多個Api 想改變顯示的順序位置 |
| produces | For example, "application/json, application/xml" |
| consumes | For example, "application/json, application/xml" |
| protocols | Possible values: http, https, ws, wss. |
| authorizations | 高級特性認證時配置 |
| hidden | 配置為true將在文檔中隱藏 |
| response | 返回的對象 |
| responseContainer | 這些對象是有效的 "List", "Set" or "Map".,其他無效 |
| httpMethod | "GET", "HEAD", "POST", "PUT", "DELETE", "OPTIONS" and "PATCH" |
| code | http的狀態碼 默認 200 |
| extensions | 擴展屬性 |
`ApiParam`標記,請求屬性,使用方式:
~~~
public TableDataInfo list(@ApiParam(value = "查詢用戶列表", required = true)User user)
~~~
與Controller中的方法并列使用,屬性配置:
| 屬性名稱 | 備注 |
| --- | --- |
| name | 屬性名稱 |
| value | 屬性值 |
| defaultValue | 默認屬性值 |
| allowableValues | 可以不配置 |
| required | 是否屬性必填 |
| access | 不過多描述 |
| allowMultiple | 默認為false |
| hidden | 隱藏該屬性 |
| example | 舉例子 |
`ApiResponse`標記,響應配置,使用方式:
~~~
@ApiResponse(code = 400, message = "查詢用戶失敗")
~~~
與`Controller`中的方法并列使用,屬性配置:
| 屬性名稱 | 備注 |
| --- | --- |
| code | http的狀態碼 |
| message | 描述 |
| response | 默認響應類 Void |
| reference | 參考ApiOperation中配置 |
| responseHeaders | 參考 ResponseHeader 屬性配置說明 |
| responseContainer | 參考ApiOperation中配置 |
`ApiResponses`標記,響應集配置,使用方式:
~~~
@ApiResponses({ @ApiResponse(code = 400, message = "無效的用戶") })
~~~
與`Controller`中的方法并列使用,屬性配置:
| 屬性名稱 | 備注 |
| --- | --- |
| value | 多個ApiResponse配置 |
`ResponseHeader`標記,響應頭設置,使用方法
~~~
@ResponseHeader(name="head",description="響應頭設計")
~~~
與`Controller`中的方法并列使用,屬性配置:
| 屬性名稱 | 備注 |
| --- | --- |
| name | 響應頭名稱 |
| description | 描述 |
| response | 默認響應類 void |
| responseContainer | 參考ApiOperation中配置 |
- 項目介紹
- 項目聲明
- 項目簡介
- 架構設計
- 項目亮點功能介紹
- 技術棧介紹
- 核心功能
- 運行環境
- 項目更新日志
- 文檔更新日志
- F&Q
- 部署教程
- 環境準備
- JDK安裝
- JDK1.8,17共存
- maven
- 分布式緩存Redis
- 單機版
- 集群
- 注冊&配置中心alibaba/nacos
- 介紹
- Nacos安裝
- Nacos配置中心
- Nacos注冊發現
- Nacos生產部署方案
- 服務監控-BootAdmin
- 基本介紹
- 如何使用
- 整合Admin-Ui
- 客戶端配置
- 鏈路追蹤
- 基本介紹
- SkyWalking-1
- Skywalking-1
- 消息隊列
- Kafka
- docker安裝kafka
- Linux集群
- Maven私服
- nexus安裝部署
- nexus使用介紹
- 全文搜索elasticsearch
- windows集群搭建
- docker安裝es
- ElasticHD
- linux集群部署
- 統一日志解決方案
- 日志解決方案設計
- 介紹與相關資料
- ELK安裝部署
- elasticsearch 7.5
- logstash-7.5
- kibana-7.5
- filebeat
- 服務監控-Prometheus
- Prometheus安裝配置
- Prometheus介紹
- grafana
- 持續集成部署CICD
- 自動化部署Jenkins
- 安裝部署win
- 打包發布遠程執行
- 安裝部署linux
- jenkins+gitlab+docker容器化工程自動化部署
- Git
- CICD說明
- 阿里云效
- CentOS_MYSQL安裝
- docker
- 安裝
- Docker安裝Nginx
- Docker部署啟動springboot
- dockerCompose
- harbor
- Docker私有鏡像倉庫
- Portainer
- Docker遠程連接設置
- 打包工程
- 必要啟動模塊
- 核心模塊
- 登錄認證
- 緩存功能
- 日志模塊
- 分布式鎖
- 消息隊列
- 異常處理
- 系統接口
- 參數驗證
- es檢索
- 數據導出
- 系統設計
- 系統總體架構
- 擴展模塊(可選)
- 限流熔斷alibaba/sentinel
- 使用Sentinel實現gateway網關及服務接口限流
- Sentinel使用Nacos存儲規則及同步
- 服務調用Feign
- Feign基本介紹
- 如何使用
- 負載均衡
- 請求超時
- 請求攔截器
- 分布式任務調度
- XXL-JOB
- 分布式事務
- TX-LCN
- Seata
- Seata原理解析
- 數據庫分庫分表
- swagger文檔
- 分布式ID生成器解決方案
- 服務網關CloudGateway
- 基本介紹
- 使用網關
- 路由配置
- 全局過濾器
- 服務認證授權架構設計
- 認證服務流程
- 授權服務流程
- 系統冪等性設計與實踐
- 分布式日志鏈路跟蹤
- 實時搜索系統設計
- 應用性能
- 壓力測試工具
- Apache JMeter介紹和安裝
- ApacheJMeter使用
- JVM
- JVM性能調優
- 常見JVM內存錯誤及解決方案
- JVM 分析工具詳解
- Spring Cloud性能調優
- Linux運維
- Linux 常用命令
- Linux開啟端口