
## :-: springcloud 整合TX-LCN實現分布式事務
## 前言
```
SpringCloud分布式架構給我們帶來開發上的便利,同時增加了我們對事務管理的難度,微服務的遍地開花,本地事務已經無法滿足分布式的要求,由此分布式事務問題誕生。 分布式事務被稱為世界性的難題。
```
本文記錄整合TX-LCN分布式事務框架管理分布式事務,用的版本是5.0.2.RELEASE
## TX-LCN
### 簡單介紹
TX-LCN分布式事務框架,LCN并不生產事務,LCN只是本地事務的協調工,LCN是一個高性能的分布式事務框架,兼容dubbo、springcloud框架,支持RPC框架拓展,支持各種ORM框架、NoSQL、負載均衡、事務補償
### 特性一覽
1、一致性,通過TxManager協調控制與事務補償機制確保數據一致性
2、易用性,僅需要在業務方法上添加@TxTransaction注解即可
3、高可用,項目模塊不僅可高可用部署,事務協調器也可集群化部署
4、擴展性,支持各種RPC框架擴展,支持通訊協議與事務模式擴展
本文實現的是基于spring-cloud-alibaba整合tx-lcn實現分布式事務。
~~~
springcloud :Hoxton.RELEASE
spring-cloud-alibaba:2.2.0.RELEASE
spring-boot:2.3.2.RELEASE
openfeign:2.2.0.RELEASE
nacos:1.0.0
~~~
原理

## 實施步驟1 【搭建tx-manage 管理后臺服務】
創建數據庫、表
1. 創建MySQL數據庫, 名稱為:hj\_mall\_tx
2. 創建數據表:t\_tx\_exception
```
CREATE TABLE `t_tx_exception` (
`id` bigint(20) NOT NULL AUTO_INCREMENT,
`group_id` varchar(64) CHARACTER SET utf8mb4 COLLATE utf8mb4_general_ci NULL DEFAULT NULL,
`unit_id` varchar(32) CHARACTER SET utf8mb4 COLLATE utf8mb4_general_ci NULL DEFAULT NULL,
`mod_id` varchar(128) CHARACTER SET utf8mb4 COLLATE utf8mb4_general_ci NULL DEFAULT NULL,
`transaction_state` tinyint(4) NULL DEFAULT NULL,
`registrar` tinyint(4) NULL DEFAULT NULL,
`remark` varchar(4096) NULL DEFAULT NULL,
`ex_state` tinyint(4) NULL DEFAULT NULL COMMENT '0 未解決 1已解決',
`create_time` datetime NULL DEFAULT NULL,
PRIMARY KEY (`id`) USING BTREE
) ENGINE = InnoDB AUTO_INCREMENT = 1
CHARACTER SET = utf8mb4 COLLATE = utf8mb4_general_ci ROW_FORMAT = Dynamic;
```
下載官網提供的最新版的TM項目,修改配置文件(PS:由于官網的下載地址打不開,我們去GitHub上面下載例子:[https://github.com/codingapi/txlcn-demo](https://github.com/codingapi/txlcn-demo)),參考txlcn-demo-tm工程,在我們之前的項目下面創建一個springboot項目叫txlcn-tm
**改造項目:使用遠程nacos配置中心配置項目 且分為多環境 改造過程略......tx-manage項目配置文件如下**
```
spring.application.name=hmall-tx-manager
server.port=9009
spring.datasource.driver-class-name=com.mysql.jdbc.Driver
spring.datasource.url=jdbc:mysql://***************.mysql.rds.aliyuncs.com:3306/hj_mall_tx
spring.datasource.username=****
spring.datasource.password=****
mybatis.configuration.map-underscore-to-camel-case=true
mybatis.configuration.use-generated-keys=true
# TxManager Host Ip
tx-lcn.manager.host=127.0.0.1
# TxClient連接請求端口
tx-lcn.manager.port=9108
# 心跳檢測時間(ms)
tx-lcn.manager.heart-time=15000
# 分布式事務執行總時間
tx-lcn.manager.dtx-time=3000000
#參數延遲刪除時間單位ms
tx-lcn.message.netty.attr-delay-time=10000
tx-lcn.manager.concurrent-level=128
# TM后臺登陸密碼,默認值為codingapi
tx-lcn.manager.admin-key=123456
logging.level.com.codingapi=debug
#redis 主機
spring.redis.host=***********
#redis 端口
spring.redis.port=6379
#redis 密碼
spring.redis.password=*********
# 開啟日志,默認為false
tx-lcn.logger.enabled=true
tx-lcn.logger.driver-class-name=${spring.datasource.driver-class-name}
tx-lcn.logger.jdbc-url=${spring.datasource.url}
tx-lcn.logger.username=${spring.datasource.username}
tx-lcn.logger.password=${spring.datasource.password}
#事物執行時間
```
```
<dependencies>
<dependency>
<groupId>com.codingapi.txlcn</groupId>
<artifactId>txlcn-tc</artifactId>
<version>5.0.2.RELEASE</version>
</dependency>
<dependency>
<groupId>com.codingapi.txlcn</groupId>
<artifactId>txlcn-tm</artifactId>
<version>5.0.2.RELEASE</version>
</dependency>
<!--alibaba:nacos配置中心-->
<dependency>
<groupId>com.alibaba.cloud</groupId>
<artifactId>spring-cloud-starter-alibaba-nacos-config</artifactId>
</dependency>
</dependencies>
```
*****
\*\*打包執行hmall-tx-manage.jar \*\*
瀏覽器打開http://127.0.0.1:9009 如下


## 實施步驟2【搭建2個 Tx-Client】
1、創建2Tx-Client個項目 作為事務消費者服務。
TC端參照官網一步步操作:[https://www.txlcn.org/zh-cn/docs/start.html](https://www.txlcn.org/zh-cn/docs/start.html)

2、每個服務配置如下
```
<dependency>
<groupId>com.codingapi.txlcn</groupId>
<artifactId>txlcn-tc</artifactId>
<version>5.0.2.RELEASE</version>
</dependency>
<dependency>
<groupId>com.codingapi.txlcn</groupId>
<artifactId>txlcn-txmsg-netty</artifactId>
<version>5.0.2.RELEASE</version>
</dependency>
<dependency>
<groupId>com.alibaba.cloud</groupId>
<artifactId>spring-cloud-alibaba-nacos-discovery</artifactId>
</dependency>
<dependency>
<groupId>org.springframework.cloud</groupId>
<artifactId>spring-cloud-starter-openfeign</artifactId>
</dependency>
```
```
server:
port: 6001
spring:
# --------------cloud配置------------------
cloud:
nacos:
discovery:
server-addr: 127.0.0.1:8848 #注冊服務控制中心
main:
allow-bean-definition-overriding: true
application:
name: tx-lcn-A
#------------數據庫鏈接-----------------------------
datasource:
url: ${datasource.url}
username: ${datasource.username}
password: ${datasource.password}
driver-class-name: ${datasource.driver-class-name}
mybatis-plus:
mapper-locations: classpath:/mapper/*Mapper.xml
#實體掃描,多個package用逗號或者分號分隔
typeAliasesPackage: com.hjf.test.entity,com.hjf.base,MyOgnl
configuration:
log-impl: org.apache.ibatis.logging.stdout.StdOutImpl
# 是否開啟自動駝峰命名規則(camel case)映射,即從經典數據庫列名 A_COLUMN(下劃線命名) 到經典 Java 屬性名 aColumn(駝峰命名) 的類似映射
map-underscore-to-camel-case: false
global-config:
db-config:
id-type: auto
datasource:
url: jdbc:mysql://***********.mysql.rds.aliyuncs.com:3306/hj_mall?useUnicode=true&characterEncoding=UTF-8&serverTimezone=CTT&zeroDateTimeBehavior=convertToNull&useSSL=false
username: root
password: ***
driver-class-name: com.mysql.jdbc.Driver
tx-lcn:
client:
manager-address: 127.0.0.1:9108
springcloud:
loadbalance:
enabled: true
logger:
password: ********
username: root
jdbc-url: jdbc:mysql://*****************.mysql.rds.aliyuncs.com:3306/hj_mall_tx?useUnicode=true&characterEncoding=UTF-8&serverTimezone=CTT&zeroDateTimeBehavior=convertToNull&useSSL=false
driver-class-name: com.mysql.cj.jdbc.Driver
enabled: true
springcloud:
loadbalance:
enabled: true
#開啟hystrix 熔斷
feign:
hystrix:
enabled: true
# --------------負載均衡器配置------------------
ribbon:
ReadTimeout: 60000
ConnectTimeout: 60000
```
3、在啟動類上使用?@EnableDistributedTransaction
~~~
//注冊服務到注冊中心去
@EnableDiscoveryClient
@SpringBootApplication
//開啟分布式事務
@EnableDistributedTransaction
@EnableTransactionManagement
@EnableFeignClients
@ServletComponentScan(basePackages = "com.hjf")
public class TxLanClient1Application {
public static void main(String[] args) {
SpringApplication.run(TxLanClient1Application.class, args);
}
}
~~~
4、流程分析
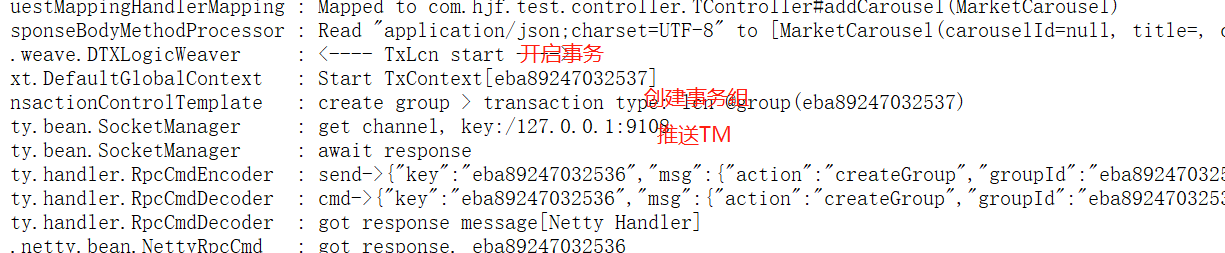
txlcn-client2 使用openfeign 調用遠程txlcn-client1 添加數據庫服務, 然后在執行一次添加數據庫;正常情況下會添加2條數據
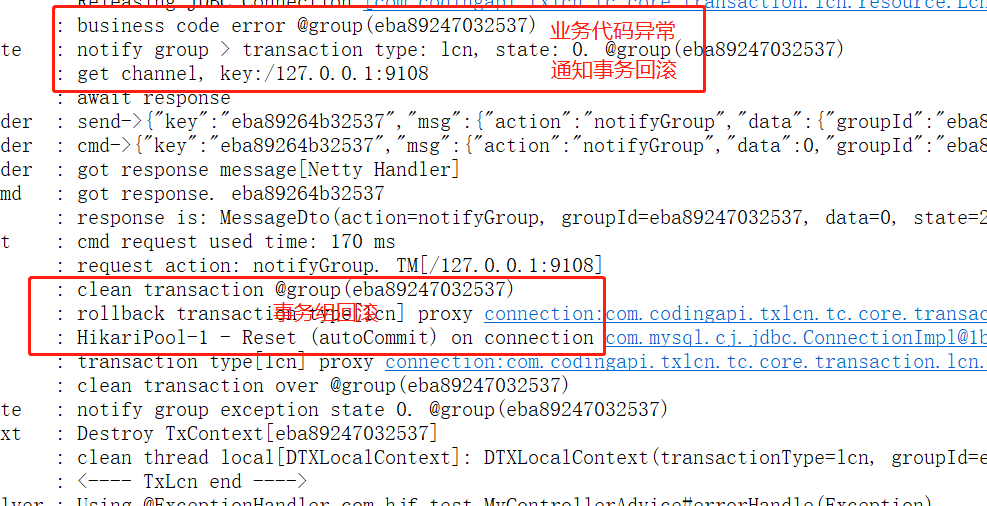
發生異常會回滾事務。添加0條數據。
### **A:調用方代碼**
~~~
/**
* @LcnTransaction//分布式事務
* @Transactional//本地事務
*/
@LcnTransaction(propagation = DTXPropagation.REQUIRED) //分布式事務注解
@Override
public BaseResp addCarousel(MarketCarousel q) {
String groupId = TracingContext.tracing().groupId();
String applicationId = Transactions.getApplicationId();
System.out.println(groupId);
System.out.println(applicationId);
marketCarouselMapper.insert(q);
BaseResp r=feignService.add(q);
if (StringUtils.isBlank(q.getTitle())){
throw new NullPointerException("拋出異常........");
}
return BaseResp.SUCCESS;
}
~~~
### **B:遠程方法調用 feign通過nacos注冊中心**
~~~
/**
* 遠程服務名稱
*/
@FeignClient(name = "tx-lcn-A")
public interface FeignService {
@PostMapping("/cus/add")
public BaseResp add(@RequestBody MarketCarousel q);
}
~~~
### **C:遠程方法**
~~~
@RestController
@Slf4j
@RequestMapping("/cus")
public class CusController {
@Resource
BootService bootService;
@RequestMapping(value = "add")
public BaseResp addCarousel(@RequestBody MarketCarousel q){
BaseResp r=bootService.addCarousel(q);
return r;
}
}
~~~
~~~
/**
* @LcnTransaction//分布式事務
* @Transactional //本地事務
*/
@LcnTransaction(propagation = DTXPropagation.SUPPORTS)
@Override
public BaseResp addCarousel(MarketCarousel q) {
String groupId = TracingContext.tracing().groupId();
String applicationId = Transactions.getApplicationId();
System.out.println(groupId);
System.out.println(applicationId);
marketCarouselMapper.insert(q);
return BaseResp.SUCCESS;
}
~~~
### **D:測試**
1、正常
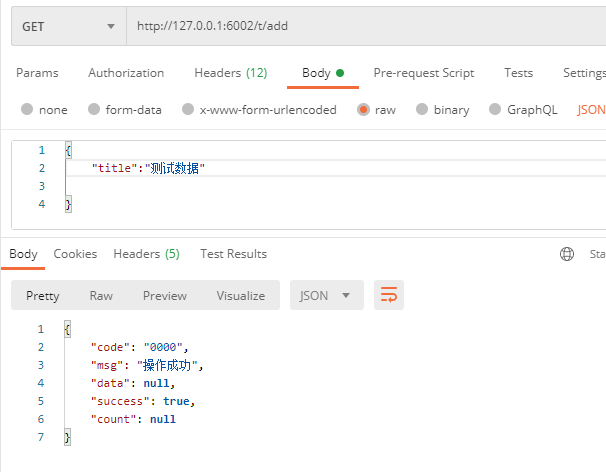

2 異常:事務回滾


- 項目介紹
- 項目聲明
- 項目簡介
- 架構設計
- 項目亮點功能介紹
- 技術棧介紹
- 核心功能
- 運行環境
- 項目更新日志
- 文檔更新日志
- F&Q
- 部署教程
- 環境準備
- JDK安裝
- JDK1.8,17共存
- maven
- 分布式緩存Redis
- 單機版
- 集群
- 注冊&配置中心alibaba/nacos
- 介紹
- Nacos安裝
- Nacos配置中心
- Nacos注冊發現
- Nacos生產部署方案
- 服務監控-BootAdmin
- 基本介紹
- 如何使用
- 整合Admin-Ui
- 客戶端配置
- 鏈路追蹤
- 基本介紹
- SkyWalking-1
- Skywalking-1
- 消息隊列
- Kafka
- docker安裝kafka
- Linux集群
- Maven私服
- nexus安裝部署
- nexus使用介紹
- 全文搜索elasticsearch
- windows集群搭建
- docker安裝es
- ElasticHD
- linux集群部署
- 統一日志解決方案
- 日志解決方案設計
- 介紹與相關資料
- ELK安裝部署
- elasticsearch 7.5
- logstash-7.5
- kibana-7.5
- filebeat
- 服務監控-Prometheus
- Prometheus安裝配置
- Prometheus介紹
- grafana
- 持續集成部署CICD
- 自動化部署Jenkins
- 安裝部署win
- 打包發布遠程執行
- 安裝部署linux
- jenkins+gitlab+docker容器化工程自動化部署
- Git
- CICD說明
- 阿里云效
- CentOS_MYSQL安裝
- docker
- 安裝
- Docker安裝Nginx
- Docker部署啟動springboot
- dockerCompose
- harbor
- Docker私有鏡像倉庫
- Portainer
- Docker遠程連接設置
- 打包工程
- 必要啟動模塊
- 核心模塊
- 登錄認證
- 緩存功能
- 日志模塊
- 分布式鎖
- 消息隊列
- 異常處理
- 系統接口
- 參數驗證
- es檢索
- 數據導出
- 系統設計
- 系統總體架構
- 擴展模塊(可選)
- 限流熔斷alibaba/sentinel
- 使用Sentinel實現gateway網關及服務接口限流
- Sentinel使用Nacos存儲規則及同步
- 服務調用Feign
- Feign基本介紹
- 如何使用
- 負載均衡
- 請求超時
- 請求攔截器
- 分布式任務調度
- XXL-JOB
- 分布式事務
- TX-LCN
- Seata
- Seata原理解析
- 數據庫分庫分表
- swagger文檔
- 分布式ID生成器解決方案
- 服務網關CloudGateway
- 基本介紹
- 使用網關
- 路由配置
- 全局過濾器
- 服務認證授權架構設計
- 認證服務流程
- 授權服務流程
- 系統冪等性設計與實踐
- 分布式日志鏈路跟蹤
- 實時搜索系統設計
- 應用性能
- 壓力測試工具
- Apache JMeter介紹和安裝
- ApacheJMeter使用
- JVM
- JVM性能調優
- 常見JVM內存錯誤及解決方案
- JVM 分析工具詳解
- Spring Cloud性能調優
- Linux運維
- Linux 常用命令
- Linux開啟端口