
[http://holbrook.github.io/2014/01/07/eclipse\_e4\_RCP\_quickstart.html](http://holbrook.github.io/2014/01/07/eclipse_e4_RCP_quickstart.html)
e4是位于底層的Equinox、EMF、SWT/JFace和上層的Eclipse應用(Plugin、RCP、RAP等)之間的一個應用開發平臺。
從RCP的角度來說,e4的一個主要目標就是更輕松地編寫和重用組件。
為了實現這個目標,與之前的Eclipse平臺相比,e4帶來的新特性主要包括:
* 基于EMF的應用模型(Application Model)
* 依賴注入
* 基于CSS定義外觀
# [](http://holbrook.github.io/2014/01/07/eclipse_e4_RCP_quickstart.html#%E5%BF%AB%E9%80%9F%E5%BC%80%E5%A7%8B)快速開始
需要的環境和工具包括:
* Java >= 1.7
* Eclipse >= 4.3
* [Enide - Eclipse bootstrap e4](https://marketplace.eclipse.org/content/enide-eclipse-boostrap-e4)
* [WindowBuilder](http://www.eclipse.org/windowbuilder/)
安裝了Eclipse bootstrap e4插件之后,可以創建Eclipse 4 --> Eclipse 4 Application Project。
生成的目錄結構如下:
[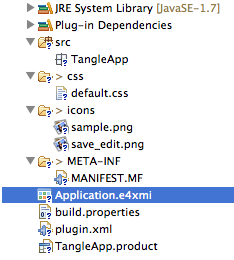](http://holbrook.github.io/2014/01/07/eclipse_e4_RCP_quickstart/e4_project.png)
其中,`*.product`文件是Eclipse插件項目的產品配置文件,可以以“E4Application”的方式運行:
[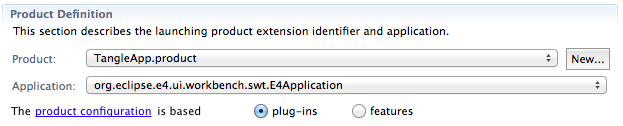](http://holbrook.github.io/2014/01/07/eclipse_e4_RCP_quickstart/e4_product.png)
在`*.product`文件上右鍵–>Run As–>Eclipse Application,就可以啟動一個e4應用:
[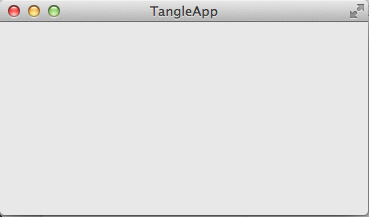](http://holbrook.github.io/2014/01/07/eclipse_e4_RCP_quickstart/e4_application.png)
整個工程可以導出(Export)為"Eclipse Product",稱為一個可以脫離Eclipse獨立運行的、跨平臺的RCP應用。
# [](http://holbrook.github.io/2014/01/07/eclipse_e4_RCP_quickstart.html#%E5%BA%94%E7%94%A8%E6%A8%A1%E5%9E%8B)應用模型
好吧,到目前為止,e4所表現出來的功能與Eclipse 3.x相比沒什么區別。但是請關注一下上面生成的`Application.e4xmi`文件。
該文件是e4中的應用模型文件。
在 Eclipse 平臺 UI 的早期版本中,workbench 被顯式地硬編碼來布局 workbench 窗口、workbench 頁面、編輯器區域或視圖堆棧。e4 引入了額外的一層,可將UI元素提取和抽象成一個模型。應用程序可以重新配置或擴展這個模型來制作不同的外觀。這個模型也可被動態操縱;模型的改變可以立即反映出 UI 的變化。
e4的模型的特性為:
* 基于抽象描述
* 可以在運行時(runtime)更改
* 支持擴展
## [](http://holbrook.github.io/2014/01/07/eclipse_e4_RCP_quickstart.html#%E6%8A%BD%E8%B1%A1%E6%8F%8F%E8%BF%B0)抽象描述
e4的應用模型基于抽象描述——應用模型只定義了需要哪些組件,而不關注這些組件是如何實現的。e4應用模型實現了應用模型和實際視圖(Views)的分離。
由于應用模型沒有綁定的具體實現,這意味著一種可能:同一個應用模型可以用各種界面技術(如SWT/JFace, Swing甚至web,Flash)來實現。
模型中即描述了可視的組件,如 windows, parts (views 和 editors), menus, toolbars等,也可以描述非可視化組件如handlers, commands , key bindings等。所有能夠在模型中描述的組件(包括可視化組件和非可視化組件),都實現了MApplicationElement接口,如下圖:
[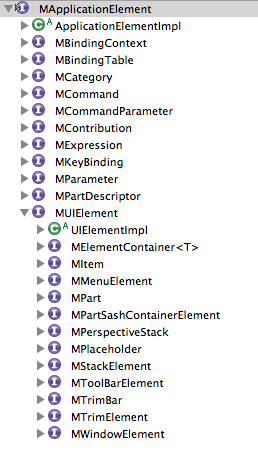](http://holbrook.github.io/2014/01/07/eclipse_e4_RCP_quickstart/e4_MApplicationElement.png)
用Eclipse 4 model editor打開`Application.e4xmi`,可以看到如下的視圖:
[](http://holbrook.github.io/2014/01/07/eclipse_e4_RCP_quickstart/e4_app_model.png)
`Application.e4xmi`是基于EMF定義的。其定義文件(.ecore)位于 org.eclipse.e4.ui.model.workbench 插件的model文件夾中。
## [](http://holbrook.github.io/2014/01/07/eclipse_e4_RCP_quickstart.html#%E5%B8%B8%E7%94%A8%E7%9A%84%E5%8F%AF%E8%A7%86%E5%8C%96%E7%BB%84%E4%BB%B6)常用的可視化組件
e4中的可視化組件描述類都來自`MUIElement`,該接口當然也繼承了`MApplicationElement`接口。
常用的可視化組件包括:
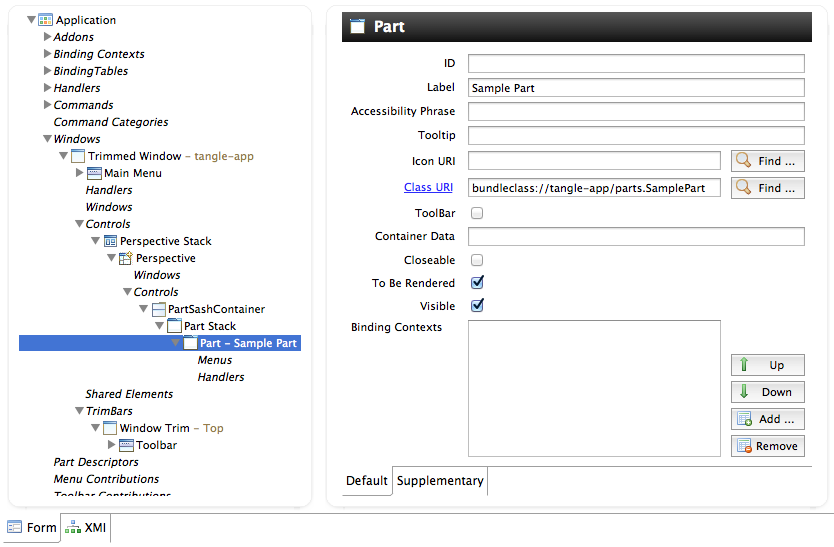
* Window
窗口。一個Eclipse 應用可以包含一個或多個窗口。
[](http://holbrook.github.io/2014/01/07/eclipse_e4_RCP_quickstart/window.png)
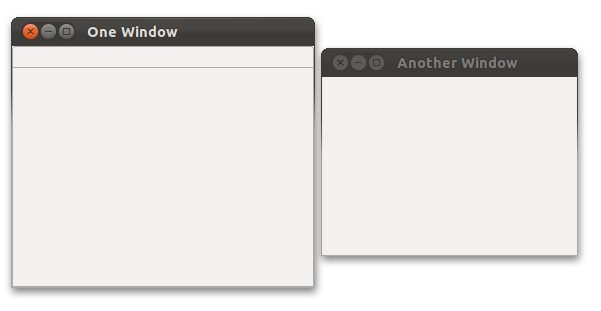
* Parts
e4中不區分Views和editors,而是統一定義為Parts。Part能夠放置在用戶界面的任何位置,每個Part可以有自己的菜單、工具條,可以出來自己的模型數據。
[](http://holbrook.github.io/2014/01/07/eclipse_e4_RCP_quickstart/part.png)
* Perspective
Perspective是Parts的容器,可以管理內部Part的布局。一個應用可以有多個不同的Perspective(不能同時出現),以適應不同的應用場景。
比如,Eclipse IDE提供了Java、Java EE、Debug等Perspective。
在應用模型中,為了管理方便,還可以將Perspective放置到Perspective Stack中。
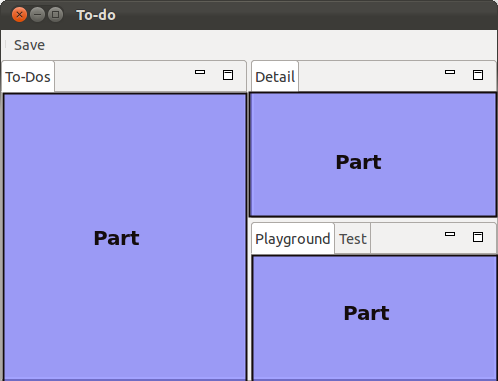
* PartStack 和 PartSashContainer
Part可以直接用于Window或Perspective中,也可以將其分組。使用PartStack 和 PartSashContainer可以實現Part的分組和布局管理。
PartStack可以容納多個Part,每次只能顯示其中一個Part,以頁簽(tab)的形式進行切換,而PartSashContainer以水平或豎直布局的方式同時顯示多個Part。如下圖:
[](http://holbrook.github.io/2014/01/07/eclipse_e4_RCP_quickstart/partstack.png)
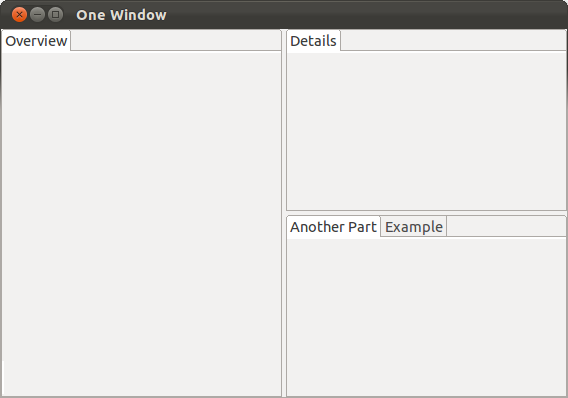
通過PartStack和PartSashContainer的組合,能夠創建出非常復雜的布局:
[](http://holbrook.github.io/2014/01/07/images/e4/elements/partsashcontainer.png)
PartStack 和 PartSashContainer中的子組件,可以設置“容器數據(Container Data)”,作為決定自己在容器中布局的參數。
[](http://holbrook.github.io/2014/01/07/images/e4/elements/containerdata.png)
需要注意的是,容器中的所有元素要么都設置容器數據,要么都不設置,否則會出現異常。
# [](http://holbrook.github.io/2014/01/07/eclipse_e4_RCP_quickstart.html#%E4%BE%9D%E8%B5%96%E6%B3%A8%E5%85%A5)依賴注入
基于上一節的內容,我們可以脫離UI組件的實現,直接定義出應用模型。
同樣的,當我們實現一個UI組件的時候,也完全無需考慮應用模型的存在。在e4中,View甚至無需實現任何接口,而是通過依賴注入的方式獲取UI組件的上下文環境。可以使用[JSR330](http://holbrook.github.io/2013/12/31/jsr330.html)中定義的`@Inject`注解,也可以使用e4的`org.eclipse.e4.ui.di`包中定義的`@Focus`、`@Persist`等注解。比如:
1
2
3
4
5
6
7
8
9
10
11
12
13
14
15
16
17
18
19
20
21
22
23
24
25
26
27
28
29
30
31
32
33
34
35
36
37
38
39
40
41
public class SamplePart {
private Text txtInput;
private TableViewer tableViewer;
@Inject
private MDirtyable dirty;
@PostConstruct
public void createComposite(Composite parent) {
parent.setLayout(new GridLayout(1, false));
txtInput = new Text(parent, SWT.BORDER);
txtInput.setMessage("Enter text to mark part as dirty");
txtInput.addModifyListener(new ModifyListener() {
@Override
public void modifyText(ModifyEvent e) {
dirty.setDirty(true);
}
});
txtInput.setLayoutData(new GridData(GridData.FILL_HORIZONTAL));
tableViewer = new TableViewer(parent);
tableViewer.add("Sample item 1");
tableViewer.add("Sample item 2");
tableViewer.add("Sample item 3");
tableViewer.add("Sample item 4");
tableViewer.add("Sample item 5");
tableViewer.getTable().setLayoutData(new GridData(GridData.FILL_BOTH));
}
@Focus
public void setFocus() {
tableViewer.getTable().setFocus();
}
@Persist
public void save() {
dirty.setDirty(false);
}
}
由于UI組件與應用模型完全解耦,可以對UI組件單獨進行測試:
1
2
3
4
5
6
7
8
9
10
11
12
13
public static void main(String[] args) {
Display display = new Display();
Shell shell = new Shell(display);
shell.setLayout(new FillLayout());
SamplePart part = new SamplePart();
part.createComposite(shell);
shell.open();
while( !shell.isDisposed() ) {
if( ! display.readAndDispatch() ) {
display.sleep();
}
}
}
# [](http://holbrook.github.io/2014/01/07/eclipse_e4_RCP_quickstart.html#%E5%90%91%E6%A8%A1%E5%9E%8B%E6%B3%A8%E5%85%A5%E8%B5%84%E6%BA%90)向模型注入資源
前面兩節分別介紹了創建應用模型和UI組件,接下來就是將二者結合起來。
在應用模型中,使用URI注入外部資源。比如,一個Part的Icon、Class都是通過URI注入的。這些資源是延遲加載(lazy loaded)的——只有顯示某個可視化組件時,才加載其需要的資源。
模型使用的資源即可以在運行時注入或更改,也可以在Eclipse 4 model editor中指定初始的資源:
[](http://holbrook.github.io/2014/01/07/eclipse_e4_RCP_quickstart/e4_app_model.png)
任何形式的URI都可以作為資源使用。比如:`http://thinkinside.tk/assets/ico/favicon.png`。
對于Eclipse的插件環境,可以使用應用模型所在的插件(bundle)或來自其他插件的資源,分別使用
`bundleclass://Bundle-SymbolicName/ package.classname`和
`platform:/plugin/Bundle-SymbolicName/ path/filename.extension`的形式。
比如:
1
2
3
bundleclass://tangle-app/parts.SamplePart
platform:/plugin/test/icons/save_edit.gif
# 定義行為
e4的應用模型中,通過`Handler`定義行為。可視化組件和`Handler`之間通過`Command`關聯。
與GUI組件一樣,Handler的定義和實現也是分離的。在應用模型中定義的`Handler`通過Class URI關聯到具體的實現類。我們可以單獨編寫一個`Handler`,無需實現任何接口:
```
public class MyHandler {
@Execute
public void execute(Shell shell) {
MessageDialog.openInformation(shell, "", "Hello World!");
}
@CanExecute
public boolean canExecute() {
return true;
}
}
```
其中,`canExecute()`方法是可選的。該方法定義了`execute()`方法是否可以被執行的一個開關。
由于`Handler`與應用模型完全解耦,可以單獨對`Handler`進行測試:
```
public static void main(String[] args) {
Display display = new Display();
Shell shell = new Shell(display);
shell.open();
MyHandler.execute(shell);
while( !shell.isDisposed() ) {
if( ! display.readAndDispatch() ) {
display.sleep();
}
}
}
```
最簡單的事件處理是菜單/工具條的處理。使用模型編輯器,可以在圖形界面中很容易的將`Handler`和菜單項都關聯到同一個`Commnad`,
即實現了行為的定義。這里不做截圖,定義好的`Application.e4xmi`中相關內容可能是:
<!--定義一個Command-->
<commands xmi:id="_4mWoMHcyEeOYmvSF-9z33Q" elementId="holbrook.tangle.demo.myCommand" commandName="測試Cmd"/>
<!--定義一個Handler,并關聯到Command-->
<handlers xmi:id="_J-fYsHczEeOYmvSF-9z33Q" elementId="holbrook.tangle.demo.myHandler" contributionURI="bundleclass://tangle-app/handlers.MyHandler" command="_4mWoMHcyEeOYmvSF-9z33Q"/>
<!--定義一個菜單項,也關聯到Command-->
<mainMenu xmi:id="_FfY8UHbUEeOYmvSF-9z33Q" elementId="tangle-app.menu.0">
<children xsi:type="menu:Menu" xmi:id="_OwboQHc0EeOYmvSF-9z33Q" elementId="tangle-app.menu.1" label="測試菜單">
<children xsi:type="menu:HandledMenuItem" xmi:id="_TwOjEHc0EeOYmvSF-9z33Q" elementId="tangle-app.handledmenuitem.0" label="測試Cmd" command="_4mWoMHcyEeOYmvSF-9z33Q"/>
</children>
</mainMenu>
# CSS樣式
e4將桌面應用和Web應用的一些特性融合在了一起,比如,可以通過CSS定義桌面應用的外觀。
使用Eclipse bootstrap e4創建的Eclipse 4 Application Project,會包含一個`css/default.css`的空文件。
編輯這個文件就可以修改應用的外觀。
在e4中,CSS選擇器使用`type#id.class`的格式。其中:
* type:對應SWT組件類(如Button、Composite等)
* id:對應應用模型中的`elementId`
一些映射關系可以參考[這里](http://wiki.eclipse.org/E4/CSS/SWT_Mapping)
下面是一個CSS的例子:
```
Text {
font: Verdana 15px;
color: red;
background-color: green;
}
```
默認情況下,該CSS就會生效。因為在`plugin.xml`中,已經指定了CSS的擴展點:
更靈活的使用CSS是通過主題管理器。
- 前言
- CSS
- VUE
- Vue.js 安裝
- Vue.js 目錄結構
- Vue.js 起步
- Vue.js 模板語法
- Vue.js 條件與循環
- Vue.js 循環語句
- Vue.js 計算屬性
- Vue.js 監聽屬性
- Vue.js 樣式綁定
- Vue.js 事件處理器
- Vue.js 表單
- Vue.js 組件
- Vue.js 自定義指令
- Vue.js 路由
- React
- 安裝
- React JSX
- React 組件
- 問題1
- React state
- React Props
- React 組件 API
- React 組件生命周期
- React AJAX
- React 表單與事件
- React Refs
- Babel
- Ant Design
- 安裝
- 快速上手
- webpack
- 安裝
- JavaScript
- 知識點
- 字符轉數字
- js中字符串全部替換
- 函數
- reduce() 方法
- UI控件
- DataTable
- 語言配置 選項
- 增加行
- 列渲染-自定義列
- 創建行回調-操作行
- 自定義數據長度
- 默認設置
- 樣式
- 集成Bootstrap 3
- 分頁相關
- 數據
- NodeJs
- Electron
- 打包
- 介紹
- 知識點
- 使用 jquery
- CommonJS規范
- Bower
- 簡介
- 安裝
- Swing
- Swing界面組件
- JComboBox
- JDesktopPane和JInternalFrame
- JFrame
- JTabbedPane
- JTable
- JProgressBar
- JToolBar
- 知識點
- 截取log4j日志并輸出到GUI組件
- JFrame 居中顯示
- Swing中三種最大化初始窗口的方法
- Layout布局
- BorderLayout
- GridBagLayout
- GridLayout
- BoxLayout
- JxBrowser
- 瀏覽器引擎-Browser Engine
- 創建瀏覽器-Creating Browser
- 創建隱身瀏覽器-Creating Incognito Browser
- 存儲用戶數據-Storing User Data
- 處理瀏覽器-Disposing Browser
- 瀏覽器偏好-Browser Preferences
- 恢復瀏覽器-Restoring Browser
- 渲染流程事件-Render Process Events
- 渲染進程ID-Render Process ID
- 獲取幀ID-Getting Frame IDs
- 獲取產品版本-Getting Product Version
- 尋找文本-Finding Text
- 清除緩存-Clearing Cache
- 轉發鍵盤事件-Forwarding Key Events
- 轉發鼠標事件-Forwarding Mouse Events
- 加載內容-Loading Content
- 加載網址-Loading URL
- 使用POST加載URL-Loading URL with POST
- 加載HTML-Loading HTML
- 從JAR加載HTML-Loading HTML from JAR
- 獲取HTML-Getting HTML
- 獲取選定的HTML-Getting Selected HTML
- 加載事件-Loading Events
- 正在加載和等待-Loading & Waiting
- 顯示PDF-Displaying PDF
- 網絡活動-Network Events
- 處理資源加載-Handling Resources Loading
- 啟用/禁用退格導航-Enabling/Disabling Backspace Navigation
- 處理SSL證書錯誤-Handling SSL Certificate Errors
- SSL證書驗證程序-SSL Certificate Verifier
- 導航歷史-Navigation History
- User-Agent
- WebSockets
- 處理加載-Handling Loading
- 修改POST / PUT / PATCH上傳數據-Modifying POST/PUT/PATCH Upload Data
- HTML5本地和會話存儲-HTML5 Local & Session storages
- 訪問HTTP響應數據-Accessing HTTP response data
- HTTP服務器白名單-HTTP Server Whitelist
- 自定義協議處理程序-Custom Protocol Handler
- ActiveX
- 瀏覽器視圖-Browser View
- 輕量級或重量級-Lightweight or Heavyweight
- 在Swing中使用JxBrowser-Using JxBrowser in Swing
- 在JavaFX中使用JxBrowser-Using JxBrowser in JavaFX
- 在SWT中使用JxBrowser-Using JxBrowser in SWT
- 自定義CSS光標-Custom CSS Cursors
- 標題事件-Title Events
- 狀態事件-Status Events
- 鍵盤和鼠標事件-Keyboard & Mouse Events
- 處理鍵盤事件-Handling Keyboard Events
- 處理鼠標事件-Handling Mouse Events
- 編輯器命令-Editor Commands
- 拖放-Drag & Drop
- 內容縮放-Content scaling
- 上下文菜單-Context Menu
- JMenuBar
- JInternalFrame
- JTabbedPane
- JPanel
- 加速輕量級渲染-Accelerated Lightweight Rendering
- 透明背景-Transparent Background
- DOM
- 使用文檔-Working with Document
- 注入css-Injecting CSS
- 尋找元素-Finding Elements
- 元素屬性-Element Attributes
- 創建元素和文本節點-Creating Element & Text Node
- 設置節點值-Setting Node Value
- Select & Option Elements
- 選擇CheckBox-Selecting CheckBox
- Getting Selected Text
- 模擬點擊-Simulating Click
- DOM事件
- XPath
- 查詢選擇器-Query Selector
- 使用表單-Working with Form
- 滾動文檔-Scrolling Document
- 在Point處查找節點-Finding Node at Point
- 獲得元素界限-Getting Element Bounds
- 監聽內容變化-Listening to the Сontent Сhanges
- 模擬DOM事件-Simulating DOM Events
- Audio & Video
- MP3/MP4/H.264
- 網絡攝像頭和麥克風-Web Camera & Microphone
- 全屏視頻-Full Screen Video
- 靜音音頻-Muting Audio
- HTML5 Video
- Pop-ups
- 關于彈出窗口-About Pop-ups
- 在swing中處理彈出窗口-Handling Pop-ups Swing
- 在JavaFX中處理彈出窗口-Handling Pop-ups JavaFX
- Dialogs
- JavaScript對話框-JavaScript Dialogs
- 文件下載-File Download
- 上傳文件-File Upload
- 選擇SSL證書-Select SSL Certificate
- 選擇自定義SSL證書-Select Custom SSL Certificate
- 卸載前-Before Unload
- 顏色選擇器-Color Chooser
- Proxy
- 使用代理-Working with Proxy
- 系統代理設置-System Proxy Settings
- Authentication
- 處理代理驗證-Handling Proxy Authentication
- 處理基本,摘要和NTLM身份驗證-Handling Basic, Digest and NTLM Authentication
- JavaScript Java Bridge
- 從Java調用JavaScript-Calling JavaScript from Java
- 從JavaScript調用Java-Calling Java from JavaScript
- 控制臺消息-Console Messages
- 使用JSON-Working with JSON
- 使用jQuery-Working with jQuery
- 使用ScriptContext-Working with ScriptContext
- 將表單數據發送到Java-Sending Form Data to Java
- 使用數組-Working with Arrays
- @JSAccessible
- Plugins
- Printing
- Cookies
- Saving Web Page
- Zoom
- Integration
- Deploying
- Chromium
- Spell Checker
- Debugging
- Why JxBrowser
- Tips & Tricks
- 基礎知識
- AbstractAction
- Void
- SwingWorker應用詳解
- JAVA實現國際化
- UIManager
- AppJS
- heX
- bootstrap
- 知識點
- 空行
- Eclipse RCP
- Eclipse e4 概覽