大部份的Android應用程式,都需要一些畫面提供使用者執行操作或瀏覽資料。Android系統使用Activity元件,負責提供應用程式一個畫面的所有相關工作。一個畫面就是一個繼承自“android.app.Activity”的Java類別,所以通常會把它稱為Activity元件,也有人叫它“活動”元件。Activity元件幾乎是Android應用程式中最常使用的,應用程式的功能如果比較復雜,需要提供比較多的操作和瀏覽資料的畫面,就會包含很多Activity元件。
每一個Activity元件除了撰寫需要的Java原始程式碼,也需要在應用程式設定檔加入相關的設定,在application的開始和結束標簽里面,使用activity標簽為每一個Activity元件加入設定,所以從應用程式設定檔的內容,也可以知道一個應用程式有幾個Activity元件。
這一章介紹Activity元件的開發與設定方式,并了解關于Activity元件的生命周期概念,還有Activity元件之間的互動與資料傳輸。
## 8-1 記事本應用程式
之前已經建立好的應用程式主畫面,提供基本的資料瀏覽與操作功能,現在要為它加入兩個Activity元件,一個用來顯示關于應用程式的資訊,另一個用來新增一筆記事本資料。
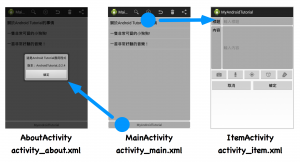
依照之前的說明,為應用程式設計需要的Activity元件,應該要先規劃好畫面與資源的需求,而且也要想好操作的流程,所以你可以簡單的畫一個像這樣的圖型:
[](http://www.codedata.com.tw/wp-content/uploads/2015/02/AndroidTutorial5_02_04_01.png)
在規畫這些元件的時候,就可以整理好需要建立的Activity與畫面配置檔:
* 應用程式資訊:AboutActivity.java,activity_about.xml
* 新增記事本:ItemActivity.java,activity_item.xml
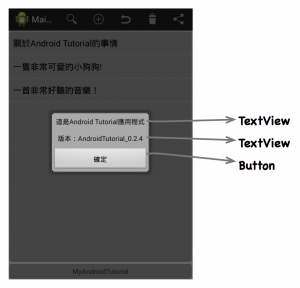
使用者點擊主畫面下方的應用程式名稱,應用程式啟動資訊元件,畫面的設計會比較簡單一些,只有兩個TextView和一個Button元件,畫面需要的文字資源也要先建立好。
[](http://www.codedata.com.tw/wp-content/uploads/2015/02/AndroidTutorial5_02_04_02.png)
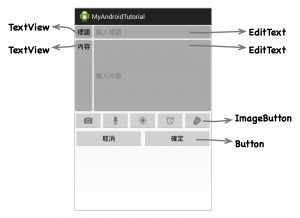
使用者選擇功能表的新增項目,應用程式啟動新增記事本元件,在這個畫面讓使用輸入標題與內容,為了后續加入的功能,先在畫面中提供記事本功能按鈕,例如錄音與地圖。
[](http://www.codedata.com.tw/wp-content/uploads/2015/02/AndroidTutorial5_02_04_03.png)
## 8-2 建立與啟動Activity元件
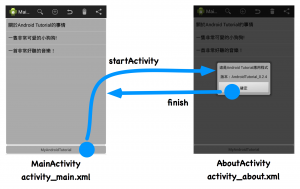
現在開始建立顯示應用程式資訊的Activity元件,不過要先了解Activity元件的基本運作。應用程式可以呼叫“startActivity”方法啟動其它Activity元件,呼叫“finish”方法可以結束Activity元件:
[](http://www.codedata.com.tw/wp-content/uploads/2015/02/AndroidTutorial5_02_04_04.png)
現在開始新增應用程式資訊元件,在Android Studio開啟MyAndroidStudio應用程式。開啟“res/values/strings.xml”,加入下列的文字資源:
~~~
<string name="version">版本:AndroidTutorial_0.2.4</string>
~~~
開啟“res/values/colors.xml”,加入下列的顏色資源:
~~~
<color name="dark_text">#111111</color>
~~~
在最頂端的“app”目錄按鼠標左鍵,選擇“New -> Activity -> Blank Activity”,元件與畫面配置檔名稱依照上面的規劃。開啟畫面配置檔“activity_about.xml”,修改為下面的內容:
~~~
<LinearLayout xmlns:android="http://schemas.android.com/apk/res/android"
xmlns:tools="http://schemas.android.com/tools"
android:layout_width="match_parent"
android:layout_height="match_parent"
android:orientation="vertical"
android:background="@drawable/retangle_drawable"
tools:context="net.macdidi.myandroidtutorial.AboutActivity">
<TextView
android:layout_width="match_parent"
android:layout_height="wrap_content"
android:gravity="center"
android:layout_margin="@dimen/default_margin"
android:padding="@dimen/default_padding"
android:text="@string/about"
android:textColor="@color/dark_text" />
<TextView
android:layout_width="match_parent"
android:layout_height="wrap_content"
android:gravity="center"
android:layout_margin="@dimen/default_margin"
android:padding="@dimen/default_padding"
android:text="@string/version"
android:textColor="@color/dark_text" />
<Button
android:layout_width="match_parent"
android:layout_height="wrap_content"
android:gravity="center"
android:layout_margin="@dimen/default_margin"
android:padding="@dimen/default_padding"
android:text="@android:string/ok"
android:onClick="clickOk" />
</LinearLayout>
~~~
開啟“AboutActivity.java”,加入取消應用程式標題的敘述,還有在負責執行按鈕工作的方法中加入結束Activity元件的敘述,刪除其它不需要的程式碼:
~~~
package net.macdidi.myandroidtutorial;
import android.app.Activity;
import android.os.Bundle;
import android.view.View;
import android.view.Window;
public class AboutActivity extends Activity {
@Override
protected void onCreate(Bundle savedInstanceState) {
super.onCreate(savedInstanceState);
// 取消元件的應用程式標題
requestWindowFeature(Window.FEATURE_NO_TITLE);
setContentView(R.layout.activity_about);
}
// 結束按鈕
public void clickOk(View view) {
// 呼叫這個方法結束Activity元件
finish();
}
}
~~~
Android應用程式的每一個Activity元件,都需要在應用程式設定檔加入對應的設定,使用Android Studio建立Activity元件會自動幫你加入默認的設定。開啟“mainfests/AndroidManifest.xml”,找到ADT為你加入的設定,把它改為下面的內容:
~~~
<?xml version="1.0" encoding="utf-8"?>
<manifest xmlns:android="http://schemas.android.com/apk/res/android"
package="net.macdidi.myandroidtutorial" >
<application
android:allowBackup="true"
android:icon="@drawable/ic_launcher"
android:label="@string/app_name"
android:theme="@style/AppTheme" >
<activity
android:name=".MainActivity"
android:label="@string/app_name" >
<intent-filter>
<action android:name="android.intent.action.MAIN" />
<category android:name="android.intent.category.LAUNCHER" />
</intent-filter>
</activity>
<!-- 關于應用程式的資訊 -->
<!-- 因為使用對話框的樣式,所以不用設定標題 -->
<activity
android:name="net.macdidi.myandroidtutorial.AboutActivity"
android:theme="@android:style/Theme.Dialog" />
</application>
</manifest>
~~~
因為這個Activity元件的內容比較簡單,使用整個螢幕顯示畫面的話,看起來會比較空曠一些,所以可以在設定檔加入“android:theme="@android:style/Theme.Dialog"”的設定,讓這個Activity元件使用對話框的樣式。
最后的工作就是執行啟動這個Activity元件,先檢查應用程式主畫面的畫面配置檔“activity_main.xml”,看看主畫面下方顯示應用程式名稱元件有沒有加入需要的設定:
~~~
<LinearLayout ...>
...
<!-- 加入“android:clickable="true"”的設定,TextView元件才可以點擊 -->
<!-- 加入“android:onClick="方法名稱"”的設定 -->
<TextView
android:layout_width="match_parent"
android:layout_height="wrap_content"
android:gravity="center"
android:layout_margin="@dimen/default_margin"
android:padding="@dimen/default_padding"
android:background="@drawable/retangle_drawable"
android:text="@string/app_name"
android:clickable="true"
android:onClick="aboutApp" />
</LinearLayout>
~~~
開啟“MainActivity.java”,找到aboutApp方法,把程式碼改為下面的內容:
~~~
package net.macdidi.myandroidtutorial;
import android.content.Intent;
...
public class MainActivity extends Activity {
...
// 點擊應用程式名稱元件后呼叫的方法
public void aboutApp(View view) {
// 建立啟動另一個Activity元件需要的Intent物件
// 建構式的第一個參數:“this”
// 建構式的第二個參數:“Activity元件類別名稱.class”
Intent intent = new Intent(this, AboutActivity.class);
// 呼叫“startActivity”,參數為一個建立好的Intent物件
// 這行敘述執行以后,如果沒有任何錯誤,就會啟動指定的元件
startActivity(intent);
}
}
~~~
執行應用程式,看看點擊主畫面下方應用程式名稱元件后,會不會啟動與顯示新的畫面。在啟動的畫面點擊確定按鈕,應用程式會回到主畫面。這是在應用程式啟動與結束一個Activity元件的基本作法。
## 8-3 在結束Activity元件時傳送資料
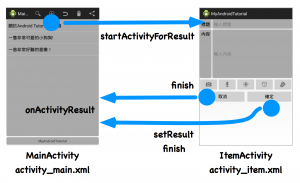
在一般的應用程式運作的時候,經常需要啟動另一個Activity元件執行選擇、輸入或修改資料的功能,完成工作以后,再把資料回傳給原來的Activity元件使用。以記事本應用程式來說,主畫面負責顯示所有的記事資料,需要新增資料的時候,啟動一個讓使用者輸入資料的Activity元件,完成新增的工作回到主畫面,這個新增的記事資料就要加入主畫面。
如果應用程式在啟動的Activity元件結束并返回后,還要執行一些特定的工作,就要使用“startActivityForResult”啟動Activity元件。這是新增記事本的元件流程:
[](http://www.codedata.com.tw/wp-content/uploads/2015/02/AndroidTutorial5_02_04_05.png)
決定應用程式的流程以后,現在開始設計新增記事用的Activity元件。在最頂端的“app”目錄按鼠標左鍵,選擇“New -> Activity -> Blank Activity”,元件與畫面配置檔名稱依照上面的規劃,元件名稱為“ItemActivity”,畫面資源名稱為“activity_item.xml”。開啟activity_item.xml,把它改為下面的內容:
~~~
<?xml version="1.0" encoding="utf-8"?>
<TableLayout xmlns:android="http://schemas.android.com/apk/res/android"
xmlns:tools="http://schemas.android.com/tools"
android:layout_width="match_parent"
android:layout_height="match_parent"
android:stretchColumns="1"
tools:context="net.macdidi.myandroidtutorial.ItemActivity">
<TableRow>
<TextView
android:text="@string/title"
android:background="@drawable/retangle_drawable"
android:padding="6sp"
android:layout_margin="2sp"
android:textAppearance="?android:attr/textAppearanceMedium" />
<EditText
android:id="@+id/title_text"
android:hint="@string/enter_title"
android:background="@drawable/retangle_drawable"
android:padding="6sp"
android:layout_margin="2sp"
android:textAppearance="?android:attr/textAppearanceMedium" />
</TableRow>
<TableRow>
<TextView
android:text="@string/content"
android:layout_height="200sp"
android:layout_gravity="center_vertical"
android:background="@drawable/retangle_drawable"
android:padding="6sp"
android:layout_margin="2sp"
android:textAppearance="?android:attr/textAppearanceMedium" />
<EditText
android:id="@+id/content_text"
android:hint="@string/enter_content"
android:layout_gravity="top"
android:layout_height="200sp"
android:background="@drawable/retangle_drawable"
android:padding="6sp"
android:layout_margin="2sp"
android:textAppearance="?android:attr/textAppearanceMedium" />
</TableRow>
<TableLayout
android:layout_width="match_parent"
android:layout_height="wrap_content"
android:stretchColumns="*">
<TableRow>
<ImageButton
android:id="@+id/take_picture"
android:src="@drawable/take_picture_icon"
android:onClick="clickFunction" />
<ImageButton
android:id="@+id/record_sound"
android:src="@drawable/record_sound_icon"
android:onClick="clickFunction" />
<ImageButton
android:id="@+id/set_location"
android:src="@drawable/location_icon"
android:onClick="clickFunction" />
<ImageButton
android:id="@+id/set_alarm"
android:src="@drawable/alarm_icon"
android:onClick="clickFunction" />
<ImageButton
android:id="@+id/select_color"
android:src="@drawable/select_color_icon"
android:onClick="clickFunction" />
</TableRow>
</TableLayout>
<TableLayout
android:layout_width="match_parent"
android:layout_height="wrap_content"
android:stretchColumns="*">
<TableRow>
<Button
android:id="@+id/cancel_item"
android:text="@android:string/cancel"
android:onClick="onSubmit"
android:padding="6sp"
android:layout_margin="2sp"
android:textAppearance="?android:attr/textAppearanceMedium" />
<Button
android:id="@+id/ok_teim"
android:text="@android:string/ok"
android:onClick="onSubmit"
android:padding="6sp"
android:layout_margin="2sp"
android:textAppearance="?android:attr/textAppearanceMedium" />
</TableRow>
</TableLayout>
</TableLayout>
~~~
開啟“ItemActivity.java”,修改為下面的內容。為了以后需要擴充的功能,加入一些控制按鈕執行工作的程式碼:
~~~
package net.macdidi.myandroidtutorial;
import android.app.Activity;
import android.content.Intent;
import android.os.Bundle;
import android.view.View;
import android.widget.EditText;
public class ItemActivity extends Activity {
private EditText title_text, content_text;
@Override
protected void onCreate(Bundle savedInstanceState) {
super.onCreate(savedInstanceState);
setContentView(R.layout.activity_item);
processViews();
}
private void processViews() {
title_text = (EditText) findViewById(R.id.title_text);
content_text = (EditText) findViewById(R.id.content_text);
}
// 點擊確定與取消按鈕都會呼叫這個方法
public void onSubmit(View view) {
// 確定按鈕
if (view.getId() == R.id.ok_teim) {
// 讀取使用者輸入的標題與內容
String titleText = title_text.getText().toString();
String contentText = content_text.getText().toString();
// 取得回傳資料用的Intent物件
Intent result = getIntent();
// 設定標題與內容
result.putExtra("titleText", titleText);
result.putExtra("contentText", contentText);
// 設定回應結果為確定
setResult(Activity.RESULT_OK, result);
}
// 結束
finish();
}
// 以后需要擴充的功能
public void clickFunction(View view) {
int id = view.getId();
switch (id) {
case R.id.take_picture:
break;
case R.id.record_sound:
break;
case R.id.set_location:
break;
case R.id.set_alarm:
break;
case R.id.select_color:
break;
}
}
}
~~~
開啟“AndroidManifest.xml”,找到Android Studio為你加入的設定,把它改為下面的內容:
~~~
<?xml version="1.0" encoding="utf-8"?>
<manifest xmlns:android="http://schemas.android.com/apk/res/android"
package="net.macdidi.myandroidtutorial" >
<application
android:allowBackup="true"
android:icon="@drawable/ic_launcher"
android:label="@string/app_name"
android:theme="@style/AppTheme" >
<activity
android:name=".MainActivity"
android:label="@string/app_name" >
<intent-filter>
<action android:name="android.intent.action.MAIN" />
<category android:name="android.intent.category.LAUNCHER" />
</intent-filter>
</activity>
<activity
android:name=".AboutActivity"
android:theme="@android:style/Theme.Dialog" />
<!-- 記事項目元件 -->
<activity
android:name="net.macdidi.myandroidtutorial.ItemActivity" />
</application>
</manifest>
~~~
開啟“MainActivity.java”,把程式碼改為下面的內容:
~~~
package net.macdidi.myandroidtutorial;
...
public class MainActivity extends ActionBarActivity {
...
public void clickMenuItem(MenuItem item) {
int itemId = item.getItemId();
switch (itemId) {
case R.id.search_item:
break;
// 使用者選擇新增選單項目
case R.id.add_item:
// 建立啟動另一個Activity元件需要的Intent物件
Intent intent = new Intent(this, ItemActivity.class);
// 呼叫“startActivityForResult”,第二個參數“0”目前沒有使用
startActivityForResult(intent, 0);
break;
case R.id.revert_item:
break;
case R.id.delete_item:
break;
case R.id.googleplus_item:
break;
case R.id.facebook_item:
break;
}
}
...
}
~~~
使用“startActivityForResult”啟動Activity元件,結束并返回以后,Android會呼叫“onActivityResult”方法一次。所以覆寫這個方法,在里面執行需要的判斷與工作。同樣在“MainActivity.java”,因為原來使用字串陣列提供資料給ListView元件,現在要把它換成“ArrayList”物件,這樣可以修改ListView包裝的資料項目。把程式碼改為下面的內容:
~~~
package net.macdidi.myandroidtutorial;
import java.util.ArrayList;
...
public class MainActivity extends ActionBarActivity {
private ListView item_list;
private TextView show_app_name;
// 換掉原來的字串陣列
private ArrayList<String> data = new ArrayList<>();
private ArrayAdapter<String> adapter;
@Override
protected void onCreate(Bundle savedInstanceState) {
super.onCreate(savedInstanceState);
setContentView(R.layout.activity_main);
processViews();
processControllers();
// 加入范例資料
data.add("關于Android Tutorial的事情");
data.add("一只非常可愛的小狗狗!");
data.add("一首非常好聽的音樂!");
int layoutId = android.R.layout.simple_list_item_1;
adapter = new ArrayAdapter<String>(this, layoutId, data);
item_list.setAdapter(adapter);
}
@Override
protected void onActivityResult(int requestCode, int resultCode, Intent data) {
// 如果被啟動的Activity元件傳回確定的結果
if (resultCode == Activity.RESULT_OK) {
// 讀取標題
String titleText = data.getStringExtra("titleText");
// 加入標題項目
this.data.add(titleText);
// 通知資料已經改變,ListView元件才會重新顯示
adapter.notifyDataSetChanged();
}
}
...
private void processControllers() {
AdapterView.OnItemClickListener itemListener = new AdapterView.OnItemClickListener() {
@Override
public void onItemClick(AdapterView<?> parent, View view,
int position, long id) {
// 換掉“data[position]”
Toast.makeText(MainActivity.this,
data.get(position), Toast.LENGTH_LONG).show();
}
};
item_list.setOnItemClickListener(itemListener);
AdapterView.OnItemLongClickListener itemLongListener = new AdapterView.OnItemLongClickListener() {
@Override
public boolean onItemLongClick(AdapterView<?> parent, View view,
int position, long id) {
// 換掉“data[position]”
Toast.makeText(MainActivity.this,
"Long: " + data.get(position), Toast.LENGTH_LONG).show();
return false;
}
};
...
}
~~~
執行應用程式,點擊功能表的新增項目,在啟動的畫面輸入標題后,選擇確定按鈕,回到主畫面后,看看有沒有多一筆你剛才輸入的資料。
## 8-4 在啟動Activity元件時傳送資料
以這個記事應用程式來說,除了已經寫好的新增記事資料功能,通常也需要讓使用者修改記事資料。在主畫面點擊一筆需要修改的記事項目以后,應用程式開啟修改記事的元件,讓使用者執行修改資料的工作。這個修改記事的元件其實跟新增記事的功能是差不多的,所以通常就不會另外設計一個新的Activity元件,讓已經設計好的“ItemActivity”同時提供新增與修改兩種功能。
為了讓一個Activity元件可以執行兩種工作,通常會幫這類元件另外取不同的“Action”名稱。開啟“AndroidManifest.xml”,把它改為下面的內容:
~~~
<?xml version="1.0" encoding="utf-8"?>
<manifest ... >
...
<application ... >
...
<!-- 記事項目元件 -->
<activity
android:name="net.macdidi.myandroidtutorial.ItemActivity">
<intent-filter>
<!-- 新增用的名稱 -->
<action android:name="net.macdidi.myandroidtutorial.ADD_ITEM"/>
<!-- 修改用的名稱 -->
<action android:name="net.macdidi.myandroidtutorial.EDIT_ITEM"/>
<!-- 一定要加入,內容固定不變 -->
<category android:name="android.intent.category.DEFAULT" />
</intent-filter>
</activity>
</application>
</manifest>
~~~
開啟“ItemActivity.java”,修改為下面的內容:
~~~
package net.macdidi.myandroidtutorial;
...
public class ItemActivity extends Activity {
private EditText title_text, content_text;
@Override
protected void onCreate(Bundle savedInstanceState) {
super.onCreate(savedInstanceState);
setContentView(R.layout.activity_item);
processViews();
// 取得Intent物件
Intent intent = getIntent();
// 讀取Action名稱
String action = intent.getAction();
// 如果是修改記事
if (action.equals("net.macdidi.myandroidtutorial.EDIT_ITEM")) {
// 接收與設定記事標題
String titleText = intent.getStringExtra("titleText");
title_text.setText(titleText);
}
}
...
}
~~~
開啟“MainActivity.java”,把程式碼改為下面的內容:
~~~
package net.macdidi.myandroidtutorial;
...
public class MainActivity extends Activity {
private ListView item_list;
private TextView show_app_name;
private ArrayList<String> data = new ArrayList<>();
private ArrayAdapter<String> adapter;
...
@Override
protected void onActivityResult(int requestCode, int resultCode, Intent data) {
if (resultCode == Activity.RESULT_OK) {
String titleText = data.getStringExtra("titleText");
// 如果是新增記事
if (requestCode == 0) {
// 加入標題項目
this.data.add(titleText);
// 通知資料已經改變,ListView元件才會重新顯示
adapter.notifyDataSetChanged();
}
// 如果是修改記事
else if (requestCode == 1) {
// 讀取記事編號
int position = data.getIntExtra("position", -1);
if (position != -1) {
// 設定標題項目
this.data.set(position, titleText);
// 通知資料已經改變,ListView元件才會重新顯示
adapter.notifyDataSetChanged();
}
}
}
}
private void processViews() {
item_list = (ListView)findViewById(R.id.item_list);
show_app_name = (TextView) findViewById(R.id.show_app_name);
}
private void processControllers() {
OnItemClickListener itemListener = new OnItemClickListener() {
@Override
public void onItemClick(AdapterView<?> parent, View view,
int position, long id) {
// 使用Action名稱建立啟動另一個Activity元件需要的Intent物件
Intent intent = new Intent("net.macdidi.myandroidtutorial.EDIT_ITEM");
// 設定記事編號與標題
intent.putExtra("position", position);
intent.putExtra("titleText", data.get(position));
// 呼叫“startActivityForResult”,第二個參數“1”表示執行修改
startActivityForResult(intent, 1);
}
};
...
}
...
public void clickMenuItem(MenuItem item) {
int itemId = item.getItemId();
switch (itemId) {
case R.id.search_item:
break;
case R.id.add_item:
// 使用Action名稱建立啟動另一個Activity元件需要的Intent物件
Intent intent = new Intent("net.macdidi.myandroidtutorial.ADD_ITEM");
// 呼叫“startActivityForResult”,,第二個參數“0”表示執行新增
startActivityForResult(intent, 0);
break;
case R.id.revert_item:
break;
case R.id.delete_item:
break;
case R.id.googleplus_item:
break;
case R.id.facebook_item:
break;
}
}
...
}
~~~
執行應用程式,試試看新增記事功能是否可以正常運作。在主畫面點選一個記事項目,修改記事標題并確定后,看看主畫面的記事資料會不會更新。目前完成的功能并沒有處理記事資料的內容,也還沒有儲存到數據庫,所以不會保存新增與修改后的資料。
- 第一堂
- 第一堂(1)西游記里的那只猴子
- 第一堂(2)準備 Android Studio 開發環境
- 第一堂(3)開始設計 Android 應用程式
- 第一堂(4)開發 Android 應用程式的準備工作
- 第二堂
- 第二堂(1)規劃與建立應用程式需要的資源
- 第二堂(2)設計應用程式使用者界面
- 第二堂(3)應用程式與使用者的互動
- 第二堂(4)建立與使用 Activity 元件
- 第三堂
- 第三堂(1)為ListView元件建立自定畫面
- 第三堂(2)儲存與讀取應用程式資訊
- 第三堂(3)Android 內建的 SQLite 數據庫
- 第四堂
- 第四堂(1)使用照相機與麥克風
- 第四堂(2)設計地圖應用程式 - Google Maps Android API v2
- 第四堂(3)讀取裝置目前的位置 - Google Services Location
- 第五堂
- 第五堂(1)建立廣播接收元件 - BroadcastReceiver
- 第五堂(2)系統通知服務 - Notification
- 第五堂(3)設計小工具元件 - AppWidget
- 第六堂
- 第六堂(1)Material Design - Theme與Transition
- 第六堂(2)Material Design - RecylerView
- 第六堂(3)Material Design - Shared Element與自定動畫效果
